


DRAFT DRAFT
page
20
page
9
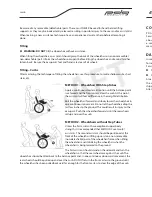
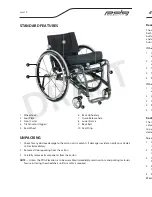
DRESSING OR CHANGING CLOTHES
WARNING
— Your weight may shift if you dress or change clothes while seated in this chair. To reduce the
risk of a fall or tip-over:
1 Rotate the front casters until they are as far forward as possible. This makes the chair more stable.
2 Lock anti-tip tubes in place. (If your chair does not have antitip tubes, back it up against a wall and
lock both rear wheels).
ENvIRONMENTAL CONDITIONS
WARNING
1 Use extra care if you must ride your chair on a wet or slick surface. If you are in doubt, ask for help.
2 Contact with water or excess moisture may cause your chair to rust or corrode. This could cause your
chair to fail.
a Do not use your chair in a shower, pool or other body of water. The chair tubing and parts are
NOT
water-tight and may rust or corrode from the inside.
b Avoid excess moisture (for example, do not leave your chair in a damp bathroom while taking a
shower).
c Dry your chair as soon as you can if it gets wet, or if you use water to clean it.
COMPONENTS & OPTIONS WARNINGS
Positioning or Seat Belts
WARNING
PDG hook & loop, non-padded seat belts and Bodypoint® non-padded hip belts, both of which are
optional equipment, are intended ONLY for use as a positioning aid for simple positioning needs, such as
posterior pelvic tilt.
These belts will not be suffi cient for persons with more involved positioning needs. Only your health care
advisor can determine the proper positioning products for your situation. If used improperly, positioning
or seat belts can cause severe injury or even death. If your health care advisor has instructed you to
use positioning or seat belts, make sure they instruct you on the proper usage of such belts, and such
professional should supervise your use of such belts to ensure you can use them safely.
1 Belts must fi t snugly in order to work properly. However, they must not be so snug they interfere with
your breathing. Your health care advisor should be able to slide his or her open hand fl at between the
belt and your body.
2 Make sure you do not slide down in your chair while wearing a belt. If this should happen, you may
suff er chest compression or be suff ocated due to pressure from the belt.
3 Do not use a positioning or seat belt unless you are capable of removing the belts easily in an
emergency. If you cannot do this, consult with your health care advisor for other options to help with
your posture.
4 There are devices that help to keep you from sliding down in the seat of your wheelchair, such as a
pelvic wedge. Consult with your health care advisor to fi nd out if you need to use such a device in
conjunction with positioning or seat belts to mitigate the risks described above.
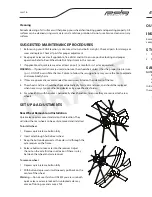
To adjust footrest height
1 Using a 4mm allen wrench loosen the Socket head cap screws on
the clamp.
2 Position the footrest to the desired height and ensure it is level to
the ground.
3 Re-tighten the bolts.
Warning
— never attempt to adjust the footrest with the wheelchair
occupied.
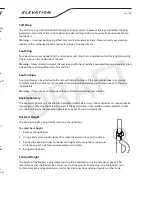
Scissor Brakes
Brakes lock the rear wheels and prevent any undesirable movement of your wheelchair. To apply the
brakes, bring both brake operation levers forward as far as they will go until they lock into place. Once
the brakes are applied the wheels should not be able to rotate. If they do, PDG recommends the chair be
serviced by a PDG dealer.
To adjust brakes
1 Position the chair on a solid level surface and secure the chair so it will not move when the brakes are
unlocked.
2 Release the brakes as far as they will go.
3 Loosen both screws on the cylindrical brake mounting bracket.
4 Adjust the position of the brakes and re-tighten the screws such that fi rm braking action prevents the
wheels from rotating.
Warning
— If adjustments to the position of the rear wheel axle have been performed, the brakes must
also be adjusted. Never attempt to adjust the brakes with the wheelchair occupied.
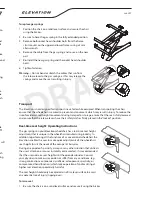
Side Guards
Your elevation may be purchased with the patented Flexguard™ side guards. These unique side guards
fl ex inward to protect the occupants clothing from contact with the tires and allow easier access to the
wheels for better performance and handling. The patented fl exibility of the side guards also allow for
ease of transferring. Flexguard™ side guards off er fl exibility and protection at a fraction of the thickness
and weight of conventional side guards. Because of their unique fl exibility, Flexguard™ side guards also
reduce the risk of injury due to pinching or trapping of body parts between the side guards and moving
parts. In addition, when the seat height of elevation is raised, the side guards pull inwards to improve the
user’s stability, an added safety feature. The side guards must be fi rmly affi xed with the Velcro straps.
Gas Spring
The gas springs on elevation are pre-set at the factory for the weight of the user and allow for ease of
seat height adjustment. The gas springs are specially adjusted to balance the occupant’s weight to allow
minimal arm strength to move the seat up or down. By pushing lightly on the wheels and/or wheelchair
frame, the occupant can sit higher, and by pulling lightly down one can sit lower with minimal eff ort. The
gas spring release lever, actuators, cables must be properly adjusted and maintained for comfortable and
safe usage. The gas spring units do not have any serviceable parts, do not attempt to servicing.


