PDG Mobility Evelation Скачать руководство пользователя страница 16

DRAFT DRAFT

page

13

page

 16

OUT OF THE BOX ASSEMBLY INSTRUCTIONS

INSPECTION

Examine exterior of the PDG Elevation for nicks, dents, scratches or other damages. Inspect all 
components. If damage is evident, notify your Dealer/Carrier immediately.

STORAGE

1   Store the repackaged PDG Elevation in a dry area.
2   DO NOT place other objects on top of the repackaged wheelchair.

SAFETY INSPECTION CHECKLIST

NOTE

 — Twice a year take your wheelchair to a qualified dealer for a thorough inspection and servicing. 

Regular cleaning will reveal loose or worn parts and enhance the smooth operation of your 
wheelchair. To operate properly and safely, your wheelchair must be cared for just like any other 
vehicle. Routine maintenance will extend the life and efficiency of your wheelchair.

Initial adjustments should be made to suit your personal body structure and preference. Thereafter follow 
these maintenance procedures:

Cleaning

Periodic cleaning of all surfaces will help keep your wheelchair looking good and operating properly. All 
surfaces can be cleaned using warm water and a mild soap solution. Do not use abrasive cleaners on any 
surfaces. 

SUGGESTED MAINTENANCE PROCEDURES

1  Before using your PDG Elevation, make sure all nuts and bolts are tight. Check all parts for damage or 

wear and replace. Check all parts for proper adjustment.

2.  Keep quick-release axles, if applicable, free of dirt and lint to ensure positive locking and proper 

operation. Refer to Rear-Wheel Axle Nut Adjustment in this manual.

3  If applicable, oil quick-release axles at least once (1) a month (3-in-1 oil or equivalent).

WARNING

 — If pneumatic tires are used, do not use the wheelchair unless it has the proper tire pressure 

(p.s.i.). DO NOT over inflate the tires. Failure to follow these suggestions may cause the tire to explode 
and cause bodily harm.

4  If tires are pneumatic, recommended tire pressure is listed on the side wall of the tire.
5.  The wheels and tires should be checked periodically for cracks and wear, and should be replaced 

when necessary at your authorized dealer or by a qualified technician.

6  For wheelchairs with handrims, periodically check handrims to ensure they are secured to the rear 

wheels.

SET UP & ADjUSTMENTS

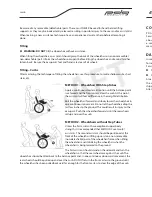
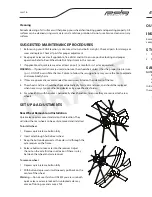
Rear Wheel Removal and Installation

Quick-release axles come standard on the Elevation. They 
will allow the rear wheels to be easily removed and installed.
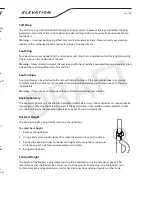
To install wheel

1  Depress quick-release button fully.
2  Insert axle through hub of rear wheel.
3  Keep the button depressed as the axle is slid through the 

axle receiver on the frame.

4   Release button to lock axle into the receiver. Adjust 

the nut on the axle if it does not lock or if there is play 
between the wheel and axle receiver.
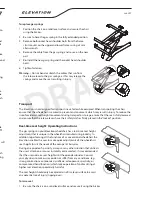
To remove wheel

1  Depress quick-release button fully.
2  With button depressed simultaneously pull back on the 

center of the wheel.

Warning

 — Do not use this chair UNLESS you are sure both 

quick-release axles are locked. An unlocked axle may 
come off during use and cause a fall.

Содержание Evelation

Страница 1: ...wheelchair USER Before using this wheelchair read this entire manual and save for future reference Class 1 Medical MANUAL WHEELCHAIR Owner s Operation and Maintenance Manual For more information rega...

Страница 2: ...es 3 Safety Summary 3 Limited Warranty 4 Stairways 6 Escalators 6 Contacting Your Supplier To Obtain Service 6 Damage Requiring Service By Qualified Service Agent 6 Transferring To And From Other Seat...

Страница 3: ...HEALTH CARE PROFESSIONALS TO DETERMINE IF A SEATING RESTRAINT IS REQUIRED TO ENSURE THE SAFE OPERATION OF THIS EQUIPMENT BY THE USER SERIOUS INJURY CAN OCCUR IN THE EVENT OF A FALL FROM A WHEELCHAIR S...

Страница 4: ...the seat raised above the horizontal position or the backrest reclined to avoid the risk of tipping over and possible injury 6 Seat height adjustment of Elevation must only be performed with the wheel...

Страница 5: ...recognizes and encourages each individual to try what works best in overcoming architectural obstacles that they may encounter Techniques in this manual are a starting point for the new wheelchair us...

Страница 6: ...clear the curb At this point the assistant will feel a difference in the weight distribution Roll the wheelchair forward and slowly lower the wheelchair in one continuous movement Do not let the wheel...

Страница 7: ...foot on the next stair and repeats STEP 1 3 The wheelchair should not be lowered until the last stair has been negotiated and the wheelchair has been rolled away from the stairway ESCALATORS SORRY DO...

Страница 8: ...n stability and balance The approximate reach limit values shown in the accompanying graph were derived on the basis of a sample of 91 male and 36 female subject wheelchair users Note the difference b...

Страница 9: ...pelvic tilt These belts will not be sufficient for persons with more involved positioning needs Only your health care advisor can determine the proper positioning products for your situation If used i...

Страница 10: ...tubes should be BETWEEN 1 1 2 to 2 inches off the ground a If set too HIGH they may not prevent a tip over b If set too LOW they may hang up on obstacles you can expect in normal use If this occurs y...

Страница 11: ...p over or loss of control and cause severe injury to the rider or others Rear Wheels WARNING A change in set up of the rear wheels will affect the center of balance of your chair 1 The farther you mov...

Страница 12: ...ts If damage is evident notify your Dealer Carrier immediately 2 Remove all loose packing from the carton 3 Carefully remove all components from the carton NOTE Unless the PDG Elevation is to be assem...

Страница 13: ...FETY INSPECTION CHECKLIST NOTE Twice a year take your wheelchair to a qualified dealer for a thorough inspection and servicing Regular cleaning will reveal loose or worn parts and enhance the smooth o...

Страница 14: ...REAR WHEELS Procedure 4 No excessive side movement or binding when lifted and spun 6 6 Quick release axles lock properly 6 6 6 FRONT CASTER Procedure 5 6 6 6 Inspect wheel fork assembly for proper te...

Страница 15: ...at the same time 6 Chair veers left 6 Casters flutter MAINTENANCE FINE TUNING THE FIT Adjustment Guide The following instructions are intended to provide assistance in making wheelchair adjustments I...

Страница 16: ...e bodily harm 4 If tires are pneumatic recommended tire pressure is listed on the side wall of the tire 5 The wheels and tires should be checked periodically for cracks and wear and should be replaced...

Страница 17: ...d wrench securely hold the detent ball end of the axle 2 Use the open end wrench to turn the axle nut clockwise 3 Turn the nut approximately in turn increments 4 Insert the axle and test for play 5 Co...

Страница 18: ...ease the tendency of elevation to tip over either forwards or backwards The use of anti tip devices are strongly recommended to avoid accidents or injury Camber Angle Your Elevation comes standard wit...

Страница 19: ...elops with usage see your Physician immediately Warning Never use your Elevation without a fitted and attached seat cushion Back Upholstery The backrest upholstery is attached to the backrest with Vel...

Страница 20: ...he brakes with the wheelchair occupied Side Guards Your elevation may be purchased with the patented Flexguard side guards These unique side guards flex inward to protect the occupants clothing from c...

Страница 21: ...is fully lowered and ensure that the release levers have their safety latches firmly placed in the locked position Real time seat height Operating Instructions The gas springs on your Elevation wheelc...

Страница 22: ...est Recline Operating Instructions Your elevation has a unique backrest design that allows real time adjustment The backrest can be adjusted to suit the occupants comfort by simply activating the adju...

Страница 23: ...ICE BY QUALIFIED SERVICE AGENT In some circumstances it may be required that your wheelchair be returned to a Qualified Service Agent for repairs If any of the following conditions are observed the wh...

Страница 24: ...tributes of the Test Wheelchair Feature Min Max Overall length with legrest 815 mm 32 in 876 mm 34 5 in Overall width 587 mm 23 1 in 688 mm 27 1 in Total mass 12 0 kg 26 5 lbs 12 0 kg 26 5 lbs Static...

Страница 25: ...ndicate nature of the defect and if the product is serialized indicate the serial number Do not return products to our factory without our prior consent Limitations and exclusions the foregoing warran...

Страница 26: ...DRAFT page 26 SPE WARN re NOTE WHEE m in se WHEE u C tr It fo ca REGA AND ENSU EVEN SAF Oper To de in sev of the 6 D 6 D b 6 D w 6 D m 6 D 6 D 4 B th a 6 D 6 D 6 D...

Страница 27: ...T DRAFT page 27 e to apist r 8 9 2 2 2 3 3 3 3 3 4 4...

Страница 28: ...DRAFT PDG PRODUCT DESIGN GROUP INC Ph 604 323 9220 Fax 604 323 9097 info pdgmobility com www pdgmobility com PDG Product Design Group Inc October 2013...

Отзывы: