


DRAFT DRAFT
page
12
page
17
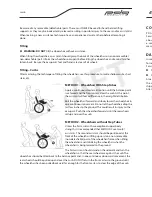
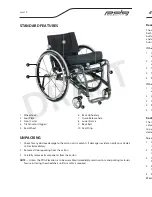
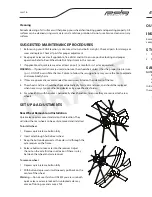
STANDARD FEATURES
1 Wheel Lock
2 Foot Plate
3 Front Caster
4 Tilt Activator (trigger)
5 Rear Wheel
6 Back Upholstery
7 Quick-Release Axle
8 Lower Frame
9 Back Rest
10 Seat Sling
UNPACKING
1 Check for any obvious damage to the carton or its contents. If damage is evident, notify your Dealer/
Carrier immediately.
2 Remove all loose packing from the carton.
3 Carefully remove all components from the carton.
NOTE
— Unless the PDG Elevation is to be assembled immediately, retain cartons and packing materials
for use in storing the wheelchair until assembly is required.
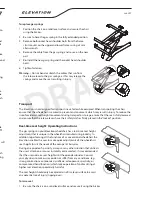
Rear Wheel Axle Nut Adjustment
The quick-release axle attaches the rear wheel to the axle receiver. When the axle is fully inserted into
both the wheel and axle receiver the detent balls will lock the wheel assembly in place. By pushing the
button on the quick-release axle the detent balls will be disengaged and wheel can be removed. If wheel
and axle will not lock or alternatively if it is locking into place but there is excessive play when the wheel
hub is pushing back and forth, the nut on the axle needs to be adjusted.
If the axle does not lock
1 Using a 7/16” open end wrench, securely hold the detent ball end
of the axle.
2 Use the ¾” open-end wrench to turn the axle nut counter-
clockwise.
3 Turn the nut approximately in ½ turn increments
4 Try to lock the axle into the axle receiver.
5 If it doesn’t lock, continue step c. and d. until it locks securely.
If the axle locks, but there is excessive play
1 Using a 7/16” open end wrench, securely hold the detent ball end
of the axle.
2 Use the ¾” open-end wrench to turn the axle nut clockwise.
3 Turn the nut approximately in ½ turn increments.
4 Insert the axle and test for play.
5 Continue steps 3 and 4 until the play has be eliminated.
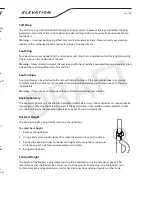
Seat Height
The minimum seat height adjustment setting of the elevation is preset at the factory for the user to
achieve the most commonly used range of seat heights. However, minor adjustments maybe required
to optimize an occupant’s unique requirements and comfort. Increasing the minimum seat height will
decrease the distance the seat will go down and increase the maximum distance the seat will go up.
To adjust minimum height
1 Using the 5mm allen key, loosen the socket head cap screws on the
seat brackets, as shown.
2 Slide brackets towards the front of the wheelchair to increase the
minimum height.
3 Alternatively slide the bracket rearward to decrease the minimum
height.
4 Ensure the brackets are equal distance to ensure proper functioning of
the seat height mechanism.
5 Re-tighten the cap screw once set.
Warning
— Never attempt to adjust the seat height mechanism with the wheelchair occupied.
3
2
5
6
7
1
8
9
10
4


