background image


6   Camera Control for the pco.dimax


pco.dimax User’s Manual V1.00 © PCO AG, Germany 

9                            

6   Camera Control for the pco.dimax 

 
The  'Camera  Control'  window  in  Camware  is  the  main  interface  for  all 
camera settings. 
 
For further Camware features please see chapter 7! 


6.1


The “Camera Control” window 


The  camera  control  window  can  be  opened  by  selecting  the  proper 
command  in  the  "Camera"-Menu  or  by  the  corresponding  button  in  the 
toolbar: 


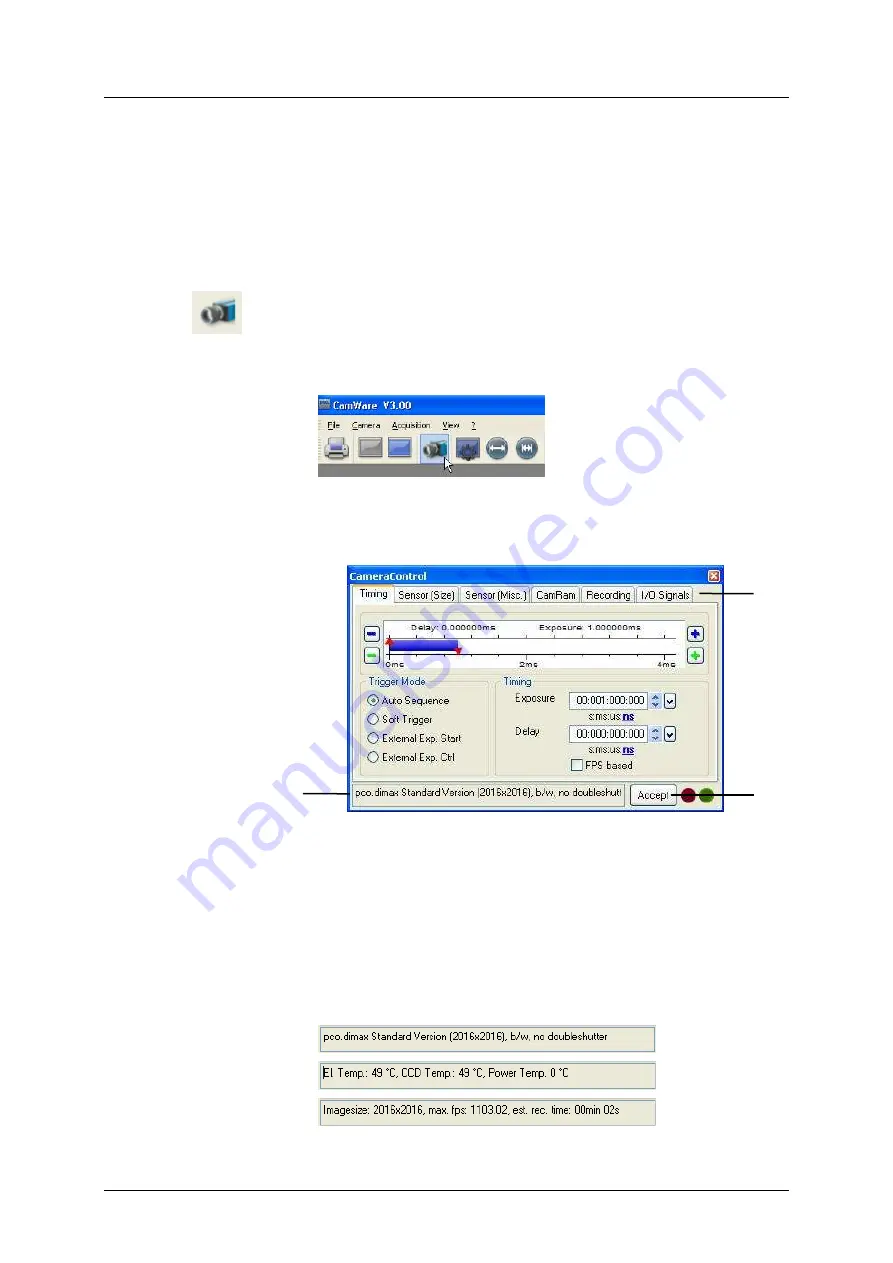
The  camera  control  dialog  always  adapts  to  the  camera  type  connected. 
For the pco.dimax the camera control settings are spread over six 

property 

sheets


1

, which will be explained below.  


Changes to the camera control sheets must be completed by pressing the 

“Accept” button 

2


If  the  "Accept"  button  is  not  pressed,  these  changes  will  be  ignored  and  lost.  If  the 
changes are within the allowed condition limits of the camera, a message is sent to the 
computer,  the  button  disappears  and  the  green  lamp  will  be  highlighted.  If  an  illegal 
change was attempted, the camera will not accept the change and the red lamp will be 
highlighted. 

 
In  the 

information  field


3

  you  can  view  some  information  about  the 

camera. Click into the info field in order to scroll through the values. 


Estimated Recording Time (est. rec. time) due to selected fps, ROI, camRAM size.


1


2


3


Содержание pco.1300

Страница 1: ...pco dimax User s Manual preliminary ...

Страница 2: ...teness of the information text graphics links or other items contained within these materials PCO shall not be liable for any special indirect incidental or consequential damages including without limitation lost revenues or lost profits which may result from the use of these materials The information is subject to change without notice and does not represent a commitment on the part of PCO in the...

Страница 3: ...heet 11 6 4 The Sensor Misc sheet 12 6 5 The CamRam sheet 13 6 6 The Recording sheet 14 6 7 The In Out Signals sheet 15 7 Camware Features 16 Software for image acquisition and archiving 7 1 If no camera is connected 16 7 2 Overview 17 7 3 The File Menu 18 7 4 The Camera Menu 22 7 5 The Acquisition Menu 23 7 6 The View Menu 24 7 7 The Window Menu 25 7 8 The Help Menu 26 7 9 The Local Menu 26 7 10 ...

Страница 4: ... 2016 pixel 12 bit dynamic range 4502 fps 1008 x 1000 pixel color monochrome image sensor versions available exposure time range 2 µs 40 ms image memory in camera camRAM up to 36 GB double shutter operation GigE USB2 0 data interfaces multiple trigger interface optimized for automotive applications smart battery control 1h full operation or 6h data backup Areas of Application high speed particle i...

Страница 5: ...mera do not block these slits Do not leave the camera system in direct sunlight to avoid the risk of overheating Electric shock warning Never slide any items through the slits into the camera because of the risk of electric shock if the voltage parts inside are touched Each time the camera is used check the power cable for any damage Never position the cable in a way that it could become a trippin...

Страница 6: ...in out Lemosa connectors Automotive applications www lemo com Interface GigE Vision USB 2 0 DVI optional 1 4 20 UNC and 3 8 16 UNC and M8 threads 5 2 mm pinholes Serial Number tag Power Supply 24V AC Desktop Power Supply with IEC14 chassis plug and XLR connector Power Cord Standard IEC13 connector for Germany only Battery Pack optional NiMH standard Li Ion upon request Cable 10m Patch cable RJ45 C...

Страница 7: ... device has been detected Afterwards the typical Windows hardware drivers installation process will begin At this point you are asked for the location of the corresponding file Please click on the drive where the CD with the drivers has been inserted or to the directory where the installation software has been downloaded Windows will perform any further installation and system registration automat...

Страница 8: ...y to the microscope spectrograph or other scientific device camera is connected to the power supply camera is connected to the PC 5 2 Computer Turn on the connected computer 5 3 Camera Turn on the camera The camera is ready after one beep 5 4 Software Camware start Camware open view window if not already open start live preview apply auto range peak you may adjust aperture and focus You should now...

Страница 9: ...tings are spread over six property sheets 1 which will be explained below Changes to the camera control sheets must be completed by pressing the Accept button 2 If the Accept button is not pressed these changes will be ignored and lost If the changes are within the allowed condition limits of the camera a message is sent to the computer the button disappears and the green lamp will be highlighted ...

Страница 10: ...acquisition is triggered by an external signal It is also possible to force a software trigger for a test image with the Single Trigger button In the External Exp Start exposure control mode single image recording is started by the falling or rising edge of the voltage signal at the BNC input see chapter 6 7 pixel clock intrinsic system delay 55 MHz tbd 62 MHz tbd External Exp Ctrl An external sig...

Страница 11: ...ective pixels recommended by the sensor manufacturer or an extended size which adds optical black pixels which can be helpful for calibration or control purposes In extended mode you will not increase image size Region of Interest The ROI region of interest selects only a part of the sensor to be read out in order to speed up the frame rate and to save memory Due to the sensor structure and readou...

Страница 12: ...rate and estimated recording time due to selected timing values in the information box 6 4 The Sensor Misc sheet Pixelclock The pixel clock sets the clock frequency and therefore the image sensor readout speed In general at higher readout speed the image quality will suffer due to higher readout noise 55 MHz 62 5 MHz pco dimax Quality Mode Speed Mode AD Converter Feature not applicable for pco dim...

Страница 13: ...ensor in each pixel are necessary to generate one count one intensity level in the digital image Therefore the conversion factor describes the gain that is applied to the signal before it is converted into a digital value The conversion is optimized for the pco dimax 10 e count Electronics Temperature Display of electronics and sensor temperature Active cooling by fan is implemented in the pco dim...

Страница 14: ...e external signal enables recording see chapter 6 7 Time Stamp A time stamp can be placed into the upper left corner of the image It can be either off binary binary with text or text only In binary mode there will be filled the first 16 pixels with the time stamp In binary and or ASCII there will be placed text into the image in a way where the content of the image will be replaced by the text Thi...

Страница 15: ...ter 6 2 is accepted Status Expos Status Busy If checked a signal indicating exposure status or busy status is given at respective BNC output Type TTL Maximum low level 0 8V Minimum high level 2V High Lev Maximum low level 5V Minimum high level 10V CONTACT Maximum switch on resistance 100Ohms Minimum switch off resistance 40kOhms Minimum switch voltage rating 5VDC Minimum switch current rating 1mA ...

Страница 16: ...essing features are available The user only has to tell Camware which type of images will be opened For that purpose the Demo Mode Setup window opens and asks for the corresponding input Need Help If this window pops up because you have trouble running the camera please see instructions in appendix A6 Resolution The drop down list offers the existing image sensor spatial resolutions of all PCO cam...

Страница 17: ... balance color see chapter 7 9 starts the Camware auto exposure routine see chapter 7 4 live preview useful for fast and easy camera adjustment and focusing soft trigger records a single image see chapter 6 2 master gain 2dB see chapter 7 6 under Convert Control Cursor display cursor pixel position and intensity value continuous auto range crop scaling Recorder record START PLAY STOP opens the rec...

Страница 18: ...ap format only allows for 8bit values to be stored and therefore the image content of a 12 or 14bit image is reduced if stored as bitmap If more than one camera is connected it is possible to save all current images by selecting Export all images in the Save file dialog box With this feature it is possible to save one image of each active camera within one process step it is not necessary to repea...

Страница 19: ...e currently displayed image or comment display Options This command opens the Options dialog allowing special settings File Settings Tiff Bit Alignment Here you can select the alignment of the pixel value If this item is checked each pixel value is shifted from bit 12 1 to bit 16 5 This removes the dark image effect inside other image applications Check this item if you want to import Camware gene...

Страница 20: ...ew image acquired will be subtracted from the reference image or vice versa Math can be activated by pressing the R button last acquired image will be copied to reference buffer or the Flash R button a reference picture will be acquired To avoid negative values which would not be visible you can add an offset If the math function is enabled you will see a toolbar button with a green checkmark By p...

Страница 21: ...ion LT2 a file with 3x 256 binary values consisting of 256 x red followed by 256 x green followed by 256 x blue 3 File extension LT3 a file with 768 ASCII values consisting of 256 x rgb rgb rgb rgb r red g green b blue 4 File extension LT4 a file with 3x 256 ASCII values consisting of 256 x red followed by 256 x green followed by 256 x blue Use one of the attached predefined LUTs or define your ow...

Страница 22: ...press the Get Hotpixel button After this the hot pixel list will be created using the last acquired image Now you have the possibility to save the hot pixel list for later use All list box items with a checkmark will be saved to the hot pixel file You can select or deselect a group of items by highlighting a group and pressing the checkmark in front of one of the highlighted items Additionally you...

Страница 23: ...er is retrieved from the image window that has received the input focus is active If no image window is opened the dialog is referred to camera 1 If the Set to all checkbox is checked the settings apply to all connected cameras The Global Settings are valid for all connected cameras Averaging If in the Avg dropdown list a value not equal to 1 is selected the corresponding number of images is avera...

Страница 24: ...s dark or bright light spots reflections etc are cut off Convert Control BW The Convert Control Black White consists of a diagram which graphically displays the method how the 12 bit intensity values x axis of the black white image are converted in 8 bit values y axis The 8 bit value 0 corresponds to the 12 bit value at the left triangle The 8 bit value 255 corresponds to the 12 bit value at the r...

Страница 25: ...hown inside the window will be sent to the printer Multi Window With the Multi Window you have the ability to view the images of all active cameras in one window You can select between time oriented or camera number oriented order Time oriented means that the sequence of images depends on the individual time stamp of each image Camera number oriented means that the first image shown is from camera...

Страница 26: ...w Histogram Opens the histogram window see 7 6 Camera Control Opens the Camera Control window see chapter 6 Convert Control BW Color Opens the corresponding Convert Control windows see 7 6 Zoom Changes the zoom used to display the image Auto Range Peak Crop Displays the image in a predefined scaling see 7 6 Auto Balance Color The white balance feature The White Balance for color images is done by ...

Страница 27: ...es of the rubber band window act as a border for calculating the minimum and maximum values Setting a new ROI by Mouse In the same manner you can setup a new region of interest see ROI in Camera control for the camera You only have to press the CTRL Strg button instead of the shift button The coordinates of the rubber band window are used for calculating a new region of interest You can reset the ...

Страница 28: ...Appendix 28 pco dimax User s Manual V1 00 PCO AG Germany Appendix ...

Страница 29: ...Appendix pco dimax User s Manual V1 00 PCO AG Germany 29 A1 Technical Data tbd Please refer to current datasheet ...

Страница 30: ...Appendix 30 pco dimax User s Manual V1 00 PCO AG Germany A2 Mechanical Dimensions tbd For main dimensions please refer to current datasheet For detailed drawing please contact PCO ...

Страница 31: ...the steps in this order Additional information can be found in the respective subchapters e g A3 1 for installing the GigE card Install GigE card NIC A3 1 Set NIC IP to 192 168 144 10 Subnet 255 255 255 0 A3 1 Is your complete network GigE compliant Only use Cat5e or higher patch cable Deactivate virus protection A3 3 Install GigE driver PCO GigE Intermediate Driver A3 2 Deactivate uncheck the Gig...

Страница 32: ...ch cable directly Before you turn on the camera set the NIC IP address to 192 168 144 10 manually Otherwise the connection between NIC and camera will not succeed because both camera and NIC have to be located to the same subnet The PCO GigE camera is set to the persistent IP address 192 168 144 200 by default if no DHCP server is available Use the tool PCO GigE Configuration Tool to change the pe...

Страница 33: ...e file GigE_Uninstall exe Start Programs Digital Camera Tools pco gige UnInstall pco gige or call the GigE Driver InstallShield setup exe and follow the Remove instructions Manual Installing Locate and right click My Network Places in the Start Menu and choose Properties A new window Network Connections opens Right click on the corresponding Local Area Connection to the NIC for which you want to c...

Страница 34: ...l that the PCO GigE driver is only activated at the specific NIC that is physically connected to your camera In addition just the service pco camera with GigE and the Internet protocol TCP IP should be activated for each NIC used for PCO cameras A3 3 Network Environment Patch Cable A correct configuration of the network is important for the throughput of the image data which could be brought out I...

Страница 35: ...d until a packet delay is found at which images can be transferred without loosing packets or until the delay value is 0µs If the image transfer succeeded at a delay of 0 µs this transfer will be repeated at Max Speed Modus If the image transfer is successful Max Speed Modus will be activated After the camera was successfully tested a respective message appears and you are asked to quit the progra...

Страница 36: ...e e g Intel Pro 1000 Pt with Intel 82572GI chipset NIC configuration none number of descriptors network connection directly or via switch e g NetGear GS 605 directly or via switch e g NetGear GS 605 Patch cable Cat5e Cat5e or higher additional network components switch hub router are compatible to 1000Mbps switch hub router are compatible to 1000Mbps network environment virus protection inactive d...

Страница 37: ... extension for this format ASCII 16 bit format some mathematical programs prefer ASCII data b16 The b16 16 bit format is similar to the bmp format However 16 bit pixel values are used instead of 8 bit pixel values The 16 bit pixel values represent unsigned integer values where the camera 12 bit values sets the higher 4 bits to zero The file format consists either of a Basic Header 6 Long parameter...

Страница 38: ...green LUT setting maximum value 15 blue min blue LUT setting minimum value 16 blue max blue LUT setting maximum value 17 color linlog color LUT setting 0 linear 1 logarithmic 18 266 internal use Comment file in ASCII characters with variable length of 0 XX The length of the comment filed must be documented in the header length field 16 bit pixel data line 1 pixel 1 value of the first pixel line 1 ...

Страница 39: ...the input window is cleaned there is the possibility of surface damage Do not clean the input window unless it is absolutely necessary Be careful and avoid scratches and damage to the input window surface Use a cotton swab dipped in pure alcohol or optical cleaning liquid and wipe only on the glass surface Do not get any cleaning liquid on the metallic parts such as the lens thread because tiny de...

Страница 40: ...a serial number Operating system PC Processor type PC Memory Graphic card Graphic card setup Please use the email options under the Help menu see 7 8 or go to our website http www pco de support request Before sending the camera for repair first contact your local dealer or PCO respectively When shipping the camera for repair be certain to carefully pack the camera with proper shipping materials I...

Страница 41: ...ls please select pco camera For the latest versions please check our website Image Converter Use the PCO file converter to convert 16 bit tif and b16 images to various formats display file information show thumbnail images Third Party Image Viewer for PCO b16 images We recommend the free XnView www xnview com an efficient multimedia viewer browser and converter Please enable all formats ...

Страница 42: ...42 pco dimax User s Manual V1 00 PCO AG Germany A9 FAQ tbd ...

Страница 43: ...ll over the world Cameras for every point of view The systems produced by PCO AG are cameras and scientific measuring instruments at the same time Our high tech systems are mostly the result of manual labor over 50 highly specialized employees handle development and production at the Kelheim site We deliver roughly 4 000 cameras a year to customers all over the world As in every cutting edge techn...

Страница 44: ......

Отзывы: