background image


20 


6.3


Operation and Settings 


8


Power switch 

43 

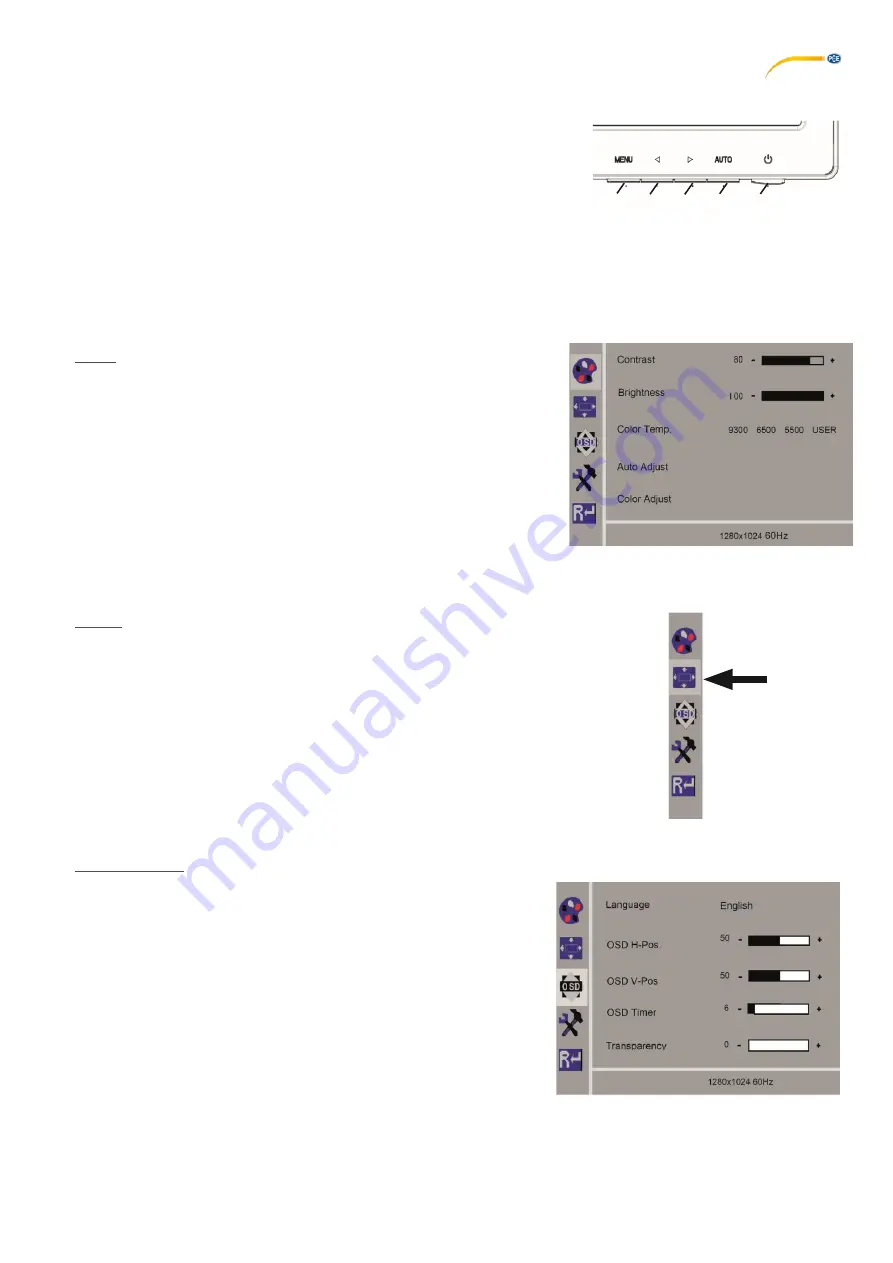
MENU, opens the monitor menu. 

44 

Signal source selection. Reduce the selected value in the monitor 
menu. 

45 

Adjust brightness. Increase the selected value in the monitor menu.


46 

AUTO, automatic horizontal and vertical adjustment of the image. It also exits the monitor 
menu. 

6.4


Monitor Menu 

Color 

Contrast 

Adjust screen contrast (difference between light and dark regions of the 
image). 

 
Brightness 

Adjust the image brightness. 

 
Color Temp 

Select between different, preset color temperatures or set your own 
custom parameters (9300/6500/5500/USER). 

Auto Adjust (not selectable).                                        


Fig. 19


Color Adjust (not selectable).


Image 

The settings under this menu item are fixed and cannot be changed. 
The menu item cannot be selected. 


Fig. 20


Monitor Menu 

Language 

Select the language for the monitor menu (English, French / German / 
Italian / Russian / Spanish / Portuguese / Japanese / Korean / 
Traditional Chinese / Simplified Chinese). 

Horizontal position of the monitor menu (QSD H-Pos.) 

Adjust the horizontal position of the monitor menu (left or right). 

Vertical position of the monitor menu (QSD V-Pos.) 

Adjust the vertical position of the monitor menu (up or down). 

Monitor menu time setting (QSD Timer) 

Set the time that the monitor menu is displayed (3 - 60 seconds). 

Transparency 

Adjust the transparency of the monitor menu. 

Fig. 21


8


46


45


44


43


Fig. 18


Содержание PCE-OVM 3D

Страница 1: ...om PCE Instruments UK Ltd Unit 11 Southpoint Business Park Ensign way Hampshire Southampton United Kingdom SO31 4RF From outside UK 44 Tel 0 2380 98703 0 Fax 0 2380 98703 9 info pce instruments co uk...

Страница 2: ...4 1 Unpacking 9 4 2 Mounting the Monitor Stand 9 4 3 Setup 9 4 4 Electrical Connection 11 5 Operation 12 5 1 Switching On 12 5 2 Adjusting the Monitor 12 5 3 Adjusting the Focus 12 5 4 System Setting...

Страница 3: ...3 9 1 Head Incl Support Arm 26 9 2 Monitor 27 10 Guarantee 28 11 Disposal Instructions 29...

Страница 4: ...e A general notice that improves and eases use The device complies with applicable EU directives Within the EU this device is subject to the provisions of the directive 2002 96 EC WEEE directive List...

Страница 5: ...ient Conditions for Storage and Transport For storage and transport the following ambient conditions must be maintained Ambient temperature of 20 60 C 4 140 F Maximum relative humidity of 80 2 5 Hazar...

Страница 6: ...n Chapter 6 2 6 Approved Personnel The device may only be operated and maintained by trained personnel Repairs that are not specified in this operating manual should only be carried out by an electric...

Страница 7: ...ses For easy operation the head is mounted on an adjustable support arm 3 2 Assemblies and Functional Elements Fig 1 1 Head 9 Tool for clamping force adjustment 2 Supporting arm with base Allen key 3...

Страница 8: ...livery 3 3 1 PCE OVM 3D 1 PCE OVM 3D head with power supply unit and power cord 1 support arm with cable and base with universal clamp 1 3D capable monitor with power supply unit and power cord 2 pair...

Страница 9: ...r with a structured surface 4 3 1 Mounting the Support Arm The support arm should preferably be mounted on the back or side of the table top at least 400 mm 15 75 in away from the front edge This make...

Страница 10: ...er with the fastening screw and tighten the fastening screw until the head no longer tilts downward 4 3 3 Positioning the Monitor Position the monitor so that it is directly in the field of view The d...

Страница 11: ...CE OVM 3D Head Power Supply The PCE OVM 3D power supply 4 Fig 1 has a cable with an angled jack plug 37 Fig 12b Plug the jack into the socket at the cable of the power supply which protrudes at the ba...

Страница 12: ...Adjusting the Focus There are two options for focusing the image Coarse adjustment by moving the head with the support arm Fine adjustment through height adjustment 6 Fig 1 The amount of force require...

Страница 13: ...ized for different materials of the respective objects 1 3 stored modes for different applications Neutral For the object modes 1 2 and 3 image processing is performed internally improving the image q...

Страница 14: ...ight mouse button C in the menu Leave the menu Main Menu Items Split Screen Split screen menu USB USB menu Black White Image display color black and white Settings General settings Exit Exit the menu...

Страница 15: ...only possible if the file contains 3D image information Note 3D images can only be displayed in full screen mode Delete the image Leave the menu The selected file is displayed red in the list Live Ima...

Страница 16: ...in full screen mode 5 5 2 USB Note This sub menu has the same functions as the sub menu USB in the split screen menu Select this menu item to have an image from your USB stick displayed After clicking...

Страница 17: ...ting on and off switch between 2D and 3D image saving mode and query information about PCE OVM 3D Settings Menu Items Lighting Saving in 2D 3D Information The lighting is switched on The lighting is s...

Страница 18: ...2 Saving a Screen Shot Briefly press the foot switch The screen contents are saved to the USB stick as a screen shot The screen shot icon appears on the monitor The file name is displayed on the moni...

Страница 19: ...Grease from the skin may leave fingerprints on the screen which are difficult to remove and can damage the screen Do not put any pressure on the screen Cleaning Clean only with a dry cloth Repair Do...

Страница 20: ...00 5500 USER Auto Adjust not selectable Fig 19 Color Adjust not selectable Image The settings under this menu item are fixed and cannot be changed The menu item cannot be selected Fig 20 Monitor Menu...

Страница 21: ...9 AUTO 4 3 DCR Select DCR Dynamic contrast ratio on off Fig 22 Reset Reset Reset the monitor settings to the PCE Instruments factory settings Self Diagnosis If there is no image a self diagnosis wind...

Страница 22: ...cted by a protective glass which can be removed for cleaning and replacement CAUTION Risk of injury if broken Do not bend protective glass it may break Wear protective goggles and protective gloves CA...

Страница 23: ...e that the plug is inserted from the correct side Hold the cable duct securely behind the insertion aid Pull the insertion aid and the plug of the cable to be inserted through the cable duct to the ot...

Страница 24: ...Align the monitor so that the view is perpendicular to the monitor see Chapter 4 3 3 Calibrate the display See the instructions included in PDF format Head without function The PCE OVM 3D power suppl...

Страница 25: ...capable PC monitor Use the PCE Instruments 2D 3D monitor PCE OVM 3D HDMI Tutor No 3D image can be viewed on the PCE Instruments 2D 3D monitor 2D 3D connections mixed up Make sure the PCE Instruments 2...

Страница 26: ...000 lux Color temperature 5 000 kelvins USB memory stick capacity 4 GB Number of storable images approx 600 Max video sequence length approx 15 minutes Max distance between mounting point of support...

Страница 27: ...e mains voltage 100 240 V Mains frequency 50 60 Hz Power consumption 25 W Screen resolution 1920 x 1080 pixels Dimensions with stand width x height x depth 511 x 377 x 170 mm 20 12 x 14 84 x 6 69 in D...

Страница 28: ...28 10 Guarantee You can read our warranty terms in our General Business Terms which you can find here https www pce instruments com english terms...

Страница 29: ...ust be given to collection points designed for that purpose In order to comply with the EU directive 2012 19 EU we take our devices back We either re use them or give them to a recycling company which...

Страница 30: ...nited Kingdom SO31 4RF Italia T rkiye Tel 44 0 2380 98703 0 Telefono 39 0583 975 114 Tel 0212 471 11 47 Fax 44 0 2380 98703 9 Fax 39 0583 974 824 Faks 0212 705 53 93 info pce instruments co uk info pc...

Отзывы: