3
Thank you and congratulations on the purchase of your new Model 330A
Patty Molding Machine from Patty-O-Matic, Inc! The Model 330A will form,
interleave paper between, and stack patties. This machine is designed for easy
operation and cleaning. Please become familiar with this manual and your
machine will give you many years of productive service.
The Model 330A is shipped to you in at least two cartons which contain the
patty machine, feed tray, mold plate guard, spare parts box, receiving table, and
this manual. If you purchased your machine with any other accessories, such as a
mobile table or patty paper, these items may be in a separate carton. The parts box
that comes with the machine should include a bottle of machine lubricant, a speed
driver, samples of patty paper, and a spare parts kit.
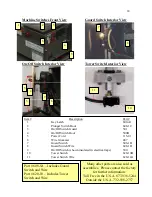
Your machine is equipped with two interlocks. One is located on the front
of the machine and one is located on the top of the machine. The Mold Plate
Guard must be installed on the machine to engage the interlock on the front of the
machine and the Feed Tray including the Guard must be installed on top of the
Hopper to engage the interlock on top of the machine.
Mold Plate
Guard
Mold Plate
Guard Knobs
Plunger and Key
Latch Interlock
Installing the Mold Plate Guard
Loosen Guard Knobs on the Hopper and
place Mold Plate Guard under the fender
washers located under the knobs.
Tighten down on Guard Knobs. To
Activate the interlock switch, slide push
rod against the plunger, inside the
keylatch, and turn rod to the right. This
will lock the push rod in place and
activate your interlock switch.
Installing the Feed Tray
Place stainless steel tube of feed tray over
the Hopper. Make Sure the Switch Plunger
on the bottom of Feed Tray depresses the
Tower Stem inside the Tower Sleeve on
the top of the machine.
Tower Interlock
Hopper
Push Rod
and Collar
Feed Tray
Stainless
Steel Tube
DO NOT ATTEMPT TO RUN THIS
MACHINE WITHOUT THE FEED
TRAY AND THE MOLD PLATE
GUARD IN THEIR PLACE!!
FAILURE TO DO SO COULD
RESULT IN SERIOUS BODILY
INJURIES!!
Switch Plunger Located
on back of Tray
Содержание 330A
Страница 6: ...6 Proper Label Location for a Model 330A 1 2 3 4 5 6 7 8 9 10 10 11 2 6 12...
Страница 25: ...25...


