manualshive.com logo in svg
background image

35

36

5.4  THE V.52 BER TEST PATTERN GENERATOR

The Model 2500RC Series has a built-in test pattern generator and

detector.  It can be invoked at both ends of a link simultaneously (using
two operators) or it can be invoked in conjunction with the LAL or RDL
tests (using one operator).  The following example requires two
operators–one to initiate and monitor the test at the local Model
2500RC Series, and one at the remote Model 2500RC Series.  To use
the V.52 BER test by itself, both operators should 

simultaneously follow

these steps:

1.

Locate the “511/511E” toggle switch on the front panel of the 
Model 2500RC Series and move it to the left hand side (see 
Note 1).  This activates the V.52 BER test mode and transmits 
a “511” pseudorandom test pattern to the other unit.  If any 
errors are received, the receiving CSU/DSU’s red “Error” LED 
will blink sporadically (see Notes 1 & 2, below).

2.

If the test indicates no errors are present, move the V.52 
toggle switch to the right hand side, activating the “511/E” test 
(see Note 2).  The 511/E test transmits the 511 pseudorandom
test pattern and injects intentional errors about once per 
second.  If the test is working properly, the receiving 
CSU/DSU’s red “Error” LED will blink 

regularly.  A successful 

“511/E” test will confirm that the link is in place, and that the 
Model 2500RC Series’ built-in “511” generator and detector 
are working properly.

NOTE

1

:

The 511 BER pattern can also be activated using the 

software control port.  Follow these steps:  From a terminal, first go
to the Main Menu and select item 3 to display the Software Switch
Menu (

Section 3.2.4

)  In the Software Switch Menu, select item “c”

to go to the Send 511 Pattern Menu (see below).  To send a 511
pattern,  select item 1.  

NOTE

2

:

Control Port activation of the “511E” pattern is not

possible.  The “511E” pattern may only be activated using  the front
panel toggle switch.

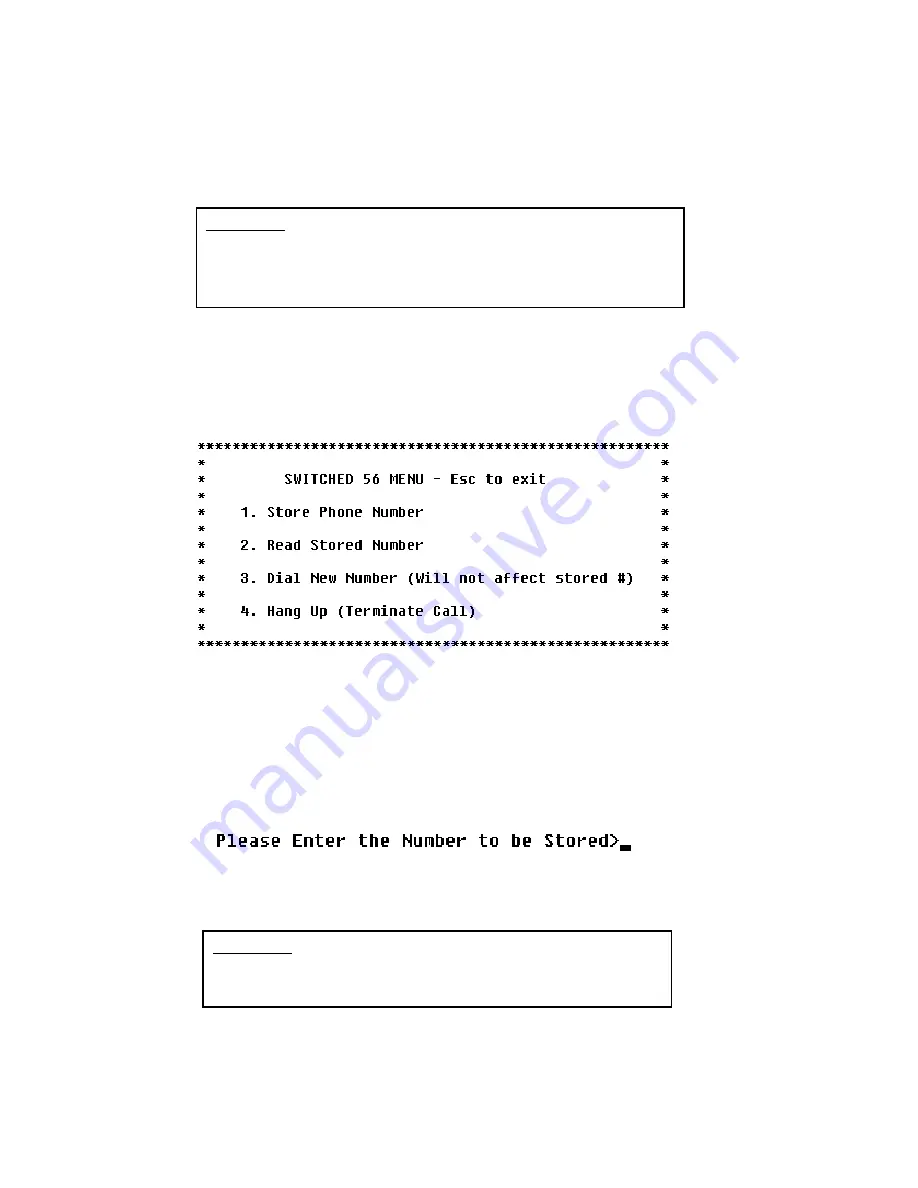
5.5  SWITCHED 56 DIALING COMMANDS (MODELS 2510RC &
2520RC)

To access the Switched 56 dialing capabilities of the Mode 2500RC

Series, go to the Main Menu (see 

Section 3.2.4

) and select item 5, “Set

Switched 56 Dialing Parameters”.  This will take you to the Switched 56
Menu (see below).  The following paragraphs describe the commands
in the Switched 56 Menu.

Store Phone Number (Enable DTR Dialing)

Selecting item 1 in the Dial Menu lets you activate the Model

2500RC Series’ “DTR Dialing” feature by storing a phone number in the
unit’s non-volatile memory.  The Model 2500RC Series automatically
dials this number when the DTE raises the DTR lead.  When you issue
this command, the Model 2500RC Series responds with this prompt:

Enter up to 12 digits (without hyphens or other alphabetic characters),
followed by [RETURN].  For example: “13015551212.”

NOTE:

To disable DTR dialing, press [RETURN] (and nothing 

else) when asked to enter the number to be stored.

CAUTION! Pressing [RETURN] by itself will erase any
previously stored number from the unit’s non-volatile memory
and cannot be undone.  This will also disable DTR dialing.

CAUTION! For proper Switched 56 operation, you must enable
the Circuit Assurance and Force RTS options as described in
Section 4.0.  Failure to do so may prevent the Model 2500RC
Series unit from answering incoming Switched 56 calls.

Содержание 2500RC

Страница 1: ...ls 2500RC 2510RC and 2520RC All Rate CSU DSU Rack Mount Card SALES OFFICE 301 975 1000 TECHNICAL SUPPORT 301 975 1007 http www patton com Part 07M2500RC D Doc 099011U Rev E Revised 1 23 08 C E R T I F...

Страница 2: ......

Страница 3: ...etalized connector and configure the rear card as shown in section 3 3 of this manual 1 1 RADIO AND TV INTERFERENCE The Model 2500 Series generates and uses radio frequency energy and if not installed...

Страница 4: ......

Страница 5: ...er This number may be obtained from Patton Electronics Technical Support 301 975 1007 http www patton com or support patton com Notice Packages received without an RMA number will not be accepted Patt...

Страница 6: ......

Страница 7: ...els 2510RC 2520RC The unit can be used in Switched 56 applications Set the Line Rate to 56 Kbps Set the Mode switches for Switched 56 and enable Force RTS and Circuit Assurance Dial or store a number...

Страница 8: ......

Страница 9: ...n On 2 4 Kbps On On Off 4 8 Kbps On Off On 9 6 Kbps On Off Off 19 2 Kbps Off On On 56 Kbps Off On Off 64 Kbps Off Off Off Force configuration pointer to default to Hardware Switches See Section 3 2 Fo...

Страница 10: ......

Страница 11: ...Loop 3 1 2 Switch Set S2 The configuration switches on switch S2 control the Rate Adapter DTE Rate Clock Mode Anti Stream Timer and RTS CTS Delay The table below shows factory default settings for Sw...

Страница 12: ......

Страница 13: ...Various Line Rates S2 8 CTS Delay 56 19 2 9 6 4 8 2 4 Off Normal 0 3 0 9 1 9 3 8 7 5 On Extended 1 3 3 8 7 5 15 30 3 1 3 Setting the Reversible Interface Driver Board The Model 2500RC Series supports...

Страница 14: ......

Страница 15: ...a time The Model 2500RC Series Main Menu should then display on the terminal screen see below 3 2 2 Using the Software Menu System The Model 2500RC Series Menu System operates as follows 1 All select...

Страница 16: ......

Страница 17: ...interface at a lower rate To do this set the line rate to 56 or 64 Kbps Then set the DTE Speed as required Software Switch Menu option 7 Circuit Assurance Choosing option 2 in the Software Switch Menu...

Страница 18: ......

Страница 19: ...provided the DTE equipment is configured to transmit two stop bits The extra stop bit reduces the DTE s effective data rate to allow synchronization with the 56 kbps line speed Set the Model 2500RC S...

Страница 20: ......

Страница 21: ...bits DTE Loop Control Choosing option 8 in the Software Switch Menu takes you to the DTE Loop Control Menu below The local and remote loopbacks on the Model 2500RC Series can be controlled from the DT...

Страница 22: ......

Страница 23: ...Choosing option b in the Software Switch Menu takes you to the RTS CTS Delay Menu below This option lets you set the RTS CTS turn on delay to Normal or Extended The delay interval decreases as the lin...

Страница 24: ......

Страница 25: ...is a detailed description of each strap s function DTE Shield Pin 1 FRGND JB3 In the connected position this strap links DB 25 pin 1 frame ground In the open position pin 1 is lifted from frame groun...

Страница 26: ......

Страница 27: ...ed conveniently 4 1 1 The Rack Power Supply The power supply included in the Model 1000R16 rack uses the same mid plane architecture as the modem cards The front card of the power supply slides in fro...

Страница 28: ......

Страница 29: ...status of communication Figure 12 below shows the location of the LEDs on the Model 2500RC Series front panel Note also the location of the test mode switches and RS 232 control port used in Switched...

Страница 30: ......

Страница 31: ...itches go to the Main Menu and select item 2 Read Configuration This will take you to the Read Configuration Menu below In the Read Configuration Menu you may select item 1 to read the hardware switch...

Страница 32: ......

Страница 33: ...l Line Loop Menu see below To activate LAL select item 1 LAL Test Procedure Once LAL is activated the Model 2500RC Series transmit output is connected to its own receiver The Test LED should be lit Fo...

Страница 34: ......

Страница 35: ...out making visits to a customer s premises CSU Loop The CSU Loop is activated when the central office reverses the DC sealing current that flows between the TX pair and the RX pair In this case the Mo...

Страница 36: ......

Страница 37: ...eries automatically dials this number when the DTE raises the DTR lead When you issue this command the Model 2500RC Series responds with this prompt Enter up to 12 digits without hyphens or other alph...

Страница 38: ......

Страница 39: ...S point to point or multipoint campus area point to point Indicators LED indicators for TD RD CTS CD DTR No Signal Out of Service Error and Test Mode Diagnostics V 54 compliant local and remote loopba...

Страница 40: ......

Страница 41: ...le 1000RPSM 2 120 240V Front Power Supply Module 1000RPEM DC DC Rear Power Entry Module 1000RPSM 48A 48V Front Power Supply Module 1000RPEM V 120 240V CE Compliant Rear Power Entry Module 1000RPSM V 1...

Страница 42: ......

Страница 43: ...rame Ground 2 TD 3 RD 4 RTS 5 CTS 6 DSR 7 SGND Signal Ground 8 CD 15 TC 17 RC 18 LL Local Loop 20 DTR 21 RL Remote Loop 24 XTC 25 TM Test Mode CONTROL PORT INTERFACE 8 Position modular connector compl...

Страница 44: ......

Страница 45: ......

Страница 46: ......

Страница 47: ......

Страница 48: ...n any of the following ways to tell us how you like this product and how we can meet your product needs today and in the future Web http www patton com Sales E mail sales patton com Support E mail sup...

Отзывы: