Patriot PS5 Скачать руководство пользователя страница 2

Do not pierce the battery case as it contains 
corrosive acid. 

1


Remove the battery compartment screw 
and cover. 

2


Connect the positive (+) battery lead (red) 
to the positive (+) battery terminal (red). 

3


Connect the negative (-) battery lead 
(black) to the negative (-) battery terminal 
(black). 

4


Replace the battery compartment screw 
and cover. 

Positioning the unit 

Install the unit: 


adjacent to the electric fence. 


preferably in the middle of the electric 
fence. 


where it will receive the most daily sun 
throughout the season. 


where a good ground connection can be 
obtained. 


on firm soil away from flooding and out of 
reach of animals and children (inside a 
protective fence, if required). 


Face the unit’s solar panel towards the 
midday (12.00 pm) sun - true north in the 
southern hemisphere and true south in the 
northern hemisphere. 
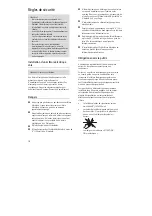
Mounting the unit 

The unit can be mounted to a wooden post or 
other surface using two 10 gauge galvanized 
screws. 
1


Insert the screws into the Mounting points 
at the top of the carry handle. 

2


Tighten the screws, ensuring the unit is 
positioned correctly and that it won’t move 
in the wind. 

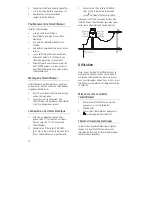
Connecting to an electric fence 

1


Push a 3’ (1 m) galvanized steel ground 
rod fully into firm ground within 15’ (5 m) 
of the unit. 

2


Connect a 20-9 AWG wire lead from the 
Fence ground terminal   on the unit to 
the ground rod. 

3


Connect a 20-9 AWG wire lead from the 
Fence output terminal   on the unit to the 
fence. 

Caution!

  Make sure the connecting leads drop 

downwards from the unit to prevent water from 
collecting at the terminals. 


Operation 

Note:

 Before using the unit for the first time, 

expose the solar panel to sunlight for at least 
three days with the switch in the ‘Off’ position. 
This will ensure the battery is fully charged, 
ready for use. 


Switching on and off 

1


To switch on, press   on the On/Off 
switch. 

2


To switch off, press   on the On/Off 
switch. 

Содержание PS5

Страница 1: ...lified personnel No user serviceable parts Read full instructions before use This unit must NOT be disposed of with other normal waste Instead it is your responsibility to dispose of it correctly by h...

Страница 2: ...nit The unit can be mounted to a wooden post or other surface using two 10 gauge galvanized screws 1 Insert the screws into the Mounting points at the top of the carry handle 2 Tighten the screws ensu...

Страница 3: ...r local dealer The battery must only be replaced with a 4 V 4 5 Ah sealed rechargeable battery Do not use a non rechargeable battery Contact your local dealer if you are unsure Maintenance and storage...

Страница 4: ...close to overhead power or communication lines Duty to the public A warning sign shall be fitted to every point where persons may gain ready access to the conductors Where an electric animal fence cro...

Страница 5: ...ffectively insulated from the grounded structural parts of the building This may be achieved by using insulated high voltage cable Connecting leads that are run underground shall be run in conduit of...

Страница 6: ...of protection IPX4 Product specifications Peak output energy 50 mJ Peak stored energy 70 mJ Period between pulses charged battery 2 s Maximum output voltage up to 7 5 kV Rated load performance 2000 3...

Страница 7: ...nto con los residuos dom sticos M s bien es su responsabilidad desechar correctamente el residuo del aparato entreg ndolo en un punto de recogida de una autoridad local responsable del reciclaje de re...

Страница 8: ...dor est correctamente posicionado y que no se mueva con el viento Conectar el energizador a una cerca el ctrica 1 Entierre completamente en el suelo firme una varilla de toma a tierra de acero galvani...

Страница 9: ...a el energizador y la bater a a su distribuidor local La bater a s lo debe ser reemplazada por una bater a sellada recargable de 4 V 4 5 Ah No utilice una bater a no recargable P ngase en contacto con...

Страница 10: ...les Recomendamos que se apoye s lo un alambre electrificado en ambos lados de una cerca de espino o de mallas met licas No alimente nunca una cerca el ctrica con dos energizadores La distancia entre a...

Страница 11: ...es no conductivos o una barrera met lica aislada Tanto el alambre de espino como el alambre de arista viva no deber n ser electrificados por un energizador Una cerca no electrificada con alambre de es...

Страница 12: ...esultado satisfactorio y seguro Si se desean usar cercas el ctricas para animales para apartar p jaros de edificios no se debe conectar ning n alambre de cerca el ctrica al electrodo a la varilla de t...

Страница 13: ...ordinaires Il est de votre responsabilit de l liminer correctement en l apportant une autorit locale responsable de la collecte de d chets d quipements lectriques et lectroniques Installation Pour me...

Страница 14: ...une cl ture lectrique 1 Enfoncez un piquet de terre en acier galvanis de 3 1 m dans un sol ferme dans un rayon de 15 5 m autour de l lectrificateur 2 Connectez un fil de calibre 20 9 AWG 0 51 mm 6 6...

Страница 15: ...lectrificateur et la batterie votre concessionnaire local La batterie ne doit tre remplac e que par une batterie rechargeable scell e 4 V 4 5 Ah N utilisez pas de batterie non rechargeable En cas de...

Страница 16: ...0 mm d un fil barbel N lectrifiez jamais une cl ture qui pourrait entra ner un risque d emm lement pour l homme ou les animaux Nous vous recommandons par exemple de n installer qu un seul fil d cal le...

Страница 17: ...es pour animaux s par es chacune aliment e par un lectrificateur ind pendant la distance entre les fils des deux cl tures lectriques pour animaux sera au moins de 8 2 5 m Si cette s paration doit tre...

Страница 18: ...une alimentation par un lectrificateur faible puissance pour obtenir une performance satisfaisante et fiable Si les cl tures lectriques pour animaux sont utilis es pour loigner les oiseaux ou pour les...

Страница 19: ...tom or otherwise Garant a de 1 a o a partir de la fecha de la compra La garant a de este producto cubre defectos de materiales y de fabricaci n durante un periodo de 1 a o A PARTIR DE LA FECHA DE LA C...

Страница 20: ...la survenue qu elles manent d une loi d une prescription du secteur commercial des us et coutumes etc 2011 Tru Test Limited All product names and brand names in this document are trademarks or registe...

Отзывы: