background image

7

Warning

CHEMICAL/EXPLOSION

HAZARD

Read ALL instructions be-

fore charging or using bat-

tery.  Failure to follow ALL 

instructions may result in 

fire, severe burns, or re-

lease of toxic materials.

Battery and Charging System

Charging Instructions

1.  

2. Remove the battery from tool or case and insert ter-

minals down into charger. The red light will come on

indicating that the battery is charging and the green

light will go out.

3. After charging is complete, the red light will go out

and the green light will come on, indicating that the

battery is fully charged. The charger will keep the

battery at full charge until it is removed.

4. Unplug the charger from the 120V AC outlet.

CHARGING TIMES:

First charge (new battery)  

      1.5 hour

      Discharged Battery   

5 minutes to 1.5 hour

CHARGING DON'TS:

1. Do not charge battery outdoors or in temperatures

below 40°F (5°C).

2. Do not allow metal objects to come in contact with

battery terminals.

3. Do not puncture or attempt to open battery case or

cells.

4. Do not store battery where it will be subjected to

temperatures above 120°F (49°C).

5. Do not incinerate battery.

6. Do not use a defective battery charger, one that

over-heats and/or smokes when plugged in.

7. Do not immerse the battery or charger in water.

Charging System Accessories:

Battery Charger - Part No. 902667

Note

Battery and Charging System

Important Charging Notes

Remove the  charger unit from the tool case and plug 

it into a 120V AC outlet. Set the charger base on a 

stable surface. A green light will come on to indicate

the power is on and the charger circuit is ready.


If battery is completely discharged, the red light and 

the green light may alternate back and forth for up to 

20 minutes. This safety feature slowly recharges the 

battery until it is ready to accept the full charging 

current. If the red and green lights continue to alter-

nate after 20 minutes, replace the battery.

The  Paslode Cordless 16   Gauge  Straight  Lithium-ion 

Finish Nailer comes with a rechargeable battery and 

its own charging system. This charging system  is 

the  only one that will work with the Paslode 

lithium-ion batteries. The  first step in preparing a 

new tool for operation is to fully charge the battery. 

New batteries are shipped partially discharged 

and must be charged prior to first use.  Batteries 

will take 5 minutes to 1.5  hour (time will be dependant 

on the amount of discharge of the battery) to 

recharge.

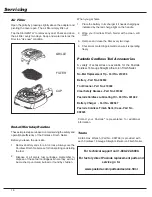
6ft. Cord

Battery

Charger

THE PASLODE BATTERY CHARGING SYSTEM

Содержание IM250S Li

Страница 1: ...responsibility to have all operators and service personnel read and understand this manual OPERATING MANUAL Part No 916000 www paslode com Model IM250S Li Printed in U S A 2023 Illinois Tool Works In...

Страница 2: ......

Страница 3: ...Troubleshooting 17 The battery charger system meets all safety requirements for power tools is a trademark Paslode An Ilinois Tool Works Company 155 Harlem Avenue Glenview IL 60025 www paslode com Pow...

Страница 4: ...IVE YEAR EXTENDED LIMITED WARRANTY A ve year warranty will apply to all molded nylon parts Motor Housing Cap and Grille Handle Halves and Actuator Trigger WARRANTY STATEMENT This warranty is limited t...

Страница 5: ...d cause the tool to overheat resulting in loss of performance or damage to tool components Fasteners 16 Gauge Straight Magazine Capacity 2 nail strips or 100 fasteners Battery 7 4 volts DC Provides en...

Страница 6: ...e ammable materials This tool must not be used in a combustible environ ment or in the presence of combustible materials such as ammable chemi cals adhesives gasoline or solvents Do not attempt to ope...

Страница 7: ...TY Never point the tool at yourself or anyone else 3 NEVER ENGAGE IN HORSEPLAY WITH THE TOOL The Cordless Finish Nailer is not a toy it is a tool Careless and improper use may result in a serious acci...

Страница 8: ...l tool operation safety a n d m a i n t e n a n c e instructions should be allowed to operate the tool WARNING A fastener may exit at an angle unexpectedly and cause injury WARNING Battery Disposal IM...

Страница 9: ...tery charger one that over heats and or smokes when plugged in 7 Do not immerse the battery or charger in water Charging System Accessories Battery Charger Part No 902667 Note Battery and Charging Sys...

Страница 10: ...eady Position Standby Position ASSUME TOOL IS ALWAYS LOADED AND WILL ALWAYS FIRE A FASTENER TOOL OPERATORS AND BYSTANDERS MUST WEAR EYE AND HEARING PROTECTION THAT CONFORMS TO ANSI STANDARDS READ MANU...

Страница 11: ...after all the fuel has been expelled Fuel Cartridge NOTE 1 When replacing fuel cartridge also clean or replace the air lter for optimum tool operation PaslodeCordlesstechnologyispoweredbyaninternal co...

Страница 12: ...sers may contact U S EPA s RCRA Superfund Call Center at 1 800 424 9346 to receive more information 10 Fuel Cartridge NOTE Paslode Cordless fuel cartridges are marked with a Best Use Before date on th...

Страница 13: ...off of the work surface so the work contact element WCE is not depres sed Press forward at the back of the actuator cover and pivot outward to open The cover will swing out of the way D Close the actu...

Страница 14: ...ocks the tool to prevent the tool from operating To unlock the tool simply reload another strip of nails Lockout Feature Preparing the Paslode Cordless 16 Gauge Straight Lithium ion Finish Nailer for...

Страница 15: ...he temperature of the tool warms up enough Once the tool reaches operational temperature the tool will generate it s own heat and will function normally If the tool sits for an for an extended period...

Страница 16: ...16 ga Straight Finish Nailer drives Paslode 16 Gauge Straight Finish Nails Fasteners are collated into strips of 50 for easy loading Paslode fasteners are designed to be used in Paslode tools use of o...

Страница 17: ...e d e u q i n u e h t f o e s u a c e B r e n e t s a f Finish Nailer clearing a jammed fastener is easy 1 Remove the battery 2 Pull the latch releasing front guide Pivot front guide forward 3 Clear...

Страница 18: ...move and clean the lter every two days 4 Checkworkcontactingelementtoensureit isoperating freely Paslode Cordless Tool Accessories e d o l s a P e h t r o f e l b a l i a v a e r a s e i r o s s e c c...

Страница 19: ...r light is solid red Battery is not charged Battery terminals are oily dirty or corroded Battery is discharged Charge battery Clean battery terminals with soft cloth Charge battery SYMPTOM POSSIBLE PR...

Страница 20: ...hen material density or thick ness of material being fastened changes Use only fasteners meeting Paslode speci cations Check Fasteners and Ap plications section for fastener types and sizes recommende...

Страница 21: ...RUYE ESTE MANUAL El cliente tiene la responsibilidad de que todo el personal de operaciones y servicio lea y entienda este manual MANUAL DE FUNCIONAMIENTO Pieza No 916000 Modelo IM250S Li RECTA 16 GAU...

Страница 22: ......

Страница 23: ...e la Clavadora 13 Clavos y aplicaciones 14 Servicio 15 Detecci n y correcci n de fallas 17 Tantolabater acomoelcargadordebater aImpulsere nen todos los requisitos de seguridad de las herramientas mec...

Страница 24: ...a accidental o intencionalmente usada con sujetadores combustible bater as o cargadores de bater a que no re nan las especificaciones el tama o o la calidad de Paslode o a la que no se le haya dado el...

Страница 25: ...Especificaciones Dimensiones Peso Altura Longitud Magazine Angulado Solamente use sujetadores Paslode derecho Velocidad Funcionamiento intermitente 2 a 3 clavos por segundo NOTA Si se excede esta vel...

Страница 26: ...resde 49 C 120 F El cartucho de gas o la bater a pueden explotar dejando escapar gases inflamables No intente usar esta herramienta hasta que haya le do y comprendido todas las advertencias de segurid...

Страница 27: ...as en este manual para corregir el problema Si no puede resolver el problema deje de usar la herramienta y notifique la situaci n a su supervisor o al representante de Paslode 6 NO CARGUE SUJETADORES...

Страница 28: ...S LO PERMITA QUE EL PERSONAL CALIFICADO USE LA CLAVADORA PASLODE CORDLESS DERECHO Nunca trate de usar la clavadora en lugares que deba alcanzar con esfuerzo ya que el retrocesopuedehacerque pierda el...

Страница 29: ...el cargador en agua Accessorios De cargador de bater as Part No 902667 Notas importantes de carga Bater a y cargador de bater a ADVERTENCIA PELIGRO QU MICO Y DE EXPLOSI N Desechar la bater a Las bater...

Страница 30: ...n su posici n de bloqueo listo La luz indicadora de la bater a se iluminar Para desconectar la bater a presione hacia abajo sobre el bloqueo ficha y respaldo de bater a de espera 3 ASSUME TOOL IS ALWA...

Страница 31: ...no se siguen TODAS las instrucciones pueden producirse explosiones o incendios Esto puede causar lesiones personales graves o da os a la propiedad Mantenga el cartucho de gas alejado del calor las ch...

Страница 32: ...re abajo de la lata extraiga el tap n de cartucho de gas o instalar en otras c lulas de combustible 10 Cartucho de gas PELIGRO Los cartuchos de gas Paslode cordless son inflamable No NOTA Los cartucho...

Страница 33: ...cubierta se abrepara dejar espacio B Levante el adaptador de cartucho de gas e insertar el cartucho de gas en la herramienta C Suelte el adaptador por lo que se centra en el cartucho de combustible D...

Страница 34: ...o del motor se enfr e para que funcione correctamente El ventilador generalmente produce el flujo de aire necesario para permitir que funcione continuamente Siempre que la clavadora Paslode Cordless e...

Страница 35: ...de com bustible y aire La combusti n mueve el pist n que impulsa el clavo LEVANTE LA CLAVADORA Y SUELTE EL GATILLO La c mara de combusti n se abre El ventilador deja salir los gases calientes y enfr...

Страница 36: ...alaci n de molduras en la uni n de paredes y pisos o en la uni n de paredes y techo la fijaci n de paneles de guardasillas molduras para cuadros y cualquier otra decoraci n Clavos Moldura superior Gua...

Страница 37: ...nimiento s lo debe hacerse despu s de que la clavadora est completamente inoperable PELIGRO PELIGRO 15 En el lugar de trabajo lim tese a REVISAR EL NIVEL DE ENERGIA DE LA BATERIA RECARGAR LA BATERIA R...

Страница 38: ...Si la luz roja en el mango indica que la bater a necesita ser recargada col quela en el cargador 2 Limpie la clavadora para acabados con un pa o limpio y suave 3 Saque y limpie el filtro cada dos d a...

Страница 39: ...La luz indicadora est iluminada constantemente en verde El elemento de contacto est doblado o la acumulaci n de suciedad restringe su funcionamiento El cartucho de gas est vac o Elcablequeproducelach...

Страница 40: ...ores y aplicaciones para ver los tipos y tama os recomendados en esta clavadora Paslode Cordless Coloque el transportador detr s de la tira de clavos y suj telo Saque los clavos atorados Revise el car...

Отзывы: