19
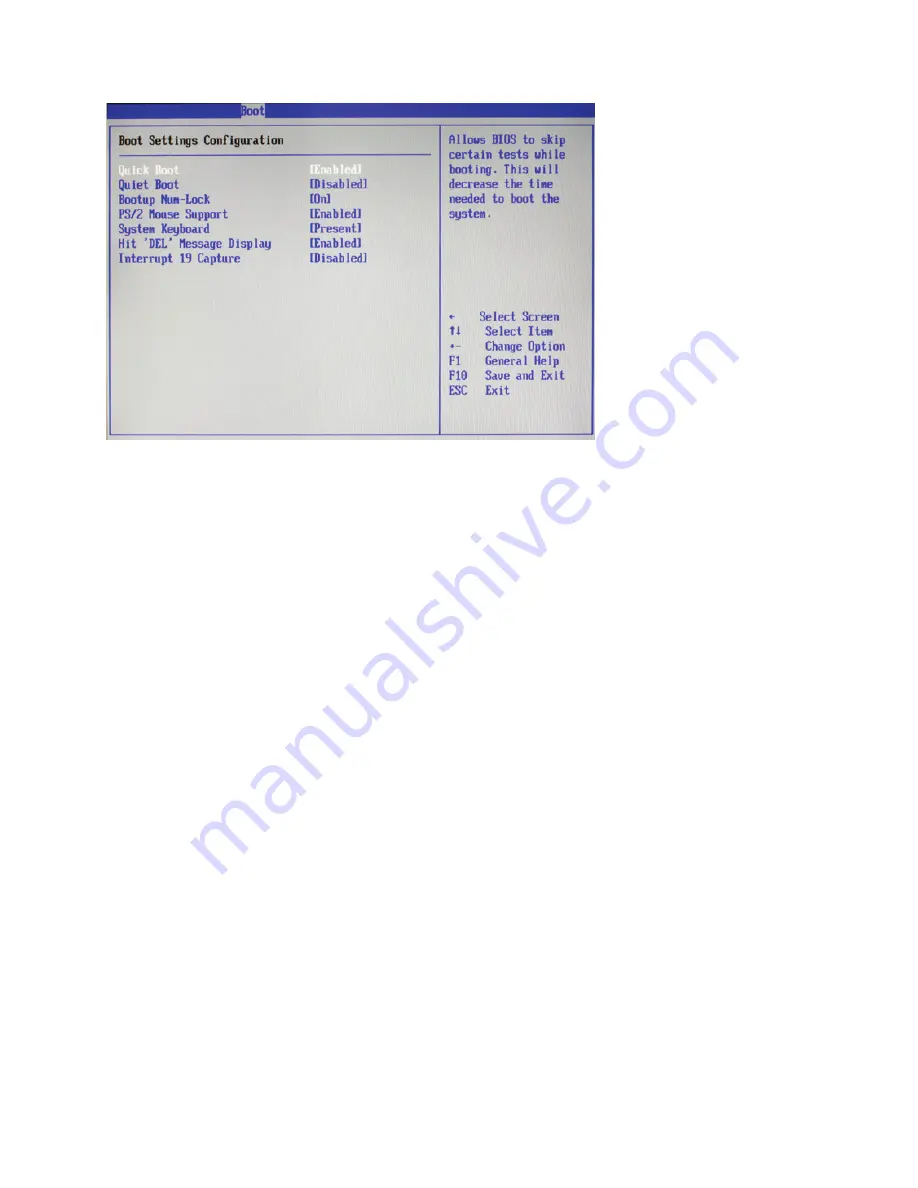
Boot Settings Configuration
Figure 2.13 Boot Settings
Configuration sub-menu
Quick Boot
Enabling this setting will cause the BIOS power-on self test routine to skip some of its tests during booting
for faster system boot.
Quiet Boot
This BIOS feature determines if the BIOS should hide the normal POST messages with the motherboard or
system manufacturer’s full-screen logo. When it is enabled, the BIOS will display the full-screen logo during
the booting sequence, hiding normal POST messages. When it is disabled, the BIOS will display the normal
POST messages, instead of the full-screen logo. Please note that enabling this BIOS feature often adds 2-3
seconds of delay to the booting sequence. This delay ensures that the logo is displayed for a sufficient amount
of time. Therefore, it is recommended that you disable this BIOS feature for a faster boot-up time.
Bootup Num-Lock
This setting is to set the Num Lock status when the system is powered on. Setting to [On] will turn on the
Num Lock key when the system is powered on. Setting to [Off] will allow users to use the arrow keys on the
numeric keypad.
PS/2 Mouse Support
Select [Enabled] if you need to use a PS/2-interfaced mouse in the operating system.
System Keyboard
Set this option to select whether a system keyboard is available. The Optimal and Fail-Safe default setting is
Present.
[Absent] Set this value to prevent the computer system from using a keyboard. Use this option is there is no
keyboard attached to the computer system.
[Present] Set this value to allow the use of a keyboard with the computer system. This is the default setting
and should not be changed under normal use.
Hit ‘DEL’ Message Display
Enable this value to allow the Hit “DEL” to enter Setup Message Display to be modified.
Interrupt 19 Capture
This function allows option ROMs such as network controllers to trap BIOS interrupt 19.
Содержание SP-1000
Страница 1: ...POS Terminal SP 1000 Service Manual ...
Страница 2: ......
Страница 8: ...vi ...
Страница 18: ...10 C H A P T E R 2 B I O S S E T U P IDE Configuration Figure 2 4 IDE Configuration sub menu ...
Страница 38: ...30 C H A P T E R 2 B I O S S E T U P ...
Страница 45: ...37 4 Click Yes I want to restart my computer now and then click Finish ...
Страница 47: ...39 4 When installation is completed click Finish ...
Страница 73: ...65 APPENDIX PART LIST AND SPECIFICATION Figure 6 1 Exploded diagram main parts ...
Страница 74: ...66 A P P E N D I X Figure 6 2 Exploded peripheral parts ...


