background image

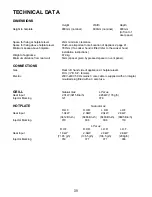
TECHNICAL DATA

DIMENSIONS


Height

Width

Depth

Height to hotplate

900mm (nominal)

600mm (nominal)

600mm
(to front of 
door panel)

Space for fixing at hotplate level

2mm minimum clearance

Space for fixing above hotplate level

Flush-see important note 'Location of Appliance' page 41.

Minimum space above hotplate

787mm (If a cooker hood is fitted refer to the cooker hood

installation instructions).

Weight of appliance

67.0kg.

Minimum distance from rear wall

5mm (spacer given by pressed spacer on vent panel).

CONNECTIONS

Gas

Rear left  hand side of appliance at  hotplate level.
Rc½ (½" B.S.P. female).

Electric

230V-240V 50 Hz mains 3 core cable is supplied with an integral, 

  moulded plug fitted with a 3 amp fuse.

GRILL

Natural Gas

L.P.Gas

Heat Input

2.7kW (9215 Btu/h)

2.45kW (176 g/h)

Injector Marking

121

078

HOTPLATE


Natural Gas

R.H.F.

R.H.R.

        L.H.R.               L.H.F

Heat Input

1.0kW

2.0kW

       2.0kW              2.8kW

(3412 Btu/h)           (6483 Btu/h)     (6483 Btu/h)     (9895 Btu/h)

Injector Marking

070

096

096

119

L.P.Gas

R.H.F.

R.H.R.

L.H.R.

L.H.F.

Heat Input

1.0kW

2.0kW

2.0kW

2.8kW

(71.85 g/h)

(136.5 g/h)

(136.5 g/h)

(208g/h)

Injector Marking

050

071

071

086

39

Содержание CSG 500

Страница 1: ...CSG 500 Operating and Installation Instructions...

Страница 2: ...s something is wrong RATING PLATE This is situated on the lower front frame of the appliance and can be seen upon opening the door Alternatively the rating plate may also be found on the back or top o...

Страница 3: ...oven 19 Slow cooking 22 Care and cleaning 24 Installing the appliance 30 General information 32 What is wrong and why 34 Servicing 36 Installation Instructions 38 Technical Data 39 Safety requirements...

Страница 4: ...arning If the ignition button is not pressed a build up of gas may cause the flame to spread Please note If you have any trouble lighting a hotplate burner turn all the hotplate control knobs off and...

Страница 5: ...is not pressed immediately a build up of gas may cause the flame to spread Second oven To light 1 Open the oven door 2 Push in the control knob and turn it to the left to gas mark 1 Press the ignitio...

Страница 6: ...er cut you cannot use the main oven You can use the second oven To turn off any burner 1 Push in the control knob and turn it to the off position This is shown by a large dot Oven light The main oven...

Страница 7: ...When you first operate the grill you may hear some sounds as the burner heats up this is quite normal and is not a fault on the appliance Heat control The grill control has two heat settings The contr...

Страница 8: ...l second oven When you are not using the grill you should remove the handle and store the pan on the shelf in the grill Turn the grill burner off before you store the pan Remember that the pan will ge...

Страница 9: ...ure the handle is correctly located It is not necessary to remove the grill pan handle during grilling Place the grill pan on the shelf so that the pan is positioned centrally beneath the grill To rem...

Страница 10: ...t and lowest settings These are shown as a large and a small flame symbol Burner sizes The hotplate has three burner sizes to suit different types of cooking Largest burner Rapid use a large pan for f...

Страница 11: ...lid Do not leave a pan unattended If the pan catches fire leave it where it is and turn off all controls Place a damp cloth or a fitting lid over the pan to smother the flames Never put water on the...

Страница 12: ...verfill pans 3 Cover pans with a lid whenever possible The food will heat up more quickly and there will be less steam in the kitchen 4 Try cooking more than one vegetable in the same pan for example...

Страница 13: ...king time Preheating You do not need to preheat the main or second oven for casseroling and so on Preheat the ovens for baking or when you are cooking sensitive food such as Yorkshire puddings souffl...

Страница 14: ...a baking tray which is 310mm 12 square If you use a tray or tin which is larger than this you may need to turn it around during cooking The size of tray which should be used in the second oven should...

Страница 15: ...inutes for each 1 2kg 1lb When cooking large items such as turkeys the use of foil may be required to prevent the breast becoming dry before the rest of the bird is fully cooked Condensation Condensat...

Страница 16: ...e dishes in the centre of the shelf You can change the gas marks and cooking times to suit your own tastes It is important to check that food is piping hot before serving If you are using both ovens a...

Страница 17: ...oughly thaw frozen joints before cooking them The times given above are for open roasting in a preheated oven If you cover the food with foil or a lid allow an extra 10 15 minutes for each kg 1lb York...

Страница 18: ...e on baking tray Puddings Milk pudding Baked sponge pudding Baked custard 2 4 3 3 4 4 2 hrs approx 45 60 mins 50 60 mins Yeast mixtures Bread 0 45 kg 1lb loaves 0 90 kg 2 lb loaves Rolls and buns 8 8...

Страница 19: ...ving If you are using both ovens at the same time you may need to adjust the cooking times Food Gas mark Shelf position Approximate cooking time Roasting meat Beef 5 Shelf on base Rare Medium Well Don...

Страница 20: ...oughly before cooking them The times given above are for open roasting in a preheated oven If you cover the food with foil or a lid allow an extra 10 15 minutes for each kg 1lb Yorkshire pudding indiv...

Страница 21: ...late or if plates are flat and have no rim underneath place on baking tray Food Gas mark Shelf position Approximate cooking time Puddings Milk pudding Baked sponge pudding Baked custard 2 3 3 2 2 2 2...

Страница 22: ...out You can uncover food for the last half hour if it is normally served golden brown Food preparation slow cooking Joints of meat and poultry l Do not cook meat joints over 2 7kg 6lb l Do not cook p...

Страница 23: ...e pudding in the usual way l Cook for 30 minutes at gas mark 6 then reduce to the slow cook setting General points for slow cooking Frozen foods Thaw thoroughly before cooking Thickening Toss meat in...

Страница 24: ...you remove parts of your appliance for cleaning do not plunge them into water whilst they are very hot as this may damage the finish of the parts Cleaning the handles and control knobs Do not remove...

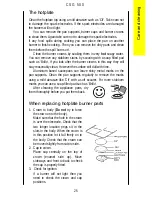
Страница 25: ...nium based saucepans can leave shiny metal marks on the pan supports Clean the pan supports regularly to remove the marks using a mild abrasive like Cif with a soft scourer For more stubborn marks you...

Страница 26: ...using mild abrasives or a soap filled pad such as Brillo Clean the grill shelf using hot soapy water Mild abrasives can be used if necessary The grill and top oven Clean the grill and top oven freque...

Страница 27: ...r Do not put dishes too high in the oven If you do they may stick to the oven roof Cover your roasting tins with foil This will prevent fat splashing Use a roasting tin which is just large enough for...

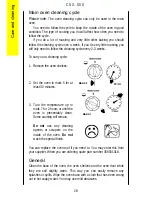
Страница 28: ...es 2 Set the oven to mark 5 for at least 30 minutes 3 Turn the temperature up to mark 7 for 2 hours or until the oven is presentably clean Some staining will remain Do not use any cleaning agents or s...

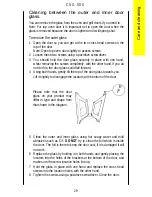
Страница 29: ...g both hands gently tilt the top of the door glass towards you Lift it slightly to disengage the locators at the bottom of the door 5 Clean the outer and inner glass using hot soapy water and mild abr...

Страница 30: ...well ventilated keep natural ventilation holes open or install a mechanical ventilation device mechanical extractor hood Prolonged intensive use of the appliance may call for additional ventilation f...

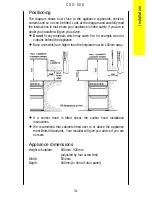
Страница 31: ...tch fire for example wood or curtains behind the appliance l Base units which are higher than the hotplate must be 100mm away l If a cooker hood is fitted check the cooker hood installation instructio...

Страница 32: ...a 3 amp fuse which has been ASTA approved to BS 1362 Do not use the plug until you have put the fuse cover back on If the fuse cover is lost you can get a replacement from an electrical retailer The c...

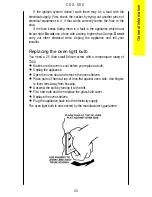
Страница 33: ...installer Replacing the oven light bulb You need a 25 Watt small Edison screw with a temperature rating of T300 l Make sure the oven is cool before you replace a bulb l Unplug the appliance l Open the...

Страница 34: ...aller If the appliance will not light because there is an electrical power failure such as a power cut you cannot use the main oven All other burners may be lit with a match l Check that there is not...

Страница 35: ...s not a fault with the electrical supply Check this by pressing the ignition button If you cannot hear sparking there is probably a fault l First check the socket by trying out another electrical appl...

Страница 36: ...uk Before you call an engineer check through the information under the heading What is wrong and why When you report a problem try to describe the nature of the fault Always give your appliance s ful...

Страница 37: ...of gas users If you need advice you will find the telephone number in your local telephone directory under Gas 37 C S G 5 0 0 For your safety Maintenance must only be carried out by a competent qualif...

Страница 38: ...Natural Gas and L P Gas versions of this appliance are available Check that this model is suitable for the type of supply available In the interest of safety this appliance must be installed and or s...

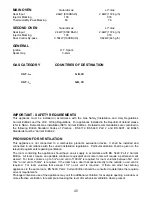
Страница 39: ...wall 5mm spacer given by pressed spacer on vent panel CONNECTIONS Gas Rear left hand side of appliance at hotplate level Rc B S P female Electric 230V 240V 50 Hz mains 3 core cable is supplied with an...

Страница 40: ...appliance is not connected to a combustion products evacuation device It shall be installed and connected in accordance with the current installation regulations Particular attention shall be given to...

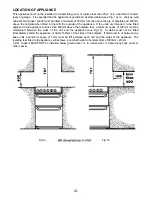
Страница 41: ...tted adjacent to the appliance but less than 400mm above the hotplate then a minimum space of 100mm must be maintained between the sides of the unit and the appliance see Fig 1b Curtains must not be f...

Страница 42: ...ents Page 40 These instructions should be read in conjunction with the leaflet packed with the stability bracket 1 Place the appliance in its intended position and level appliance 2 Mark off 300mm fro...

Страница 43: ...HED DO NOT EARTH THIS APPLIANCE TO THE GAS SUPPLY PIPING This appliance must be connected to 230V 240V A C 50Hz supply It is supplied with 2 metres of 5 amp 3 core cable incorporating a moulded 13 amp...

Страница 44: ...clip back into the right hand side of the burner box Remove oven burner by removing the spring clip from the right hand side of the oven burner and slide burner off injector whilst easing it forward...

Страница 45: ...thermostat control knob anticlockwise to Mk8 and press the ignition button As soon as the burner is alight the button can be released 2 When the oven burner lights up there should be a low gas rate a...

Страница 46: ...46 C S G 5 0 0 311698200...

Страница 47: ...ack include No OFF DESCRIPTION 2 Main Oven shelves 1 Grill pan grid small wire 311419801 1 Grill pan small DIP 311409401 1 Detachable grill pan handle 311468100 1 Grill second oven shelf 4 Burner crow...

Страница 48: ...o Off Maker s Part Number Burner Cap Rapid Burner Cap Normal Burner Cap Simmer Burner Crown Rapid N G Burner Crown Rapid L P G Burner Crown Normal Burner Crown Simmer Pan Support 1 2 1 1 1 2 1 2 35400...

Отзывы: