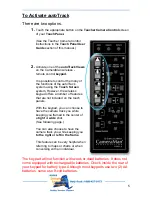
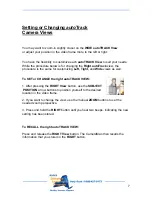
ParkerVision System II Presenter Скачать руководство пользователя страница 7


7


Setting or Changing 

auto

Track 

Camera Views 


You may want to zoom-in slightly closer on the 

WIDE autoTRACK View  

or adjust your position in the video frame more to the left or right. 
 
 
You have the flexibility to customize each 

autoTRACK View 

to suit your needs. 

While the procedure below is for changing the 

Right


autoTrack

 view, the 

procedure is the same for customizing 

Left, Tight,

 and 

Wide

 views as well. 


To SET or CHANGE the right autoTRACK VIEW: 
 

1. After pressing the 

RIGHT View 

button, use the 

SUBJECT 

 POSITION 

arrow buttons to position yourself to the desired  

location in the video frame. 
 
2. If you want to change the view, use the manual 

ZOOM 

buttons to set the 

needed zoom perspective. 
 
3. Press and hold the 

RIGHT 

button until you hear two beeps, indicating the new 

setting has been stored. 


To RECALL the right autoTRACK VIEW: 
 

Press and release the 

RIGHT View 

button. The CameraMan then recalls the 

information that you stored in the 

RIGHT 

button. 


Содержание System II Presenter

Страница 1: ...Ring Power Pack Belt 2 Wearing the Tracker 3 4 To Activate autoTrack 5 Overview of autoTrack Camera Views 6 Setting or Changing autoTrack Camera Views 7 Adjusting View while in or out of autoTrack mo...

Страница 2: ...uously following the teacher s movements Tracking Ring Power Pack Belt Back Sensor Front Sensor and Microphone sor and Microphone Clip Clip Tracking Ring Connector Tracking Ring Connector Power Pack P...

Страница 3: ...directly to your clothing or to the nylon Power Pack Belt Do not place the Power Pack in your pocket This interferes with the RF signal and may affect the audio and tracking capability The Tracking Ri...

Страница 4: ...the camera will continue to automatically track the teacher s movement The Back Sensor should lie flat against the back of the collar or neck The Front Sensor should be lying flat and centered on the...

Страница 5: ...ffers a number of features that are not included on the touch panels With the keypad you can choose to have the camera track you while keeping you framed in the center of a tight or wide shot See foll...

Страница 6: ...the autoTRACKView buttons shown on page 5 To emphasize facial expressions you can change to a close head shot with the TIGHT autoTRACK View button You can select to a full body shot by pressing the W...

Страница 7: ...eft Tight and Wide views as well To SET or CHANGE the right autoTRACK VIEW 1 After pressing the RIGHT View button use the SUBJECT POSITION arrow buttons to position yourself to the desired location in...

Страница 8: ...OM Press the IN or OUT button to zoom the camera in tighter or out further ZOOM adjustments will not deactivate tracking if you are in autoTrack mode SUBJECT POSITION arrows Adjustments to your positi...

Страница 9: ...the manual Pan Tilt will disengage the autoTrack mode Indicator LED Indicates keypad is in operation Subject Position Controls See page 8 Tracking Freeze Used to disengage autoTrack and freeze the cam...

Страница 10: ...he switch on the front of the battery charger to TRACKING POWER PACK 3 Plug the Battery Charger into an electrical outlet and connect the Power Pack to the charger as shown in the diagram to the right...

Страница 11: ...ical outlet and connect the Auxiliary Battery Pack to the charger To get the maximum usage from the batteries use the built in battery first until the Battery LOW LED illuminates then attach the Auxil...

Отзывы: