background image

Hose Products Division
Parker Hannifin Corporation
Wickliffe, Ohio
www.parkerhose.com

4

Crimping Machine
TH8-D206

Bulletin 4480-T22-US

QUICK START GUIDE AND CALIBRATION CHECK

FOLLOW THESE STEPS BEFORE USING THE CRIMPER FOR THE FIRST TIME

„

Remove reservoir plug and replace with Oil Fill and Vent Cap.  The Oil Fill and Vent cap and the work light

bulb are found in the accessories box.

„

Place the crimper on a sturdy bench in a well lit area, and plug the crimper directly into a 115 V

15 Amp wall outlet.  

Do not run the crimper on an extension cord as low voltage can damage the motor.

„

The oil level in the pump should be approximately 1-1/2 inches below the fill plug.  If necessary,

replenish with ISO Viscosity Grade 46 hydraulic oil.

Note: The crimper is calibrated prior to shipment, but a calibration check is recommended prior to using
the crimper for the first time.

„

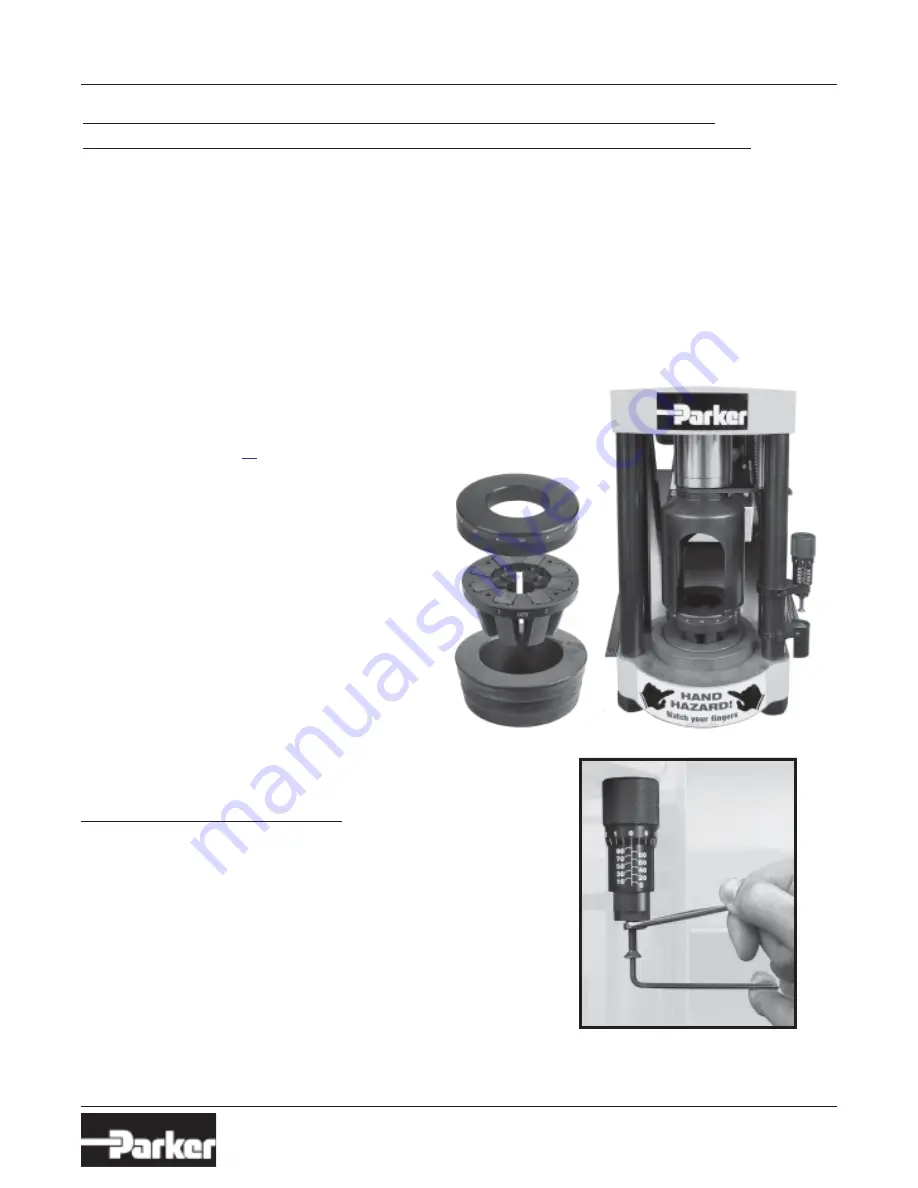
Lubricate all contact surfaces and place the Cone Insert, any Small

Series die set and the Standard Pusher in the crimper in the order shown.
Note that a hose and fitting are not required for an initial calibration check.

Note: failure to lubricate all contact surfaces can
cause the Cone Insert and/or the dies to seize in
the cone base.

„

Slide the Pusher onto the stud on the

hydraulic ram.

„

Set the Micro-Crimp adjuster at “95”

„

Press and hold the start switch bulb.

„

If the ram extends and the crimper shuts off

approximately 1 second after the dies are
completely closed and the pump starts to build
pressure, the crimper is correctly calibrated.

„

If the time to shut off is not approximately 1

second, the crimper must be recalibrated.  Recalibrate as follows:

CALIBRATION INSTRUCTIONS

„

Hold the micrometer barrel with a 5/16 inch open end wrench

and rotate the stem either in or out with a 5/32 inch hex key wrench.

„

If the motor shuts off too quickly or before the dies are

completely closed, rotate the stem in.

„

If the motor does not shut off or shuts off in substantially more

than 1 second, rotate the stem out.

„

Recheck calibration.

Start Guide and Calibration Check

Содержание TH8-D206

Страница 1: ...ucts Division Parker Hannifin Corporation Wickliffe Ohio www parkerhose com 1 Crimping Machine TH8 D206 Bulletin 4480 T22 US TH8 D206 Bulletin 4480 T22 US Technical Manual Crimping Machine Effective J...

Страница 2: ...document are hereby offered for sale by Parker Hannifin Corporation its subsidiaries or its authorized distributors This offer and its acceptance are governed by the provisions stated in the Offer of...

Страница 3: ...l Die Series Die Stack with Large Die Series Work Light Oil Fill Vent Cap Power Switch Circuit Breaker Micro Crimp Adjuster Start Stop Switch Bent Tube Pusher Plate Standard Pusher Plate Cone Insert S...

Страница 4: ...Cone Insert any Small Series die set and the Standard Pusher in the crimper in the order shown Note that a hose and fitting are not required for an initial calibration check Note failure to lubricate...

Страница 5: ...down menu then click Crimp Spec button at left You will then be able to choose from a list of hose and fitting combinations approved with this machine Once the hose and fitting has been chosen a page...

Страница 6: ...Slide the Pusher onto the stud on the hydraulic ram and press and hold the start switch until the motor shuts off Check the finished crimp diameter to be certain that it is within the crimp specificat...

Страница 7: ...WARNING Failure to lubricate will cause damage to die sets and crimper Align the hose and coupling as recommended Load the Pusher Plate and Pusher and press and hold the start stop switch until the cr...

Страница 8: ...iameter of the die The closed diameter is the die size stamped on the die ring Check crimper calibration and re calibrate if required Inadequate pump pressure Check oil level in the pump It should be...

Страница 9: ...X 1 Hex Bolt 4 7 91102A031 3 8 Lock Washer 4 8 95462A031 3 8 16 Nut 4 9 101987 TH8 D206 Head Assembly 1 10 101633 Pump Assembly 1 11 90126A029 1 4 Flat Washer 4 12 91102A029 1 4 Lock Washer 4 13 9286...

Страница 10: ...bly 1 13 100727 Micrometer Nut 1 14 100640 80 Ton Top Flange 1 15 100663 80 Ton Cylinder Assembly 1 16 100648 Pusher Suspension Pin 1 17 100711 Stop Rod 1 18 100710 Stop Rod Locking Handle 1 19 100818...

Страница 11: ...that are being consid ered for use 1 2 Fail Safe Hose and Hose Assemblies and Fittings can and do fail without warning for many reasons Design all systems and equipment in a fail safe mode so that fai...

Страница 12: ...may occur even if electrically conductive Use of other Hoses in CNG applications or failure to prop erly connect or ground this Hose can cause a fire or an explosion resulting in death personal injury...

Страница 13: ...cial testing prior to Hose selection 2 11 Physical Damage Care must be taken to protect Hose from wear snagging kinking bending smaller that minimum bend radius and cutting any of which can cause prem...

Страница 14: ...ose that was in service for use in a fluid power application 3 6 Pre Installation Inspection Prior to installation a careful examination of the Hose Assembly must be performed Inspect the Hose Assembl...

Страница 15: ...t and leave the area until pressure has been completely released from the Hose Assembly Sim ply shutting down the hydraulic pump may or may not eliminate the pressure in the Hose Assembly Many times c...

Страница 16: ...are manufactured using such property Seller shall not be responsible for any loss or damage to such property while it is in Seller s possession or control 9 Taxes Unless otherwise indicated on the fac...

Страница 17: ...poration Wickliffe Ohio www parkerhose com 17 Crimping Machine TH8 D206 Bulletin 4480 T22 US Parker Hannifin Corporation Hose Products Division 30240 Lakeland Boulevard Wickliffe OH 44092 Phone 440 94...

Отзывы: