!
!
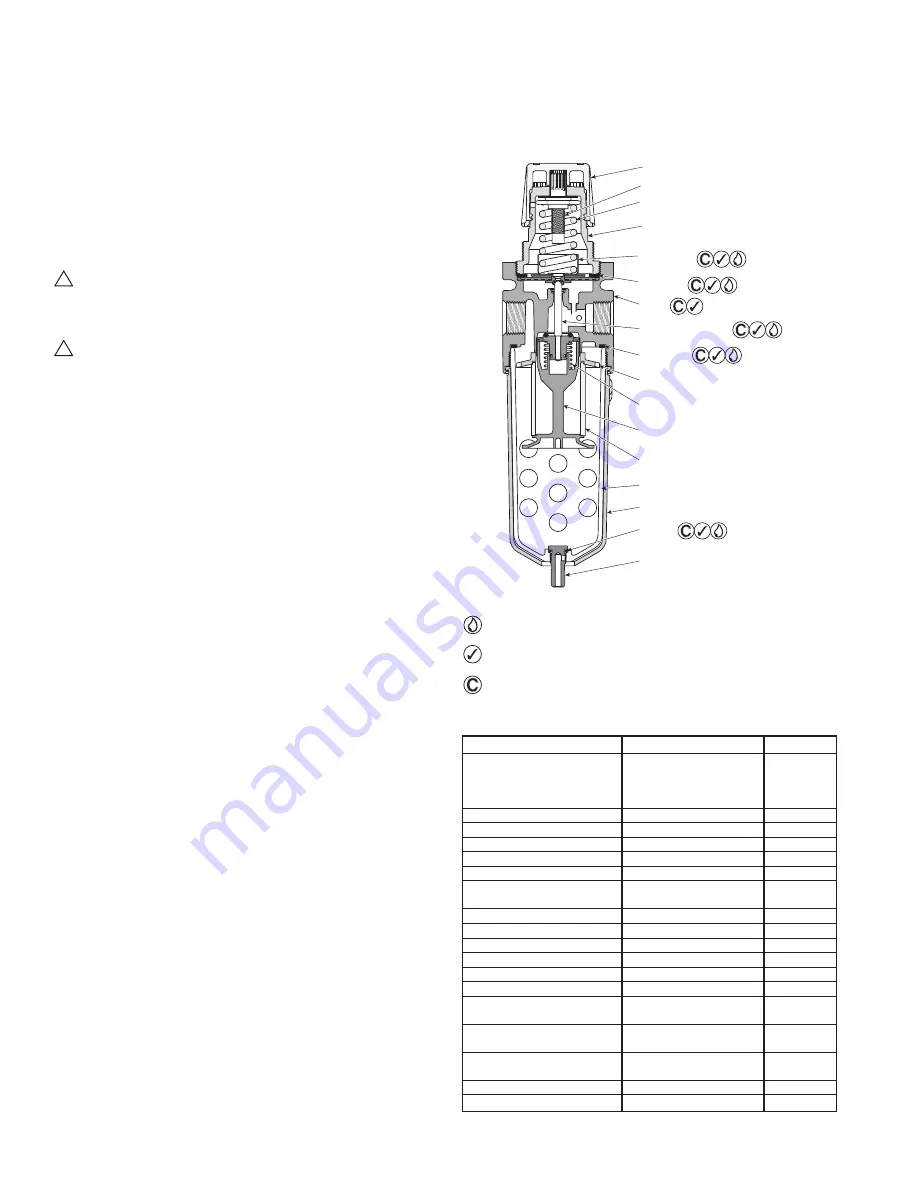
Adjusting Knob
Adjusting Screw Assembly
Bowl Seal
Inner Valve
(Poppet) Assembly
Control Spring
Spring, Return
Diaphragm
Assembly
Slip Ring
Body
Spring Cage (Bonnet) Assembly -
Torque: 18.6 to 19.8 Nm
(165 to 175 in. lb.)
Filter
Element
Bowl (Hand Tighten)
Bowl Guard
Deflector
(Vane Plate)
Element
Retainer
O-Ring
Manual Drain
(Finger Tighten)
B105 Integral Filter / Regulator Series
IS-B105
4. Before turning on the air supply, disengage the Adjusting Knob
by pulling upward. Turn Adjusting Knob counterclockwise until the
compression is released from the Pressure Control Spring.
5. Then turn Knob clockwise and adjust regulator to desired downstream
pressure. This permits pressure to build up slowly in the downstream
line.
6. To decrease regulated pressure settings, always reset from a pressure
lower than the final setting required. Example, lowering the secondary
pressure from 550 to 410 kPa (80 to 60 PSIG) is best accomplished by
dropping the secondary pressure to 350 kPa (50 PSIG), then adjusting
upward to 410 kPa (60 PSIG).
7. When desired secondary pressure settings have been reached, push
the Knob down to lock this pressure setting.
Service
Caution: Disconnect or shut off air supply and exhaust the
primary and secondary pressures before servicing unit. Turning
the Adjusting Knob counterclockwise does not vent downstream
pressure on non-relieving regulators. Downstream pressure must
be vented before servicing regulator.
Caution: Grease packets are supplied with kits for lubrication of
seals. Use only mineral based grease or oils. Do not use synthetic
oils such as esters. Do not use silicones.
Note: After servicing unit, turn on air supply and adjust regulator
to the desired downstream pressure. Check unit for leaks. If
leakage occurs, do not operate - conduct repairs and retest.
Servicing Filter Element -
(Refer to Figure 1)
1. Unscrew and remove Bowl.
2. Unscrew the Element Retainer from Body and then remove Deflector
and Element.
3. Clean all internal parts and bowl before reassembling.
4. Install new element. Install Deflector. IMPORTANT: The Filter /
Regulator will not operate properly if the Deflector is not installed
properly.
5. Attach Element Retainer and finger tighten firmly.
6. Replace Bowl Seal. Lightly lubricate new seal to assist with retaining
it in position.
7. Install Bowl into Body and tighten; hand tight, plus 1/4 turn.
Servicing Regulator -
(Refer to Figure 1)
1. Disengage the Adjusting Knob by pulling upward. Turn Adjusting Knob
counterclockwise until the compression is released from the Pressure
Control Spring.
2. Remove the Bonnet and Bowl assemblies by unscrewing the Bonnet
and Bowl from the Body.
3. Remove Diaphragm Assembly and Slip Ring from Body.
4. Remove Element Retainer, Deflector, Filter Element, Poppet Assembly,
Poppet Return Spring.
5. Clean and carefully inspect parts for wear or damage. Wipe parts, clean
with soapy water or denatured alcohol
but do not use denatured
alcohol on plastic bowl or sight gauge
. If using compressed air to
blow dry, be sure to wear appropriate eye protection. If replacement
is necessary, use parts from service kits. Clean Bowl.
6. Lubricate O-rings with grease found in service kits.
7. Install Filter Element onto the Filter Retainer, and install Deflector onto
Retainer.
8. Install Poppet Assembly, Poppet Return Spring, Element Retainer and
Element. IMPORTANT: The Filter / Regulator will not operate properly
if the Defector is not installed properly.
9. Install Diaphragm Assembly and Slip Ring into Body Assembly.
Assemble Bonnet Assembly onto Body and tighten per Figure 1.
10. Install Bowl into Body and tighten, hand tight, plus 1/4 turn.
Combination Unit Assembly
To assemble units in combination, use AK105 Combination Assembly Kit.
Liberally apply grease to the o-ring and insert into the o-ring groove on the
filter “outlet” face or the lubricator “inlet” face. Regulator may be mounted
in either up or down position, but not sideways. Insert assembly screws in
through slots in the body of the filter or lubricator and into tapped holes on
regulator mounting face. Position parts with mounting slots aligned, and
tighten screws slightly more than hand tight. Units are easily disassembled
Figure 1
Lightly grease with provided lubricant.
Inspect for nicks, scratches, and surface imperfections.
If present, reduced service life is probable and
future replacement should be planned.
Clean with lint-free cloth.
Service / Parts Kits Available
Description
B105 (3/8", 1/2", & 3/4") Bowl Type
Bowl Kits*
Polyurethane
BKF105B
B
Zinc
BKF105D
D
Zinc (with Sight Gauge)
BKF105W
W
Cage Kits
CKR105
—
Combination Assembly Kit
AK105
B, D, W
F/L Combination Assembly Kit AK105FL
B, D, W
Filter Element (5 Micron)
EK100G
B, D, W
Filter Element (40 Micron)
EK100J
B, D, W
Filter Repair Kit
(Deflector, Element Retainer)
RKF100
B, D, W
Gauge, 0 to 60 (0 to 4 bar)
K4520N14060
B, D, W
Gauge, 0 to 160 (0 to 11 bar)
K4520N14160
B, D, W
Gauge, 0 to 300 (0 to 21 bar)
K4520N14300
B, D, W
Panel Mount Bracket / Nut
SAR10Y57
B, D, W
Panel Mount Nut
R10X51-P
B, D, W
Wall Mount Bracket
SAR105Y57
—
Internal Auto Drain
SA602MD
B, D
(Max. Pressure 175 PSIG)
SAF105MD
W
Regulator Repair Kit
(Relieving)
RKR105
B, D, W
Regulator Repair Kit
(Non-Relieving)
RKR105K
B, D, W
Adjusting Knob
R105-0542P
B, D, W
Return Spring
SPR-100
B, D, W
*Bowl kits include bowl seal and bowl guard assembly.
in reverse order of above procedure. End plates and diverter block may
be assembled in the same manner as described above, with the o-ring
in the appropriate groove and the screws through the slots. Note: To
assemble F/L (filter/lubricator) combinations, AK105FL (Combination
Assembly Kit) must be used, using the joining block in the same position
as the regulator.


