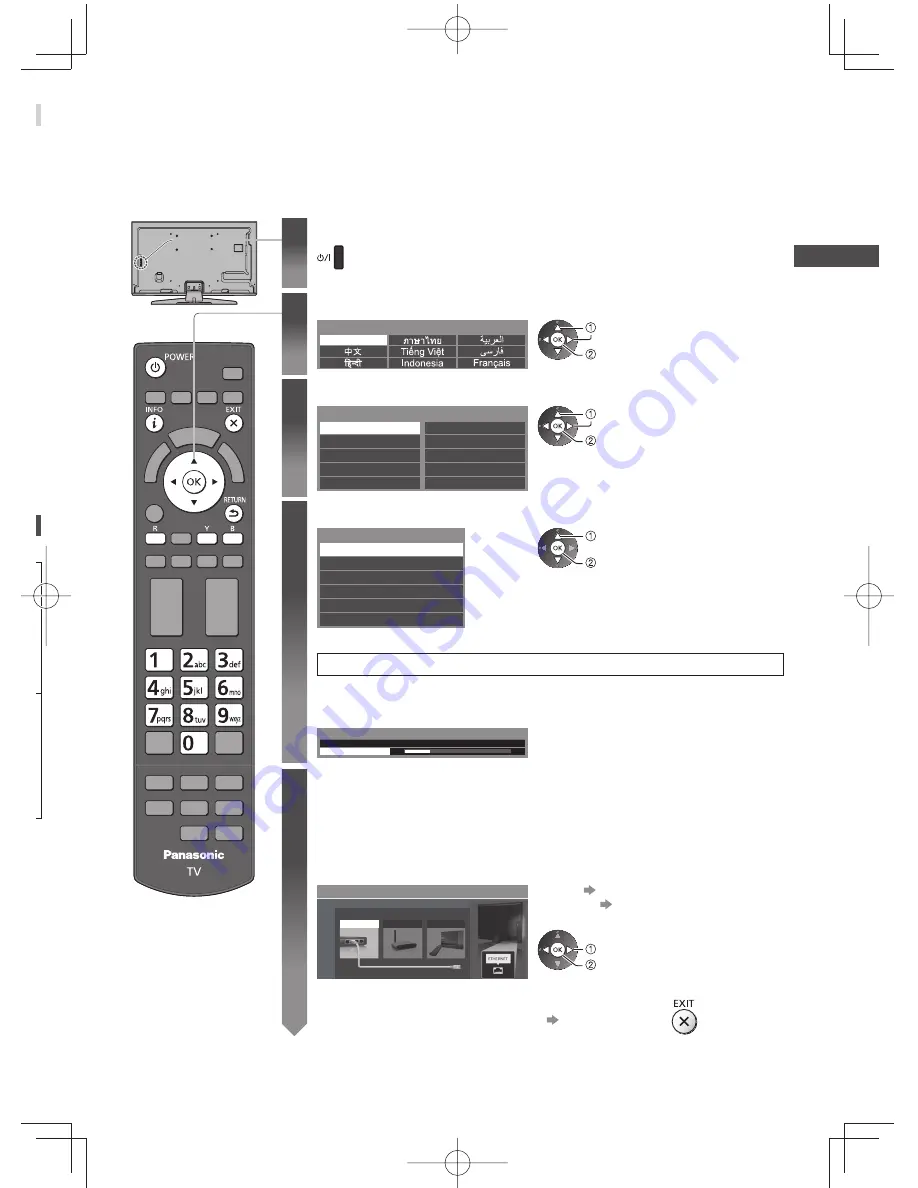
Auto T
uning
17
Auto Tuning
Search and store TV channels automatically.
●
These steps are not necessary if the setup has been completed by your local dealer.
●
Please complete connections (p. 14 - 16) and settings (if necessary) of the connected equipment before starting Auto
Tuning. For details of settings for the connected equipment, read the manual of the equipment.
1
Plug the TV into mains socket and switch on
●
Takes a few seconds to be displayed.
●
If the red LED shows on the TV, press the Standby On / Off switch on the
remote control.
2
Select your language
OSD Language
English
select
set
3
Select your country
Country
Thailand
Vietnam
Saudi Arabia
United Arab Emirates
Malaysia
India
Others
Kuwait
Indonesia
Singapore
select
set
4
Select your area
Channel Plan
Asia/W.Europe
NZ/Indonesia
China
CIS/E.Europe
CATV/Other
Hong Kong
select
access
●
When selecting [CATV/Other], press the
OK button, and then select the Channel
Plan from Indian CATV, South Africa,
American System, American CATV or
Japan CATV.
Auto Tuning starts
●
Auto Tuning will start to search for TV channels and store them.
The stored channels and sorted channel order vary depending on the area,
broadcasting system and conditions of signal reception.
CH 4
2
1
120
Auto Tuning
Scan
5
Setup the network connection
Setup the network connection to enable the network service functions such as VIERA
Connect, etc. (p. 20, 61).
●
Please note that this TV does not support wireless public access points.
●
Ensure the network connections (p. 16) and network environment are completed
before starting setup.
Select the network type
Network Setup
Select Wired or Wireless
Wired
Wireless
Set later
[Wired] “Wired connection” (p. 16)
[Wireless] “Wireless connection”
(p. 16)
select
access
●
To setup later on or skip this step
Select [Set later] or


