background image

Configuring the Printer Driver Settings

22

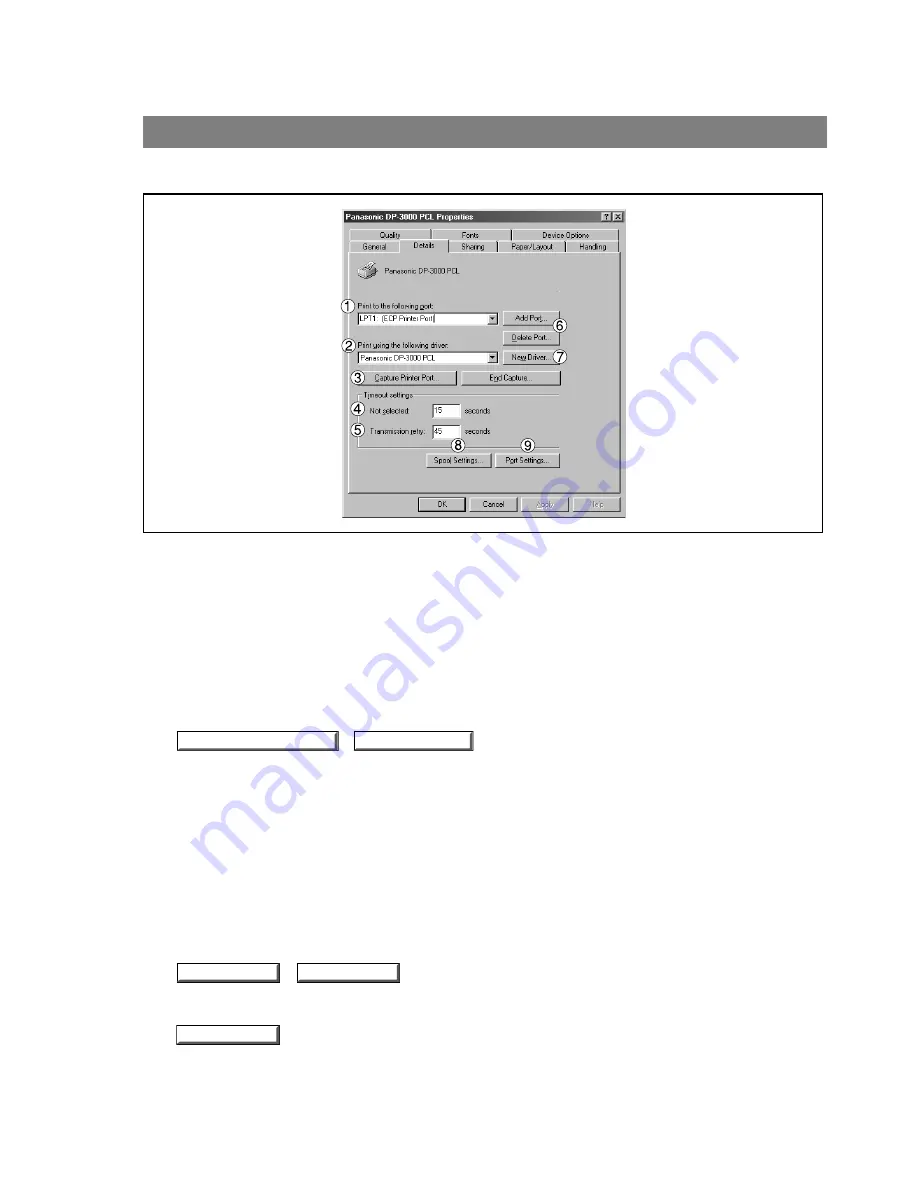
Windows 95/98/Me

Details Tab

1.

Print to the following port

Displays either the port to which the printer is connected or the path to the network printer.

To  change  the  printing  destination,  either  select  the  printing  destination  port  from  the  list  or  enter  the
network path here.

2.

Print using the following driver

Displays  the  type  of  the  printer  driver.  Specify  the  printer  being  used  or  a  printer  model  which  can  be
emulated with the printer being used.

3.

 / 

 button

Assigns a port to the network drive or cancels a port assigned to the network drive.

4.

Timeout settings - Not selected

Specify the amount of time (in seconds) allowed to elapse before the printer becomes online. If the printer
is not online within this duration, an error message will be displayed.

5.

Timeout settings - Transmission retry

Specify the amount of time (in seconds) allowed to elapse before the printer is ready for printing. If the
printer is not ready for printing within this duration, an error message will be displayed.

Increase this value if a timeout error occurs when printing a large document.

6.

 / 

 button

Adds/deletes a new port or a new network path.

7.

 button

Updates or modifies the printer driver.

Capture Printer Port...

End Capture...

Add Port...

Delete Port...

New Driver...

Содержание WORKIO DP-135

Страница 1: ... ...

Страница 2: ...equipment please read these instructions completely and keep these operating instructions for future reference Getting To Know Your Machine J I Before Starting Making Copies Options Others Model No DP 1810P Operating Instructions For Copier English ...

Страница 3: ...w to record information you may need in the future Model No Serial No Date of Purchase Dealer Address Telephone Number Supplies Telephone Number Service Telephone Number Model and Serial Number Copyright 2002 by Matsushita Graphic Communication Systems Inc All rights reserved Unauthorized copying and distribution is a violation of law Printed in Japan The contents of these Operating Instructions a...

Страница 4: ...ot be copied CFor originals smaller than invoice size position the original within the area of INVOICE and select invoice Commonly Used Functions and Operating Procedures Full Size Makes a copy that is the same size as the original 1 4 5 Reduction or Enlargement Copies the original at a fixed reduction or enlargement ratio 1 3 4 2 5 Memory Capacity When the memory becomes full during original scan...

Страница 5: ...tain energy consumption and usage standards This product will automatically power down after a specified period of non use The use of this ENERGY STAR compliant product will reduce energy consumption and ultimately benefit the environment The default functions can be adjusted depending on your office requirements Please see your authorized Panasonic dealer for more details ...

Страница 6: ...n 1 Copy 16 2 Page Copy 17 Book Edge Margin 18 Job Memory 19 Sort Copy 20 Other Features 21 Energy Saver Interrupt Mode 21 Skyshot Mode 22 Combined FunctionTable 24 Function 25 Checking the Copier s Total Counter 25 General Functions 26 Copier Settings 27 General Functions for Key Operator 28 Copier Settings for Key Operator 29 Function Setting 30 Function Setting for Key Operator 31 For Your Safe...

Страница 7: ...ument Feeder 36 Problem Solving Problem Solving 38 Adding Paper J 38 Adding the Toner and Replacing Toner Waste Container 39 Removing a Misfed Paper 41 Troubleshooting 46 Before Calling Service 46 User Error Codes U Code 48 Others Specifications 49 Options and Supplies 51 ...

Страница 8: ...mpt to service this device due to possible eye injury CAUTION USE OF CONTROLS ADJUSTMENTS OR PERFORMANCE PROCEDURES OTHER THAN THOSE SPECIFIED HEREIN MAY RESULT IN HAZARDOUS RADIATION EXPOSURE Caution Labels Manufacturer s name and address Factory ID Before Starting Digital copier with ADF option Digital copier with ADF option ...

Страница 9: ...into the copier Toner and Paper Store toner drum and paper in cool areas with low humidity CHigh quality paper of 16 24 lb 60 90 g m2 15 34 lb 56 128 g m2 using the sheet bypass may be used CFor optimum performance it is recommended that only Panasonic Brand supplies are used in the copier Ventilation The copier should be installed in a well ventilated area to minimize the ozone density in the air...

Страница 10: ...his equipment has been tested and found to comply with the limits for a Class A digital device pursuant to part 15 of the FCC Rules These limits are designed to provide reasonable protection against harmful interference when the equipment is operated in a commercial environment This equipment generates uses and can radiate radio frequency energy and if not installed and used in accordance with the...

Страница 11: ...nal Mode Select Key Photo Text Photo Text Page 12 Exposure Keys Darker Lighter Page 12 Function Key CUse when changing the paper size initial values for functions default values and key operator settings Pages 25 34 SET Key CSet the present selection Control Panel NOTE CThe Control Panel displayed above shows only copier functions Please refer to the operating instructions in the Panasonic Documen...

Страница 12: ...erTray Key CUsed to select the paper tray manually 7 Copy Size Key CUsed to select Reduction Enlargement only For additional details see page 13 8 Original Size Key CUsed to select the original size manually For additional details see page 13 9 Print Key C When selecting the Printer ON OFF Line NOTE CThe Control Panel displayed above shows only copier functions Please refer to the operating instru...

Страница 13: ...to Text Photo Combined originals with text and photo Text Originals are mainly composed of text Select exposure control Press the Darker Lighter keys to adjust the exposure Manually Selecting Exposure Control or Original Type Use Clear key when canceling the copy count While the copier is warming up you may position your original on the copier enter your copy job selections and press the Start key...

Страница 14: ...er of Copies CIf the desired copy size is different from the paper size loaded in the paper tray use the sheet bypass See page 15 CPress the RESET key to cancel all job settings 5 Press START Example Reduction Original size Copy size LEDGER LETTER The correct ratio is automatically selected Reduction and enlargement ratios Original size Copy size Ledger Legal Letter Invoice Ledger Legal Letter Inv...

Страница 15: ...eset Zoom Copying Basic Copy Example 125 Zoom 1 Place the Original 2 Press Cursor G or F keys to select Zoom Ratio 4 Number of Copies 5 Press START CWhen changing the paper size after setting the zoom ratio please use the paper tray key CPress the RESET key to cancel all job settings 3 Select Original Size without using ADF ...

Страница 16: ... the sheet bypass 2 Pull out the sheet bypass tray until it stops For Ledger size only 3 Insert the paper until it stops Adjust the side guides Incorrect adjustment may cause the paper to wrinkle misfeed or skew Press START Side Guides CAdjust the side guides properly to avoid skewing wrinkling or misfeeding CDo not feed curled paper through the sheet bypass to avoid misfeed Do not fill above Maki...

Страница 17: ...ion Landscape Orientation 1 2 Layout 2 1 Layout 4 Number of Copies Procedure ADF Face Up 1 Place the Originals 2 Press 2 in 1 key 3 Copy Size Reduction Enlargement Only 5 Press START CThe ADF is required for 2 in 1 copy CPress the RESET key to cancel all job settings The Orientation and Layout can be set in the function mode See page 27 NOTE ...

Страница 18: ...5 Press START Platen Ledger size original Letter Book Mark 2 Page Copy Copying two facing pages on a ledger size original on two separate letter size sheets Procedure 1 Place the Originals 2 Press the 2 Page Copy key 2 Page Copy Creative Features Making Copies Center book by length and width according to center marks ...

Страница 19: ...gin mode change the Frame Reduction setting to ON See page 27 CPress the RESET key to cancel all job settings Book Initial setting Factory setting 20 mm Initial setting Factory setting 5 mm and Equal Rate Initial setting Factory setting 10 mm and Left Margin Edge Margin 1 Place the Original 2 Press Book Edge or Margin key 5 Press START 4 Number of Copies BOOK MARGIN CENTER VOID 20mm EQUAL RATE VOI...

Страница 20: ...sh the copier to perform Press the Memory In F2 key Press the M1 F3 or M2 F4 key To recall a job stored in memory Place the Original Press the M1 F3 or M2 F4 key The stored contents will be displayed Press START CStored job s will not be deleted even if the power switch is turned Off CWhen storing a new job into programmed memory the previously stored job will be overwritten JOB MEMORY PRESS M1 M2...

Страница 21: ...ing the sort copy select the desired sorting mode by setting its function first See page 26 1 ADF Place the Originals Platen Place the First Original 2 Select the Sort Mode 3 Copy Size Reduction Enlargement Only 4 Number of Copies 5 Press START 6 ANOTHER ORIGINAL 1 YES 2 NO Press 1 key 7Place next Original 8Press START 9 Repeat steps 6 and 7 until all originals are scanned and stored into the copi...

Страница 22: ...make copies press the Energy Saver key Interrupt Mode CThis mode can interrupt other copy jobs while making copies Press the Interrupt F1 key the indicator will light Make another copy job using the platen glass Press the Interrupt F1 key again to continue the original job Note The ADF can not be used with interrupt Use only the Platen Energy saver time 15 minutes and Sleep time 30 minutes can be ...

Страница 23: ... Digital Skyshot Mode The scanning area size is not pre determined Manual Skyshot Mode The scanning area size is pre registered into memory M1 and M2 in advance See page 29 Digital Skyshot Mode 1 Place the Original on the platen Opening the Platen Cover ADF Note The default setting of Digital Skyshot Mode is NORMAL In this setting the unit scans once If there are black areas around the borders in ...

Страница 24: ...with the key operator CWhen using the manual skyshot mode M1 and M2 are turned ON and other job memory cannot be used CPress the RESET key to cancel all job settings FUNCTION MODE 1 2 ENTER NO OR 2 COPIER SETTINGS PRESS SET TO SELECT COPIER PARAM 00 14 ENTER NO OR 07 MANUAL SKYSHOT 2 M1 ON Press the 2 key to select COPIER SETTINGS Press the SET key Press 7 and SET key to select MANUAL SKYSHOT Pres...

Страница 25: ...O A O O O O O A A O O O O O A O O O O A A O O O O O O A O O O A A O O O O O O O A A A A A O O O O O O O A A A A A O O O O O O O A A A A A O O O O O A A O O O O O Zoom Copy 2 ORIGINAL H COPY Margin Other Functions SORT 2 in 1 Copy 2 Page Copy Book Edge Margin Non Sort Sort Sort Rotate Manual Skyshot Interrupt O Possible Combined Functions Unavailable Combined Functions A Next Selection is Carried O...

Страница 26: ...ptions operating instructions for function settings Printer Settings for Key Operator General Functions for Key Operator Copier Settings for Key Operator LAN Settings for Key Operator Input Identification Code Printer Settings Using Function Modes to Change the Initial Copy Modes General Functions Copier Settings LAN Settings Options Function Making Copies Checking the Copier sTotal Counter To dis...

Страница 27: ... the amount of sort memory used on the panel CINVALID VALID SORT MEMORY USAGE INVALID Copy usage and copy limit of the selected department and total copy usage will appear on the screen DEPT COUNTER Consult your service technician 06 08 09 Select Sort Rotate mode COFF ON SORT ROTATE DEFAULT ON KEY OPERATOR MODE Input the key operator ID code ...

Страница 28: ...e KEY OPERATOR MODE Automatically adjusts the copy density for text and photographic originals CINVALID VALID AUTO EXPOSURE 01 02 06 07 08 14 PORTRAIT L R Selects the orientation and layout for 2 in 1 Copy CORIENTATION Portrait L Scape CLAYOUT L R R L 2 in 1 DEFAULT 12 L R Selects the 2 page mode CL R R L 2 PAGE MODE DEF 13 INVALID Select the reduction ratio in margin mode CINVALID VALID FRAME MAR...

Страница 29: ... enter the between each set of 3 digit numbers TCP IP ADDRESS Sets the Subnet Mask C3 digit 4 Use the MEMORY IN key to enter the between each set of 3 digit numbers TCP IP SUBNET MSK Sets the Subnet Mask C3 digit 4 Use the MEMORY IN key to enter the between each set of 3 digit numbers TCP IP G W ADDR 14 22 23 24 CIt is necessary to input the Key Operator ID code before changing items on this page ...

Страница 30: ... P Text Photo PHOTO 3 Selects contrast for Text mode C1 5 TEXT CONTRAST 3 MAX COPY SETTING Determines whether to limit number of copies C1 999 999 01 02 03 04 10 Input a size in memory 2 for frequent usage size CX 5 432 Y 5 297 mm See page 22 M2 SIZE 95 220 mm X Y 70 160 mm X Y Input a size in memory 1 for frequent usage size CX 5 432 Y 5 297 mm See page 22 M1 SIZE 16 MEM FULL ACTION Selects the m...

Страница 31: ... select COPIER SETTINGS Press the SET key Press 8 and SET key to select AUTO EXPOSURE MODE Press 1 or 2 key whether Auto Exposure is to be carried out or not Press the SET key to set up the AUTO EXPOSURE MODE Press the RESET key to exit the Function mode Function Proceed as Follows FUNCTION MODE 1 2 ENTER NO OR COPIER PARAM 00 14 ENTER NO OR 2 COPIER SETTINGS PRESS SET TO SELECT 08 AUTO EXPOSURE 2...

Страница 32: ... digit and the SET key Press 00 and 1 or 2 key to select the PAPER SIZE Press SET to select the paper tray and press G or F keys to set the paper size Paper size changes are as follows Letter R Invoice R Ledger Legal Press the SET key to set up the PAPER SIZE Press the RESET key then exit the Function mode Function FUNCTION MODE 1 2 ENTER NO OR 1 GENERAL FUNCTIONS PRESS SET TO SELECT GENERAL PARAM...

Страница 33: ... guide b to the paper width required Pinch the stopper to move the paper guide b Change the paper size indicator Paper Guide a a a a a Stopper Paper Guide b b b b b Size Indicator Close the paper tray 3 CIt is recommended that the paper guide b be fixed in place with screws Consult an authorized servicing dealer for details on how to fasten using screws Function Setting for Key Operator ...

Страница 34: ...ey Press 9 key Press the Key Operator ID code 3 digit and SET key Press 14 and the SET key to select DEPT COUNTER MODE NOTE CTo reset the function mode press the RESET key CContact your authorized servicing dealer to enable the Departmental Counter feature Function FUNCTION MODE 1 2 ENTER NO OR 1 GENERAL FUNCTIONS PRESS SET TO SELECT GENERAL PARAM 0 9 ENTER NO OR 09 KEY OPERATOR MODE ENTER PASSWOR...

Страница 35: ...n number of copies 6 digits Department No Press the Keypad and the SET key G or F keys to select the Department No 01 123456 Counter 6 digits Department No Press 0 and the SET key Input 0 to clear the counter 14 DEPT COUNTER MODE 1 TOTAL COUNTER 3 Select the Department Counter Mode Press 2 and the SET key NOTE Function CTo reset the function mode press the RESET key DEPT CODE 01 50 ENTER NO OR DEP...

Страница 36: ...o increase the paper feed sources and capacity Paper Feed Module 1 550 sheets PCL6 is a Page Description Language of the Hewlett Packard Company CThe table below shows the options which are required for various functions CContact your authorized servicing dealer for details on combinations of options 2 ORIGINAL H COPY Margin SORT Other Functions Function Options 2nd Paper Feed Module Required NOTE...

Страница 37: ...size originals It can accommodate originals from invoice to ledger size CAutomatic original size detection 2 in 1 Copy CTo make a 1 Sided copy full size or reduction from two 1 Sided originals side by side Accessories 2 Components Original Guides Adjust to the original s width ADFTray Automatic Document Feeder CSet the originals up to the upper limit arrow ...

Страница 38: ...ce such as glossy and coated papers CTransparencies COriginals with a lead edge that is creased folded punched or glued Accessories CPaste ups CPressure sensitive or carbon backed papers CPaper with excessive curl CStapled originals CFreshly printed copies from a laser printer NOTE CTo copy these kinds of originals use the Platen Glass instead Options ...

Страница 39: ... is not loaded above the overfill indicator located in the paper tray Adding Paper J J J J J ATTENTION CDo not use paper with folds or wrinkles Refer to page 30 for details on changing the paper size for the paper tray CUnused paper should always be placed into a bag and the opening should be sealed for storage If the paper is left exposed problems such as paper curl paper jams wrinkles or loss of...

Страница 40: ...f the bottle will not pull out from the machine turn the bottle slightly in either direction to release the key and try it again Cap Problem Solving U13 CFor optimum copy quality use the recommended Panasonic toner Store toner in a cool dark place Do not unseal toner before use Use it as fast as possible after unsealing CWhen U13 is displayed the Add Toner Warning Indicator will begin to flash Thi...

Страница 41: ... before installing the bottle Insert the bottle as far as it will go then turn it clockwise 160 approx 1 2 turn until it locks Locked symbol Note If the bottle is not inserted all the way into the machine as illustrated turn the bottle slightly in either direction to engage the key and try it again 7 Install a new toner waste container 8 Close the front cover Problem Solving CDo not reuse the tone...

Страница 42: ...all misfed paper Paper Misfeed Locations A ADF see page 45 J70 J71 B Copier Paper Exit Paper Entry Transport area see page 42 J51 J59 J80 C Paper Feed Module see page 44 J00 J50 I Misfeed Indicator Removing a Misfed Paper Problem Solving Paper Misfeed Indicators and Locations When a paper misfeed occurs the misfeed indicator and the misfeed location s will be displayed on the panel display I ...

Страница 43: ...isfed Paper CMake sure that the misfeed indicator goes off after removing all misfed paper 1 Remove the misfed paper Paper Exit Area CMake sure that the misfeed indicator goes off after removing all misfed paper Problem Solving ...

Страница 44: ...ove the misfed paper Paper Entry Transport Area CMake sure that the misfeed indicator goes off after removing all misfed paper ATTENTION 4 Open the heat roller cover Remove the misfed paper Close the right cover Caution This fuser area may be hot Caution heated surface CMake sure that the misfeed indicator goes off after removing all misfed paper I ...

Страница 45: ... the original position Open the feed cover Remove the misfed paper Close the feed cover Paper Feed Module CMake sure that the misfeed indicator goes off after removing all misfed paper CMake sure that the misfeed indicator goes off after removing all misfed paper ATTENTION Removing a Misfed Paper ...

Страница 46: ...he misfed original s Remove the misfed paper Close the ADF Cover Close the ADF ADF CMake sure that the misfeed indicator goes off after removing all misfed paper CPush the tab on the center of the ADF cover to close it CMake sure that the misfeed indicator goes off after removing all misfed paper CTo prevent original s damage please make sure ADF cover open before removing misfed original s I ...

Страница 47: ...or code does not clear call for service Does E indicator and message appear on the display No Yes When the Add Toner Warning Indicator begins to flash or is lit replace the toner bottle with a new one After this warning is activated machine operation will begin with the Toner Charging Mode approximately 3 minutes to complete each time the power switch is turned Off then On or if the Front Right Co...

Страница 48: ...n the glass or platen cover See below 2 The Toner Charging Mode starts and the LCD displays Add Toner Warning Indicator CFlashing Toner Bottle is nearly empty CLit Toner Bottle is empty 3 This message is displayed for approximately 200 seconds C Each is approximately 10 sec 4 This massage will continue to be displayed until the warm up cycle is completed and if the toner bottle was replaced upon c...

Страница 49: ...the copier When any trouble occurs the copier stops Code Display Message Check Points U01 CLOSE FRONT RT COVER Front Cover is open U07 CLOSE FEED COVER Feed Cover is open U13 ADD TONER NO WASTE TONER BOX 1 Toner Cartridge is incorrectly installed 2 Low Toner U14 WASTE TONER BOX IS FULL 1 Toner Waste Container is incorrectly installed 2 Toner Waste Container is full of toner U16 NO WASTE TONER BOX ...

Страница 50: ... Paper Feed Paper tray 550 sheets 1 Sheet bypass 50 sheets 2nd Paper feed module 550 sheets option Paper Weight Paper Tray 16 24 lb 60 90 g m2 Sheet Bypass 15 34 lb 56 128 g m2 Quantity Selector Max 999 sheets output tray capacity is 250 sheets Electrical Requirements AC 120V 50 60Hz 9A Energy Consumption Max 1 2 kW 1 5 Wh in Sleep Mode Imaging Method Dry Type Single component imaging Dimensions W...

Страница 51: ... Ledger Legal 30 sheets 20 lb Paper Size Invoice Letter Legal Ledger Paper Weight 14 28 lb 50 110 g m2 Electrical Requirements Supplied from the copier 20 9 lb 9 5 kg Dimensions W D H Weight Paper Size Invoice Letter Legal Ledger Paper Weight 16 24 lb 60 90 g m2 CSpecifications are subject to change without notice 21 7 6 1 23 0 in 550 155 585 mm Electrical Requirements Supplied from the copier ...

Страница 52: ...ient Remarks Part Name Part No DA SM16B Image Memory 16 MB For Electronic Sorting For Electronic Sorting DA SM28B Image Memory 128 MB DA AS180 Automatic Document Feeder Also referred as ADF DA DS182 2nd Paper Feed Module PCL6 Emulation Kit DA PC210 Printer Controller for PCL6 For Printer Part Name Part No Remarks DA NE200 10 100 Ethernet Interface Internet Fax Kit Network Interface Board PCL6 is a...

Страница 53: ...52 ...

Страница 54: ...53 ...

Страница 55: ...LITY FOR ANY DAMAGE INCLUDING BUT NOT LIMITED TO DIRECT INDIRECT SPECIAL INCIDENTAL OR CONSEQUENTIAL DAMAGES OR LOSS OF PROFITS SUSTAINED BY THE CUSTOMER IN CONNECTION WITH THE USE OR APPLICATION OF THIS PANASONIC MACHINE SEEYOUR DEALER FOR DETAILS OF DEALER S WARRANTY Panasonic Document Imaging Company A Business Unit of Matsushita Electric Corporation of America Two Panasonic Way Secaucus New Je...

Страница 56: ...uctions Software Model No English Before operating this software please read these instructions completely and keep these operating instructions for future reference For Panasonic Printing System Ver 6 Printer Section Before Use Troubleshooting ...

Страница 57: ...Centronics is a registered trademark of Centronics Data Computer Corporation TrueType is a registered trademark of Apple Computer Inc All other trademarks identified herein are the property of their respective owners Copyright c 2000 2001 by Matsushita Graphic Communication Systems Inc All rights reserved Unauthorized copying and distribution is a violation of law Published in Japan The contents o...

Страница 58: ...ws 95 98 Me 20 Windows NT 4 0 Administrator 33 Windows NT 4 0 User 41 Windows 2000 XP Administrator 49 Windows 2000 XP User 58 Print Operation 66 Printing from Windows Applications 66 Printing on Network 67 Troubleshooting 69 Printing operation fails 69 Document is not printed correctly 70 Error messages displayed on the computer 71 Appendix 72 Printing Area 72 Parallel Interface Connector 73 Font...

Страница 59: ...connected 4 Consult the dealer or an experienced radio TV technician for help Warning To assure continued compliance use only shielded interface cable when connecting the facsimile machine parallel interface port to host computer Also any changes or modifications not expressly approved by the party responsible for compliance could void the user s authority to operate this equipment This device com...

Страница 60: ...tion Installing the Printer Driver Windows 95 98 Me NT 2000 XP 1 Insert the Panasonic Printing System Ver 6 CD ROM 2 Click on the desired language 3 Click on the button 4 Click Install Printer Driver Next Continued on the next page ...

Страница 61: ...machine s model s and click the button 6 Click the button if you would like to change your current default printer to the one that you are installing 7 Select your new default printer from the New Printer List and click the button 8 The required files are copied Next Yes Next ...

Страница 62: ...ing please contact your network administrator for the IP Address of the machine and proceed to the next section to install the LPR Monitor service after your computer has rebooted NOTE 1 When installing on Windows NT 4 0 and Windows 2000 XP log onto the computer network with an account rights of Administrator 9 When the setup process is completed a message is displayed prompting you to restart you...

Страница 63: ...PR Line Printer Remote Monitor Windows 95 98 Me 1 Insert the provided CD ROM 2 Click on the desired language 3 Click on the button 4 Click Install LPR Monitor 5 The Setup dialog box appears Click on the button Next Next ...

Страница 64: ...or is started Click on the button 7 After your computer is rebooted click the Start button point to Settings and then click Printers The Printers folder appears Right click on your desired printer Ex Panasonic DP 3000 PCL and select Properties from the pop up menu 8 The printer properties dialog box appears The following step is to Register the LPR Port for network printing Before proceeding ensur...

Страница 65: ...and select HLPRMON from Click the type of port you want to add and click on the button 11 The LPR Port Name dialog box appears Type the IP Address of the machine and lp as the queue name separated by a Ex 10 74 229 105 lp Click on the button If an error occurs because the queue name was already used for the same IP Address select a different unique name such as lpr Add Port OK OK ...

Страница 66: ... 12 The screen reverts to the Printer s Properties Check that the Print to the following port was changed as entered and click on the Apply button first and then on the button The printer properties dialog box is closed and you have now configured the printer as a network printer OK ...

Страница 67: ... on the Network applet The Network dialog box appears 2 Click on the Services tab Verify whether the LPR Service is already installed Indicated by Microsoft TCP IP Printing shown in the Network Services list If it is already installed skip over to Step 7 Otherwise continue installing the LPR Service 3 Click on the button to display the Select Network Service dialog box then select Microsoft TCP IP...

Страница 68: ... Reinstall the Microsoft TCP IP Printing if an error occurs and the Microsoft TCP IP Printing is displayed in the Network Services list but the OK button does not change into a Close button 6 The Network Settings Change dialog box is displayed click on the button to confirm whether to restart your computer now You have now completed the LPR Service installation 7 After your computer is rebooted cl...

Страница 69: ... and operating properly Select the Ports Tab and click on the button 9 The Printer Ports dialog box appears Select LPR Port and click the button 10 The Add LPR compatible printer dialog box appears Enter the IP Address of the Printer in the upper field and lp for the print queue name in the lower field Click on the button Please wait while the wizard verifies the IP Address and connectivity to the...

Страница 70: ...Windows NT 4 0 Printer Section 11 The Printer Ports dialog box appears Click on the button 12 Select the printer port and click the button The printer properties dialog box is closed and you have now configured the printer as a network printer Close OK ...

Страница 71: ...with the administrator s right Windows 2000 XP 1 Open the Printers folder Right click on your desired printer Ex Panasonic DP 3000 PCL and select Properties from the pop up menu The printer properties dialog box appears 2 Select the Ports Tab and click on the button Add Port ...

Страница 72: ...ion 3 Select Standard TCP IP Port and click the button 4 Click on the button 5 Enter the IP Address and the Port Name and click the button Note The Port Name is automatically entered by Windows 2000 XP You may change this as required New Port Next Next Continued on the next page ...

Страница 73: ...r 18 Windows 2000 XP 6 Select Custom and click the button 7 1 Under the Protocol select LPR 2 Under the LPR Settings enter the Queue Name Ex LPR1 and check the LPR Byte Counting Enabled 3 Click on the button 8 Click on the button Settings OK Next ...

Страница 74: ...19 Windows 2000 XP Printer Section 9 Click on the button 10 Click on the button 11 Click on the button Click on the button The printer properties dialog box is closed and you have now configured the printer as a network printer Finish Close Apply OK ...

Страница 75: ...and Device Options is allowed by clicking Properties in the print dialog box of an application 2 Sharing Tab in property dialog box is not displayed unless printer sharing has been specified Windows 95 98 Me 1 Click the Start button point to Settings and then click Printers 2 Right click on the desired printer icon in the printers folder and select Properties in the dropdown menu The printer prope...

Страница 76: ...r computer when sharing the printer the comment specified here will also appear on that computer However the comment displayed for an already set up user will remain unchanged even if the comment is modified later 2 Separator page This feature is not available on your machine 3 button Prints a test page This allows the user to verify if the printer is installed properly Print Test Page ...

Страница 77: ...rive or cancels a port assigned to the network drive 4 Timeout settings Not selected Specify the amount of time in seconds allowed to elapse before the printer becomes online If the printer is not online within this duration an error message will be displayed 5 Timeout settings Transmission retry Specify the amount of time in seconds allowed to elapse before the printer is ready for printing If th...

Страница 78: ...ication operational after printing on the application Note Spooling by EMF format metafile compression may cause the following problems on some application software 1 Printing result is different from the screen display 2 Printing requires excessive time Enable bidirectional support Be sure to check the check box for Enable bidirectional support when installing the status monitor Otherwise printin...

Страница 79: ...when other users view information about the printer on the network 3 Comment You can enter comment regarding a shared printer such as the type of printer and the location where it is installed When other users view information about the printer on the network the comment specified here will be displayed 4 Password Specify a password when other users will connect to this printer Leave the box blank...

Страница 80: ... is allowed when the Inner Tray option is enabled 5 Finisher For DP 2000 2500 3000 Check this checkbox if the 1 Bin Finisher DA FS200 is installed Setting of this option is allowed when the Inner Tray option is enabled The staple function also is selectable when this option is enabled 6 Number of Paper Tray Select the number of available paper trays for the printer if an optional Paper Feed Module...

Страница 81: ...cify the number of copies in the Print dialog box of the application 5 Zoom 25 400 Specify an enlargement or reduction percentage when printing documents If enlargement reduction can be set within the application indicate 100 here and specify the enlargement reduction percentage in the Print dialog box of the application Printer controlled The printer controls numbers of copies Prints faster utili...

Страница 82: ...es the Zoom to display the actual enlargement reduction percentage Note 2 in 1 or 4 in 1 allows the user to select the following layouts under the Position field 8 button Return all items in Paper Layout Tab to standard settings default 9 button Displays the version information about the printer driver 4 in 1 Landscape 1 2 3 4 1 3 2 4 2 1 4 3 3 1 4 2 Pattern 1 Pattern 2 Pattern 3 Pattern 4 2 1 1 2...

Страница 83: ...omatic Duplex Unit DA FK200 FK210 MD200 are mounted 2 Check Duplex Unit check box in Device Options Tab 3 Flipping Direction For DP 2000 2010E 2500 3000 Select binding side Long Edge Short Edge for duplex printing 4 Binding Margin For DP 2000 2010E 2500 3000 Select the binding margin upon duplex printing The width of the binding margin is specified on the main unit 5 Output Tray For DP 2000 2500 3...

Страница 84: ...top left or at the top right See table below Document orientation Paper orientation Stapling position Letter A4 Letter A4 Letter A4 Top left Letter A4 Letter A4 Top right Note Stapling on Invoice B5 sheet is not allowed Letter A4 Letter A4 Letter A4 Top right Letter A4 Letter A4 Top left Note Stapling on Invoice B5 sheet is not allowed Ledger Legal A3 FLS B4 Ledger Legal A3 FLS B4 Ledger Legal A3 ...

Страница 85: ...erties dialog box 8 Click OK from your application s Print dialog box to save the page as an Overlay Image To Print a document with an Overlay Image 1 Create or open an existing file to be printed with your application 2 When you are ready to print the document from the Menu bar select File Print 3 The Print dialog box appears Select the Panafax facsimile unit printer driver and then click on the ...

Страница 86: ...black All colored text is printed as solid black Print colored text with halftone Colored text is printed using shades of gray 3 button Return all items in the Quality Tab to standard settings default 4 button Displays the version information about the printer driver NOTE 1 dpi dot per inch means the number of dots contained in one inch The higher the value is the higher the resolution becomes Res...

Страница 87: ...bstitution Table is set to substitute TrueType fonts with the most similar printer fonts However if you wish to modify the substitution select a font from the list of TrueType fonts displayed at the top and then select a corresponding Printer font from the Substituted printer fonts list box 3 Always use TrueType fonts Always uses TrueType fonts without substituting them with printer fonts 4 button...

Страница 88: ...erties to be specified by an administrator system manager See Configuring the Printer Driver Settings User for details of user properties See page 41 Windows NT 4 0 Administrator 1 Log onto the computer network with an account rights of Administrator 2 Click the Start button point to Settings and then click Printers 3 Right click on the desired printer icon in the printers folder and select Proper...

Страница 89: ...cify the printer being used or a printer model that can be emulated with the printer being used 4 button Updates or modifies the printer driver 5 button This feature is not available on your machine 6 button Specify the processor to be used for printing Print Processor and the data type Default Data type The processor and data type affect the manner in which the printer functions in Windows NT Nor...

Страница 90: ...figuration data and status data from computer Be sure to check this checkbox when installing status monitor Printing may be disabled without checking on the checkbox 5 Enable printer pooling Printer spool allows outputting data from one logical printer to two or more printers With printer spool enabled a transmitted printing job is output to the first printer that allows printing NOTE 1 Specify ti...

Страница 91: ... sent from the application to the printer 4 Hold mismatched documents The spooler compares document settings against printer settings and holds printing of a document if its settings Paper Size Orientation and so on do not match the printer settings 5 Print spooled documents first Always prints spooled documents first regardless of printing priority 6 Keep documents after they have printed Holds d...

Страница 92: ...name specified at this time will be displayed when other users view information about the printer on the network 3 Alternate Drivers Specify the operating systems of other computers that might share this printer NOTE 1 When sharing a printer on the network the print driver is installed on one print server other computers will automatically copy and use that driver For this reason the print server ...

Страница 93: ...eges 2 button Displays the persons who used this printer and how they used 3 button Set the ownership of the printer NOTE 1 In order to utilize these features you need to have selected Audit from User Manager s Policies and have enabled File and Object Access in the Audit Policy dialog box Permissions Auditing Ownership ...

Страница 94: ...option is allowed when the Inner Tray option is enabled 5 Finisher For DP 2000 2500 3000 Check this checkbox if the 1 Bin Finisher DA FS200 is installed Setting of this option is allowed when the Inner Tray option is enabled The staple function also is selectable when this option is enabled 6 Number of Paper Tray Select the number of available paper trays for the printer if an optional Paper Feed ...

Страница 95: ...n Table In the original setting the Font Substitution Table is set to substitute TrueType fonts with the most similar printer fonts However if you wish to modify the substitution select a font from the list of TrueType fonts displayed at the top and then select a corresponding Printer font from the Substituted printer fonts list box ...

Страница 96: ...s to be specified by a user upon executing a print operation on an application See Configuring the Printer Driver Settings Administrator for details of administrator properties See page 33 Windows NT 4 0 User 1 Select Print in the File menu of the application 2 Select the printer model in the name box 3 Click the button in the Print dialog box 4 The printer properties dialog box appears Click the ...

Страница 97: ...pecify the number of copies in the Print dialog box of the application 5 Zoom 25 400 Specify an enlargement or reduction percentage when printing documents If enlargement reduction can be set within the application indicate 100 here and specify the enlargement reduction percentage in the Print dialog box of the application Printer controlled The printer controls numbers of copies Prints faster uti...

Страница 98: ...nges the Zoom to display the actual enlargement reduction percentage Note 2 in 1 or 4 in 1 allows the user to select the following layouts under the Position field 8 button Return all items in Paper Layout Tab to standard settings default 9 button Displays the version information about the printer driver 4 in 1 Landscape 1 2 3 4 1 3 2 4 2 1 4 3 3 1 4 2 Pattern 1 Pattern 2 Pattern 3 Pattern 4 2 1 1...

Страница 99: ...tomatic Duplex Unit DA FK200 FK210 MD200 are mounted 2 Check Duplex Unit check box in Device Options Tab 3 Flipping Direction For DP 2000 2010E 2500 3000 Select binding side Long Edge Short Edge for duplex printing 4 Binding Margin For DP 2000 2010E 2500 3000 Select the binding margin upon duplex printing The width of the binding margin is specified on the main unit 5 Output Tray For DP 2000 2500 ...

Страница 100: ... top left or at the top right See table below Document orientation Paper orientation Stapling position Letter A4 Letter A4 Letter A4 Top left Letter A4 Letter A4 Top right Note Stapling on Invoice B5 sheet is not allowed Letter A4 Letter A4 Letter A4 Top right Letter A4 Letter A4 Top left Note Stapling on Invoice B5 sheet is not allowed Ledger Legal A3 FLS B4 Ledger Legal A3 FLS B4 Ledger Legal A3...

Страница 101: ...00 Select to enable Security Print Note Security print is allowed only when the security print password is set on the Device Options Tab See page 39 8 button Return all items in the window to standard settings default 9 button Displays the version information about the printer driver Restore Defaults About ...

Страница 102: ... black All colored text is printed as solid black Print colored text with halftone Colored text is printed using shades of gray 3 button Return all items in the Quality Tab to standard settings default 4 button Displays the version information about the printer driver NOTE 1 dpi dot per inch means the number of dots contained in one inch The higher the value is the higher the resolution becomes Re...

Страница 103: ...ing printer font can be set with the Font Substitution Table 2 Always use TrueType fonts Always uses TrueType fonts without substituting them with printer fonts 3 button Return all items in the window to standard settings default 4 button Displays the version information about the printer driver NOTE 1 For information regarding setting the Font Substitution Table see Font Substitution Tab See page...

Страница 104: ...roperties to be specified by an administrator system manager See Configuring the Printer Driver Settings for details of user properties See page 58 Windows 2000 XP Administrator 1 Log onto the computer network with an account rights of Administrator 2 Click the Start button point to Settings and then click Printers 3 Right click on the desired printer icon in the printers folder and select Propert...

Страница 105: ...her user sets up this printer on his her computer After completion of setup however changing this comment does not update the location and comment appearing on users PCs 3 Model Model name of the printer is displayed 4 Features Functions and settings of the printer are displayed 5 button Changes properties print settings specifiable for each user Refer to Configuring the Printer Driver Settings Us...

Отзывы: