background image

23

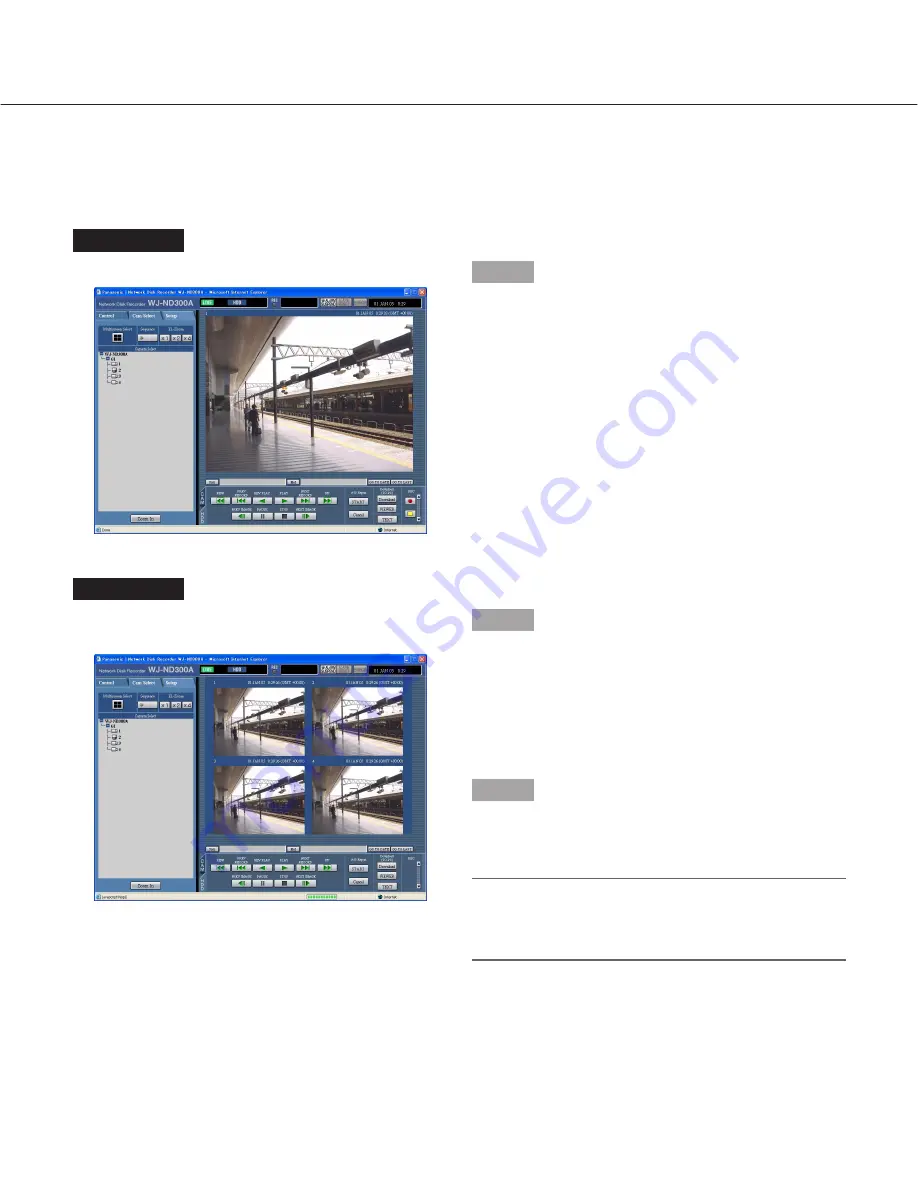
Display Images from Cameras on a 4-Screen

Images from cameras will be displayed on a 4-Screen screen.

Screenshot 1

Display the [Cam Select] tab.

Step 1

Click the button of the [Multiscreen Select] box.

Screenshot 2

Images from cameras will be displayed on a 4-Screen
screen.

Step 2

Up to 4 camera images can be displayed simultaneous-
ly on a 4-Screen screen.
Each time the button is clicked, the camera picture is
changed to quad display according to the settings made
in [System] – [Basic Setup] – [Monitor Display Setup] of
the setup menu (Advanced).

Step 3

Click a camera title in the [Cam Select] tab or the cam-
era title displayed on the image to return to a single
screen display.

Note:

When the [GO TO LAST] button is clicked while dis-
playing live images, playback of the latest recorded
images from the selected camera channel will start.

Содержание WJ-ND300A

Страница 1: ...d these instructions carefully and save this manual for future use Network Disk Recorder Operating Instructions Model No WJ ND300A ALARM ALARM SUSPENDED ERROR TIMER REC OPERATE 1 LINK ACT 2 HDD 1 HDD...

Страница 2: ...mera to the Preset Position 27 Auto mode Function Auto Pan etc 27 About mode the Event Function 28 Action at an Event Occurrence 28 Cancel the Alarm Action 30 Suspend the Alarm Action 30 Copying Dupli...

Страница 3: ...ecording at a different recording rate according to time range Emergency recording In the case of an emergency emergency recordings will be given a higher priority than other recording modes by operat...

Страница 4: ...strations used in these operating instructions indicate this unit or the WJ ND300A series System Requirements for a PC It is recommended to operate this unit using a PC that meets the following system...

Страница 5: ...rom the camera into independent JPEG images sequentially by query from the unit Network load will be reduced comparing with the method that obtains JPEG images independently from the camera However th...

Страница 6: ...amera control Camera control refers to controlling the functions of the combination cameras connected to the unit These functions include Pan Tilt Zoom Focus Brightness Preset Operations moving the ca...

Страница 7: ...itted to a PC and they can be played A single net work disk recorder can transmit images to up to 8 PCs web browsers It is necessary to use a web browser or the optional software WV AS65 to display re...

Страница 8: ...3 When playing recorded images q Displayed playback time may be fast for several seconds when the following operations are performed while playing recorded images When MPEG 4 recorded images are playe...

Страница 9: ...s later than the designated start time when copying MPEG 4 images To copy the desired images for sure designate start time several seconds earlier than the time when the desired images are recorded an...

Страница 10: ...king the recording button The REC indicator in the status display area will be lit red when recording has started When images from cameras are currently recorded with higher priority than manual recor...

Страница 11: ...ing Mode Emergency recording Post event recording Manual recording Schedule recording Pre event recording Description When an emergency event occurs perform recording manually using an external switch...

Страница 12: ...cted or when live recorded images are displayed on multiple windows When playing images on a 4 Screen images will be played with frame dropping When playing images recorded at a different record ing r...

Страница 13: ...5 Approx 32x Step6 Approx 48x Step7 Approx 96x Reverse playback speed will be changed in the following order each time the fast reverse playback button is clicked Step2 Approx 4x Step3 Approx 8x Step4...

Страница 14: ...EXT button after pausing playback The text information display edit is available only when a recorded image is played in a single screen Displayed playback images or live images will be enlarged Click...

Страница 15: ...e time and date of point B will be displayed next to the End button e Playback between point A and B will start and keep playing repeatedly when the START button is clicked r Click the Cancel button d...

Страница 16: ...ilable during recording The capacity of each recording area will be different depending on the settings Refer to a system administrator for further information Playback after Selecting a Disk Copy are...

Страница 17: ...utton Recorded images on the selected disk will be played will be displayed in the status display area Note Playback will start from the finishing point time and date of the last playback by clicking...

Страница 18: ...ded images of the entered time and date will be displayed in the status display area When there is no image for the entered time and date the following action will be taken When there are images recor...

Страница 19: ...ons PDF Site alarm Recording at a site alarm occurrence page 28 Terminal alarm Recording at a terminal alarm occurrence page 28 Command alarm Recording at a command alarm occurrence page 28 SD memory...

Страница 20: ...Standard CH are installed in the same time zone select Camera Filter by camera channel Check the radio button of the desired camera channel to be searched for TEXT Filter by with without text informat...

Страница 21: ...button to stop playback Notes Playback of SD memory data When a recorded image of the recording event con tains not many frames to play smoothly a black screen may be displayed or it may take time to...

Страница 22: ...he respective camera channel Screenshot 2 Live images from the selected camera channel will be displayed Notes Camera Select Clicking the camera title will display a list of cameras connected to the u...

Страница 23: ...layed simultaneous ly on a 4 Screen screen Each time the button is clicked the camera picture is changed to quad display according to the settings made in System Basic Setup Monitor Display Setup of t...

Страница 24: ...a Screenshot 2 Live images will be displayed sequentially according to the settings performed in advance Step 2 To stop the sequential display click the button once again The lamp on the button will g...

Страница 25: ...ns may be not available Controlling cameras is possible only when displaying live images on a single screen Panning Tilting Operation Moves a camera horizontally vertically Screenshot 1 Display the CA...

Страница 26: ...x The auto focus function is available by clicking the Auto button Brightness adjustment Adjust the brightness by clicking the button or the button in the Brightness box Click the Reset button to rese...

Страница 27: ...ce Screenshot 1 Display the CAM tab Step 1 Click the i button in the Preset box to select a pre set number HOME 1 256 to be moved Step 2 Click the Go button The camera moves to the registered preset p...

Страница 28: ...arm mode is referred to as the alarm action Activity Detection Mode ADM This mode does not notify of an event outside but records event logs and performs recording and preset actions OFF Performs only...

Страница 29: ...ach an image to the alarm mail Up to 4 addresses can be registered as recipients of the alarm mail To send the alarm mail at an event occurrence it is required to perform the settings on the setup men...

Страница 30: ...an event occurs It is useful to suspend the alarm action at an event occurrence such when maintaining the unit for a certain period Even though the alarm action is suspended recording of images event...

Страница 31: ...ormed page 41 When COPY AREA is selected for Disk Select Screenshot 2 The Data Copy window will be displayed Notes It is possible to cancel copying using the copy can cel window that can be displayed...

Страница 32: ...isplayed in the status display area when copying starts However copying will not be performed in the following cases the pop up window will be displayed When another user has selected the desired copy...

Страница 33: ...dow will be displayed Step 3 Click the OK button Deletion will start Delete recorded images saved in the normal area the event area or the copy area of the hard disk manually By setting a time and dat...

Страница 34: ...back by clicking the PAUSE button Step 2 Click the Text button in the HDD tab Screenshot 2 The Edit Text window will be displayed Step 3 The text information attached to the recorded images will be di...

Страница 35: ...me Table FTP SEND PERIODIC TIMER whether or not to transmit images periodically Refer to the Setup Instructions PDF for setup Note When the image compression method of the camera used for the camera c...

Страница 36: ...nshot 2 The error log the error log window will be displayed in list form below the Control tab Refer to page 54 for further information about the error log Step 2 Click the List button to close the e...

Страница 37: ...for access log IN The user name or the IP address displayed before IN indicates the user host logged in OUT The user name or the IP address displayed before OUT indicates the user host logged out A u...

Страница 38: ...window will be displayed in list form below the Control tab Indications for event log COM Command alarm EMR Emergency recording TRM Terminal alarm CAM Site alarm SCD Scene change alarm EXT External r...

Страница 39: ...he Control tab Refer to page 54 for further information about the network trouble log Step 2 Click the List button to close the NW log window Notes Up to 1 000 network trouble logs can be kept When mo...

Страница 40: ...d Notes The letters SD on the SD memory data obtain but ton will be displayed in blue when there is no record ed image on the SD memory card When the SD memory data obtain button is clicked while the...

Страница 41: ...te the start time by clicking the Start button at the desired point to set as the start point of the image to be downloaded The time and date of the start point will be displayed in the playback posit...

Страница 42: ...ck the Save button Recorded images will be downloaded as image data files filename n3r Screenshot 2 The Download pop up window will be displayed Step 4 Click the OK button after selecting ON or OFF fo...

Страница 43: ...from this unit to PC Download the Viewer Software Screenshot 1 Display the HDD tab Step 1 Click the VIEWER button of the Download TO PC box Screenshot 2 The download window will be displayed Step 2 Cl...

Страница 44: ...1 The install wizard window will be displayed Step 1 Double click the downloaded file n3vsetup exe Note When the older version of the viewer software is installed installation may not be successfully...

Страница 45: ...reen will be displayed Step 4 Select Complete and click the Next button Screenshot 4 The wizard is ready to install Step 5 Click the Install button Screenshot 5 Step 6 Click the Finish button The inst...

Страница 46: ...nstalled programs and click the Remove button The uninstall program will be launched and the wizard will be displayed 3 Uninstall the program by following instructions on the monitor For Windows 2000...

Страница 47: ...button Screenshot 3 The recorded images will be played in this area Step 4 Click the PLAY button Notes When played image reached the end black screen will be displayed and paused When two files or mor...

Страница 48: ...ed Screenshot 1 Start operation when playing the downloaded images using the viewer software Step 1 Click the PAUSE button Step 2 Click the SAVE button Screenshot 2 The Save As window will be displaye...

Страница 49: ...the paused image Screenshot 1 Start operation when playing the downloaded images using the viewer software Step 1 Click the PAUSE button Step 2 Click the PRINT button Note The time and date being disp...

Страница 50: ...The Open file window will be displayed Step 2 Select the downloaded image data file filename n3r Step 3 Click the Open button Screenshot 3 The first frame of the downloaded image will be dis played a...

Страница 51: ...almmail tmpl Step 2 Start up the FTP software and enter the IP address of the unit to connect to that unit Enter the user name and password as follows User Name User ID of the administrator Default AD...

Страница 52: ...mergency recording EMERGENCY Site SITE ALARM Scene change SCD ALARM Alarm number 05000900 1 or 2 digit 1 32 CH File name of the alarm image 05001000 xx_ALMyyyymmddhhmmss jpg Remains blank when no alar...

Страница 53: ...y HOUR METER WARNING Remove auto links HDDx y LOGICALLY REMOVED x y indicates disk number sequential serial number RAID5 recovery failure HDDxRAID5 RECOVERY FAILURE x indicates unit number Fan trouble...

Страница 54: ...ETER HDD error output HDD error output HDD error output Remove auto links HDD error under HDD RAID 5 recovery REMOVE u d HDu d RCVR ERR e HDD 3 u d ERR HDD REMOVED HDD error output HDD RAID5 failure R...

Страница 55: ...rk error output RCPT TO command error SMTPRCPTTO_ERR Network error output Failed to find SMTP server Other error SMTPOTHER SMTP Network error output FTP client trans mission complete FTPCLIENT_OK FTP...

Страница 56: ...SNMP user name SNMPUSERPASS_ERR Network error output SNMP object inquiry failure SNMPOBJ_ERR Network error output Other error for SNMP SNMPOTHER Network error output Having IP address succeeded DHCP...

Страница 57: ...IST ERR NET_5 0 ERR CAMERA cc SD ERROR Camera error output Request to obtain SD memory data on the camera SD denied CAM cc GET IMG ERR NET_5 0 ERR CAMERA cc SD ERROR Camera error output Request to del...

Страница 58: ...replace the HDD 1 H METER u d HDD 2 u d ERR HDD HOUR METER The set time for the hour meter has passed It may be reaching the end of the HDD s lifetime If this error occurs frequently contact the deale...

Страница 59: ...RAID 5 recov ery Parameter in the logs above 1 The HDD should be replaced by the qualified service personnel or system installers Contact the dealer to replace the HDD Contact the dealer when an unli...

Страница 60: ...e IP address and the subnet mask Is the valid IP address set Refer to a system administrator for further informa tion Is the connection indicator of the 10BASE T 100BASE TX port lit When it is not lit...

Страница 61: ...This may occur due to the display adapter and driver combination a When this occurred update the driver of the display adapter to the latest version first If updating the driver does not solve the pro...

Страница 62: ...a port when the camera is active images may not be displayed recorded in a normal manner for around a minute at a maximum just after turning on the power of this unit or after connecting the LAN cable...

Страница 63: ...pending on the network traffic and it may cause configuration errors Check the line speed settings of both the unit and the hub and configure the line speed settings of both to conform them The config...

Страница 64: ...k the information bar and select Always Allow Pop ups from This Site The dialog window saying Allow pop ups from this site will be displayed Click the Yes button The following message is displayed on...

Страница 65: ...ernet Explorer and then click the security tab Then click the Custom Level button The Security Settings window will be displayed Under Downloads select Enable for Automatic prompt ing for file downloa...

Страница 66: ...c equipment please contact your dealer or supplier for further information Information on Disposal in other Countries outside the European Union This symbol is only valid in the European Union If you...

Отзывы: