background image

Preparation

7

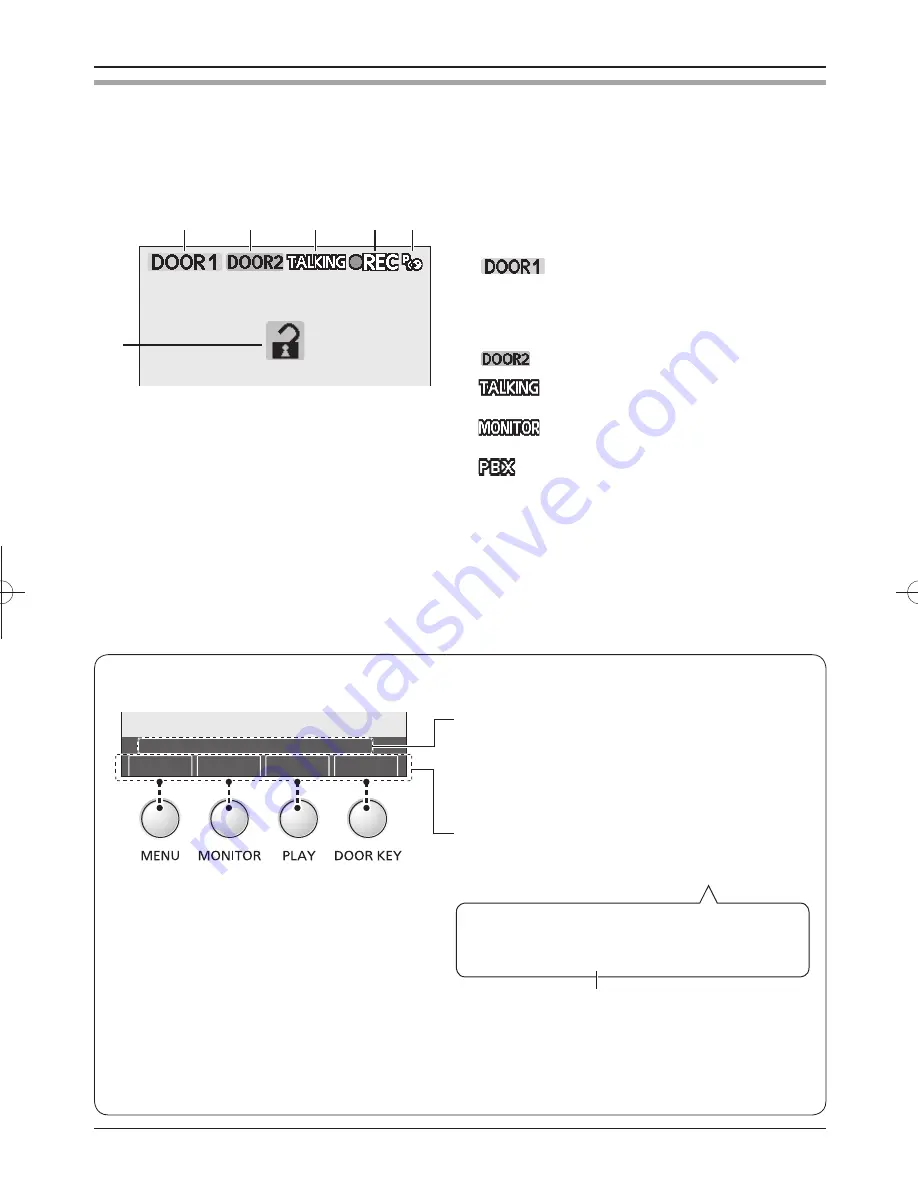
Monitor display

The following display is an example for description purposes, and it may differ from the actual display.

L

The monitor display is turned off during standby.

A

 Indicates which door station is calling, monitoring, or 

in a call. Also indicates which door station took the 
image while viewing it.

(Example)

: Door station 1

B

   Indicates which door station is calling while talking or 

monitoring (page 12).

(Example)

: Door station 2

C


:   Indicates that the main monitor station is in 

a call (page 10).

:   Indicates that the main monitor station is 

monitoring outside (page 13).

:  

 Indicates that one of the PBX extensions 
connected to the main monitor station is 
being used for a call from the door station.

D

 Indicates an image is being taken by the door station.

E

 Indicates that the “Press-to-talk” mode is on (page 

11).

F

 Indicates that the door is opened when the door 

opener (sold separately) is connected to the main 
monitor station (page 11).

A

B

E

F

C

D

L

The above display is an example for 
description purposes, and it may differ from 
the actual display.

L

The display varies depending on the 
operation.

N

 Operation guidance and button guidance

(Example)

Operation guidance

The example means that pressing the 

{

TALK/OFF

}


button ends the call.

L

 If you set “OPERATION GUIDE SETTINGS” to 
“OFF”, you can always hide the operation guidance 
(page 23).

Button guidance

Press the button for the function directly above it.
Example: To operate “

r

REC

”, press 

{

PLAY

}

.

In these Operating Instructions, the button and 
function displayed above are indicated as follows.
Press 

{

PLAY

}


(

r

REC)

.

To hide the guidance that overlaps the image: 

When the display shows images (for example, during a call and while monitoring), you can temporarily 
hide the guidance to easily view the whole image. (See “Hiding the guidance” on page 11.)

DOORKEY

REC

MONITOR

MENU

  PRESS [TALK/OFF] TO FINISH

The displayed function is not stated when the 
corresponding button name means the same as the 
displayed function.

SV30BX̲OI.indb   7

SV30BX̲OI.indb   7

2010/10/22   17:21:45

2010/10/22   17:21:45

Содержание VL-MV30BX

Страница 1: ...ave for future reference Operating Instructions Model Name Video Intercom System Main Monitor Model No VL SV30BX Including VL MV30BX VL V566BX VL MV30BX 1 62 4 chome Minoshima Hakata ku Fukuoka 812 8531 Japan Panasonic System Networks Co Ltd 2010 PNQX3052ZA SV1110MT0 VL MV30BX VL V566BX Attached Installation Guide ...

Страница 2: ...while monitoring 12 Monitoring the outside Door station monitor 13 Recording Recording an image 14 L Auto recording 14 L Manual recording 15 Viewing recorded images 16 Programming Adjusting the ringer volume 18 Changing the ringer tone 19 Setting DOOR KEY button 20 Changing the function settings Function list 21 Expanding the System Expanding your system with optional units 24 Help Troubleshooting...

Страница 3: ...e you purchased VL SV30BX or VL MV30BX N When using with a lobby station LConnection Connect the lobby station to terminal D1 D2 on the rear of the main monitor station Refer to the Installation Guide for details The lobby station connected to terminal D1 D2 works as door station 1 LOperation You cannot monitor outside where the lobby station is located page 13 For all other operations however the...

Страница 4: ...or any type of moisture LDo not allow the power cord to be excessively pulled bent or placed under heavy objects Operating safeguards LTo reduce the risk of electric shock do not disassemble this unit Refer servicing to an authorized service center when service is required Opening or removing covers may expose you to dangerous voltages or other risks Incorrect reassembly can cause electric shock w...

Страница 5: ...s less than 0 C or greater than 40 C Damp basements should also be avoided Other information Privacy and rights of portrait When installing or using the door station please take into consideration the rights of others with regard to privacy LIt is generally said that Privacy means the ability of an individual or group to stop information about themselves from becoming known to people other than th...

Страница 6: ...tion page 13 E PLAY button and indicator LViews the recorded image page 16 LThe indicator flashes when there are unviewed images that are newly recorded F DOOR KEY button LAllows you to open the door when connecting the door opener sold separately to the main monitor station page 11 G TALK OFF button LPress to answer a call and or speak to a visitor page 10 LPress to end an operation H Speaker CDE...

Страница 7: ...ener sold separately is connected to the main monitor station page 11 A B E F C D LThe above display is an example for description purposes and it may differ from the actual display LThe display varies depending on the operation N Operation guidance and button guidance Example Operation guidance The example means that pressing the TALK OFF button ends the call LIf you set OPERATION GUIDE SETTINGS ...

Страница 8: ...he main monitor station D Water drain holes LThese holes allow rain water to drain Do not cover them E Panel F Speaker G Microphone A B C D E F G N Door station image quality The following phenomena may occur They are not malfunctions LIf the sun can be seen its center appears as a black dot LAt night or when there is poor lighting in the doorway the image colors become unclear If there is a light...

Страница 9: ...TTINGS TIME AND DATE SETTINGS RING ANSWERING SETTINGS RECORDING PLAY SETTINGS CONNECTED DEVICE SETTINGS 2 Press MONITOR OK then set the current date and time MENU NEXT Select the location for day month year hour minute MONITOR or PLAY Select numbers LYou can scroll numbers quickly by pressing and holding MONITOR or PLAY Example TIME AND DATE 11 JAN 2011 23 45 3 Press DOOR KEY OK after finishing th...

Страница 10: ...rn off LThe image taken by the door station is automatically recorded page 14 When using an additional door station LWhen you receive another call from the other door station during a conversation see page 12 Answering a call by voice sensor Voice answer mode This mode allows you to answer a call by voice without pressing TALK OFF Voice answer must be set ON beforehand page 21 1 When a ringer tone...

Страница 11: ...ode You can speak with the visitor alternately by pressing TALK OFF to switch between the talking mode and the receiving mode 1 Press and hold TALK OFF for about 2 seconds during a call until a beep sounds L appears on the display 2 To speak to the visitor Speak while pressing and holding TALK OFF To hear the visitor Release TALK OFF NTo end the conversation Tap TALK OFF for 0 8 seconds or less No...

Страница 12: ...ng During a call While monitoring Main monitor station or Calling door station Example Door station 2 TALK OFF When answering a call 1 Press TALK OFF to end the previous call or monitoring LThe previous call or monitoring is terminated LThe image taken by the other door station is displayed You cannot hear the visitor s voice 2 To speak to the other party press TALK OFF 3 To end the conversation p...

Страница 13: ... press TALK OFF N When installing 2 door stations When you press MONITOR in step 1 the following is displayed Press MENU SELECT to select the desired door station then press MONITOR OK Note LMonitoring will automatically end in about 90 seconds LTo talk to the visitor at the door station press TALK OFF to end monitoring then press TALK OFF again LYou can perform the following operations during mon...

Страница 14: ...e as follows The PLAY indicator flashes To view recorded images see page 16 Note LYou can set the PLAY indicator not to flash when there are unviewed images PLAY LAMP FLASHING on page 22 LWhen you answer a call the recorded image will be treated as a viewed image LIf you receive a call from the other door station while monitoring or during a conversation page 12 the image for the call is not recor...

Страница 15: ...g a call during a conversation or while monitoring PLAY 1 When an image is shown on the display press PLAY rREC Note LManually recorded images will be treated as viewed images To view the recorded images see page 16 Appears while recording an image Disappears when recording ends ...

Страница 16: ...ayed in a light tone color and you cannot select them UNPLAYED PICTURES 5 PLAYED PICTURES 1 2 2 Press MONITOR OK to view the image LThe most recently recorded image is displayed NTo view the next image Press MONITOR LEach time you press the button images from other calls or monitoring are displayed in chronological order starting from the most recently recorded image LFor display information when ...

Страница 17: ...image is displayed Sets to adjust the display brightness or hide the guidance page 11 Returns to PLAY MENU A See Note below Recording date and time Set the date and time beforehand page 9 Recording number Indicates that the image is unviewed Note LYou can hide the guidance indicated by A above that overlaps the image to view the whole image For details on temporarily hiding the guidance see page 1...

Страница 18: ...then select RING VOLUME by pressing MENU SELECT RING ANSWERING SETTINGS RING VOLUME RING TONE 3 Press MONITOR OK then select the desired volume by pressing MENU SELECT RING VOLUME HIGH MEDIUM LOW OFF Current setting 4 Press MONITOR OK L r moves to the selected item 5 To end the operation press TALK OFF Note LYou can also adjust the ringer volume while receiving a call 1 Press MENU then select RING...

Страница 19: ...oor station by pressing MENU SELECT DOOR STATION 1 DOOR STATION 2 4 Press MONITOR OK then select the desired ringer tone by pressing MENU SELECT RING TONE DOOR STATION 1 SOUND 1 SOUND 1 REPEAT SOUND 2 SOUND 2 REPEAT Current setting 5 Press MONITOR OK L r moves to the selected item 6 To end the operation press TALK OFF N Ringer tone patterns The default settings are Door station 1 SOUND 1 Door stat...

Страница 20: ...OK then select DOOR KEY by pressing MENU SELECT CONNECTED DEVICE SETTINGS DOOR STATION CONNECTION LOBBY CONNECTION DOOR KEY 3 Press MONITOR OK then select the door opener to be set by pressing MENU SELECT DOOR KEY DOOR KEY 1 DOOR KEY 2 4 Press MONITOR OK then select the desired item by pressing MENU SELECT DOOR KEY 1 2 SEC OPEN 3 SEC OPEN 4 SEC OPEN 5 SEC OPEN 6 SEC OPEN 7 SEC OPEN NOT CONNECTED C...

Страница 21: ...omatically quits Function list The default setting is indicated in bold Item function Setting TIME AND DATE SETTINGS LYou can set the current date and time page 9 RING ANSWERING SETTINGS RING VOLUME HIGH MEDIUM LOW OFF LYou can select the ringer volume of the main monitor station page 18 RING TONE DOOR STATION 1 SOUND 1 SOUND 1 REPEAT SOUND 2 SOUND 2 REPEAT SOUND 3 SOUND 3 REPEAT DOOR STATION 2 SO...

Страница 22: ... is done for about 90 seconds the setting function screen automatically quits Function list The default setting is indicated in bold Item function Setting RECORDING PLAY SETTINGS PLAY LAMP FLASHING YES NO LIf you select YES the PLAY indicator flashes when unviewed images taken by the door station remain page 14 PICTURE RECORD TIMING NORMAL about 2 seconds DELAYED about 3 seconds LSelect DELAYED at...

Страница 23: ...nnected to the main monitor station page 3 change the setting to YES YES NO DOOR KEY DOOR KEY 1 2 SEC OPEN 3 SEC OPEN 4 SEC OPEN 5 SEC OPEN 6 SEC OPEN 7 SEC OPEN NOT CONNECTED DOOR KEY 2 2 SEC OPEN 3 SEC OPEN 4 SEC OPEN 5 SEC OPEN 6 SEC OPEN 7 SEC OPEN NOT CONNECTED LYou can select how long the door remains open when the door opener sold separately is connected to the main monitor station page 20 ...

Страница 24: ...tensions 24 Expanding the System Expanding your system with optional units You can expand your system with the following optional units Accessory items on page 3 For installing or using the optional units refer to their separate Operating Instructions For wiring between the optional units and the main monitor station refer to the Installation Guide included separately System components as of Novem...

Страница 25: ...a PBX extension is on the call see C on page 7 While is displayed you cannot answer the call using the main monitor station The display will turn off when the conversation between the door station and the PBX extension ends or if the call duration time is longer than 3 minutes If you answer a call from the door station with the main monitor station the call will continue to ring at the extension f...

Страница 26: ...isplay is not properly adjusted Adjust the brightness while receiving a call during a conversation or while monitoring 11 The image is white or white lines or circles are shown on the display LStrong light such as sunlight is shining into the lens of the door station Though this may cause the display image to become difficult to see this is not a malfunction Locate the door station away from direc...

Страница 27: ...lem Cause Solution Page The main monitor station and the door station do not work during a power failure LThe unit does not work during a power failure The date and time may be reset to the default setting after a power failure In this case set the date and time using the main monitor station again 9 L DEMO MODE is displayed LYou cannot answer the call LDemo mode is activated Change the setting to...

Страница 28: ...htly damp cloth Important LWhen cleaning the unit disconnect the plug from the power outlet LDo not use anything containing alcohol polish powder powder soap benzine thinner wax petroleum or boiling water Also do not spray with insecticide glass cleaner or hair spray This could cause a change in color or quality ...

Страница 29: ...method Hands free Installation method Wall mount Wall mount bracket included Door station VL V566BX Power source Supplied by the main monitor station Dimensions Approx height 131 mm x width 99 mm x depth 36 5 mm Excluding protruding sections Mass Weight Approx 200 g Operating environment 10 C to 50 C Up to 90 RH Relative Humidity non condensing Installation method Wall mount Wall mount base includ...

Страница 30: ...CTURES 23 LDOOR STATION CONNECTION 23 LLOBBY CONNECTION 23 LDOOR KEY 20 23 LOPERATION GUIDE SETTINGS 23 LINITIALIZE SETTINGS 23 LDEMO MODE 23 G GUIDE OFF 11 I Image LAuto image update 14 LViewing recorded images 16 INCOMING VOL 11 Initialization 23 L Lobby station 3 M Main monitor station 2 6 Manual recording 15 M Microphone LMain monitor station 6 LDoor station 8 Monitor display 7 O Operation gui...

Страница 31: ...31 Notes ...

Страница 32: ...For your future reference Date of purchase Serial number found on the rear of the main monitor station Dealer s name and address Dealer s telephone number Attach your sales receipt here ...

Отзывы: