background image

46

Technical Information

Menu

Item

Adjustments

Setup

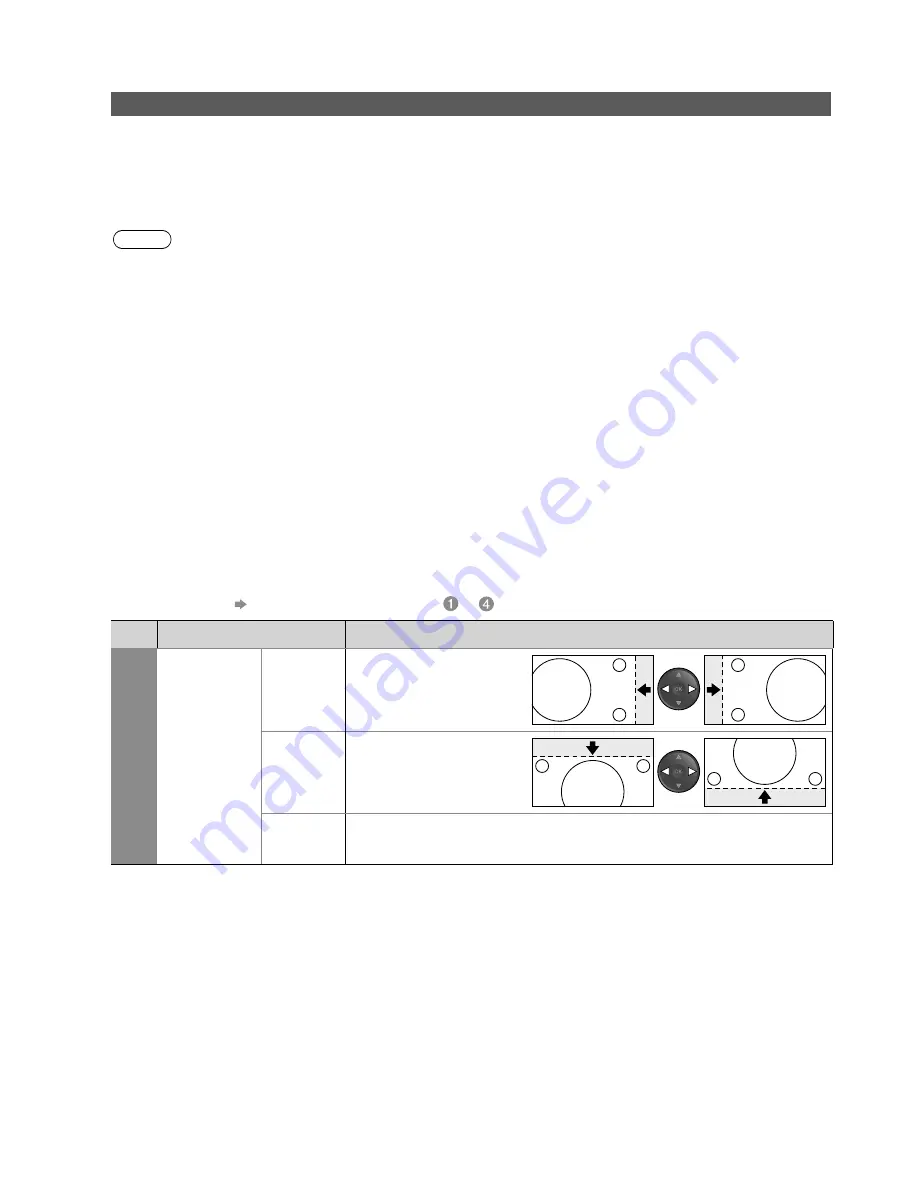
DVI Position 

Settings

H-pos

Adjusts horizontal position


V-pos

Adjusts vertical position


Reset 

DVI Position 

Settings

Press the OK button to reset to the default Setup settings

(

1): The HDMI logo is displayed on HDMI-compliant equipment.

(

2): Enquire at your local digital equipment retailer shop.

HDMI (high-definition multimedia interface) allows you to enjoy high-definition digital images and high-

quality sound by connecting the TV and the equipment.

HDMI-compatible equipment (

1) with an HDMI or DVI output terminal, such as a set top box, a DVD 

player or a game equipment, can be connected to the HDMI terminal using an HDMI compliant (fully 

wired) cable.

About connections, see “External Equipment” (p. 42).

Note

HDMI is the world’s first complete digital consumer AV interface complying with a non-compression standard.

Audio settings can be made on the “HDMI1 / 4 Input” menu screen. (p. 23)

Applicable audio signal sampling frequencies (2ch L.PCM): 48 kHz, 44.1 kHz, 32 kHz

HDMI2 and 3 terminals are for digital audio signal only.

Use with a PC is not guaranteed. Only HDMI video formats in the HDMI table (p. 47) are applicable.

If the connected equipment has an aspect adjustment function, set the aspect ratio to “16:9”.

These HDMI connectors are “type A”.

These HDMI connectors are compatible with HDCP (High-Bandwidth Digital Content Protection) copyright 

protection.

An equipment having no digital output terminal may be connected to the input terminal of either “COMPONENT”, 

“S-VIDEO”, or “VIDEO” to receive analogue signals.

The HDMI input terminal can be used only with the following image signals:

480i, 480p, 576i, 576p, 720p, 1080i and 1080p. Match the output setting of the digital equipment.

For details of the applicable HDMI signals, see p. 47.


DVI connection

If the external equipment has only a DVI output, connect to the HDMI1 / 4 terminal via a DVI to HDMI adapter 

cable (

2).

When the DVI to HDMI adapter cable is used, connect the audio cable to the audio input terminal (HDMI1: use 

AV2 IN AUDIO terminals / HDMI4: use AV3 IN AUDIO terminals).


DVI Position Settings

If the picture position is not fit to the screen during the DVI connection, adjust the position on “DVI Position 

Settings” in Setup Menu. The settings are memorized for each HDMI terminals and input signals.

To make settings   “How to Use Menu Functions” 

 to 

 (p. 20)

HDMI Functions

Содержание Viera TH-P50V10Z

Страница 1: ...id in identification in the event of theft or loss and for Warranty Service purposes Model Number Serial Number Printed in Japan PBS0709H0 Web Site http panasonic net Panasonic Corporation 2009 WARRANTY New Zealand only Distributed in New Zealand by Panasonic New Zealand Limited 350 Te Irirangi Drive East Tamaki Private Bag 14911 Panmure Auckland Tel 09 272 0100 Customer Care Center Email Customer...

Страница 2: ...odel No TH P50V10Z Thank you for purchasing this Panasonic product Please read these instructions before operating your set and retain them for future reference The images shown in this manual are for illustrative purposes only TQBC2433 English ...

Страница 3: ...theatre Experience an amazing level of multi Receive digital terrestrial services using an integrated Digital TV tuner Sharp pictures with HDMI terminal Create home theatre and DVD recorder link ups with VIERA Link without complicated settings ...

Страница 4: ...es Watching TV 12 Using Freeview Guide Digital TV mode 15 Viewing Teletext 16 Watching Videos and DVDs 18 Advanced Features How to Use Menu Functions 20 picture sound quality etc Input Labels 24 Digital TV Settings Digital TV mode 25 Control Channel Audience 26 Editing Channels 27 Tuning Channels 29 Restore Settings Shipping Condition 31 Displaying PC Screen on TV 32 Viewing from SD Card VIERA IMA...

Страница 5: ... Hz Do not remove covers NEVER modify the TV yourself High voltage components may cause serious electrical shock Have the TV checked adjusted or repaired at your local Panasonic dealer Keep liquids away from the TV To prevent damage which may result in fire or shock hazard do not expose this appliance to dripping or splashing Do not place containers with water flower vase cups cosmetics etc above ...

Страница 6: ...t Minimum distance cm 10 10 10 7 When using the pedestal keep the space between the bottom of the TV and the surface where the TV is set In case of using Wall hanging bracket follow the manual of it Do not block the rear air vents Blocked ventilation by newspapers table cloths curtains etc may cause overheating fire or electrical shock Do not expose your ears to excessive volume from the headphone...

Страница 7: ...ook 2 Note the correct polarity or Close Caution Incorrect installation may cause battery leakage and corrosion resulting in damage to the remote control Do not mix old and new batteries Do not mix different battery types such as alkaline and manganese batteries Do not use rechargeable Ni Cd batteries Do not burn or breakup batteries Batteries must not be exposed to excessive heat such as sunshine...

Страница 8: ...esult Two or more people are required to install and remove the TV If two or more people are not present the TV may be dropped and personal injury may result Assembly screw 4 silver XYN5 F18FN Assembly screw 4 black THEL060N Pole 2 L TBLA3680 R TBLA3679 Base TBLX0123 M5 18 M5 25 L R Assembling the pedestal Use the four assembly screws to fasten the left and right poles to the base securely Make su...

Страница 9: ...by red On green When using the remote control indicates the TV has received a command Remote control signal receiver Do not place any objects between the TV remote control signal receiver and remote control C A T S Contrast Automatic Tracking System sensor Senses brightness to adjust picture quality in Eco Mode in Picture Menu p 22 Mains power On Off switch Switch On to turn on the TV AV4 terminal...

Страница 10: ...selection navigation and operation of various functions Exit Returns to the normal viewing screen Numeric buttons Changes channel and teletext pages When in Standby mode switches TV On SD Card p 33 Switches to SD Card viewing mode Stereo Bilingual Sound Selection p 44 Changes the sound track when more than two choices are available Digital TV mode p 13 Sound Mute Switches sound mute On or Off Subt...

Страница 11: ...e the responsibility of you the Customer VIERA Link connection p 36 Read the manual of the equipment too Basic Connection Connecting DVD Recorder VCR TV DVD Recorder or VCR RF OUT RF IN AUDIO OUT VIDEO OUT AC 220 240 V 50 60 Hz Rear of the TV Aerial Mains lead supplied RF cable RF cable DVD Recorder or VCR To remove from the TV Push until both side tabs click Press both tabs and pull on mains conn...

Страница 12: ...V 10 62 BBC Radio Wales Digital TV 10 62 E4 Digital TV 10 62 Cartoon Nwk Digital TV 10 29 Analogue TV 33 Digital TV 4 Radio 0 Analogue TV 2 Searching Analogue TV Analogue TV Scan CH 1 120 Digital TV Scan CH21 69 Channel Name Type Auto Tuning will start to search for TV channels and store them The sorted channel order depends upon the TV signal the broadcasting system and reception conditions 3 Sel...

Страница 13: ...on Nwk All Digital Channels BBC Radio Wales BBC Radio Cymru BBC ONE Wales BBC THREE BBCi CBBC Channel 6 7 8 1 2 3 4 Select View EXIT RETURN Page up Page down watch select channel Select a channel using information banner p 13 Possible to confirm the programme name before selecting channels Display information banner if it is not displayed While the banner is displayed select a channel Possible to ...

Страница 14: ...uning Menu Off select Select Off Timer and set the time To cancel Set to 0 set to Off or turn the TV off To display the remaining time Information banner When the remaining time is within 3 minutes the remaining time will flash on screen Display information banner To confirm another tuned channel name To watch the programme listed in the banner To select a favourite list Digital TV mode B To hide ...

Страница 15: ...16 9 displays the image at its maximum with slight enlargement Note Only 16 9 is available in Digital TV mode Only 16 9 and 4 3 are available in PC mode Only 16 9 is available when Viewing Mode is set to Game Not available in teletext mode and multi window Aspect mode can be memorized separately for SD Standard definition and HD High definition signals except Digital TV mode Select Change EXIT RET...

Страница 16: ...tion To the previous day Y To the next day B To scroll through programme or channel channel programme Example What s on Now Next Watch TV Chnl OK 2 TV2 Now Lost 20 30 20 00 Wed 2 Apr What s on now next Next Dirty Sexy Money 21 30 Now Criminal Intent 20 30 Next Law Order 21 30 Now Celebrity Joker Poker 20 30 Next It s Always Sunny In Philadelp 21 30 Now NZ Doco Children of the Revol 20 30 Next Te T...

Страница 17: ...e up down R G To select among subject blocks B To select next subject within the subject block After the last subject it moves to the next subject block Y What is List mode In List mode four differently coloured page numbers are situated at the bottom of the screen Each of these numbers can be altered and stored in the TV s memory Store frequently viewed pages p 17 1 Switch to Teletext TEXT Displa...

Страница 18: ...6 Enter the 4 digit number Sub pages The number of sub pages varies depending on the broadcasters It may take some time for searching during which time you can watch TV View the TV picture while searching for a teletext page Teletext automatically updates itself when new information becomes available MENU Y P108 Appears when updating is completed Y View the updated page Changes to TV screen tempor...

Страница 19: ...emote control 1 Display the input selection menu AV 2 Select the input mode of the connected equipment Input Selection AV1 AV2 AV3 AV4 PC HDMI1 HDMI2 TV HDMI3 HDMI4 select watch You can also select the input using the AV button on the remote control or the side panel of the TV Press the button repeatedly until the desired input is selected You can label or skip each input mode Input Labels p 24 3 ...

Страница 20: ...r title Press and hold to search forward Pause Pause Resume DVD Press and hold to play at slow speed PROGRAMME Programme Up Down Select programme REC Record Start recording Panasonic equipment connected to the TV can be directly operated with the remote control Setting your remote control to operate Panasonic VCR DVD etc Switch to BD DVD Press and hold POWER during the following operations Enter t...

Страница 21: ... buttons Characters 1 1 _ 6 m n o 6 M N O 2 a b c 2 A B C 7 p q r s 7 P Q R S 3 d e f 3 D E F 8 t u v 8 T U V 4 g h i 4 G H I 9 w x y z 9 W X Y Z 5 j k l 5 J K L 0 Space 0 INPUT REC PROGRAMME INDEX HOLD STTL TEXT ASPECT TV AV BD DVD TV OPTION G U I D E MUTE SURROUND G Y INFO POWER POWER PIP VIERA TOOLS V I E R A L i n k EXIT RETURN MENU R B 20 How to Use Menu Functions 1 Display the menu MENU Disp...

Страница 22: ...abels TOP Teletext Banner Display Timeout 3 seconds High Side Panel Preferred Subtitles English p 23 Access VIERA Link Settings Power on Link Off VIERA Link Power off Link On On Access Standby Power Save Off Access Intelligent Auto Standby Off p 37 System Menu Access Software Licence Access System Update Access Shipping Condition System Information Access p 23 Analogue TV Tuning Menu Channel List ...

Страница 23: ...14 Advanced Settings Set for colour balance view and position p 32 Set for colour balance in Normal Cinema or THX viewing mode Reset Picture Defaults Press the OK button to reset the present Picture Menu to the default settings Sound Mode Basic sound mode Music Speech Set for each input signal Bass Increases or decreases level to enhance or minimise lower deeper sound output Treble Increases or de...

Страница 24: ... 24 Banner Display Timeout Sets how long the information banner stays on screen from 0 No display to 10 sec in 1 sec increments Playing Time Display Displays the length of time in every thirty minutes for playing game Off On When Viewing Mode is set to Game VIERA Link Settings VIERA Link Sets to use VIERA Link functions Off On VIERA Link functions become available when VIERA Link is set to On Powe...

Страница 25: ...tings Setup Menu VIERA Link Settings Display Settings System Menu Off Timer Other Settings Digital TV Tuning Menu Access Off access select 4 Select Input Labels Display Settings On Playing Time Display Access Input Labels TOP Teletext Banner Display Timeout 3 seconds High Side Panel Preferred Subtitles English access select 5 Select an input terminal and set Input Labels AV1 AV1 AV2 AV2 AV3 AV3 AV...

Страница 26: ... EXIT Download new software to TV For details p 44 If System Update is performed the software will be updated It may change TV functions If you do not wish to do so set Auto Update Search in Standby to Off Select Auto Update Search in Standby and then set On or Off System Update Auto Update Search in Standby System Update Search Now On set select On Automatically performs a search in standby and d...

Страница 27: ...PIN number 4 digits Child Lock PIN Entry Please enter new PIN PIN Enter the PIN number twice at first setting Make a note of the PIN number in case you forget it Select Child Lock List Child Lock Child Lock List Change PIN Access select access Select the channel input to be locked Child Lock List TV and AV Name AV1 AV2 Lock Digital TV Digital TV Digital TV Digital TV Digital TV Digital TV AV AV Ty...

Страница 28: ...gital TV or Analogue TV TV 2 Display the menu MENU 3 Select Setup Main Menu Picture Sound Setup access select 4 Select Digital TV Tuning Menu or Analogue TV Tuning Menu Setup Menu VIERA Link Settings Display Settings System Menu Child Lock Off Timer Other Settings Digital TV Tuning Menu Off Access access select 5 Select Favourites Edit or Channel List Channel List Auto Tuning Digital TV Tuning Men...

Страница 29: ...s cannot be displayed except in this function Use this function to skip unwanted channels Select a channel and add delete CBBC Channel Digital TV Channel List Cartoon Nwk BBCi BBC Radio Wales BBC Radio Cymru BBC ONE Wales BBC THREE 70 72 105 719 720 1 7 add delete select add delete skip To retune each channel Manual Tuning p 30 R You can edit channels If a VCR is connected only with the RF cable e...

Страница 30: ...logue TV Auto Tuning To return to TV EXIT Automatically retune all Digital TV or Analogue TV channels received in the area Only Digital TV channels are retuned in Digital TV mode Only Analogue TV channels are retuned in Analogue TV mode Start Auto Tuning Settings are made automatically EXIT RETURN Start Auto Tuning All digital TV tuning data will be erased Digital TV Auto Tuning Digital TV Auto Tu...

Страница 31: ...TV Signal Condition Selects a channel and checks the Digital TV signal condition To change the channel A good Signal Strength is not an indication of suitable signal for Digital TV reception Please use the Signal Quality indicator as follows Signal Quality Green bar Good Yellow bar Poor Red bar Bad Check the aerial Digital TV Signal Condition Channel Name 101 DZFinfokanal Network Name RiksTV RF Pa...

Страница 32: ... Access Off access select 4 Select Shipping Condition Software Licence System Information System Update System Menu Shipping Condition Access access select 5 Set Resets the TV to its original condition i e no channels tuned in All settings channels picture sound quality etc are reset Restore Settings Shipping Condition To return to TV EXIT Check the message and reset EXIT RETURN Confirm All tuning...

Страница 33: ...se Eliminates flicker and distortion Adjust after Clock adjustment Set to the minimum level if noise occurs Sync PC sync signal type H V SOG H V Horizontal and Vertical sync from your PC Most common sync format SOG Sync on Green sync from your PC Reset PC Settings Press the OK button to reset to the default Setup settings Other items p 22 and p 23 PC menu setting changed as desired VIERA TOOLS EXI...

Страница 34: ... 7 pictures Photo View Mode Folder view Select EXIT Select RETURN All pictures View Folder view select thumbnail The files which are not in a folder will be collected to the folder named To display all the photos p 34 4 Select a photo from the thumbnail to be viewed File name Date Pixel p1010001 1 38 23 10 2008 1600 x 1200 p1010004 p1010003 p1010002 p1010001 p1010008 p1010007 p1010006 p1010005 p10...

Страница 35: ... picture 201_PANA 7 pictures Photo View Mode Folder view Select EXIT Select RETURN All pictures View Folder view G File name Date Pixel p1010001 1 175 23 10 2008 1600 x 1200 p1010004 p1010003 p1010002 p1010001 p1010008 p1010007 p1010006 p1010005 p1010012 p1010011 p1010010 p1010009 Photo View Mode All pictures Slideshow Folder view Sort by Month Sort by Date Select EXIT Select RETURN View Thumbnail...

Страница 36: ...e next movie G To return to list stop To change aspect ratio only for the 4 3 movie content ASPECT Movie View You can enjoy the multi channel sound via an amplifier connected to DIGITAL AUDIO OUT terminal To confirm or change the current sound status during playback Display the Option menu Change the sound if the movie has multiple audio signals OPTION Audio Selection Stereo Option Menu Current so...

Страница 37: ...Blu ray Disc theatre 2 Amplifier 2 Channel download 4 Easy playback 7 7 Power on link Power off link Reduce unnecessary power consumption in standby 5 5 5 Auto standby for unnecessary equipment 3 3 3 8 3 8 3 Pause Live TV programme 4 6 Direct TV Recording 4 Control the menu of the connected equipment by VIERA remote control 3 3 3 3 3 Speaker control 1 HDMI Connection only 2 HDMI and Audio out conn...

Страница 38: ...etup Menu to use this function Power on Link p 23 When the connected equipment starts playback or direct navigator function menu for the equipment are activated the TV is automatically turned on Only when the TV is in Standby mode Power off link Set Power off Link On in Setup Menu to use this function Power off Link p 23 When the TV is set to Standby mode the connected equipment is also automatica...

Страница 39: ...ive TV programme and resume later Live TV programme will be recorded on HDD of the connected DIGA Recorder This function is available with DIGA Recorder which has HDD If you connect several recorders including other manufacturers recorders at the same time please connect DIGA Recorder which has HDD to the TV s lower HDMI terminal number If you cannot operate check the settings and the equipment VI...

Страница 40: ...y Disc theatre or Recorder theatre Other means Tuner set top box The menu of the accessed equipment Input mode will be changed automatically Operate the connected equipment 1 Switch to TV 2 Follow the operation guide To display the operation guide OPTION Store set access Move the cursor select the menu Return to the previous menu RETURN Move the cursor access adjust Exit the menu EXIT When the key...

Страница 41: ...ment Volume up down Volume slide bar will be displayed when adjusting the volume of the equipment Mute MUTE The sound of TV speakers is mute When the equipment is turned off TV speakers will be active TV TV speakers are active Note If you wish to enjoy the multi channel sound e g Dolby Digital 5 1ch via an Amplifier connect with HDMI cable and Optical digital audio cable p 36 and then select Home ...

Страница 42: ... Control VIERA Link Control p 39 The connected device can be operated with the VIERA remote control When multiple devices are connected an indicator appears below the icon so that one device can be selected Pause Live TV Pause Live TV p 38 A live TV programme can be paused and resumed later Direct TV Rec Direct TV Rec p 38 What is on TV can be recorded immediately Speaker Selection Speaker Control...

Страница 43: ...rd playback videocassettes DVDs VCR DVD recorder To watch DVDs DVD player To watch camcorder images Video camera To watch satellite broadcasts Set top box To play games Game equipment To use amplifier with speaker system VIERA Link Recommended Connection Amplifier with speaker system To listen with speakers Viewing Listening PC Headphones VIDEO or S VIDEO AUDIO To adjust volume Headphone Volume in...

Страница 44: ...d 6 TMDS Data1 4 TMDS Data1 2 TMDS Data2 Shield HDMI terminal Connect the S VIDEO or VIDEO terminal when using AV3 AV4 IN terminal Connect the COMPONENT or VIDEO terminal when using AV1 AV2 IN terminal Connect the VIDEO terminal when using AV1 IN terminal DIGITAL AUDIO OUT 1 2 3 4 To watch satellite broadcasts Set top box To record playback DVD Recorder VCR Fully wired HDMI compliant cable or RF c...

Страница 45: ... completed When the TV is switched to standby there will be a clicking sound after a short delay Similar clicking sounds will also occur at 3 00 AM and 5 00 AM when Auto update Search in Standby p 25 is set to On These sounds are normal Stereo Bilingual Sound Selection Analogue TV mode When you receive the stereo bilingual sound system sound output modes can be selected by pressing the Stereo Bili...

Страница 46: ... Industries Association JEITA Note Format the card with the recording equipment The picture may not appear correctly on this TV depending on the recording equipment used Display may take some time when there are many files and folders This function cannot display Motion JPEG and still image not JPEG formatted i e TIFF BMP A data modified with a PC may not be displayed Images imported from a PC mus...

Страница 47: ...PC is not guaranteed Only HDMI video formats in the HDMI table p 47 are applicable If the connected equipment has an aspect adjustment function set the aspect ratio to 16 9 These HDMI connectors are type A These HDMI connectors are compatible with HDCP High Bandwidth Digital Content Protection copyright protection An equipment having no digital output terminal may be connected to the input termina...

Страница 48: ...be displayed COMPONENT Y PB CB PR CR HDMI Mark Applicable input signal Signal name COMPONENT HDMI 525 480 60i 525 480 60p 625 576 50i 625 576 50p 750 720 60p 750 720 50p 1 125 1 080 60i 1 125 1 080 50i 1 125 1 080 60p 1 125 1 080 50p 1 125 1 080 24p PC D sub 15P Signal name Horizontal frequency kHz Vertical frequency Hz 640 400 70 Hz 31 47 70 07 640 480 60 Hz 31 47 59 94 640 480 75 Hz 37 50 75 00 ...

Страница 49: ...ars Follow the message s instructions If the problem persists contact your local Panasonic dealer VIERA Link function does not work and an error message appears Confi rm the connection Turn the connected equipment on and then switch the TV on p 36 Permanently lit spots on screen Due to production process involved in this technology this may result in some pixels which are permanently lit or unlit ...

Страница 50: ...res from external equipment are unusual when the equipment is connected via HDMI Is the HDMI cable connected properly p 42 Turn Off the TV and equipment then turn them On again Check an input signal from the equipment p 47 Use an equipment compliant with EIA CEA 861 861B Due to the digital reception technologies involved quality of the Digital TV signals may be relatively low in some cases despite...

Страница 51: ...t with a rubber or PVC substance for a long time Mains plug Wipe the mains plug with a dry cloth at regular intervals Moisture and dust may lead to fire or electrical shock Licence VGA is a trademark of International Business Machines Corporation S VGA is a registered trademark of the Video Electronics Standard Association SDHC Logo is a trademark HDMI the HDMI Logo and High Definition Multimedia ...

Страница 52: ...AUDIO L R RCA PIN Type 2 0 5 V rms VIDEO RCA PIN Type 1 1 0 V p p 75 Ω COMPONENT Y PB CB PR CR 1 0 V p p including synchronization 0 35 V p p AV2 Input AUDIO L R RCA PIN Type 2 0 5 V rms VIDEO RCA PIN Type 1 1 0 V p p 75 Ω COMPONENT Y PB CB PR CR 1 0 V p p including synchronization 0 35 V p p AV3 Input AUDIO L R RCA PIN Type 2 0 5 V rms VIDEO RCA PIN Type 1 1 0 V p p 75 Ω S VIDEO Mini DIN 4 pin Y ...

Отзывы: