background image

87

LSQT1146

With a computer

Connection and 
recognition

After the driver and software applications are 
installed, the unit must be connected to the 
computer and be correctly recognized by the 
computer.

Connect after installing the driver and software 
applications.

If the supplied CD-ROM is inserted in the 
computer, remove it. (If the [Setup Menu] is 
running, wait until it finishes, then remove the 
CD-ROM.)

If the recognition procedure is not 
accomplished properly, operation will not be 
possible after connecting the unit to the 
computer.

If the unit fails to operate normally, it may mean 
that you have not conducted the installation or 
recognition procedure properly.

Be sure to finalize DVD-RW (VR format), 
DVD-RW (Video format) and DVD-R on this 
unit, before using them on the computer. 
Un-finalized discs will not be recognized by 
the computer.

¬

Connect this unit to the AC adaptor.

1

Insert a disc or card with 
recorded images in the unit, then 
turn on the unit.

2

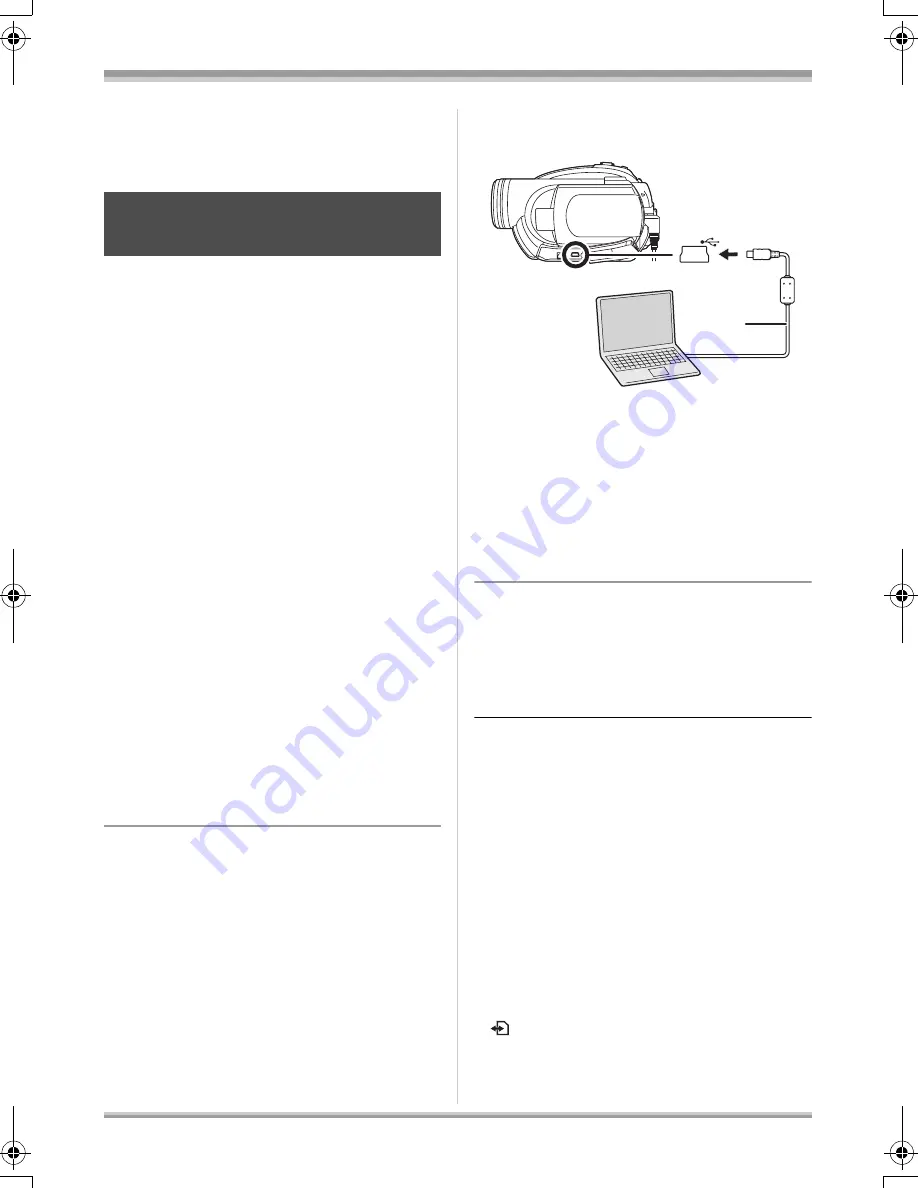
Connect this unit and a 
computer.

A

USB cable (supplied)

Insert the plugs as far as they will go. The unit 
and computer will not operate properly if the 
plugs are not inserted fully.

Do not use any other USB cables except the 
supplied one. (Operation is not guaranteed 
with any other USB cables.)

The USB function selection screen will appear.

3

Select [PC CONNECT(DISC)] or 
[PC CONNECT(CARD)] and press 
the joystick.

This unit is automatically recognized by the 
computer.

When the unit is connected to a computer, 
its power cannot be turned off.

In this case, disconnect the USB cable (

l

89).

If the unit is connected to a computer when the 
USB function is set to [PC CONNECT(DISC)], 
no image will appear on the LCD monitor or the 
viewfinder.

When this unit is connected to a computer, you 
cannot use this unit’s DISC EJECT lever to 
remove a disc. Use Windows Explorer to right-
click the drive icon for this unit and select 
[Eject].

When a computer is accessing a disc or card in 
this unit, the ACCESS/PC lamp or card access 
lamp lights. (When a card is being accessed, 

 appears on the LCD monitor.) Do not 

disconnect the USB cable or AC adaptor while 
the disc or card is being accessed as it may 
damage the data.

Connection and recognition 
procedures

A

LSQT1146.book  87 ページ  2006年12月5日 火曜日 午前10時40分

Содержание VDR VDR-D220

Страница 1: ...e instructions completely Spanish Quick Use Guide is included Gu a para r pida consulta en espa ol est incluida LSQT1146 A For USA assistance please call 1 800 211 PANA 7262 or contact us via the web...

Страница 2: ...S DO NOT REMOVE THE COVER OR BACK THERE ARE NO USER SERVICEABLE PARTS INSIDE REFER SERVICING TO QUALIFIED SERVICE PERSONNEL CAUTION DO NOT INSTALL OR PLACE THIS UNIT IN A BOOKCASE BUILT IN CABINET OR...

Страница 3: ...equipment off and on the user is encouraged to try to correct the interference by one or more of the following measures Reorient or relocate the receiving antenna Increase the separation between the...

Страница 4: ...g The wide blade or the third prong are provided for your safety If the provided plug does not fit into your outlet consult an electrician for replacement of the obsolete outlet 10 Protect the power c...

Страница 5: ...RIGHT OBJECTS DO NOT LEAVE THE CAMERA WITH THE EVF AIMED DIRECTLY AT THE SUN AS THIS MAY CAUSE DAMAGE TO THE INTERNAL PARTS OF THE EVF DO NOT EXPOSE YOUR CAMERA TO EXTENDED HIGH TEMPERATURE Such as in...

Страница 6: ...0 220 240 V But In the U S A and Canada the AC adaptor must be connected to a 120 V AC power supply only When connecting to an AC supply outside of the U S A or Canada use a plug adaptor to suit the A...

Страница 7: ...mbol are trademarks of Dolby Laboratories Microsoft and Windows are either registered trademarks or trademarks of the Microsoft Corporation in the United States and or other countries IBM and PC AT ar...

Страница 8: ...n out function 48 Recording yourself 49 Recording with the video light 49 Backlight compensation function 50 Fade in fade out function 50 Soft skin mode 51 MagicPix function 51 Self timer recording 52...

Страница 9: ...tion 87 Connection and recognition procedures 87 About the computer display 88 To disconnect USB cable safely 89 Verifying the unit is correctly recognized by the computer 89 Others Menus 91 Menu list...

Страница 10: ...recording l 42 No need to search for the recording start position The new recording will not overwrite any previously recorded scene Easy playback l 59 Recorded scenes are displayed as thumbnails You...

Страница 11: ...player recorder compatible with 8 cm 3z discs to play back the scenes recorded with this unit If you have a DVD recorder with hard disk you can copy dub scenes recorded on a disc with this unit to the...

Страница 12: ...ery holder and slide it until it clicks Removing the battery While sliding the BATTERY lever slide the battery to remove it How to turn on off the power While pressing the button A set the OFF ON swit...

Страница 13: ...card slot 3 Securely close the card slot cover Recording motion pictures Rotate the mode dial to select 1 Press the recording start stop button to start recording 2 Press the recording start stop but...

Страница 14: ...yback JPEG still pictures Rotate the mode dial to select 1 Select the file to be played back 2 Press the joystick 3 Move the joystick to operate 1 Playback Pause Skip playback backward 9 Skip playback...

Страница 15: ...Status indicator l 28 13 Video light button LIGHT l 49 14 Disc computer access lamp ACCESS PC l 29 87 15 Mode dial l 32 Battery pack CGR DU06 AC adaptor PV DAC14D AC cable K2CA2CA00029 or K2CA2CA0002...

Страница 16: ...lever BATTERY l 25 25 LCD monitor l 18 26 Terminal cover 27 Audio video output terminal A V l 78 80 28 Speaker 29 Mode select switch AUTO MANUAL FOCUS l 41 54 55 30 Reset button RESET l 103 31 Card sl...

Страница 17: ...ss the end of the lens cap cord through the belt 2 Pass the lens cap through the loop 3 To attach or remove the lens cap hold both sides of the lens cap with the tips of your finger and thumb During r...

Страница 18: ...le of the LCD monitor as desired It can rotate up to 180o A towards the lens or 90o B towards the viewfinder The brightness and color level of the LCD monitor can be adjusted from the menu l 39 The un...

Страница 19: ...2X SPEED 2X 1X Recording format DVD Video Recording format VR format DVD Video Recording format VR format DVD Video format Video format Characteristic Rewritable disc Rewritable disc One time recordi...

Страница 20: ...ssible on compatible products 6 Un finalize the disc l 75 DIsc type DVD R 8 cm 3z Single sided double sided DVD R DL 8 cm 3z Dual layer on single side DVD R for General Ver 2 0 DVD R for DL Ver 3 0 Re...

Страница 21: ...D R do not perform the following as it may make the disc unusable jRecord on a disc with other products after recording on it with this unit jRecord on a disc with this unit after recording on it with...

Страница 22: ...nserted in this unit the screen on the right appears Select YES then press the joystick 2 Select format type then press the joystick 3 When the confirmation message appears select YES then press the j...

Страница 23: ...you may not be able to use the SD card l 76 We recommend that you use a Panasonic brand SD card When the write protect switch A on SD card is locked no recording deletion or editing will be possible o...

Страница 24: ...s to discs This may cause disc warping and un balanced rotation rendering it unusable Write on the label side of the disc only with a soft oil based felt pen Do not use ballpoint pens or other hard wr...

Страница 25: ...ush the battery against the battery holder and slide it until it clicks While sliding the BATTERY lever slide the battery to remove it Hold the battery with your hand so it does not fall Before removi...

Страница 26: ...e charging time will become longer Charging time The charging time shown in the table are approximations 1 h 40 min indicates 1 hour 40 minutes Charging time and recordable time Battery model number V...

Страница 27: ...while rotating the LCD monitor frontward to record yourself etc The batteries heat up after use or charging This unit will also heat up while being used This is not a malfunction Be aware that the ope...

Страница 28: ...urning the unit on If the unit is turned on with the lens cap attached the automatic white balance adjustment l 108 may not function properly While pressing the button A set the OFF ON switch to ON Th...

Страница 29: ...C adaptor to the unit The cover of the disc compartment will not open unless the unit is powered 1 Fit the battery or connect the AC adaptor 2 Slide the DISC EJECT lever once and release it When the p...

Страница 30: ...e pressing down on the spindle grasp the edge of the disc and gently lift it out Take care not to touch the recording playback sides of a disc when inserting or removing it 4 Push the section marked P...

Страница 31: ...pen If this happens reattach the battery pack or reconnect the AC adaptor slide the DISC EJECT lever once and then release it A repair disc message may be displayed when the power is turned back on l...

Страница 32: ...may malfunction sRemoving the SD card sOperating the OFF ON switch or the mode dial sRemoving the battery or disconnecting the AC adaptor Selecting a mode The mode dial is used to switch between recor...

Страница 33: ...to select an item Rotate the mode dial to select or 1 Move the joystick up down left or right to select the scene to be played back and press the joystick The selected scene is played back on the full...

Страница 34: ...gicPix 51 2 Soft skin mode 51 In manual mode 3 3 3 White balance 56 2 Iris or gain value 57 1 Shutter speed 57 In manual focus mode 4 4 21 Manual focus adjustment 55 Icon Direction Function Page 1 3 P...

Страница 35: ...White balance 56 2 Iris or gain value 57 1 Shutter speed 57 In manual focus mode 4 4 21 Manual focus adjustment 55 Icon Direction Function Page 1 3 Slide show start pause 62 4 Stop playback and show t...

Страница 36: ...n or select EXIT When the help mode is used functions cannot be set When the help mode is used motion pictures and still pictures cannot be recorded Switching the language You can switch the language...

Страница 37: ...item 5 Move the joystick right or press the joystick 6 Move the joystick up or down in order to select the desired item 7 Press the joystick to enter the selection To get back to the previous screen...

Страница 38: ...ess the MENU button then select SETUP DATE TIME desired display style and press the joystick Changing the display style Press the MENU button then select SETUP DATE FORMAT desired display style and pr...

Страница 39: ...or level of the LCD monitor EVF SET BRIGHTNESS Brightness of the viewfinder To adjust the brightness of the viewfinder extend the viewfinder and close the LCD monitor to activate the viewfinder When t...

Страница 40: ...ors with your hands 4 Keep your arms near your body 5 Slightly open your legs When you are outdoors record pictures with the sunlight behind you If the subject is backlit it will become dark in the re...

Страница 41: ...ghtness of the subject etc the aperture and shutter speed are automatically adjusted for an optimum brightness When set to the video recording mode The shutter speed is adjusted to a maximum of 1 250...

Страница 42: ...rning the unit on If the unit is turned on with the lens cap attached the automatic white balance adjustment may not function properly 1 Turn the unit on 2 Rotate the mode dial to select 3 Open the LC...

Страница 43: ...l be reset to 0h00m00s While motion picture recording is in progress the recording will not stop even if the LCD monitor is closed and the viewfinder is retracted While WRITING CONTROL DATA TO THE DIS...

Страница 44: ...recording time is reduced Mosaic pattern noise may appear on a playback image in the following cases jWhen there is a complicated pattern in the background jWhen the unit is moved too much or too fas...

Страница 45: ...he viewfinder 4 Press the Photoshot button The unit automatically focuses on the subject at the center of screen when auto focus is selected For information about the number of recordable still pictur...

Страница 46: ...ipod A Remaining number of still pictures Flashes in red when R 0 appears B Size of still pictures C Quality of still pictures You can add a shutter sound when recording still pictures Press the MENU...

Страница 47: ...at printing Check before printing PICT QUALITY Selecting the picture quality Press the MENU button then select BASIC PICT QUALITY desired item and press the joystick Still pictures with a high pictur...

Страница 48: ...tion move it quietly RAM RW VR RW V R If the zoom magnification exceeds 32k then the digital zoom function will be activated The maximum magnification provided by the digital zoom can be switched Rota...

Страница 49: ...be displayed even if you press the joystick Only some indications will appear on the screen When appears return the direction of the LCD monitor to normal position and check the warning alarm indicati...

Страница 50: ...move the joystick down to display the icon shown in the illustration 2 Move the joystick up to select The image on the screen will become brighter To return to normal recording Select again If you tur...

Страница 51: ...the torso up Rotate the mode dial to select or 1 Press the joystick Then move the joystick down to display the icon shown in the illustration 2 Move the joystick left to select To cancel the soft ski...

Страница 52: ...to select 1 Press the joystick Then move the joystick down to display the icon shown in the illustration 2 Move the joystick left to select 3 Press the Photoshot button After the display flashes for a...

Страница 53: ...io Rotate the mode dial to select Press the MENU button then select BASIC ASPECT 4 3 and press the joystick The default setting is 16 9 RAM RW VR RW V R SD Reduces the image shaking jitter due to hand...

Страница 54: ...he mode dial to select or 1 Set the AUTO MANUAL FOCUS switch to MANUAL 2 Press the MENU button then select BASIC SCENE MODE desired item and press the joystick 5 Sports To record sports scenes or scen...

Страница 55: ...recording subject is extremely bright the recorded image may become whitish and the periphery of the recorded image extremely dark Surf snow mode If the subject is extremely bright the recorded image...

Страница 56: ...fill the screen with a white subject 2 Move the joystick up to select When the display changes from flashing to on setting is complete When the display continues flashing the white balance cannot be...

Страница 57: ...FOCUS switch to MANUAL The icon shown in the illustration is displayed automatically 2 Move the joystick left or right to select aperture or shutter speed 3 Move the joystick left or right to make th...

Страница 58: ...brightly shining subject or highly reflective subject but this is not a malfunction During normal playback image movement may not look smooth When recording in an extremely bright place the screen ma...

Страница 59: ...display 3 Press the joystick The selected scene is played back on the full screen The operation icon is automatically displayed on the screen 4 Move the joystick to operate No sound will be heard exce...

Страница 60: ...ures will be played back in reverse when you move and hold the joystick left Normal playback is restored when you move the joystick up The motion picture is advanced one frame at a time 1 Move the joy...

Страница 61: ...ases jWhen the number of scenes exceeds 99 RAM RW VR RW V R jWhen the disc is removed RW V R jWhen the ASPECT setting is changed RW V R jWhen the disc is repaired RW V R jWhen the layers switch on a D...

Страница 62: ...reen The operation icon is automatically displayed on the screen 4 Move the joystick to operate About still picture compatibility This unit is compliant with the unified standard DCF Design rule for C...

Страница 63: ...you attempt to play back file recorded in a different format or file data is defective an error message may appear The time displayed may be different from the recording time and it may take time to d...

Страница 64: ...the joystick The selected scene is encircled by a red frame When the joystick is pressed again the selected scene will be canceled Up to 8 scenes displayed on a page can be set in succession 4 Only wh...

Страница 65: ...s the joystick The selected scene is played back 3 When you reach the area where you want to divide the scene move the joystick down to set the dividing point Using slow motion playback or frame by fr...

Страница 66: ...a playlist by gathering your favorites from the recorded scenes Since the playlist is not created by copying data you will consume little of the disc capacity by making a playlist If you create or del...

Страница 67: ...yed To add another scene to the same playlist Select ADD l 68 To playback a playlist Select the scene to start playback then press the joystick RAM RW VR Rotate the mode dial to select 1 Press the MEN...

Страница 68: ...again the selected scene will be canceled Up to 8 scenes displayed on a page can be set in succession 4 Only when SELECT is selected in step 2 Press the button 5 When the confirmation message appears...

Страница 69: ...playlist that scenes were added to is displayed To continue adding scenes to the playlist Repeat steps 1 4 The scenes in a playlist can be moved Select playlist playback mode l 67 steps 1 and 2 1 Pre...

Страница 70: ...lect YES then press the joystick To continue dividing other scenes Repeat steps 2 4 To complete editing Press the MENU button Two consecutive scenes can be combined into one Combining scenes on a play...

Страница 71: ...is selected in step 2 Press the button 5 When the confirmation message appears select YES then press the joystick Only when SELECT is selected in step 2 To continue deleting other files Repeat steps 3...

Страница 72: ...the MENU button SD You can write the data of the still pictures to be printed and the number of prints DPOF data onto the SD card Rotate the mode dial to select 1 Press the MENU button then select PI...

Страница 73: ...DPOF stands for Digital Print Order Format This enables picture printing information to be written onto an SD card so that it can be used on a system supporting DPOF The DPOF setting can be establish...

Страница 74: ...pear on this unit Play back the disc on a DVD player Titles are displayed by recording date on the top menu However when PLAY MODE is set to BY DATE to view scenes by recording date some scenes record...

Страница 75: ...otate the mode dial to select 1 Press the MENU button then select DISC SETUP DISC PROTECT and press the joystick 2 When the confirmation message appears select YES then press the joystick To release d...

Страница 76: ...ormat a DVD RAM you cannot use DVDForm l 83 to physically format it Use a separate DVD RAM drive to physically format a DVD RAM Formatting DVD RW Format on this unit RAM RW VR RW V R Information such...

Страница 77: ...e time spent for recording may become longer and you may not be able to use the SD card Depending on the type of SD card being used it may take time to format During formatting do not turn this unit o...

Страница 78: ...ase read the operating instructions for the TV If the images are not displayed correctly on a wide screen TV adjust the aspect setting on the TV Refer to the operating instructions of the TV for detai...

Страница 79: ...l 74 2 Insert the disc in the playback device and then play it back Playback is possible on devices that support 8 cm 3z DVD Video but playback on all DVD players is not guaranteed Playback of DVD R D...

Страница 80: ...this playlist only to other devices l 66 Use the AC adaptor to free you from worrying about the battery running down 1 Connect this unit and a video device A AV S cable supplied Insert the plugs as f...

Страница 81: ...d with any other USB cables The USB function selection screen will appear 2 Select PictBridge and press the joystick The indication appears on this unit s screen 3 Select a file to be printed then pre...

Страница 82: ...ollowing operations during printing These operations disable proper printing jDisconnecting the USB cable jRemoving the SD card jSwitching the mode dial jTurning off the power Check the settings for t...

Страница 83: ...to a computer or when devices are connected through USB hubs or by using extension cables proper operation is not guaranteed Use the supplied USB cable when connecting to the computer Operation is no...

Страница 84: ...rs or dealers will not be responsible for any defects in the Software or damage to Licensee caused by Licensee s reverse engineering decompiling or disassembly of the Software Article 6 Limitation of...

Страница 85: ...If the Setup Menu screen does not appear double click the CD ROM drive icon in My Computer 2 Click DVD RAM Driver The software application may not run properly if you cancel the installation at any po...

Страница 86: ...a can be written from a computer to a DVD RAM When you install the DVD RAM Driver RAMASST is automatically installed and displayed in Startup For details on how to use the software applications read t...

Страница 87: ...A USB cable supplied Insert the plugs as far as they will go The unit and computer will not operate properly if the plugs are not inserted fully Do not use any other USB cables except the supplied one...

Страница 88: ...lder Example folder structure of a DVD RW Video format or DVD R DVD Video format motion pictures are stored in the VIDEO_TS folder Depending on the maker of the disc and the device used to format it t...

Страница 89: ...ode that places restrictions on the functions has been established Consult the manufacturer or follow the steps in your computer s operating instructions to establish a mode in which all the functions...

Страница 90: ...at Universal Serial Bus controllers or Other devices etc Where the display will appear depends on the type of computer you are using You can use the following method to enable it to be recognized Meth...

Страница 91: ...CD SET l 39 EVF SET l 39 INITIAL SET l 93 DEMO MODE l 93 LANGUAGE l 36 Still picture recording menus BASIC SCENE MODE l 54 GUIDE LINES l 52 PICTURE SIZE l 46 PICT QUALITY l 47 CLOCK SET l 38 ADVANCED...

Страница 92: ...ndications are selected as shown in the illustration below POWER SAVE OFF The power saving function is not activated 5 MINUTES When about 5 minutes have passed without any operation this unit automati...

Страница 93: ...its functions If any button is pressed or operated the demonstration mode is canceled If no operations take place for approx 10 minutes the demonstration mode automatically starts To terminate the de...

Страница 94: ...picture quality R 100 Remaining number of still pictures XP SP LP AWB 0 3M 0 2 Motion picture playback Still picture playback 1 Playback Pause 5 6 Fast forward rewind 7 8 Last first scene paused 9 Ski...

Страница 95: ...ith other products that have different picture sizes from the sizes shown above Time display The built in battery is low l 38 The warning alarm indication appears when LCD monitor is rotated towards t...

Страница 96: ...erted After finalizing the discs become play only and cannot record If you un finalize a DVD RW Video format it can be used for recording l 75 CANNOT RECORD DISC IS FULL The disc is full or the number...

Страница 97: ...a new SD card PUSH THE RESET SWITCH An irregularity in the unit has been detected Press the RESET button to restart the unit l 103 CHECK THE DISC AFTER PUSHING THE RESET SWITCH TO REPAIR THE DATA CHA...

Страница 98: ...mode Backlight compensation When the MagicPix function is used When the video light is on gain up mode When the iris gain is set Soft skin mode Set and cancel While recording to a disc Help mode Video...

Страница 99: ...t record continuously from one side of the disc to the other The recording time indicated on the disc package is the total time for both sides You will need to eject the disc and turn it over to recor...

Страница 100: ...ge it with the AC adaptor l 25 Are you using the battery in an extremely cold place The battery is affected by ambient temperature In cold places the operating time of the battery becomes shorter Has...

Страница 101: ...ize a DVD RW Video format it can be used for recording l 75 Has the SD card s write protect switch been set to LOCK No recording is possible while the write protect switch is set to LOCK l 23 Is the m...

Страница 102: ...k Scenes cannot be deleted or edited Is the DVD RAM or the DVD RW VR format write protected Release the protection l 75 If the disc or the contents on the disc have been protected on another device re...

Страница 103: ...nit If you do not press the RESET button the power to this unit is turned off automatically about 1 minute later Even after you press the RESET button the indication may still appear repeatedly If so...

Страница 104: ...computer again can improve this Follow the steps below Before proceeding be sure to remove the disc from the unit 1 Select start Settings Control Panel Performance and Maintenance System 2 Click the...

Страница 105: ...h chemicals its body may be marred and the surface finish may peel off Do not leave rubber or plastic products in contact with the unit for a long time When you use the unit in a sandy or dusty place...

Страница 106: ...etely used up the charged capacity Dust and other matter attached to the battery terminals should be removed Prepare spare batteries when going out for recording Prepare batteries for use up to 3 to 4...

Страница 107: ...ing displayed the access lamp is lit do not remove the SD card operate the mode dial turn off the power or shake or impact the unit About the miniSD Card Be sure to insert miniSD Cards in the dedicate...

Страница 108: ...f the lens is fogged up Remove the battery or AC adaptor and leave the unit for about 1 hour When the unit becomes close to the ambient temperature the fog disappears naturally Explanation of terms Au...

Страница 109: ...e background into focus when close up objects are placed in focus When recording people with distant mountains in the background you cannot focus on both the subject which is close up and the objects...

Страница 110: ...m 32k optical zoom 50 1000k digital zoom Monitor 2 7z wide LCD monitor approx 123 K pixels Viewfinder Color electric viewfinder approx 113 K pixels Microphone Stereo with a zoom function Speaker 1 rou...

Страница 111: ...AM SP 5 Mbps VBR Approx 37 min recordable time on a single sided DVD RAM LP 2 5 Mbps VBR Approx 75 min recordable time on a single sided DVD RAM Audio compression Dolby Digital 16 bit 48 kHz 2 ch Reco...

Страница 112: ...re approximations Number of recordable pictures on an SD card Picture size 640k480 640k360 Picture quality 8 MB 42 86 42 86 16 MB 97 195 97 195 32 MB 210 420 210 420 64 MB 430 870 430 870 128 MB 820 1...

Страница 113: ...geable Lithium Ion Battery Pack CGA DU12A 1B 1150 mAh Rechargeable Lithium Ion Battery Pack CGA DU21A 1B 2040 mAh Rechargeable Lithium Ion Battery Pack RP SDR04GU1K RP SDR02GU1A RP SDR01GU1A RP SDR512...

Страница 114: ...84th Avenue South Kent WA 98032 Ship To Mr Mrs Ms First Last Street Address City State Zip Phone Day Night 4 Shipping information UPS delivery requires complete street address Please photocopy this fo...

Страница 115: ...duct needs service Please include your proof of purchase Failure to do so will delay your repair To further speed your repair please provide an explanation of what is wrong with the unit and any sympt...

Страница 116: ...s or non expanded standard 4 3 pictures on wide screen TV s or onscreen data in a stationary and fixed location The warranty ALSO DOES NOT COVER damages which occurred in shipment or failures which ar...

Страница 117: ...l Industrial Park Carolina Puerto Rico 00985 Phone 787 750 4300 Fax 787 768 2910 For hearing or speech impaired TTY users TTY 1 866 605 1277 Purchase Parts Accessories and Instruction Books online for...

Страница 118: ...purchase receipt or other proof of date of original purchase is required before warranty service is performed THIS EXPRESS LIMITED WARRANTY IS IN LIEU OF ALL OTHER WARRANTIES EXPRESS OR IMPLIED INCLU...

Страница 119: ...ictures 72 M MagicPix function 51 Manual focus 55 Menu 36 Menu list 91 Motion picture playback 59 Motion picture recording 42 N Number of recordable pictures 112 O Operation icons 34 P Pickup lens 30...

Страница 120: ...120 LSQT1146 Others Volume adjustment 60 VR format 21 W White balance 56 109 Wide mode 53 Wind noise reduction function 54 Z Zoom 48 Zoom microphone 48...

Страница 121: ...porta bater a y h gala deslizar hasta que dispare C mo quitar la bater a Mientras hace deslizar la palanca BATTERY haga deslizar la bater a para quitarla C mo encender apagar la alimentaci n Mientras...

Страница 122: ...apa de la ranura de la tarjeta Grabaci n de im genes din micas Gire el selector de modo para seleccionar 1 Pulse el bot n de inicio parada de la grabaci n para empezar a grabar 2 Pulse de nuevo el bot...

Страница 123: ...Gire el selector de modo para seleccionar 1 Seleccione el archivo a ser reproducido 2 Pulse el joystick 3 Mueva el joystick para obrar 1 Reproducci n Pausa Salto de reproducci n hacia atr s 9 Salto de...

Страница 124: ...ompany Division of Panasonic Corporation of North America One Panasonic Way Secaucus NJ 07094 Panasonic Puerto Rico Inc Ave 65 de Infanter a Km 9 5 San Gabriel Industrial Park Carolina Puerto Rico 009...

Отзывы: