background image

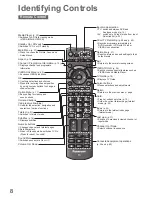
DIRECT TV REC

ASPECT MENU

N

AV

EXIT

OPTION

RETURN

TV

INPUT

18

Using TV Guide

TV Guide

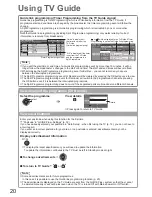
Electronic Programme Guide (EPG) provides an on screen listing of the programmes 

currently broadcast and the forthcoming broadcasts over the next seven days (depending on the 

broadcasters).

This TV supports the GUIDE Plus+ system.

The Gemstar branding partner will supply the rating informations in the programme information and the 

recommended group in the Search list.

DVB and Analogue channels are displayed on the same TV Guide screen. “D” means DVB channel and “A” 

means Analogue channel. There will be no programme listings for Analogue channels.

When this TV is turned on for the first time, or the TV is switched off for more than a week, it may take some time 

before the TV Guide is completely shown. 

1

Select DVB or Analogue

TV

2

View TV Guide

Wed 28 Oct 2009

10:46

Search

All Channels

Page up

Page down

Wed 28 Oct

1 BBC ONE
20:00 - 20:30  DIY SOS : We open in the Battersbys

-24 hours

+24 hours

Search

Category

Eastender

19:30

Time:

20:00

20:30

21:00

Hot Wars

Holiday Program

Emmerdal.

Coronation Street

The Bill

10 O’ clock News BBC

Pepsi Char.

Good bye

Panorama

Spring watch

Coast

I’ m A Celebrity

Pop Idol

News

D
D
D
D
D
D
D

Rugby

15 To 1

Sports

TV Guide

Holiday News

DIY SOS

Timer Programming

Select channel

Select programme
RETURN

EXIT

Info
RETURN
Select Advert

GUIDE

OPTION

1
7

14
70
72

105
719

BBC ONE
BBC THREE
E4
BBC FOUR
BBC 2W
BBCi
BBC Radi

Also in

Current date and time

Programme

TV Guide time

D: DVB
A: Analogue

Channel position and name

Advertisement

TV Guide date

Example:

Logo of the 
Gemstar branding partner

Some programmes may 
also be broadcast in HD

You can select HD or 

SD broadcast before 
viewing or setting 
Timer Programming.

To return to TV 


EXIT

 or 

To view a 

channel list of the 

selected category 


blue

All Channels

Free DVB Channels

All DVB Channels
All Analogue Channels

Favourites1 
Favourites2 
Favourites3 
Favourites4 

Category

All Channels

TV/Data DVB Channels

To list favourite channels 

 p. 39

Only Analogue channels 

are listed

(Category list)

To the previous day 

(DVB mode)


red

 select  category

 view

To search 

programme types 

and view a channel 

list of the searched 

programmes 

(DVB mode)


yellow

Entertainment
Sport
Children’s

Search Titles...
Movie
News and Factual

.

.

.

Search

(Search list)

To the next day 

(DVB mode)


green

 select  type

 view

To search 

programme titles 

and view a list 

of the searched 

programmes 

(DVB mode)


yellow

Entertainment
Sport
Children’s

Search Titles...
Movie
News and Factual

.

.

.

.

Search

(Search list)

Set characters one by one 

(maximum: 19 characters)

Search

  select 

“Search Titles...”

 access

 select

 set

green

You can set characters by using 

numeric buttons.

  “Characters table for numeric 

buttons” (p. 66)

All the programme titles including the word you set will be listed.

Searching without any characters will list all programmes including current programmes. 

To watch the programme

Select a current 

programme or 

channel

Select “View” 

(DVB mode)

If a programme exists in both HD and SD 

broadcasts, the “View Options” screen will 

be displayed to select HD or SD broadcast. 

(DVB mode)

 select

 access

View

Eastender
 19:30- 20:00

Timer Programming

To use Timer Programming 

 p. 19

 select
 watch

101 BBC ONE 19:30-20:00 Wed 28 Oct 2009
119 BBC HD

19:30-20:00 Wed 28 Oct 2009

View Options

DIY SOS

 select

 watch

Содержание TX-P42S20B

Страница 1: ...on English Thank you for purchasing this Panasonic product Please read these instructions carefully before operating this product and retain them for future reference The images shown in this manual are for illustrative purposes only B model no suffix denotes UK model U K Standard ...

Страница 2: ...ings etc VIERA TOOLS Display special feature icons for easy accessibility p 26 Special features such as VIERA Link and Media Player can be accessed easily by using the VIERA TOOLS button Owner ID p 47 Owner ID is an anti theft function Entering the PIN number and owner s personal information will help the Police to determine the owner in the case of theft Supports Audio Description signal p 15 and...

Страница 3: ...Menu Functions 27 Basic Advanced Features Retuning from Setup Menu 36 Tuning and Editing Channels 38 Timer Programming 42 Child Lock 44 Input Labels 45 Shipping Condition 46 Owner ID 47 Using Common Interface 48 Updating the TV Software 49 Setup for Internet Services 50 Using Media Player 52 Link Functions 56 Q Link VIERA Link External Equipment 64 Advanced FAQs etc Technical Information 66 FAQs 6...

Страница 4: ...all be connected to a mains socket outlet with a protective earthing connection IMPORTANT THE MOULDED MAINS PLUG FOR YOUR SAFETY PLEASE READ THE FOLLOWING TEXT CAREFULLY This TV is supplied with a moulded three pin mains plug for your safety and convenience A 10 amp fuse is fitted in this mains plug Shall the fuse need to be replaced please ensure that the replacement fuse has a rating of 10 amps ...

Страница 5: ...ut of reach of young children Do not allow children to handle SD Card As with any small object the SD Card could be swallowed by young children Please remove SD Card immediately after use and store out of reach of young children Caution Ventilation Allow sufficient space around the TV in order to help prevent excessive heat which could lead to early failure of some electronic components Ventilatio...

Страница 6: ... other forces may cause product damage which will void your warranty Take care when fixing wall brackets to the wall Always ensure that there are no electrical cables or pipes in the wall before hanging bracket To prevent fall and injury remove the TV from its fixed wall position when it is no longer in use for an extended period of time Installing removing remote s batteries 1 Pull open Hook 2 No...

Страница 7: ... TV from the pedestal with at least two people Assembly screw 4 silver XYN5 F18FN Assembly screw 4 black THEL079N TX P42S21B THEL080N TX P50S21B Pole 2 R TBLA3689 TX P42S21B TBLA3679 TX P50S21B L TBLA3690 TX P42S21B TBLA3680 TX P50S21B Base TBLX0136 TX P42S21B TBLX0137 TX P50S21B M5 18 M5 30 R L Assembling the pedestal Use the assembly screws to fasten the left and right poles to the base securely...

Страница 8: ...ing screen Numeric buttons Changes channel and teletext pages Sets characters When in Standby mode switches TV On Press for about 1 second VIERA Link Menu p 60 Accesses VIERA Link Menu TV Guide p 18 Displays TV Guide Option Menu p 17 Easy setting for viewing and sound options Main Menu p 27 Press to access the Picture Sound and Setup Menus Subtitles p 16 Displays subtitles Input mode selection TV ...

Страница 9: ...e in the following conditions no signal is received and no operation is performed for 30 minutes in Analogue TV mode Off Timer is active in the Setup Menu p 17 no operation is performed for the period selected in Auto Standby p 32 This function does not affect Ext Rec of Timer Programming and Direct TV Recording Increases or decreases the channel position by one When a function is already displaye...

Страница 10: ...ly TV DVD Recorder or VCR Note Connect to the TV s AV2 for a DVD Recorder VCR supporting Q Link p 58 Connect to the TV s AV1 for a Satellite receiver For HDMI compatible equipment it is possible to connect to HDMI terminals HDMI1 HDMI2 HDMI3 by using HDMI cable p 64 Q Link connection p 56 VIERA Link connection p 56 and p 57 Please also read the manual of the equipment being connected Mains lead su...

Страница 11: ...and Satellite DVD Recorder or VCR Terrestrial aerial Mains lead supplied Rear of the TV Satellite receiver AC 220 240 V 50 60 Hz RF cable Fully wired SCART cable Fully wired SCART cable Fully wired HDMI compliant cable Fully wired HDMI compliant cable To remove from the TV Push until both side tabs click Press both tabs and pull on mains connector to release tabs Make sure that the mains lead is s...

Страница 12: ...ed by the broadcasters Actual number of channels may differ due to channel duplication Sending Preset Data Please wait 0 100 Remote control unavailable If Q Link or similar technology p 58 compatible recorder with analogue tuner is connected analogue channel setting is automatically downloaded to the recorder Digital channel setting is not downloaded If downloading has failed you can download late...

Страница 13: ...o to next step EXIT Note If tuning has failed or to retune all channels Auto Setup p 36 and p 37 To re initialise all settings Shipping Condition p 46 If you turned the TV Off during Standby mode last time the TV will be in Standby mode when you turn the TV On with Mains power On Off switch Shop viewing environment for shop display only Shop viewing environment is the demonstration mode to explain...

Страница 14: ... numbers run in the ranges 0 99 To select a two or three digit channel position number e g 399 def wxyz wxyz Note To watch pay TV Using Common Interface p 48 Select a channel using Information banner p 15 It is possible to confirm the channel name and programme information by using the Information banner before changing channels Display Information banner if it is not displayed While the banner is...

Страница 15: ...On Bad signal Poor TV signal quality Encrypted Scrambled programme AD Audio Description service available This function can aid visually impaired viewers by adding an additional audio track to describe events on screen For settings p 29 STTL Subtitle service available TEXT Teletext service available Multi Audio Multiple audio available Stereo Mono NICAM Audio mode 1 90 Off Timer remaining time For...

Страница 16: ...16 9 14 9 4 3 Zoom1 Zoom2 Zoom3 Aspect Selection list store select To change the mode using the ASPECT button only ASPECT Press repeatedly until you reach the desired mode Auto The best ratio is chosen and the image expanded to fill the screen For details p 66 16 9 Zoom1 Directly displays the image at 16 9 without distortion anamorphic Displays a 16 9 letterbox or 4 3 image without distortion 14 9...

Страница 17: ...en you will hear an additional audio track to describe events on screen To adjust the volume for Audio Description Audio Description Menu p 29 Last view Switch to previously viewed channel or input mode easily LAST VIEW Press again to return to the present view Note Switching channel is not available while Ext Rec of Timer Programming or Direct TV Recording is in progress Watching less than 10 sec...

Страница 18: ...nt TV Guide date Example Logo of the Gemstar branding partner Some programmes may also be broadcast in HD You can select HD or SD broadcast before viewing or setting Timer Programming To return to TV EXIT or To view a channel list of the selected category blue All Channels Free DVB Channels All DVB Channels All Analogue Channels Favourites1 Favourites2 Favourites3 Favourites4 Category All Channels...

Страница 19: ...or record the programme will appear Select Timer Programming and set Ext Rec to record from the time you finish programming the timer event setting View Eastender 19 30 20 00 Timer Programming select access If a programme exists in both HD and SD broadcasts The Timer Options screen will be displayed to select HD or SD broadcast 101 BBC ONE 19 30 20 00 Wed 28 Oct 2009 119 BBC HD 19 30 20 00 Wed 28 ...

Страница 20: ...amming only works reliably if correct information is received from broadcasters Guide Guide Guide Wed 28 Oct 21 00 22 30 Date Start End Wed 28 Oct 22 45 23 00 Thu 29 Oct 10 30 11 30 90 min 15 min min 60 min Reminder Ext Rec 1 Timer Programming Ext Rec Function Channel Name 14 D E4 The Bill 72 BBC 2W TIMER D D BBC ONE Red Cap No Wed 28 Oct 2009 10 46 1 D Wed 28 Oct 20 00 20 30 30 min Ext Rec BBC ON...

Страница 21: ...avigate the pages using buttons on the remote control but because the commands available must apply to all manufacturers of digital equipment some on screen commands may not correspond exactly to the remote control buttons For example When select or go is displayed When symbol is displayed When the key words are displayed on colour bar red green yellow blue When options with numbers are displayed ...

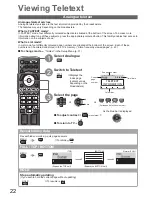
Страница 22: ...t the bottom of the screen Each of these numbers can be altered and stored in the TV s memory Store frequently viewed pages p 23 To change mode Teletext in the Setup Menu p 31 1 Select Analogue TV 2 Switch to Teletext 01 02 03 04 05 06 07 TELETEXT INFORMATION 17 51 28 Feb Time date Sub page number Colour bar Current page number TEXT Displays the index page content varies depending on the broadcast...

Страница 23: ...ured button you want to change Enter new page number press and hold jkl ghi mno tuv pqrs wxyz abc def View sub page View sub page Only when teletext is more than one page Appears at top of the screen To view specific sub page MENU blue Enter the 4 digit number example P6 mno Sub pages The number of sub pages varies depending on the broadcasters up to 79 pages It may take some time for searching du...

Страница 24: ...ions p 64 If input mode is not switched automatically Perform and Check the setup of the equipment 2 Display the Input select menu AV 3 Select the input mode connected to the equipment Input Selection AV1 AV2 S AV3 COMPONENT HDMI1 HDMI2 HDMI3 TV select watch You can also select the input using the AV button on the remote control or the side panel of the TV Press the button repeatedly until the des...
Страница 25: ...title Press and hold to search backward Fast forward Skip Search VCR Fast forward view the picture rapidly forward DVD Skip to the next track or title Press and hold to search forward Pause Pause Resume DVD Press and hold to play at slow speed PROGRAMME Channel Up Down Select channel REC Record Start recording How to change the code for the type of the equipment Each type of the Panasonic equipmen...

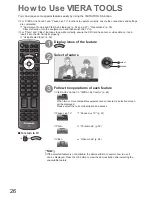
Страница 26: ... Card has photo or video data on it and insert it into the SD Card slot properly Using Media Player p 52 To return to TV EXIT or VIERATOOLS 1 Display icons of the feature VIERATOOLS 2 Select a feature VIERA Link Control access select 3 Follow the operations of each feature VIERA Link Control VIERA Link Control p 62 When two or more compatible equipment are connected a selection screen will be disp...

Страница 27: ...ime EXIT To return to the previous screen RETURN To change menu pages up down Choose from among alternatives To reset the settings To reset the picture settings only Reset to Defaults in the Picture Menu p 28 To reset the sound settings only Reset to Defaults in the Sound Menu p 29 To reset the picture and sound settings together N Also volume level and aspect mode are reset To initialize all sett...

Страница 28: ...e Tint With an NTSC signal source connected to the TV the picture hue can be adjusted to suit your taste For NTSC signal reception only Colour Balance Allows you to set the overall colour tone of the picture Cool Normal Warm Not valid when Viewing Mode is set to True Cinema Vivid Colour Automatically adjusts colours to vivid ones Off On C A T S Contrast Automatic Tracking System Automatic Brightne...

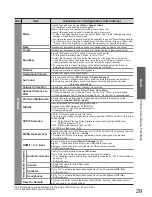
Страница 29: ... frequency sound Over 30cm Up to 30cm If the gap between the TV and wall is over 30 cm Over 30cm is recommended If the gap between the TV and wall is within 30 cm Up to 30cm is recommended Preferred Multi Audio Selects the preferred language for digital channel multi audio depending on the broadcaster English Welsh Gaelic NICAM Near Instantaneous Companded Audio Multiplex Reproduces NICAM stereo s...

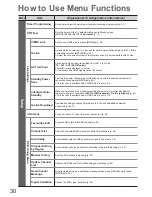
Страница 30: ...s function is available when VIERA Link is set to On Intelligent Auto Standby Makes non watched or non used connected equipment go into Standby mode to reduce the power consumption Off On With reminder On No reminder p 60 This function is available when VIERA Link is set to On Q Link Download Downloads analogue channel information to a Q Link compatible equipment connected to the TV Child Lock Loc...

Страница 31: ...4 5 6 7 8 9 10 seconds Playing Time Display Set to On to display a continuous record of time spent using Game mode every 30 mins Off On This function is available when Game is selected in Viewing Mode p 28 Radio Mode Sets the timer for turning off the screen automatically when a radio channel is selected Off 5 10 15 20 seconds The sound is active even if the screen turns off Press any button excep...

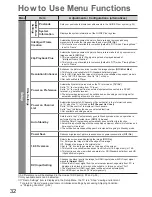
Страница 32: ...TV is turned on All Channel List Last Set to All Channel List to display all the channels Set to Last to display the one you selected last time Not available on analogue mode Auto Standby Sets the time the TV automatically goes to Standby mode when no operation is performed for the selected times Off 2 4 hours Starting Timer Programming automatically does not affect this function Automatic input s...

Страница 33: ...Available in DVB Available when Mode is set to Music or Speech Available in HDMI Sound Menu 1 2 Mode Music Bass Treble Balance Equalizer Access Headphone Volume Off Surround Volume Correction Speaker Distance to Wall Over 30cm Preferred Multi Audio English Sound Menu 2 2 NICAM Off HDMI1 Input Audio Description Reset to Defaults Digital MPEG Optical Level 0 SPDIF Selection Auto Access Reset p 29 Av...

Страница 34: ...0 Date Start End Wed 28 Oct 22 45 23 00 Thu 29 Oct 10 30 11 30 90 min 15 min min 60 min Reminder Ext Rec 1 Timer Programming Ext Rec Function Channel Name 14 D E4 The Bill 72 D BBC 2W TIMER D BBC ONE Red Cap No Wed 28 Oct 2009 10 46 1 D Wed 28 Oct 20 00 20 30 30 min Ext Rec BBC ONE DIY SOS S P p 43 Display Settings Teletext Preferred Subtitles Side Panel Input Labels Banner Display Timeout Playing...

Страница 35: ...ype Quality CBBC Channel Free TV 10 62 BBC Radio Wales Free TV 10 62 E4 Free TV 10 62 Cartoon Nwk Free TV 10 Free TV 4 Pay TV 0 Radio 0 Data 0 Searching p 36 All DVB Channels 70 72 105 719 720 1 7 CBBC Channel Cartoon Nwk BBCi BBC Radio Wales BBC Radio Cymru BBC ONE Wales BBC THREE p 39 DVB Update Channel List CH Channel Name Type Quality Searching Analogue Scan 21 68 Progress CH 21 68 This will t...

Страница 36: ...w Channel Message Signal Condition Access Channel Sorting by Region On access select 6 Start Auto Setup All DVB tuning data will be erased DVB Auto Setup Settings are made automatically DVB Auto Setup This will take about 3 minutes Progress CH 21 68 62 CH Channel Name Type Quality CBBC Channel Free TV 10 62 BBC Radio Wales Free TV 10 62 E4 Free TV 10 62 Cartoon Nwk Free TV 10 Free TV 4 Pay TV 0 Ra...

Страница 37: ...select 5 Select Auto Setup Analogue Tuning Menu Channel List Auto Setup Manual Tuning Access access select 6 Start Auto Setup All analogue tuning data will be erased Analogue Auto Setup Analogue Auto Setup 29 CH Channel Name 30 Analogue 2 Searching This will take about 3 minutes Scan CH 21 68 Settings are made automatically The analogue settings are downloaded to a Q Link compatible equipment conn...

Страница 38: ...he region Channel Sorting by Region You can sort DVB channels so that those with the best signal quality or those for your preferred region appear nearer the top of your Channel List Normally you should select Best signal quality All Regions Channel Sorting by Region GBR Best signal quality All Regions England Regions Region choice available select region access select repeatedly until you reach t...

Страница 39: ...z _ O P Q R S T 7 8 9 o p q r s t 1 2 abc 3 def 4 ghi 5 jkl 6 mno 7 pqrs 8 tuv 9 wxyz 0 set select RETURN You can set characters by using numeric buttons Characters table for numeric buttons p 66 To move the channel green Select the new position Confirm green or Select the turn jkl ghi mno tuv pqrs wxyz abc def Store RETURN Note Channel position numbers known as logical channel numbers can be swap...

Страница 40: ...List CH Channel Name Type Quality Searching Analogue Scan 21 68 Progress CH 21 68 This will take about 3 minutes Free TV 0 Pay TV 0 Radio 0 Data 0 Channel List is updated while keeping your settings in Favourites Edit Channel List Child Lock Timer Programming etc Display a notification message New Channel Message Selects whether to give a notification message when a new DVB channel is found Off On...

Страница 41: ... move the channel position green Select the new position Store green To rename the channel name blue Set characters one by one maximum five characters Store RETURN Edit channel name Name A B C D E F G H I J K L M N U V W X Y Z 0 1 2 3 4 5 6 a b c d e f g h i j k l m n u v w x y z _ O P Q R S T 7 8 9 o p q r s t 1 2 abc 3 def 4 ghi 5 jkl 6 mno 7 pqrs 8 tuv 9 wxyz 0 set select You can set characters...

Страница 42: ...to the correct channel automatically to record even if the TV is in Standby mode TV Guide may also be used to set timer programming event p 19 Timer Programming can store up to 15 events For recording using Timer Programming the TV must be either On or in standby For reminders to be displayed the TV must be On No other channel can be selected while Ext Rec of a Timer Programming is in progress It ...

Страница 43: ...ay Daily Mon Fri Monday to Friday Weekly Sat Fri Thu Wed Tue Mon Sun Same time on the same day every week Displayed if the timer programming events are overlapped D DVB A Analogue You can not change the mode within the menu Guide Guide link programming Programmes according to the TV Guide signal p 20 Timer programming Programmes according to the time setting S P Split Programme programming p 20 St...

Страница 44: ...IN jkl ghi mno tuv pqrs wxyz abc def Enter the PIN number twice at first setting Make a note of the PIN number in case you forget it Select Child Lock List Child Lock Change PIN Child Lock List Access select access Select the channel input to be locked Child Lock List TV and AV Name Input Lock Type BBC 1 Wales Free TV BBC THREE DVB Lock Free TV E4 DVB Lock Free TV VCR Analogue Lock Analogue BBC1 A...

Страница 45: ...V2 S AV3 COMPONENT HDMI1 HDMI2 HDMI3 DVB DVB Analogue Analogue set select The labels you set will be displayed in the Input Selection menu p 24 or banner If Skip is selected the input will not be displayed in the Input Selection menu and you cannot select the mode For easier identification and selection of the input mode you can label each input mode or skip terminals that are not connected to any...

Страница 46: ...tion access select 5 Set 46 Shipping Condition Resets the TV to its original condition with no channels tuned in All settings other than Owner ID are reset channels picture sound settings etc To return to TV EXIT Restore Settings Shipping Condition Check the message and initialise EXIT RETURN Confirm All tuning data will be erased Are you sure Are you sure Shipping Condition confirm confirm start ...

Страница 47: ...et characters by using numeric buttons Characters table for numeric buttons p 66 To check the personal information stored F TV AV Hold down for about 6 sec F Owner ID NAME HOUSE NO POSTCODE EXIT The PIN number is not displayed To change the PIN number Select PIN Enter a new PIN number twice Owner ID Data Entry PIN HOUSE NO POSTCODE NAME select access jkl ghi mno tuv pqrs wxyz abc def 1 Display the...

Страница 48: ...trol buttons The Common Interface Module menu provides access to software contained on Common Interface CI Modules This TV works only Pay TV modules complying with CI standard This function is not available for BSkyB s Sky channels Caution Turn Off Mains power On Off switch whenever inserting or removing the CI module If a viewing card and a card reader come as a set first insert the card reader t...

Страница 49: ...e system System Update To update automatically Select Auto Update Search in Standby and set to On System Update Auto Update Search in Standby On System Update Search Now set select Automatically performs a search in standby and downloads an update if any software updates are available The automatic updating is performed at night under the following conditions Standby TV turned Off with the remote ...

Страница 50: ...se consult your retailer for assistance Confirm the terms and conditions of the contracts with your Internet Service Provider ISP or telecommunications company Set up and connect any equipment required for the network environment Read the manual of the network equipment too or LAN cable Modem Internet Hub or Router Note Depending on the ISP or telecommunications company the required equipment and ...

Страница 51: ...ver instead of the browser and sends data to the browser Setting is required if specified by the provider Select Proxy Enter the address Store Proxy Settings Proxy Proxy Port 0 access select Set characters one by one RETURN Proxy Host http A B C D E F G H I J K L M N U V W X Y Z 0 1 2 3 4 5 6 a b c d e f g h i j k l m n u v w x y z _ O P Q R S T 7 8 9 o p q r s t 1 2 abc 3 def 4 ghi 5 jkl 6 mno 7 ...

Страница 52: ... EXIT to return to TV viewing 2 Select Photo Media Player Photo Video Contents Select EXIT RETURN Select Access access select You can also access Photo mode directly by using VIERA TOOLS How to Use VIERA TOOLS p 26 Media Player Photo All photos Slideshow Contents Select Info EXIT View RETURN View Select Select Thumbnail All photos Error display images that could not be loaded etc The thumbnail of ...

Страница 53: ...e photo size it may not be fully enlarged to fill the screen e g portrait style picture Interval Selects slideshow interval 5 10 15 30 60 90 120 seconds Repeat Slideshow repeat Off On Change to the Video mode You can switch to the Video mode of the Media Player from the thumbnail view While the thumbnail is displayed display the contents selection Select Video blue Media Player Photo All photos Sl...

Страница 54: ...00h15m39s Trip1 title number total title number file format Playback from Title view Playback of the selected title will start Select the title Start playback select red Playback from the selected scene in the title Playback will start from the selected scene to the end of the title Select the title Select the scene to start playback access select Title view Trip1 Contents Select Info EXIT Play RE...

Страница 55: ...o mode Display the menu MENU Select Video Setup Select Other Settings Select the items and set Main Menu Picture Sound Photo Setup Video Setup Video Setup Menu Display Settings Other Settings Access select access Other Settings 16 9 Overscan On Intelligent Frame Creation Off Video Preview On Repeat Off select set Other items p 32 Other items p 28 29 and p 53 Display Settings p 31 Menu Item Adjustm...

Страница 56: ...ra LUMIX Camera with VIERA Link function Analogue channel download Easy playback Power on link Power off link Reduce unnecessary power consumption in standby 3 3 Auto standby for unnecessary equipment 3 3 Pause Live TV programme 3 4 Direct TV Recording 3 Control the menu of the connected equipment by VIERA remote control 1 1 1 Speaker control Connection HDMI cable DIGA Recorder DVD Player Blu ray ...

Страница 57: ...utput connect the equipment supporting VIERA Link to the TV s AV1 or AV2 terminal and set AV1 AV2 out to Monitor in the Setup Menu p 30 Use any one of the optical digital audio cable RCA cable and SCART cable for audio output from the TV 1 Available with the equipment which has HDAVI Control 2 or later function 2 Available with the equipment which has HDAVI Control 3 or later function 3 Available ...

Страница 58: ...V watching recorder s external input AV Recorder s external input AV watching TV s external input AV TV monitor out When Direct TV Recording is performed the recorder is automatically turned on if it is in Standby mode Changing channel or turning off the TV is available while the recorder is recording from its own tuner Changing channel is not available while the recorder is recording from the TV ...

Страница 59: ...anual of the equipment For optimal recording the settings of the recorder may need to be changed For details read the manual of the recorder Download Analogue channel setting Analogue channel download see below Set VIERA Link On in the Setup Menu VIERA Link p 30 Set up the TV After connection turn the equipment on and then switch the TV on Select the input mode to HDMI1 HDMI2 or HDMI3 p 24 and mak...

Страница 60: ...can also stop recording directly Unlock the tuner Unlock Continue Tuner Locked Press EXIT to unlock and stop recording EXIT Features available Using VIERA Link Menu Features available Reduce unnecessary power consumption in standby Standby Power Save Set Standby Power Save On in the Setup Menu to use this function Standby Power Save p 30 The power consumption in Standby mode of the connected equip...

Страница 61: ...TION 1 Display VIERA Link Menu 2 Select Pause Live TV and pause VIERA Link Menu Pause Live TV Start Direct TV Rec VIERA Link Control Speaker Selection Start Recorder Home Cinema select pause The TV picture will be paused You can also pause directly by using VIERA TOOLS How to Use VIERA TOOLS p 26 Live TV programme is recorded on HDD from where it was paused If the paused TV picture disappears afte...

Страница 62: ...u cannot operate it Use its own remote control to operate the equipment 1 Display VIERA Link Menu 2 Select VIERA Link Control VIERA Link Menu Pause Live TV Start Direct TV Rec VIERA Link Control Speaker Selection Start Recorder Home Cinema select 3 Select the equipment you want to access The type of the connected equipment is displayed Select the type of the equipment and access VIERA Link Menu Pa...

Страница 63: ...9 Access and control the speaker volume EXIT DIRECT TV REC ASPECT OPTION RETURN TEXT PROGRAMME STTL INDEX HOLD MENU N INPUT TV AV TV 1 Display VIERA Link Menu 2 Select Speaker Selection VIERA Link Menu Pause Live TV Start Direct TV Rec VIERA Link Control Speaker Selection Start Recorder Home Cinema select 3 Set to Home Cinema or TV set Home Cinema The Player theatre Blu ray Disc theatre or Amplifi...

Страница 64: ... cable HD Satellite receiver To enjoy the sound from the external equipment in multi channel sound e g Dolby Digital 5 1ch connect the equipment to the amplifier For the connections read the manuals of the equipment and amplifier Types of connectable equipment to each terminal Terminal Recording Playback equipment AV1 AV2 AV3 Side panel of the TV V L R To record playback videocassettes DVDs VCR DV...

Страница 65: ...dphones Camcorder Game equipment To adjust volume Headphone Volume in the Sound Menu p 29 Camcorder HDMI equipment Fully wired HDMI compliant cable M3 stereo mini plug Viewing Listening Modem Internet Network Hub or Router LAN cable Ferrite core supplied Less than 10 cm Less than 10 cm Installing the Ferrite core Pull back the tabs in two places Wind the cable twice Open Press the cable through an...

Страница 66: ...image Letterbox detection If black bands at the top and bottom of the screen are detected Auto mode chooses the best ratio and expands the image to fill the screen If no aspect signals are detected Auto mode enhances the image for optimum viewing pleasure Note The ratio varies depending on the programme etc If the ratio is out of the standard 16 9 black bands at the top and bottom of the screen ma...

Страница 67: ...nd Information Technology Industries Association JEITA Note Format the card with the recording equipment The picture may not appear correctly on this TV depending on the recording equipment used Display may take some time when there are many files and folders This function cannot display Motion JPEG or still images that are not JPEG format i e TIFF BMP Data modified with a PC may not be displayed ...

Страница 68: ...e AV3 audio terminals Note Audio settings can be made on the HDMI1 2 3 Input in the Sound Menu p 29 If the connected equipment has an aspect adjustment function set the aspect ratio to 16 9 These HDMI connectors are type A These HDMI connectors are compatible with HDCP High Bandwidth Digital Content Protection copyright protection Equipment having no digital output terminal may be connected to the...

Страница 69: ...the TV in AV mode Check the correct AV input mode is selected Check the mains lead is plugged into the socket outlet Has the TV been turned On Check the Picture Menu p 28 and volume Check all required cables and connections are firmly in place Auto aspect Auto aspect is designed to provide you with the best ratio to fill the screen p 66 Press the ASPECT button if you would like to change the aspec...

Страница 70: ... are unusual when the equipment is connected via HDMI Check the HDMI cable is connected properly p 64 Turn the TV and equipment Off then turn them On again Check an input signal from the equipment p 68 Check the output resolution of the equipment Use equipment compliant with EIA CEA 861 861B Network Cannot connect to the network Check the LAN cable is connected properly p 50 Check the connections ...

Страница 71: ... Please exit Cannot get the time information and cannot edit Timer Programming screen Check the connection of the RF cable Invalid system time Timer Programming will not work Please press TV button on remote control and check time display on Banner Cannot get the time information If there is no time displayed on the Information banner check the connection of the RF cable Max number of timers alrea...

Страница 72: ...ramming has already passed Set the timer correctly p 43 Timer Event Due to Start has been programmed for External recording at This message will appear 2 mins before timer programming event for external recording due to start Timer incorrect Set the start and end times in Timer Programming correctly p 43 Timer overlap Press OK to keep RETURN to edit Timer programming events are overlapped Press th...

Страница 73: ...ed Video Codec High Definition A standard for high definition video cameras that can be used to record and play high resolution HD images DVB Digital Video Broadcasting DVD Digital Versatile Disc DVI Digital Visual Interface A high quality video interface standard to connect to the display EPG Electronic Programme Guide A digital guide showing scheduled programmes HDMI High Definition Multimedia I...

Страница 74: ...Mode 31 Remote control 6 8 Reset to Defaults 28 29 RGB 75 S Sales and Support Information 76 Satellite receiver 11 64 SCART 67 75 SD Card 52 67 Search list 18 Shipping Condition 46 Signal Condition 40 Slideshow 52 Specifications 75 Split Programme 20 Subtitles 16 23 S Video 67 75 System Update 49 T Teletext 21 23 Timer Programming 19 42 TV Guide 18 20 U Update Channel List 40 V V Audio Surround 29...

Страница 75: ... M3 3 5 mm stereo mini Jack 1 Receiving Systems Band name PAL I UHF E21 68 PAL 525 60 Playback of NTSC tape from some PAL Video recorders VCR or NTSC disc playback from DVD player and recorder DVB T T2 Digital terrestrial services via UHF aerial input M NTSC Playback from M NTSC Video recorders VCR NTSC AV input only Playback from NTSC Video recorders VCR Aerial input UHF Operating Conditions Temp...

Страница 76: ...his case it complies with the requirement set by the Directive for the chemical involved Sales and Support Information Customer Care Centre For customers within the UK 0844 844 3852 For customers within the Republic of Ireland 01 289 8333 Visit our website for product information www panasonic co uk E mail customer care panasonic co uk Direct Sales at Panasonic UK For customers 0844 844 3856 Order...

Отзывы: