background image

36

Red in, S.C.---In*

Socket Earth

CVBS out (video)

CVBS earth
Red earth

Green in

Green earth

Blue in

Blue earth

Audio out (L)

Audio out (R)

CVBS in (video)

RGB status earth

Status RGB

--- ---

Status CVBS

Audio in (L)

Audio earth

Audio in (R)

21

19

17

15

13

11

9

7

5

3

1

20

18

16

14

12

10

8

6

4

2

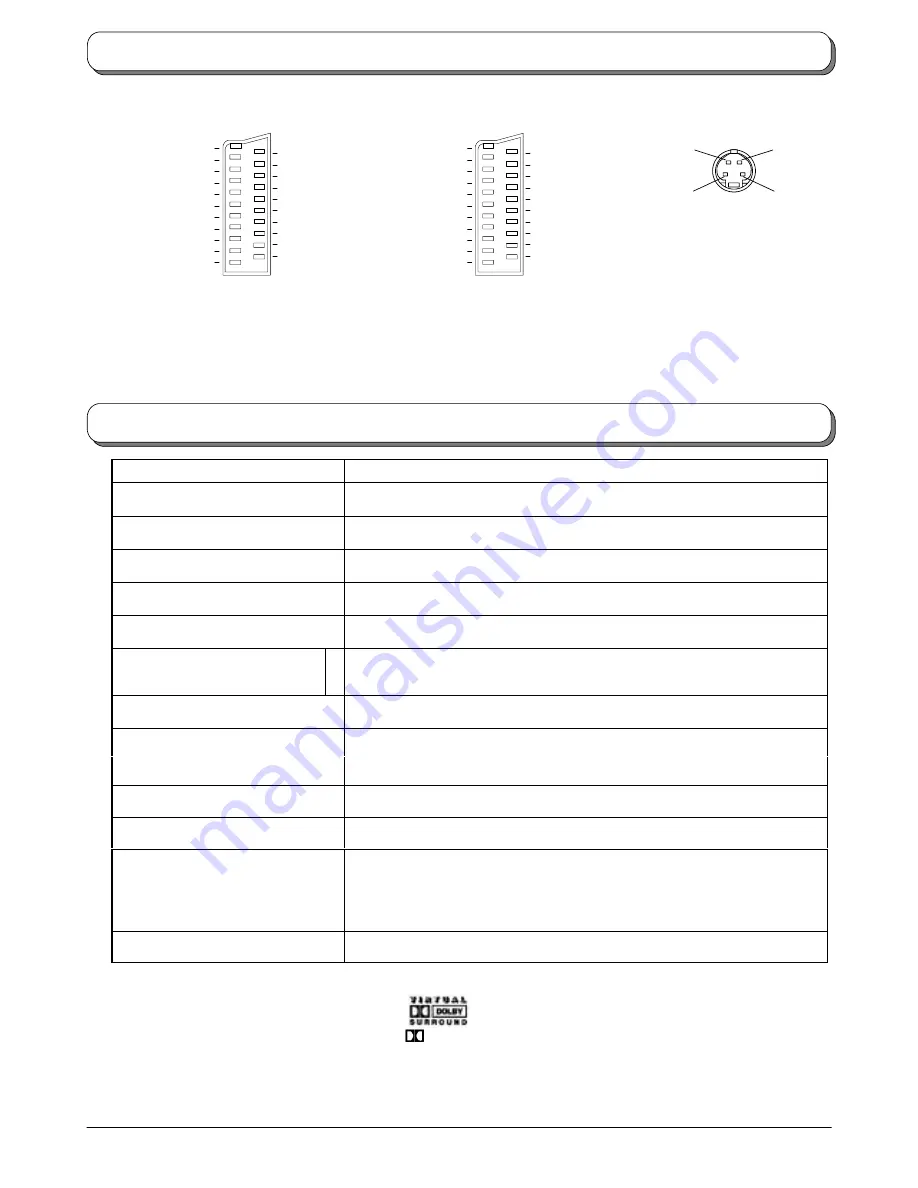
AV1 / AV4 Scart socket

(S--Video, Q--Link -- AV4 only)

S.C.---In

* : on Pin 15 ’S.C.---In’ only

applies to

AV2.

AV2 : Pins 15 and 20 are dependent on

AV2 S---VHS / VIDEO switching.

Socket Earth

CVBS out (video)

CVBS earth
Earth

Earth
Earth

Audio out (L)

Audio out (R)

CVBS in (video)

--- ---

Q---Link data AV2 only

Status CVBS

Audio in (L)

Audio earth

Audio in (R)

21

19

17

15

13

11

9

7

5

3

1

20

18

16

14

12

10

8

6

4

2

S.C. --- In

--- ---

--- ---

--- ---

AV2 Scart socket (S--Video, Q--Link)

(S--Video, Q--Link -- AV2 only)

Earth

Earth
Earth

Suitable inputs for

A V1 / A V4 include

RGB (Red/Green/Blue).

S.C.---In

* : on Pin 15 ’S.C.---In’ only

applies to

AV4.

AV4 : Pins 15 and 20 are dependent

on AV4 S---VHS / VIDEO switching.

AV3 S--Video 4 pin socket

Chrominance

in

Chrominance

earth

Luminance

earth

Luminance

in

Q---Link data AV4 only

TX--36PD30

Power Source

220 --- 240V 50Hz a.c.

Power Consumption

158W

Standby Consumption

0,5W

Picture Tube

Visible Diagonal

86 cm

Audio Output

Music Power

Subwoofer 24W, Left / Right 20W x 2 (MPO).

Dimensions

H

W

D

644 mm

897 mm

588 mm

Weight (kg)

82

Receiving

Systems/

PAL I

UHF E21

--

68

PAL 525/60 Playback of NTSC tape from some PAL video recorders (VCR)

Systems/

Bandname

PAL 525/60 Playback of NTSC tape from some PAL video recorders (VCR)

M.NTSC Playback from M.NTSC Videorecorders (VCR)

NTSC (AV input only) Playback from NTSC Videorecorders (VCR)

Aerial -- Rear

UHF

Headphones -- Front

3.5mm, 8

impedance

AV -- Rear

AV1 --- 21 pin socket --- Audio / Video in / out, RGB in

AV2 --- 21 pin socket --- Audio / Video in/out, S---Video in, Q---Link

AV4 --- 21 pin socket --- Audio / Video in / out, S---Video in, RGB in, Q---Link

AV4(C) --- Component in (Y, Pb, Pr)

AV5 --- 21 pin socket --- Audio / Video in / out

2 x RCA Audio monitor out

AV -- Front

AV3 -- S---Video in, 1 x RCA Video in, 2 x RCA Audio in

Specifications are subject to change without notice. Weight and dimensions shown are approximate.

Dolby Virtual and the are trademarks of Dolby Laboratories.

Manufactured under license from Dolby Laboratories

Scart and S---video socket information

Specifications

Содержание TX-36PD30

Страница 1: ...TQB8E3925 Operating Instructions TX 36PD30 Colour Television U K Standard ...

Страница 2: ...pulp De inked without bleaching Free from optical brightening agents OBA Warnings and Precautions 3 Accessories 4 Fitting remote control batteries 4 Basic controls front panel and remote control 5 Quick Start Guide 6 Using the On Screen Displays 12 Picture menu 13 Sound menu 14 Setup menu 15 Tuning menu overview 16 Programme edit 17 Auto setup 19 Manual tuning 20 Shipping condition 21 Owner ID 22 ...

Страница 3: ...r sources of heat To prevent fire never place any type 0f candle or naked flame on top or near the TV set FORYOURSAFETYPLEASEREADTHEFOLLOWINGTEXTCAREFULLY This appliance is supplied with a fitted three pin mains plug for your safety and convenience A 5 amp fuse is fitted in this plug If the fuse is replaced then the replacement fuse must be 5 amp rated and should be approved by ASTA or BSI to BS13...

Страница 4: ...ctive film covering the decorative front panel This may be carefully removed Questionnaire 1 D Make sure that the batteries are fitted the correct way round D Do not mix old batteries with new batteries Remove old exhausted batteries immediately D Do not mix different battery types i e Alkaline and Manganese or use rechargeable Ni Cad batteries Replace the cover Slide off the battery cover Insert ...

Страница 5: ...y Virtual On Off see page 14 Direct TV Record button see page 28 Status button Press to display programme position programme name channel number time NICAM mode ASPECT mode Scan mode and programme table VCR DVD buttons see page 30 MAINS Power On Off switch STR Normalisation store Used to store tuning and other function settings F Function select Displays the On Screen Display functions use repeate...

Страница 6: ...of TV and VCR using Scart and RF cables Scart connections D The VCR can also be connected to the TV using a Scart cable if you are using a Scart equipped device VCR D Use the TV s AV1 or AV5 Scart socket for a VCR D Use the TV s AV2S or AV4S Scart socket for an S Video VCR RF connection D Connect the RF cable to the VCR Aerial In socket and an RF cable from the VCR Aerial Out socket to the TV Aeri...

Страница 7: ...n the AV1 Scart of the DVD Recorder must be connected to the AV4 socket of the TV If your VCR or DVD Recorder is not a Q Link device please consult the operating instruction book for that product If two Q Link compatible devices are connected to this TV at the same time information will be automatically downloaded via the AV2 socket If you wish to download via the AV4 socket see page 18 Further in...

Страница 8: ...se consult your VCR operating instruction book RF connections D Connect an RF cable to the Aerial In socket of the Satellite Receiver D Connect an RF cable from the RF Out socket of the Satellite Receiver to the RF In socket of the VCR or DVD recorder D Connect an RF cable from the RF Out socket of the VCR or DVD recorder to the TV Aerial In socket Mains Socket TV Satellite Receiver VCR or DVD rec...

Страница 9: ...nstruction book If Q Link is not operating correctly check the following D The Scart cable is connected to the TV s correct Scart socket D The Scart cable is connected to the VCR s compatible Q Link NEXTVIEWLINK or similar technology Scart socket D The Scart cable is a fully wired type For further information on Q Link and connecting equipment see pages 28 33 and 34 D The sorted programme order de...

Страница 10: ...e Change character Select character position Repeat above until NAME HOUSE NUMBER and POSTCODE are entered Press STR to store the details Press STR again when you are asked Are you sure For further information on Owner ID including how to view the details you have stored see page 22 A space is provided on page 22 to write down your PIN NUMBER for future reference Enter required 4 digit Owner ID PI...

Страница 11: ...complete The screen should not be showing any On Screen Display menus Using the remote control keys indicated access the GeomagneticCorrectionmenu option and follow the procedure below for a full explanation of the On Screen Display menu system see page 12 Press the SETUP menu button Move to the Geomagnetic menu option AccesstheGeomagneticmenu Horizontalguidebars and tilt adjustment indicator appe...

Страница 12: ...er of features to store settings after adjustments have been made or options have been set The TV AV button is used to exit the menu system and return to the normal viewing screen An On Screen Help box is displayed whenever a menu is displayed on the TV This Help box indicates which keys on the remote control are used to navigate the menu shown see above for descriptions of button functions Note D...

Страница 13: ...nhancement Increase or decrease the levels of these options according to your personal preference With an NTSC signal source connected to the TV this menu option is available the option allows adjustment of the picture hue to suit your taste Allows you to set the overall colour tone of the picture Choose from Cool Normal and Warm Automatically reduces unwanted picture noise Lets you choose the scr...

Страница 14: ...ureand picturemode note that the headphones will relay the soundtrack for the programme in the left window the current programme position When usingoneoftheotherdoublewindowfeatures the soundtrackfortheprogrammeinthemainwindow rather than the smaller window is relayed Increase or decreaselevel toenhance orminimise bass output Usually set to Onto receive a stereo signal but if reception deteriorate...

Страница 15: ...1 Switches the TV off within a preset time which you can choose from between 0 to 90 minutes in 15 minute intervals Select 3D Comb filter to reduce colour patterning for certain types of picture source Provides access to many other features including Programme edit and Auto setup See page 16 Available in AV mode only Lets you adjust the volume level of individual AV inputs This feature allows you ...

Страница 16: ... and wish to retune your TV to the local stations See page 19 Allows individual programme positions to be tuned manually See page 20 This option is used when a decoder is connected via AV2 or AV4 Store the setting as On so that every time this programme position is selected the TV software is set to handle the decoded information this is important if your decoder unit is connected to AV2 or AV4 vi...

Страница 17: ...aving adjusted some features stores the change made Adding deleting a programme channel Make sure the cursor is in the Prog column Press the green button to add a programme channel to the programme position or the red button to delete one Press the same button again to confirm your decision Moving a programme channel Make sure the cursor is in the Prog column Press the yellow button Choose the new...

Страница 18: ... DVD recorder The following features are only available from the device connected to the scart socket selected using Q Link see page 15 You can copy programme information to a compatible recording device connected to AV2 or AV4 see page 34 for connection information Press the blue button Programme data will now be sent to the recording device This might take a few seconds depending on the number o...

Страница 19: ... stored If you exit the procedure after this point and before Auto setup is complete no station information will be stored Restart and complete the Auto setup procedure so that the TV is retuned Press STR to start Auto setup The TV will search for locate store and then sortinto order your local stations Ifacompatiblerecordingdeviceisconnectedviathe AV2 AV4socket programmedatawill besent tothe devi...

Страница 20: ...ossible to use the control panel buttons on the front of your TV to tune individual programme positions Press the F button Front panel until Tuning mode is reached Press the or button to access Tuning mode Press the TV AV button to move between Change programme and Search Press the or button to change programme position or start search When the desired station is found press STR to store The progr...

Страница 21: ...ning informationand resettingall controllevels backto factorysettings You may need to adjust your VCR or programme position 0 VCR after operating the Shipping condition menu refer to page 29 Press the SETUP menu button Move to Tuning menu option Access Tuning menu Move to Shipping condition Access Shipping condition Press STR to start Press again to confirm each time that you are asked Are you sur...

Страница 22: ...ia the Tuning menu Press the SETUP menu button Move to Tuning menu option Access Tuning menu Move to Owner ID Access Owner ID If the Owner ID has previously been set enter the PIN NUMBER using 0 to 9 on the remote control followed by STR to proceed this will take you to the NAME option If no Owner ID has previously been set enter the required 4 digit OwnerIDPINNUMBER using 0 to 9 on the remote con...

Страница 23: ...nic Auto appears in the top left of the screen if black stripes above and below the picture are detected Panasonic Auto chooses the best ratio and expands the picture to fill the screen This process can take several minutes depending on the darkness of the picture You may prefer to manually select one of the other aspect options available to view the picture Notes D If in Panasonic Auto mode you e...

Страница 24: ...c picture with no aspect distortions 14 9 14 9willdisplaya14 9letterboxor4 3 picture with no aspect distortions 4 3 4 3 will display a 4 3 picture at its standard 4 3 size with no aspect distortions Aspect Controls ASPECT 16 9 16 9 14 9 14 9 4 3 4 3 ...

Страница 25: ... 9 anamorphic letterbox pictures as a full screen display with no aspect distortions Zoom3 Zoom3 will display 21 9 letterbox picturesasafullscreendisplaywith no aspect distortions 16 9will display the pictureat itsmaximum sizebut with slight stretching Aspect Controls ASPECT Zoom2 Zoom1 Zoom1 Zoom2 Zoom3 Zoom3 ...

Страница 26: ... feature allows two programmes to be viewed at the same time as picture in picture does The difference is how the two programmes are displayed in picture in picture the smaller window appears within the main image in picture out of picture the smaller window appears to the right of the main image Press the yellow button to select the contents of the smaller window switching between displaying a TV...

Страница 27: ...re Press the TV TEXT button followed by the MULTI WINDOWbuttonto movebetween viewingteletext and the picture andtext feature Picture andtext lets you see the current programme and a page of teletext side by side Whilst using this feature the remote control affects the teletext page if you wish to make changes to the programme viewed press theTVTEXTbutton to return to watching the programme on its ...

Страница 28: ...o the device s operating instruction book Recording in progress The recording device is recording the programme signal from its own tuner If you wish you can switch off the TV and leave the device recording in the normal way No recording Check tape or disc The tape or disc may have been write protected missing or may be damaged The device may already be recording Refer to the device s operating in...

Страница 29: ...Tuning your TV to the VCR Switch on the VCR DVD recorder insert and play a pre recorded tape disc with known content Press the SETUP menu button Move to Tuning menu option Access Tuning menu Move to Manual tuning Access Manual tuning Select programme position 0 VCR Start searching for the playback of the known content tape or disc When the playback is found press STR to store Press the TV AV butto...

Страница 30: ... stop the tape or DVD Stop VCR Press to fast forward the tape In Play mode press to view the picture rapidly forward Cue DVD Press once to skip to the next track Skip Fast Forward Cue VCR Press to rewind the tape In Play mode press to view the picture rapidly in reverse Review DVD Press once to skip to the previous track Skip Rewind Review Press in playback mode the picture will pause Press again ...

Страница 31: ...ss the TV TEXT button to switch between the current programme teletext and the picture and text feature lets you see the current programme and teletext side by side see page 27 TV Teletext mode Pages can be selected in two ways a Press the Up Down buttons to increase or decrease the page number by one b By entering the page number using 0 9 on the remote control Page Selection Press the SET UP but...

Страница 32: ...of sub pages In picture and text mode use the left and right cursor buttons to select a sub page from the range displayed at the top of the Teletext window In Teletext operation use the following procedure to access sub pages If the sub page you want to look at is not yet available press the SETUP button to display special functions followed by the Yellow button to view the TV picture whilst waiti...

Страница 33: ...fter a few seconds If you want to select an input when the keys are not shown press the TV AV key once more and the keys will reappear Notes D You can also select an AV source using the TV AV button on the control panel on the front of your TV Press the TV AV button repeatedly until you reach the AV source you wish to view D When in AV mode a reduced number of options are available in the SOUND an...

Страница 34: ...le CAMCORDER DVD PLAYER Input Output from AV2 Scart Socket Q Link data Q LINK COMPATIBLE DVD RECORDER DVD PLAYER HI FI SYSTEM Output from L R AUDIO OUT Sockets Notes D Additional equipment and cables shown are not supplied with this TV set D Do not connect a computer with TTL output 5V to this set D For Scart socket wiring information see page 36 D Component video input is for video only you will ...

Страница 35: ...reduce picture noise Normal Picture No Sound Volume level Sound mute switched on No Picture No Sound TV set to AV mode Not plugged into A C outlet Not switched on Picture Sound controls set at minimum levels Check if in standby mode No Colour Normal Sound Colour controls set at minimum levels Poor or Distorted Picture Weak or No Sound Retune Channel s Coloured Patches Normal Sound Magnetic Interfe...

Страница 36: ...ink data AV4 only TX 36PD30 Power Source 220 240V 50Hz a c Power Consumption 158W Standby Consumption 0 5W Picture Tube Visible Diagonal 86 cm Audio Output Music Power Subwoofer 24W Left Right 20W x 2 MPO Dimensions H W D 644 mm 897 mm 588 mm Weight kg 82 Receiving Systems PAL I UHF E21 68 PAL 525 60 Playback of NTSC tape from some PAL video recorders VCR Systems Band name PAL 525 60 Playback of N...

Страница 37: ...37 Notes ...

Страница 38: ...38 Notes ...

Страница 39: ...39 Notes ...

Страница 40: ...plication at www panasonic co uk S Most major credit and debit cards accepted S All enquiries transactions and distribution facilities are provided directly by Panasonic UK Ltd S It couldn t be simpler S Also available through our internet is direct shopping for a wide range of finished products take a browse on our website for further details S For UK customers 08705 357357 S For Republic of Irel...

Отзывы: