background image


15


Geomagnetic Correction


Slight tilting of the picture may be noticeable or coloured patches may sometimes appear at the corners of the 
screen (colour purity). The Geomagnetic Correction feature can be used to eliminate them, if necessary.

Geomagnetic corrections can be made from the Remote Control or the TV set.

1. If geomagnetic changes still cause colour patches on the screen even after the TV is installed, turn the power 

off and turn back on again after about 30 minutes.

2. Adjustment for geomagnetism should be performed every time the location of the TV is changed.
3. In some cases colour patches will not be completely eliminated even after adjustment, particularly in ferro-

concrete buildings and other structures susceptible to geomagnetism. In these cases adjust by changing the 
installation location.

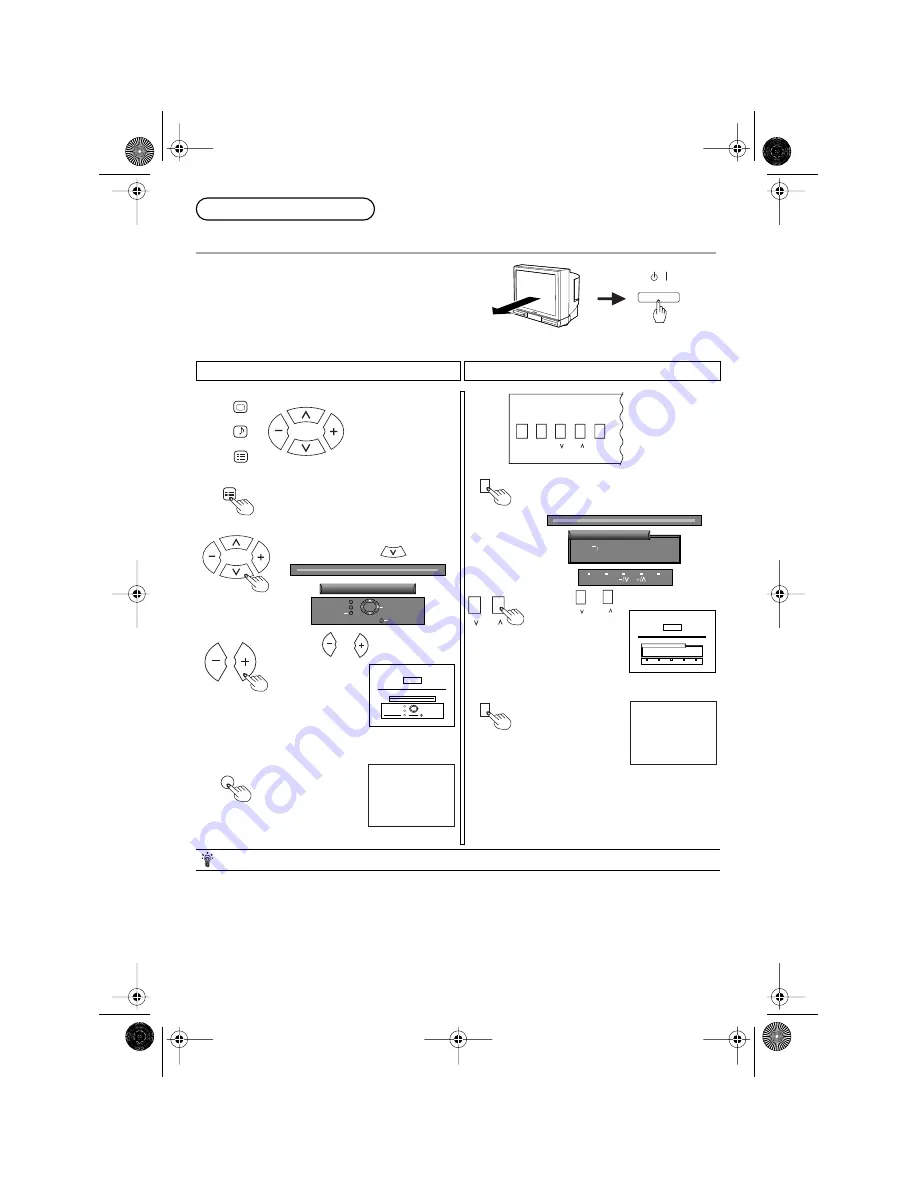
The power should be off when determining the 
installation location and direction.
At this time please verify what direction the TV screen 
is to face (direction indicated by the arrow).
Press the main power switch.


Operation from Remote Control

Operation from the TV set


1. Press the SET UP button.

2. Select the Geomagnetic correction  

menu by pressing 

.

3.


Press  

or  

to access 
Geomagnetic 
adjust the 
picture tilt or 
coloured 
patches as 
necessary.


4. Press the TV/

AV button to 
exit the 
Geomagnetic 
correction 
menu.

1. Press the F (FUNCTION) button  to 

access the Geomagnetic correction 
menu.

2. Press  

or  

to adjust the 

picture tilt or 

coloured 

patches as 

necessary.

3. Press the F 

(FUNCTION) 
button to exit the 
Geomagnetic 
correction menu.


Helpful Hint

Power ON

SOUND

SET UP

PICTURE

(Remote Control)

STR

F

+/

-/

TV/AV

(TV set)

SET UP

TV/AV

Geomagnetic  correction

E x i t

Return

TV/AV

Adjust tilt

+

002

Normal Viewing

F

+/

-/

F

Geomagnetic correction

+ : Ad just ti l t

F

: To exi t

F

STR

TV/AV

-/

+/

+

002

— / +

:   

:    

Normal Viewing


TX32F500A-2912_E  Page 15  Monday, July 18, 2005  5:50 PM

Содержание TX-32F500A

Страница 1: ...ion Colour Television TX 32F500A Please read these operating instructions completely before operating this set and retain the booklet for future reference TQB4G2912 TX32F500A 2912_E Page 1 Saturday July 16 2005 12 23 PM ...

Страница 2: ...ntents Warnings and Cautions 4 5 Before Operating This Set 6 8 Battery Installation 6 Connecting the Aerial Cable to the RF In Terminal 7 Connecting the Plug to the Wall Outlet 7 How to Turn the Power On 7 Owner ID 8 Location of Controls 9 10 Remote Control 9 Controls and Terminals on the TV 10 Connections 11 12 Connecting S Video Equipment to the AV Input 11 Connecting a Standard VCR to the AV In...

Страница 3: ...tuning via front panel 24 Manual tuning 25 Manual tuning via front panel 25 Aspect Controls 26 Menu Operation 27 28 Multi PIP 27 CH Search 28 Surround Sound 29 Advanced Remote Control Operation 29 30 Manufacturer s Code Settings 29 VCR DVD 30 Teletext Operation 31 33 Troubleshooting 34 Specifications 35 TX32F500A 2912_E Page 3 Saturday July 16 2005 12 23 PM ...

Страница 4: ...wer pots cups small metal objects or cosmetics containers chemicals or water DO NOT use if the power cord or power plug is damaged or if the plug does not fit tightly into the socket DO NOT insert foreign objects metal or easily flammable objects DO NOT use at a voltage other than indicated TAKE CARE NOT to damage the power cord DO NOT remove the rear cover as live parts and High Voltage component...

Страница 5: ...e socket if you are not going to use the unit for an extended period Ask your sales outlet to install the aerial Cleaning The unit contains many plastic parts For this reason DO NOT use benzine thinner or other chemicals to clean the unit Dust will accumulate on the picture screen Please wipe with a soft cloth from time to time If you use a chemically treated cloth please be careful to follow the ...

Страница 6: ... polarity This is identifiable by the and symbols on both the batteries and inside the battery compartment 3 Replace the cover and slide in reverse until the lock snaps Do not use rechargeable Ni Cd batteries They are different in shape and performance and may fail to ensure correct operation Battery cautions Two R6 AA size Old Batteries New Batteries Replacement both batteries at the same time Do...

Страница 7: ...red Any matters regarding Aerial installation upgrading of existing systems or accessories required and the costs incurred are the responsibility of you the Customer Connecting the Plug to the Wall Outlet How to Turn the Power On Note The On Off switch on this model does not full disconnect the TV from the mains supply Press the Power switch on Television to turn the set on See page 13 MONO MONO Y...

Страница 8: ...n when you are asked Are you sure For further information on Owner ID including how to view the details you have stored see page 22 A space is provided on page 22 to write down your PIN NUMBER for future reference We recommend that as soon as you have stored Owner ID details or have exited the feature the picture controls are reset to normal viewing levels To do this press the N button found under...

Страница 9: ... TELETEXT TEXT Favourite Page Selection TV TEXT Selection 100Hz PROGRE Surround Aspect Picture in Picture Selection Recall VCR DVD Rewind Review Normalization Store Sound Mute Programme Number Up and Down Volume Up and Down TV AV Mode Selection Coloured buttons used for Aspect functions Teletext functions AV selection TEXT Index Channel Search TEXT Hold Still Direct Programme Number Two Digit prog...

Страница 10: ... AV4 Input Terminals 12 6 Volume Up Program Number Up 3 13 É DVD Y PB PR Input Terminals 12 7 TV AV Selection 14 Ñ AV5 Input Terminals 11 MONO MONO Y PB PR Y PB PR MONO MONO S VIDEO VIDEO L R AUDIO MONITOR OUT AV1 IN AV5 IN AV2 IN COMPONENT COMPONENT AV4 IN VIDEO VIDEO AUDIO L MONO R S STR F TV AV AV3 IN VIDEO VIDEO AUDIO L MONO R S AV3 IN MONO MONO Y PB PR Y PB PR MONO MONO S VIDEO VIDEO L R AUDI...

Страница 11: ... connected to any of the AV inputs but we recommended that you use AV5 leaving the other inputs free for S VHS DVD or set top box connections If you only have one VCR we recommend that you use AV1 Note A mono VCR can be connected to this television Connect the VCR Audio out to the Left Audio Input on the television the sound will automatically be directed to both speakers MONO MONO Y PB PR Y PB PR...

Страница 12: ...onitor Out and video sources VCR video disc camera etc are connected to one of the AV Inputs the television becomes a visual display for editing copying The Monitor Out Audio can also be connected to a stereo amplifier or other hi fi equipment Note Never connect the same video recorder or other device to both the VIDEO IN and MONITOR OUT terminals of this television as this could cause incorrect o...

Страница 13: ...ction Press the Programme Number Up 3 or Down 4 button to select the next higher or lower Programme Number 3 Direct Programme Number Selection 0 9 e g To select Programme Number 1 press the 1 button 4 Two Digit Programme Number Selection e g To select Programme Number 18 Press button Press button Press button 5 Volume Adjustment Press the Volume Up or Down button to increase or decrease the sound ...

Страница 14: ... current system status such as Program number Picture menu Sound menu Scan mode and Colour system 9 STR Unit Used to store tuning and other function settings Also used to start the menu demonstration Remote Control Stores some settings in TUNING menus 10 Function Selection Displays the on screen display functions use repeatedly to select from the available functions The following adjustments can b...

Страница 15: ... power should be off when determining the installation location and direction At this time please verify what direction the TV screen is to face direction indicated by the arrow Press the main power switch Operation from Remote Control Operation from the TV set 1 Press the SET UP button 2 Select the Geomagnetic correction menu by pressing 3 Press or to access Geomagnetic adjust the picture tilt or...

Страница 16: ...ve for descriptions of button functions Note The Help box is not shown in the menu pictures in this instruction book due to space limitations N REC VCR STR HELP DVD PICTURE SOUND SET UP TV TEXT 100Hz PROGRE SURROUND ASPECT TV AV F P HOLD INDEX STILL CHSEARCH i MULTI PIP 1 2 3 4 5 6 7 8 9 0 SOUND SET UP PICTURE Pi cture menu Menu Con t rast Br i ghtness Co l our Sha r pness Co l our temperature P N...

Страница 17: ...UND SET UP TV TEXT 100Hz PROGRE TV AV F P HOLD INDEX STILL CHSEARCH i PICTURE TV AV Menu Function Dynamic For viewing in brighter environments This menu selects higher than normal levels of Brightness and Contrast Standard For viewing in normal evening lighting environments This menu selects the normal levels of Brightness and Contrast Cinema For viewing in a dark room This menu selects reduced le...

Страница 18: ...between 75 833i 100Hz and Progressive for PAL signal Note When viewing a PAL transmission other than PAL 60 with Scan mode set to Progressive the screen will flicker this is not a fault Helpful Hint Normalization Standard Warm Cool Pi cture menu Menu Con t rast Br i ghtness Co l our Sharpness Co l our temperature P NR Scan mode Cinema Standard Auto 75 833i Off Weak Auto Strong Pi cture menu Menu C...

Страница 19: ...OLD INDEX STILL CHSEARCH i 1 2 3 4 5 6 7 8 9 SOUND TV AV SURROUND Sound Menu Function Music Amplifies the Low frequencies and outputs optimum sound For music programmes for example News Human voices middle pitch sounds will sound more clear Cinema For movie and drama programmes Sound menu Menu Vo l ume Bass Tr eb le Ba l ance Headphone volume Subwoofer Do l by Vi r tual Cinema Off Menu Music Menu ...

Страница 20: ...the left and right speakers The general conceptual model of a Virtual Dolby Surround System divides the centre signal equally between the left and right speakers to achieve a Phantom Centre Image It also processes the Virtual surround signal before sending it to the left and right speakers creating a virtual image around the listener The virtual effect is stronger with Dolby Surround encoded movie...

Страница 21: ... are coloured patches at the corners of the screen use this feature to eliminate them See page 15 Owner ID This television lets you to prove ownership by letting you enter personal identification into it The Owner ID function allows you to enter a security code and address information so that in the unfortunate event of theft it will help the Police to determine the owner Refer to page 22 for inst...

Страница 22: ...eviously been set enter the required 4 digit Owner ID PIN NUMBER using 0 to 9 on the Remote Control If a 4 digit PIN NUMBER was entered above you will be taken automatically to the NAME line If not move to the NAME line by using or Change character by using or Select character position by using or Repeat above until NAME HOUSE NUMBER and POSTCODE are entered Press to store the details Press again ...

Страница 23: ...ndividual programme positions to be tuned manually See page 25 Fine tuning Use to make small adjustments to the tuning of an individual station useful for example when weather conditions are affecting reception quality of a programme Skip It is possible to skip Programme Number on which no TV stations are tuned appearing on the screen The function is only effective when selecting Programme Numbers...

Страница 24: ... on programme position 1 Press at any time to go back to watching TV please read the Note in the above procedure 1 Press Front panel until Tuning mode is reached 2 Press or to access Tuning mode 3 Press Front panel to access Auto tuning 4 Press or to start search When the desired station is found press to store The programme position will flash Repeat above procedure to tune additional programme p...

Страница 25: ...option by using or 5 Access Manual tuning by using or 6 Select the programme position to be tuned by using or 7 Press repeatedly until required station is found by using or When the desired station is found press to store The programme position will flash Repeat above procedure to tune additional programme positions Press at any time to go back to watching TV 1 Press Front panel until Tuning mode ...

Страница 26: ...ortion Just This option gives you a best fit option when showing 4 3 on wide screen The centre of the picture is not affected but there is some stretching at the edges 4 3 This option will display a standard 4 3 picture with no aspect distortion Zoom 1 This option will display 16 9 letterbox or 4 3 pictures with no aspect distortion Zoom 2 This option will display 16 9 anamorphic letterbox picture...

Страница 27: ...mode PAP Picture and picture Mode Allows two equal sized pictures to be viewed at the same time The pictures will be shown side by side Pressing the Red button will switch to the PIP The Green button will switch to the POP mode The Blue button swaps the position of the two pictures Picture and picture mode Changing channel in Multi PIP mode When the On Screen display coloured boxes is ON the sub p...

Страница 28: ...om the top left corner Channel search Picture and text Press to move between watching the current programme viewing teletext and the Picture and text feature Picture and text lets you see the current programme and a page of teletext side by side Whilst using this feature the Remote Control affects the teletext page if you wish to make changes to the programme viewed press to return to watching the...

Страница 29: ... guarantee that any other manufacturer s product will work with this Remote Control Surround This button switches the Dolby Virtual surround on and off Please refer to page 20 Stereo Mono Pressing the button changes the mode from Stereo to Mono and back again Normally the television will detect whether the broadcast signal is Mono or Stereo and will set the mode accordingly If the Stereo signal is...

Страница 30: ...or details Button Function VCR DVD 1 Play button 2 Rew Rewind Review button 3 Stop button 4 VCR Power button DVD Power button 5 REC Record button 6 Pause Still button 7 FF Fast Forward Cue button 8 VCR and DVD Select button 9 Programme Number Up and Down buttons for VCR Programme Skip button N REC VCR STR HELP DVD PICTURE SOUND SET UP TV TEXT 100Hz PROGRE SURROUND ASPECT TV AV F P HOLD INDEX STILL...

Страница 31: ...What is FASTEXT In FASTEXT mode four differently coloured subjects are displayed at the bottom of the screen To access more information about one of these subjects press the corresponding colour coded button on the Remote Control This is the current preferred method of operation in New Zealand TV TEXT Pressing this button switches the screen between TELETEXT Normal television viewing When TEXT is ...

Страница 32: ...ess the followed by the Green button Operating the F T B expands and displays the upper half of the screen Operating the F T B button again expands and displays the lower half of the screen Operating the F T B button a third time returns the display to normal condition DISPLAY CANCEL Display Cancel If you wish to watch the television while you are waiting for a page to be transmitted you can use t...

Страница 33: ...ub page number must be entered as a four digit number e g sub page 3 would be entered as 0003 If in List mode a T will appear in the current box at the bottom 4 Press theYellow button to view the TV picture while waiting for the sub page to be found This function is not necessary when the picture and the TELETEXT are both being displayed side by side 5 When found press the Yellow button To clear t...

Страница 34: ...eck whether the mute function has been activated on the Remote Control No Picture No Sound Not plugged into AC outlet Not switched on Contrast and Brightness Volume setting Check by pressing the Power Switch or Stand by button on the Remote Control No Colour Normal Sound Colour control Scrambled Normal or Weak sound Retune channels Coloured Patches Normal Sound Magnetic interference from unshielde...

Страница 35: ...S Video In Y 1 Vp p 75 Ω C 0 3 Vp p 75 Ω DVD Y 1 0 Vp p 75 Ω PB 0 7 Vp p 75 Ω PR 0 7 Vp p 75 Ω AV1 2 3 4 5 Video In 1 Vp p 75 Ω Audio In Approx 0 5 V 47 kΩ Monitor Out Video Out 1 Vp p 75 Ω Audio Out Approx 0 5 V 1 kΩ AV1 IN Rear S Video Video Audio L R terminals AV2 IN Rear Video or Y PB PR Audio L R terminals AV3 IN Front S Video Video Audio L R terminals AV4 IN Rear Video or Y PB PR Audio L R t...

Страница 36: ...can be found on its cabinet You should note this serial number in the space provided below and retain this book plus your purchase receipt as a permanent record of your purchase to aid in identification in the event of theft or loss and for Warranty Service purposes Model Number Serial Number TX32F500A 2912_E Page 36 Saturday July 16 2005 12 23 PM ...

Отзывы: