background image

38

• Teletext features may vary depending on the Broadcasting Companies and is only

available if the channel selected is transmitting Teletext.

• Pressing the Picture button whilst in Teletext operation will display the contrast function

with a cyan bar, press 

 or 

 to alter the setting as required.

Pressing the Setup button whilst in Teletext operation will display special function options
at the bottom of the screen.

• When in Teletext mode, the volume may still be altered to the desired listening level.

What is LIST mode?
In LIST mode, four differently coloured page numbers are situated at the bottom of the
screen. Each of these numbers can be altered and stored in the TV's memory.

What is FASTEXT?
In FASTEXT mode, four differently coloured subjects are situated at the bottom of the display. To access more information about one
of these subjects, press the appropriately coloured button. This facility enables fast access to information on the subjects shown.

Note:
• Characters will be illegible unless you select the Text Language which matches the text being received.

Select the correct LANGUAGE (Refer to page 25).

Advanced Remote Control Operation

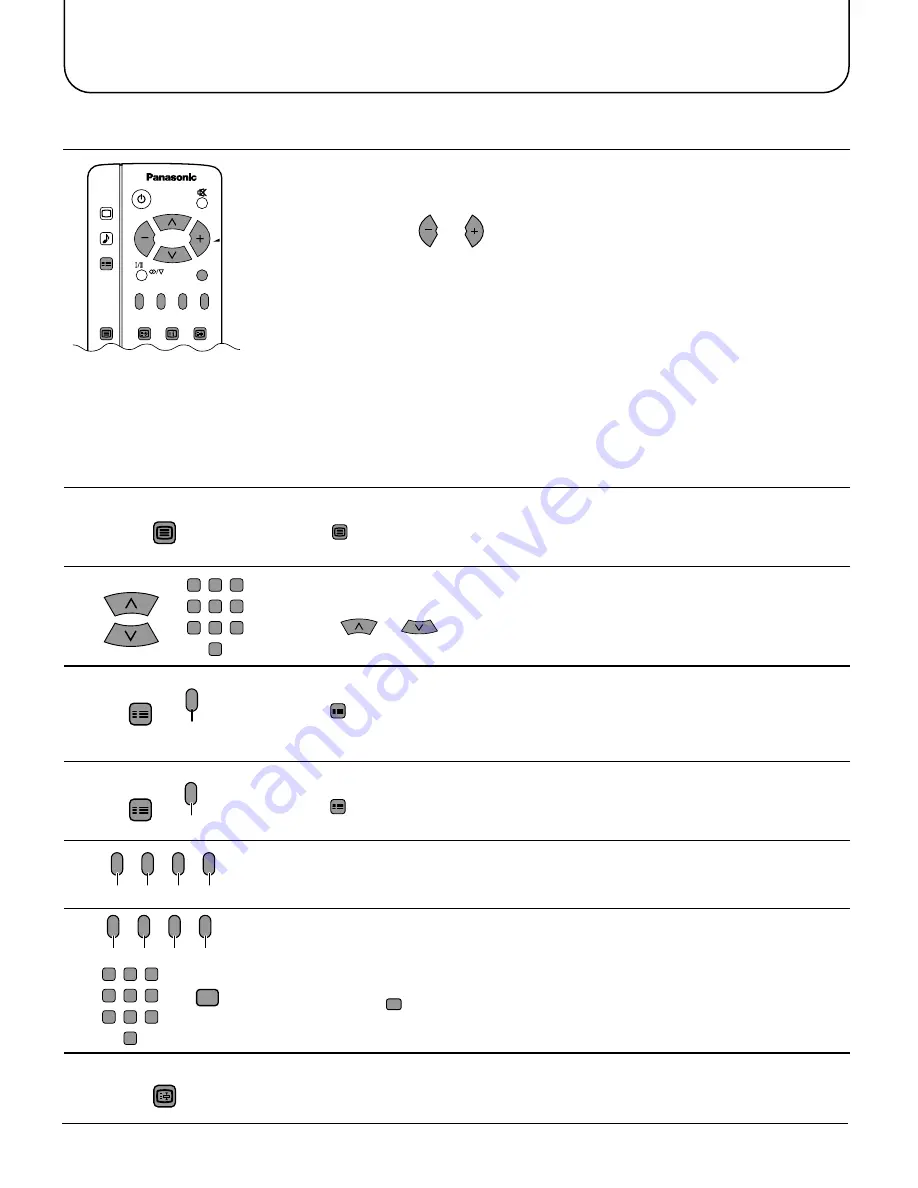
TV / Teletext mode

Press 

TV/TEXT

 to switch between the current programme, teletext and the picture and text

feature (lets you see the current programme and teletext side by side, see page 32).

TV/TEXT

Page Selection
Pages can be selected in two ways:

a. Press 

 or 

 to increase or decrease the page number by one.

b. By entering the page number, using 0-9 on the remote control.

FulI / Top / Bottom

Press 

SET UP

 to display special functions, followed by the Green button.

Press the Green button again to expand the BOTTOM half.
Press again to return to normal (FULL) size.

Reveal

Press 

SET UP

 to display special functions, followed by the Red button to reveal hidden

words e.g. quiz page answers. Press again to hide.

Red Green Yellow Blue

Red / Green / Yellow / Blue buttons
In FLOF mode these correspond to the differently coloured subjects.
In LIST mode they correspond to the differently coloured page numbers.

Red Green Yellow Blue

List Store
In LIST mode the four page numbers can be altered (programme positions 1 - 25
only).
To do this, press one of the four coloured buttons and enter the new page number.

Press and hold 

STR

 , the page numbers will change to white indicating that the page

is stored.

STR

Hold
To hold the Teletext page when viewing multi-page information
Press again to return to automatic page update.

HOLD

SET UP

SET UP

1

2

3

4

5

6

7

8

9

0

1

2

3

4

5

6

7

8

9

0

Green

Red

TELE TEXT

PICTURE

SOUND

SET UP

TV/TEXT

F.P.

INDEX

STILL

HOLD

100Hz/
PROGRE

CH SEARCH

TV/AV

Содержание TX-29P300K

Страница 1: ...TQB4G0896 tau FLAT TAL DIGI This is a combined Operating Instruction manual for all the above series of models Please read these instructions before operating your set and retain them for future refe...

Страница 2: ...How to connect the AUDIO OUT terminals 12 How to connect the DIGITAL AUDIO INPUT 12 How to connect External Speakers 13 How to connect the RGB Input Terminals 14 Connecting Headphones 15 Dear Panason...

Страница 3: ...nu 22 23 Setup Menu 24 25 Tuning Menu 26 29 Channel Selection 26 Tuning Menu 27 Auto tune 28 Auto tune via front panel 28 Manual tune 29 Manual tune via front panel 29 Aspect Controls 30 Menu Operatio...

Страница 4: ...ammable objects TAKE CARE NOT to damage the power cord DO NOT touch the aerial cable and this unit when there is lightning DO NOT place in humid or dusty location or areas exposed to smoke or steam DO...

Страница 5: ...ct with insecticide or other volatile substances DO NOT allow the unit to come into contact for extended periods with rubber or vinyl products Place in a safe location Turn the power Off before connec...

Страница 6: ...Don t Recharge Do not use rechargeable Ni Cd batteries They are different in shape and performance and may fail to ensure correct operation Replace the cover and slide in reverse until the lock snaps...

Страница 7: ...upgrading of existing systems or accessories required and the costs incurred are the responsibility of you the Customer UHF Aerial RF In Terminal Coaxial Aerial Plug VHF Aerial Mixer 75 Ohm Coaxial C...

Страница 8: ...d see page 22 Aspect see page 30 Picture in Picture Selection see page 31 Recall see page 17 VCR LD DVD Rewind Review see page 37 Normalization see page 21 Store see page 17 Programme Number Up and Do...

Страница 9: ...R PR OPTICAL COAXIAL FRONT REAR PCM AC 3 DIGITAL AUDIO INPUT EXT L R L R Main Sub S VIDEO VIDEO AUDIO R L MONO RGB 31 5kHz AV3 IN Main Sub S VIDEO VIDEO AUDIO R L MONO RGB 31 5kHz AV3 IN STR F TV AV I...

Страница 10: ...SUB WOOFER REAR S VIDEO VIDEO VIDEO AUDIO L R AUDIO L R MONO MONO MONO DVD Y PB PR DVD Y PB PR Y PB Y PB PR PR Connect VCRs and other peripheral equipment Notes When an S Video cable is connected to...

Страница 11: ...at time e g TV programmes or signals from AV1 AV2 AV3 or AV4 input Connections Notes The AV4 audio signal is common for both AV4 and DVD input signal terminals The DVD signal input terminal takes prio...

Страница 12: ...R C L R W FRONT CENTRE SUB WOOFER REAR Front L R Sub woofer R L Centre DTS Dolby Digital Amplifier To Speakers Use Phono RCA connectors not supplied Rear Centre speaker Front left speaker Rear left s...

Страница 13: ...eaker Speaker Black Red Front left speaker Press lever Insert wire Connections How to connect External Speakers The external speaker connections EXT on the rear of the TV allow you to create your own...

Страница 14: ...s This unit can be connected to PCs with 640 480 31 5 kHz 60 Hz or 640 400 31 5 kHz 70 Hz pixel In some cases other PCs may not work with this TV set There is no audio signal in RGB input The sound of...

Страница 15: ...Mono A Mono A Stereo A Stereo B Stereo Main Headphones Sub Headphones Monitor Output Connecting Headphones 3 5mm Plug Optional not supplied Main Sub S VIDEO VIDEO AUDIO R L MONO RGB 31 5kHz AV3 IN You...

Страница 16: ...gramme Number Selection Buttons 0 9 and the Programme Number Up or Down Button either on the set or on the Remote Control Programme Number Selection Press the Programme Number Up or Down Button to sel...

Страница 17: ...tom of the screen Each coloured button corresponds with each input For example pressing the Red button selects AV1 Mute Button Press this button to mute the sound completely The Mute symbol will appea...

Страница 18: ...ceable or coloured patches may sometimes appear at the corners of the screen colour purity The Geomagnetic Correction feature can be used to eliminate them if necessary Geomagnetic corrections can be...

Страница 19: ...AGNETIC SETUP MENU LANGUAGE OFF TIMER FLICKER REDUC STROBE CH COLOUR SET VCR GAME TELETEXT FASTEXT OFF OFF OFF CHILD LOCK OFF SETUP MENU The PICTURE SOUND and SET UP buttons are used to open the main...

Страница 20: ...T SHARPNESS foreachPictureMenu Picture menu mode will be memorized for each TV AV1 AV2 AV3 and AV4 mode PICTURE SOUND SET UP TV TEXT F P INDEX STILL HOLD 100Hz PROGRE CH SEARCH TV AV MENU DYNAMIC MENU...

Страница 21: ...Function AUTO 100 Hz MODE PROGRESSIVE The TV software will select the best mode for the signal being viewed 100Hz will give a steady picture for most signal transmission Recommended when receiving NTS...

Страница 22: ...be memorized for each TV AV1 AV2 AV3 and AV4 mode VOLUME BASS TREBLE HEADPHONE VOL SUBWOOFER SUB HEADPHONE MENU STANDARD NORMAL SOUND PICTURE SOUND SET UP TV TEXT F P INDEX STILL HOLD 100Hz PROGRE SU...

Страница 23: ...lly be connected to the TV to provide pictures and sound eg a DVD player connected to AV2 Select from AV1 AV2 AV3 AV4 eg if you have a DVD player connected to the AV2 socket with an optical cable conn...

Страница 24: ...ing Lets you take a series of freeze frame photos of a piece of action for example the finish of a race See page 32 Colour density varying between broadcast channels can be adjusted to three levels fo...

Страница 25: ...gnal modes The right SET UP is displayed during RGB connection Details on each functions are as follows Provides access to many other features including system select and Auto TUNE See page 28 Not dis...

Страница 26: ...No 1 Press the button 1 to view channel 2 Press the button 2 to view channel 4 Press the button 3 to view channel 6 During Position mode various reception channels can be viewed DIRECT SELECT When th...

Страница 27: ...A CATV JAPAN China Hong Kong United Kingdom Malaysia Singapore Thailand Asia countries Kuwait Saudi Arabia United Arab Emirates Middle East countries etc New Zealand Indonesia etc Australia CIS Poland...

Страница 28: ...after this point and before AUTO TUNE is complete no station information will be stored Restart and complete the AUTO TUNE procedure so that the TV is re tuned 6 Start AUTO TUNE by using or Once this...

Страница 29: ...Tuning mode 3 Press TV AV to move between Change programme Search and Change TV system 4 Press or to change programme position or start search When the desired station is found press STR to store The...

Страница 30: ...AUTO Explanation When a wide screen signal from the special video is detected by S1 Video Terminal of the unit the Aspect ratio automatically set to 16 9 screen There is a wide variety of software ava...

Страница 31: ...the yellow button to swap the contents of the two windows Use the remote control to select a TV channel or an AV source to appear in the main window Picture out of picture This feature allows two pro...

Страница 32: ...T EXIT Channel search Menu Operation STILL HOLD Picture and text Press TV TEXT to move between watching the current programme viewing teletext and the picture and text feature Picture and text lets yo...

Страница 33: ...lowing selection of NORMAL PHANTOM or 3 STEREO modes as described on page 35 If Simulated is selected in Surround mode this menu option is Simulated setting allowing selection of DISCO MOVIE or STADIU...

Страница 34: ...es in front of you to the right The 0 1 Low Frequency Effects LFE channel gives impact to bass sounds and to special effects more felt than heard eg the thud of a dinosaur footfall or the rumble of th...

Страница 35: ...f and front left and right speakers connected these must be connected using RCA cables via an external amplifier otherwise they will not output any sound See page 12 for connection details This is the...

Страница 36: ...easier if the mode is set to the MONO position using the stereo bilingual sound selection button DUAL also known as DUAL MONO or as BILINGUAL is not currently transmitted in some countries Audio Signa...

Страница 37: ...NDEX STILL HOLD 100Hz PROGRE SURROUND ASPECT 1 2 3 4 5 6 7 8 9 0 MULTI PIP CH SEARCH N REC VCR STR HELP DISC SIDE A B LD DVD TV AV 8 2 3 4 5 6 7 1 9 10 11 Button Function VCR LD DVD 1 2 3 4 5 6 7 8 9...

Страница 38: ...he current programme teletext and the picture and text feature lets you see the current programme and teletext side by side see page 32 TV TEXT Page Selection Pages can be selected in two ways a Press...

Страница 39: ...g the normal programme until the correct sub page is found Select the required page number using buttons 0 9 If the top of the page indicates that sub pages are being transmitted yet the page does not...

Страница 40: ...2 1 2 11 12 13 2 13 14 1 2 1 2 12 13 57 21 62 63 69 21 62 63 69 21 62 63 69 21 62 63 69 21 62 63 69 62 63 69 62 63 62 C13 S 1 S 2 S 3 S 1 S 2 S 3 S 1 S 2 S 3 S 1 S 1 S 2 S 3 21 22 23 24 28 57 58 59 62...

Страница 41: ...ections Aerial Location direction or Connections Electrical Appliances Cars Motorcycles Fluorescent Lamps Volume Check whether the mute function has been activated on the Remote Control Not plugged in...

Страница 42: ...13 62 NTSC M Japan 14 69 NTSC M U S A 21 Systems Function 1 2 3 4 5 6 7 8 9 10 11 12 13 14 15 16 17 18 19 20 21 PAL B G H PAL I PAL D K SECAM B G SECAM D K SECAM K1 NTSC M NTSC 3 58 4 5 MHz Reception...

Страница 43: ...demarks of Dolby Laboratories Manufactured under license from Dolby Laboratories Manufactured under license from DigitalTheater Systems Inc US Pat No 5 451 942 and other world wide patents issued and...

Страница 44: ...ld note this serial number in the space provided below and retain this book plus your purchase receipt as a permanent record of your purchase to aid in identification in the event of theft or loss and...

Отзывы: