background image

24

Tuning menu

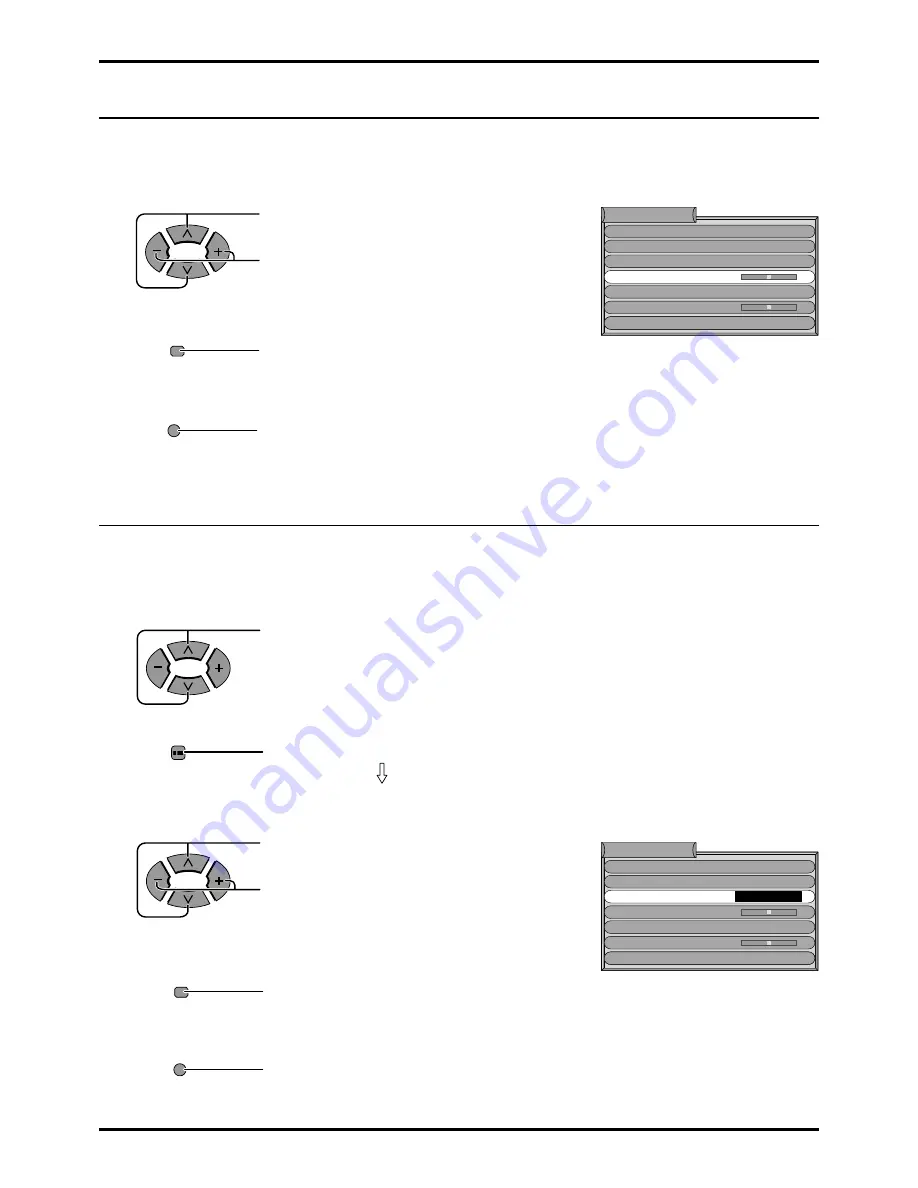
Fine tuning

How to Cancel the Fine Tuning

Under normal reception conditions this function is not required or necessary.
However, in areas of poor reception or constant interference, a slight adjustment of the tuning may improve the
picture and sound quality.

1

Press to select the Fine tuning.

Press until the clear picture is received.

2

Press to store the Fine tuning.
This stores the Fine tuning to the selected Programme Number.

3

Press to exit from the Fine tuning.
This returns the set to the normal viewing condition.

TV/AV

Cancelling previously adjusted (manually) fine tuning, means re-activating the AFT (Automatic Fine Tuning). Re-
activating the Automatic Fine Tuning means allowing the set to automatically tune to the optimum tuning position, for
that programme Number.

1

Select the Programme Number which you’d like to
return to Automatic Fine Tuning (cancel the manual
fine tuning).

2

Press to display the Setup menu screen.

Proceed to the Tuning menu (refer to page 17).

3

Press to select the Manual tuning.

Press to access to Manual tuning.
Press briefly to tune the best position.

4

Press to store the AFT.
This stores the re-activated AFT.

5

Press to exit from the Manual tuning.
This returns the set to the normal viewing condition.

STR

STR

TV/AV

Decoder (AV2)

Volume correc.

Programme edit
Auto setup
Manual tuning

Fine tuning
Colour system

Tuning menu

Auto

Off

Decoder (AV2)

Volume correc.

Programme edit
Auto setup
Manual tuning

Fine tuning
Colour system

Tuning menu

Access

Auto

Off

SET UP

Содержание TX-22LT2F

Страница 1: ...TX 22LT2F Model No F P INDEX HOLD PICTURE SOUND SET UP TV TEXT ASPECT TV AV 1 2 3 4 5 6 7 C 8 9 0 VCR DIRECT TV REC TX 22LT2 TX 22LT2 TQBC0388 Please read these instruction before operating your set and retain them for future reference English ...

Страница 2: ...start Guide 6 1 Choose Your Connection Type 6 2 Connecting the AC Adaptor 9 3 Switch TV ON 9 4 Auto set up 9 5 TV to VCR download 10 6 Q Link 10 Basic controls 12 Side panel controls and Remote control 12 Using the On Screen Displays 14 Setup menu 16 Tuning menu 17 Tuning menu overview 17 Programme edit 18 Auto setup 22 Manual Tuning 23 Fine tuning 24 How to Cancel the Fine Tuning 24 Volume correc...

Страница 3: ...displayed in 4 3 mode This type of LCD panel damage is not an operating defect and as such is not covered by the Panasonic warranty The On Off switch on this model does not fully disconnect the TV from the mains supply Remove the mains plug from the wall socket when the TV set is not used for a prolonged period of time Note If the set is not switched off when the TV station stops transmitting it w...

Страница 4: ...ransmitter 2 R6 UM3 size Warranty Card Slide off the battery cover Insert batteries note correct polarity and Replace the cover Two R6 UM3 size Fitting remote control batteries 1 2 3 Supplied Accessories Check the accessories before installations Make sure that the batteries are fitted the correct way round Do not mix old batteries with new batteries Remove old exhausted batteries immediately Do n...

Страница 5: ...en components can be made with shielded video and audio cables For best performance we recommend 75 ohm coaxial aerial cable is used Cables are available from your dealer or electronic supply store Before you purchase any cables be sure you know what type of output and input connectors your various components require Also determine the length of cable you ll need For optimum quality picture When t...

Страница 6: ... What You See Is What You Record TV VCR Auto Power On When the VCR plays a tape the TV will automatically switch On From Stand by and select the AV2 input VCR Auto Power Stand by When the TV is switched into Stand by the VCR will also switch into Stand by VCR Image view On If the TV is in Stand by mode and the VCR sends a menu to be displayed on the TV screen e g Main menu the TV will automaticall...

Страница 7: ... S Video VCR Notes Additional equipment and cables are not supplied Further details of audio video connections can be found on pages 38 and 39 2 Connection of TV and VCR using Scart and RF cables RF connection Connect the AERIAL to the Aerial in socket of the VCR and on RF cable from the VCR Aerial Out socket to the TV Aerial socket Scart connection The VCR must be connected to the AV2 Scart socke...

Страница 8: ...ions The AV2 Scart of the VCR must be connected to the VCR socket of the Satellite Receiver The TV Scart socket of the Satellite Receiver must be connected to the AV1 Scart socket of the TV Note If using a Q Link VCR then the AV1 Scart of the VCR must be connected to the AV2 socket of the TV If your VCR is not a Q Link VCR please consult your VCR operating instruction book Notes Additional equipme...

Страница 9: ...e switch on the LCD TV to turn the set on IMPORTANT NOTES There are two ways to switch the TV set to stand by mode A Press the switch on the LCD TV and check RED LED is lit OR B Press the Stand by button on the remote control The TV set can be switched on by the remote controller if it was switched to stand by using method A or method B When programme number up down but tons on the side panel of t...

Страница 10: ...tion conditions If the order is not to your preference it can be rearranged Refer to the Programme edit menu see page 18 for details TV VCR DOWNLOAD IN PROGRESS PLEASE WAIT Programme 63 Remote control unavailable This is a Q Link TV Q Link NEXTVIEWLINK and similar technology provide a way for a TV and VCR to communicate making it easier to record programmes In order to be able to exchange informat...

Страница 11: ... edit see page 21 Preset download started from the VCR refer to the VCR operating instruction book Notes With Panasonic Q Link VCRs these additional features are available If you insert a tape in the VCR and press the Play button whilst the TV is in Stand by mode the TV will automatically switch On and select the AV2 input so that you can view the tape When the TV is switched into Stand by mode th...

Страница 12: ...ect TV AV input signal modes sequentially TV ON Stand by Headphone Jack M3 jack Function selection see on this page below Volume Up Down Programme Number Up Down Volume adjustment which uses these buttons is performed after pressing Function button When programme number up down buttons on the side panel of the main part are pressed in stand by mode TV turns on Store see page 17 27 36 Function sele...

Страница 13: ...odes sequentially Coloured buttons used for Programme edit see page 20 21 Teletext functions see page 35 36 37 AV Selection TEXT Index see page 36 TEXT hold see page 36 Direct Programme Number Direct Programme Number Selection CH SELECT DIRECT You can select the number directly by pressing the C button and corresponding programme number buttons Channel Number 8 Channel Number 36 Direct Programme N...

Страница 14: ...below to access and adjust features as desired Contrast Brightness Colour Sharpness Comb filter AI Backlight Mode Colour balance Picture menu Dynamic Normal On On Bass Treble Headphone volume MPX Mode Ambience Volume Balance Sound menu No service Music Off Q Link Text language Tuning menu OSD language On West Access Access Off timer Off Teletext TOP AV2 out TV Setup menu Press to display Picture m...

Страница 15: ...TR Button Stare E x i t Select Option Change Programme Return Delete Add Move TV VCR 02 99 21 41 Manual tuning TV AV STR Button Stare E x i t Serch down up Programme down up Return Programme edit Auto setup Manual turning Decoder AV2 Volume correc Programme edit Auto setup Manual tuning Fine tuning Colour system Tuning menu Access Access Access Auto Off English Italiano ELLHNIKA Romana cestina Pol...

Страница 16: ...eletext Off timer Q Link Text language Tuning menu OSD language Volume correction TOP List OFF 60 75 90 30 15 45 Q Link Text language Tuning menu OSD language On West Access Off timer Off Teletext TOP AV2 out TV Setup menu Q Link Text language OSD language On West Off timer Off Teletext TOP AV2 out TV Setup menu Colour system Auto Volume correction 1 Press to display the setup menu screen 2 Press ...

Страница 17: ...er conditions are affecting reception quality of a program Lets you select the correct transmission standard for the transmission signal being received Controls the gain of the received signal which can differ between stations Lets you change the recording source on DIRECT TV REC see page 10 Pressing STR after having adjusted some feature will store the setting as the default replacing the factory...

Страница 18: ...en Programme edit 1 Press to select the Programme position Press to select the prog Chan Name Lock Sys Note When the cursor enters the Name field it will move character by character up to five before moving to the next field 2 The keys function in accordance with the position of the cursor prog Chan Name Lock or Sys SET UP Decoder AV2 Volume correc Programme edit Auto setup Manual tuning Fine tuni...

Страница 19: ...e Bars are displayed at the bottom of the screen These have the same functions as the Red Green Yellow and Blue keys on the remote control Tuning menu Green Red STR Red 1 CH41 XYZ Off SC1 2 Off SC1 3 Off SC1 4 Off SC1 5 Off SC1 Prog Chan Name Lock Sys Programme edit TV AV STR Button Stare E x i t Select Option Change Programme Return Delete Add Move TV VCR 1 CH41 XYZ Off SC1 2 Off SC1 3 Off SC1 4 ...

Страница 20: ...e 4 Press STR to store 5 If you have finished in the Programme edit menu press the TV AV button to exit Yellow Yellow TV AV 1 CH41 XYZ Off SC1 2 Off SC1 3 Off SC1 4 Off SC1 5 Off SC1 Prog Chan Name Lock Sys Programme edit TV AV STR Button Stare E x i t Select Option Change programme Return Delete Add Move CH44 ZXY TV VCR 1 CH41 XYZ Off SC1 2 Off SC1 3 Off SC1 4 Off SC1 5 Off SC1 Prog Chan Name Loc...

Страница 21: ...CR This might take a few seconds depending on the number of stations stored If the message Unable to download check your VCR appears on the screen the television is unable to send the programme informa tion to the VCR See the VCR instruction book for further informa tion TV AV STR 1 CH41 XYZ Off SC1 2 Off SC1 3 Off SC1 4 Off SC1 5 Off SC1 Prog Chan Name Lock Sys Programme edit TV AV STR Button Sta...

Страница 22: ...uning menu OSD language On West Access Off timer Off Teletext TOP AV2 out TV Setup menu Decoder AV2 Volume correc Programme edit Auto setup Manual tuning Fine tuning Colour system Tuning menu Access Auto Off All current tuning data will be erased WARNING TV AV E x i t Start Auto Setup Return TV AV E x i t Start Auto Setup Select Country Return Country SETUP Return to tuning menu TV AV To exit 02 9...

Страница 23: ...dcast or AV signal is received refer to the Colour System Selection operation on page 26 2 When using a VCR without video and audio input output terminals it is convenient to connect the aerial cable as indicated in the instruction manual of VCR and to set the designated channel to programme No 0 In that case perform manual tune after setting the colour system in advance Further in multi system VC...

Страница 24: ...ivating the Automatic Fine Tuning means allowing the set to automatically tune to the optimum tuning position for that programme Number 1 Select the Programme Number which you d like to return to Automatic Fine Tuning cancel the manual fine tuning 2 Press to display the Setup menu screen Proceed to the Tuning menu refer to page 17 3 Press to select the Manual tuning Press to access to Manual tunin...

Страница 25: ...he Volume level 3 Press to store Decoder AV2 Volume correc Programme edit Auto setup Manual tuning Fine tuning Colour system Tuning menu Auto Off STR Decoder AV2 If a Q link compatible VCR is connected to AV2 and is ready to record the recording source for DIRECT TV REC will change on selecting the Decoder AV2 On or Off using the remote control 1 Press to select the Decoder AV2 on tuning menu scre...

Страница 26: ... systems applicable to differing countries M NTSC is a trick playback mode used in special VCR to playback NTSC recorded video tapes through PAL television equipment During RGB input signal in AV1 mode PAL and SECAM are not available Tuning menu Colour System Selection Different region use differing systems If a clear picture with correct colours cannot be obtained when a Broadcast or AV signal is...

Страница 27: ...on the VCR insert and play a pre recorded tape with known content 1 Press SET UP 2 Move to chosen Tuning menu option by using or 3 Access Tuning menu by using or 4 Move to chosen Manual tuning by using or 5 Access Manual tuning by using or 6 Select programme position 0 VCR by using or 7 Start searching for the VCR playback of the known content tape by using or When the VCR playback is found press ...

Страница 28: ... TV the picture hue can be adjusted to suit your taste Notes When the TV is receiving NTSC Signals Tint is displayed and level adjustment is possible Only Contrast and Backlight will be displayed during TEXT mode Colour balance AIlows you to set the overall colour tone of the picture Press or to switch between modes Warm Normal Cool Contrast Brightness Colour Sharpness Comb filter On AI Backlight ...

Страница 29: ...Colour Sharpness Comb filter AI Backlight Mode Colour balance Normal On On Dynamic Picture menu Contrast Brightness Colour Sharpness Comb filter AI Backlight Mode Dynamic Colour balance Normal On On Picture menu Reduces colour noise Not displayed during RGB Video input and S Video input mode Picture menu mode will be memorized for each TV AV mode Press or to switch between modes AI Mode Mode Funct...

Страница 30: ... menu 1 Press to display the sound menu screen 2 Press to select the menu to adjust Adjust the desired level by listening to the sound Press TV AV at any time to go back to watching TV Some features are only available with the Ambience feature switched off Press to switch between On and Off SOUND Audio Signal Receiving Mode Indications DUAL M1 M2 M1 M2 STEREO STEREO MONO Stereo Mono MONO MONO No s...

Страница 31: ... Off Volume Balance On Sound menu With the Ambience feature switched Off sound quality can be improved when watching music or speech by selecting the appropriate mode Music or Speech Press or to select Mode Music Speech To enjoy a concert hall effect turn Ambience to on Press or to swich between ON and OFF Swiching is also possible by pressing the button Mode Ambience The benefits of Ambience soun...

Страница 32: ... ratio to use WIDE appears in the top left of the screen if a widescreen identification signal WSS is found or a signal is found through a Scart socket Panasonic Auto switches to the appropriate 16 9 widescreen ratio Panasonic Auto appears in the top left of the screen if black stripes above and below the picture are detected Panasonic Auto chooses the best ratio and expands the picture to fill th...

Страница 33: ...play the picture at its maximum size but with slight stretching Zoom Zoom mode magnifies the central section of the picture Press the yellow or blue buttons to move the picture vertically useful when there are sub titles positioned below the picture Blue button has been pressed to move picture upwards Zoom Zoom V POS V POS Zoom V POS V POS Zoom V POS V POS Yellow button has been pressed to move pi...

Страница 34: ... to increase or decrease the VCR programme position by one VCR DVD switch Use this switch to select whether controls operate DVD equipment or your VCR Play Press to playback the tape or DVD Stop Press to stop the tape or DVD Record Press this button to start recording Skip Fast Forward Cue VCR Press to fast forward the tape In Play mode press to view the picture rapidly forward Cue DVD Press once ...

Страница 35: ...n This facility enables fast access to information on the subjects shown Note When watching TV in 4 3 or zoom mode pressing TV TEXT button will display teletext page momentarily in that aspect before switching to normal teletext picture size F P INDEX HOLD PICTURE SOUND SET UP TV TEXT ASPECT TV AV 1 2 3 4 5 6 DIRECT TV REC TV Teletext mode Press TV TEXT to switch between the current programme and ...

Страница 36: ...ay Press SET UP to display special functions followed by the Yellow button to view the TV picture whilst searching for a Teletext page When found the screen will display the page number at the top left Press the Yellow button to view the page Press TV TEXT to return to normal TV operation News Flash When a news flash page has been selected press SET UP Yellow to view the TV picture When an update ...

Страница 37: ...change then the number at the top of the page is there to indicate that the broadcaster has updated the page s contents there are no sub pages Press SET UP followed by the Blue button T will be displayed at the top right of the screen Enter desired sub page number before the T disappears To select page 6 enter 0 0 0 and 6 If in List mode a T will appear in the current box at the bottom Press SET U...

Страница 38: ...VCR SET TOP BOX DVD PLAYER CAMCORDER S VIDEO CAMCORDER Connections How to connect the input terminals Connects VCRs and other peripheral equipment Notes Additional equipment and cables shown are not supplied with this TV set When a monaural VCR is used connect the monaural audio cable to the AUDIO L Left terminal Do not connect a computer with TTL output 5V to this set The AV2 21 pin socket can al...

Страница 39: ... controls have no effect Additional equipment and cables shown are not supplied with this TV set Connecting Headphones Earphones Connect headphones earphones as follows Optional Not supplied 3 5 mm stereo plug Notes The volume level of the headphones can be adjusted by selecting Headphone Volume from the Sound menu Additional equipment and cables shown are not supplied with this TV set Amplifier t...

Страница 40: ... screen Aerial location direction or connection Picture Sound Colour Controls set at minimum levels Aerial location direction or connection Electrical appliances Cars Motorcycles Fluorescent lights Volume level Sound mute switched on TV set to AV mode Not plugged into A C outlet Not switched on Picture Sound controls set at minimum levels Check if in stand by mode This is a characteristic of liqui...

Страница 41: ...thinner or benzine to clean this unit Before using chemically treated cloth read the instructions that came with the cloth carefully Do not wipe the LCD with water Wipe the cabinet with a soft cloth If the cabinet is heavily soiled wipe with a well wrung soft cloth dipped in kitchen cleanser neutral diluted with water CAUTION If water or similar substances get inside the monitor via the liquid cry...

Страница 42: ...dio Output Headphones FEATURES Receiving Systems Band name Aerial Rear Operating Conditions Connection Terminals AV1 AV2 VIDEO AV3 S VIDEO AUDIO L R Dimensions W H D Including TV Stand TV Set Only Mass Weight AC 100 240 V 50 60 Hz Average use 67 W TV set Stand by condition 5 W DC 15 V 3 8 A max 22 inch 558 mm 16 9 aspect ratio LCD panel 19 17 inch 486 8 mm W 10 77 inch 273 6 mm H 22 inch 558 mm Di...

Страница 43: ...43 ...

Страница 44: ...space provided below and retain this book plus your purchase receipt as a permanent record of your purchase to aid in identification in the event of theft or loss and for Warranty Service purposes Model Number TX 22LT2F Serial Number Matsushita Electric Industrial Co Ltd Web Site http www panasonic co jp global Printed in Japan MBS0302S0 MS ...

Отзывы: