Panasonic TH-98SQ2HW Скачать руководство пользователя страница 112

112

English


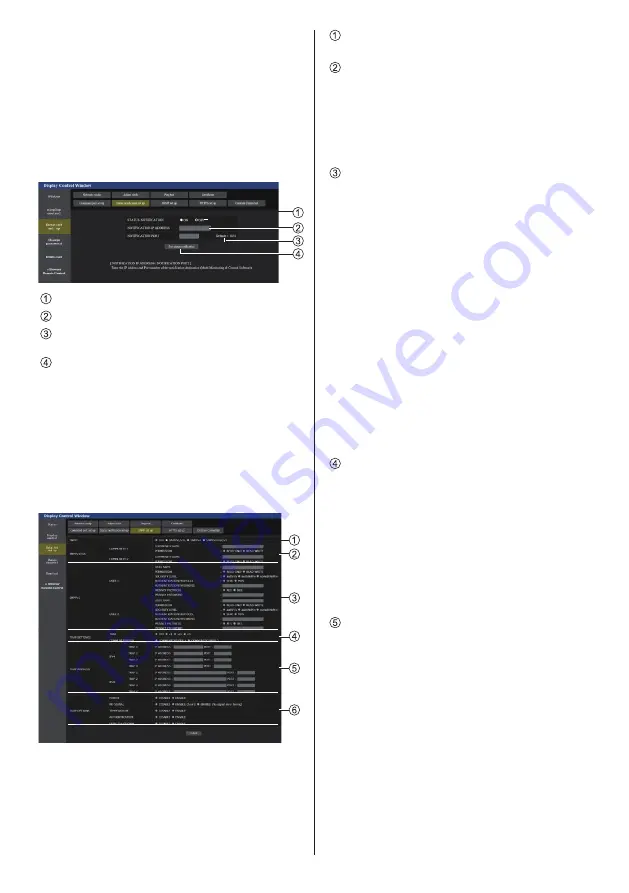
Status notification set up page

Sets the IP address and port number of the PC where 

“Multi Monitoring & Control Software (see page 105)” 

is operating when informing the PC of the status of this 

unit.
Click [Detailed set up

] → [

Status notification set up].

When the status notification is set, if the unit is 

malfunctioning and its power indicator is blinking orange, 

the trouble content can be recognized even at a remote 

location where the power indicator cannot be directly 

checked.

Selection field of status notification
IP address input field for notification destination PC
Port number input field for notification destination 

PC
Update button for the settings


SNMP set up page

Sets the various items for SNMP.
SNMP (Simple Network Management Protocol) is a 

protocol to manage devices connected to the network.
If the SNMP manager is used for connection, the 

information of the target device can be obtained, and its 

settings can be changed.
Click [Detailed set up

] → [

SNMP set up].

[SNMP]:

Select the SNMP version to use.

[SNMP v1/v2c] [COMMUNITY]
[COMMUNITY NAME]:

Enter the community name of SNMP v1/v2c.

[PERMISSION]:

Select whether to obtain only information via SNMP 

v1/v2c or to both obtain information and make the 

setting.

[SNMP v3] [USER]
[USER NAME]:

Enter the user name of SNMP v3.

[PERMISSION]:

Select whether to obtain only information via SNMP 

v3 or to both obtain information and make the 

setting.

[

SECURITY LEVEL

]:

Select the security level for SNMP v3.

[AUTHENTICATION PROTOCOL]:

Select the authentication method for SNMP v3 from 

SHA1 and MD5.

[AUTHENTICATION PASSWORD]:

Set the authentication password of SNMP v3.

[

PRIVACY PROTOCOL

]:

Select the encryption method for SNMP v3 from 

AES and DES.

[

PRIVACY PASSWORD

]:

Set the encryption password of SNMP v3.

[TRAP SETTINGS]
[TRAP]:

Select the SNMP version to use when sending 

TRAP.

[COMMUNITY/USER]:

Select COMMUNITY/USER to use when sending 

TRAP.
When SNMP v1/v2c is selected as a SNMP version 

of TRAP, the COMMUNITY 1/2 setting is used. 

When SNMP v3 is selected, the USER1/2 setting 

is used.

[TRAP ADDRESS

] Lower than Version 1.5000 

(before IPv6 compatible)
[ADDRESS]:

Set the IP address of the SNMP manager that gives 

notice of TRAP.

[PORT]:

Set the TRAP reception port number of the SNMP 

manager that gives notice of TRAP.

Содержание TH-98SQ2HW

Страница 1: ...odel TH 75EQ2W 75 inch model TH 75SQ2HW 75 inch model TH 65EQ2W 65 inch model TH 65SQ2HW 65 inch model TH 55EQ2W 55 inch model TH 55SQ2HW 55 inch model TH 50EQ2W 50 inch model TH 50SQ2HW 50 inch model TH 43EQ2W 43 inch model TH 43SQ2HW 43 inch model English Please read these instructions before operating your set and retain them for future reference DPQP1411ZD X1 EU TP0622TS3073 PB ...

Страница 2: ...cord connection and fixing Cable fixing 22 Video equipment connection 24 Before connecting 26 HDMI IN 1 HDMI IN 2 and HDMI IN 3 terminals connection 26 PC IN terminal connection 27 SERIAL IN terminal connection 28 IR IN IR OUT terminal connection 30 AUDIO OUT terminal connection 30 USB USB DEVICE terminal connection 31 USB C USB DEVICE terminal connection 32 Identifying Controls 33 Display 33 Remo...

Страница 3: ...awing 150 Selecting the mode 152 Saving pen drawings File menu 152 Switching the drawing page Page menu 154 Using the simple drawing function 155 Using Comparison mode 156 Capturing a video 156 Displaying a captured image 157 Changing screen mode 157 Selecting an image file for comparison 158 Expanding Shrinking the screen 159 Drawing on screen 160 Performing a capture operation 161 Using the vide...

Страница 4: ...o not block any ventilation openings Install in accordance with the manufacturer s instructions 8 Do not install near any heat sources such as radiators heat registers stoves or other apparatus including amplifiers that produce heat 9 Do not defeat the safety purpose of the polarized or grounding type plug A polarized plug has two blades with one wider than the other A grounding type plug has two ...

Страница 5: ...t may cause undesired operation CANADIAN NOTICE This Class A digital apparatus complies with Canadian ICES 003 WARNING Not for use in a computer room as defined in the Standard for the Protection of Electronic Computer Data Processing Equipment ANSI NFPA 75 For permanently connected equipment a readily accessible disconnect device shall be incorporated in the building installation wiring For plugg...

Страница 6: ...use interference such as noise to appear Using this appliance near sources of strong electromagnetic fields or where electrical noise may overlap with the input signals could cause the sensor function not to work correctly To avoid the possibility of harm to this appliance keep it away from sources of strong electromagnetic fields WARNING This equipment is compliant with Class A of CISPR32 In a re...

Страница 7: ...use is replaced If you lose the fuse cover the plug must not be used until a replacement cover is obtained A replacement fuse cover can be purchased from your local Panasonic dealer Do not cut off the mains plug Do not use any other type of mains lead except the one supplied with this display The supplied mains lead and moulded plug are designed to be used with this display to avoid interference a...

Страница 8: ...vironment for the pedestal or wall hanging bracket even during the warranty period Small parts can present choking hazard if accidentally swallowed Keep small parts away from young children Discard unneeded small parts and other objects including packaging materials and plastic bags sheets to prevent them from being played with by young children creating the potential risk of suffocation Do not pl...

Страница 9: ...to the Display as doing so can cause fire or electric shock Do not remove the cover cabinet or modify it High voltages which can cause fire or electric shocks are present inside the Display For any inspection adjustment and repair work please contact your local Panasonic dealer Ensure that the mains plug is easily accessible The mains plug shall be connected to a mains socket outlet with a protect...

Страница 10: ... Display If the Display is moved while some of the cables are still connected the cables may become damaged and fire or electric shock could result Disconnect the power supply plug from the wall socket as a safety precaution before carrying out any cleaning Electric shocks can result if this is not done Do not step on or hang from the display They might tip over or might be broken and it may resul...

Страница 11: ...al panel will cause unevenness of the screen display resulting in malfunction Do not install the product to a place where the product is exposed to direct sunlight If the unit is exposed to direct sunlight even indoors the temperature rise of the liquid crystal panel may cause malfunction In the case of storage store the unit in a dry room Required space for ventilation When installing the unit in...

Страница 12: ...ormally In this case turn off the power of the Display and the connected devices once and then turn on the power again Picture noise may occur if you connect disconnect the cables connected to the input terminals you are currently not watching or if you turn the power of the video equipment on off but it is not a malfunction Notes on Using Wired LAN When setting up the Display at a place where ele...

Страница 13: ...th Do not use a chemical cloth for the liquid crystal panel surface Follow the instructions for the chemical cloth to use it for the cabinet Avoid contact with volatile substances such as insect sprays solvents and thinner This may cause damage to the cabinet or cause peeling of the paint Furthermore do not leave it in contact with a rubber or PVC substance for a long time Remove dust and dirt fro...

Страница 14: ...2HW DPVF1728ZA X1 Approx 1 8 m Supplied only for the SQ2H series Power supply cord TH 98SQ2HW TH 86SQ2HW TH 86EQ2W Approx 2 m 1JP155AF1U 1JP155AF1W 2JP155AF1W 3JP155AF1W TH 75SQ2HW TH 65SQ2HW TH 55SQ2HW TH 50SQ2HW TH 43SQ2HW TH 75EQ2W TH 65EQ2W TH 55EQ2W TH 50EQ2W TH 43EQ2W Approx 2 m 1JP143CQ2U 1JP143EQ2W 2JP143EQ2W 3JP143EQ2W Attention Store small parts in an appropriate manner and keep them awa...

Страница 15: ... attempt to charge disassemble or burn used batteries 5 Do not burn or breakup batteries Moreover batteries must not be exposed to excessive heat such as sunshine fire or the like Attaching the USB Memory Cover For SQ2H series when using a USB memory device the USB memory cover can be attached to protect the device Note Depending on the shape of USB memory device to be used the USB memory cover ma...

Страница 16: ...e sensor module with a commercially sold double sided tape again Release paper Double sided tape 3 Remove the release paper from the other side of the double sided tape and attach the sensor module to the bezel of the display Note Attach it on the location where the front surface of the sensor is able to detect the environmental illuminance and an approaching hand When using the proximity sensor f...

Страница 17: ...tion and the end faces two locations securely Function board Hook End face End face 3 Using the screw removed in step 1 fix the function board to the SLOT adaptor Screw Tightening torque guideline 0 5 N m or less Note Firmly tighten the screw and check that the hook of the SLOT adaptor fixes the circuit board Check that the surface of the SLOT adaptor and the surface of the circuit board match wit...

Страница 18: ...l keep the removed function board or cover They are necessary for future repair or servicing 5 Insert the function board to the expansion slot and tighten the 2 screws Fix the function board with the 2 screws removed in step 4 Tightening torque guideline 0 5 N m or less Note When inserting the function board be careful not to allow it to come into contact with the edge of the opening of the expans...

Страница 19: ... this is not observed the unit may drop resulting in injury When carrying the unit keep the liquid crystal panel upright Carrying the unit with the surface of the liquid crystal panel facing up or down may cause deformation of the panel or internal damage Do not hold the upper lower right and left frames or the corners of the unit Do not hold the front surface of the liquid crystal panel Also do n...

Страница 20: ...he 98 86 75 inch models have the holes for attaching eyebolts 65 55 50 43 inch models don t 98 inch model Eyebolt commercially available mounting positions 86 inch model 75 inch model Eyebolt commercially available mounting positions Attaching the eyebolts 98 inch model 1 Remove the bolt and nut from the eyebolt mounting position two locations Bolt Nut 2 Attach the eyebolt and nut on the mounting ...

Страница 21: ...ing only 1 eyebolt Use the following commercially sold eyebolts that satisfies the load condition of product quality 98 inch model 86 inch model 75 inch model M10 eyebolt M10 eyebolt Shank length 18 mm to 40 mm φ 41 mm or less Shank length 12 mm to 40 mm φ 41 mm or less Use ISO 3266 standard eyebolts Also use ISO standard members wire etc for hanging The hanging angle should be 60 or more 60 or mo...

Страница 22: ...r and the AC IN terminal For the repair of the AC cord consult the dealer where you purchased the product When disconnecting the AC cord be absolutely sure to disconnect the AC cord plug at the socket outlet first The supplied AC cord is for this unit exclusive use Do not use this for other purposes TH 75SQ2HW TH 65SQ2HW TH 55SQ2HW TH 50SQ2HW TH 43SQ2HW TH 75EQ2W TH 65EQ2W TH 55EQ2W TH 50EQ2W TH 4...

Страница 23: ...r 1 Attach the clamper Note Wipe off dirt such as dust water and oil on the attachment surface and affix the clamper on the attachment surface by pressing it firmly Once the clamper is affixed it cannot be reused Be sure to confirm the attaching position before affixing it Attachment surface Remove the tape at the back and affix the clamper on the flat surface 2 Bundle the cables Pass the tip of t...

Страница 24: ...viewer Also this can be used to supply power of up to 5 V max 1 A to an external device when the picture is displayed see page 31 10 USB C HOST USB C terminal Connect a PC or video equipment that has a USB C terminal Also this can be used to supply power of up to 60 W to an external device when the picture is displayed see page 32 11 USB DEVICE USB terminal USB communication with devices connected...

Страница 25: ...to use USB media player or Memory viewer Also this can be used to supply power of up to 5 V max 1 A to an external device when the picture is displayed see page 31 10 USB C HOST USB C terminal Connect a PC or video equipment that has a USB C terminal Also this can be used to supply power of up to 60 W to an external device when the picture is displayed see page 32 11 USB DEVICE USB terminal USB co...

Страница 26: ...ain too much jitter the images on the screen may wobble In this case a time base corrector TBC must be connected When the sync signals output from PC or video equipment are disturbed for example when changing settings of video output the colour of the video may be disturbed temporarily The unit accepts YPBPR YCBCR signals PC IN analogue RGB signals PC IN and digital signals Some PC models are not ...

Страница 27: ...alues such as for the standard picture positions and sizes have already been stored in this unit Computer signals which can be input are those with a horizontal scanning frequency of 30 to 110 kHz and vertical scanning frequency of 48 to 120 Hz The display resolution is a maximum of 1 440 x 1 080 dots when the aspect mode is set to Normal and 1 920 x 1 080 dots when the aspect mode is set to Full ...

Страница 28: ...s no need to use an adapter for computers with DOS V compatible Mini D sub 15P terminal Do not set the horizontal and vertical scanning frequencies for PC signals which are above or below the specified frequency range Pin assignments and signal names for PC Input Terminal Mini D sub 15P 1 6 7 8 3 9 4 5 10 15 14 13 12 11 2 Pin No Signal Name R PR CR G Y B PB CB NC not connected GND Ground GND Groun...

Страница 29: ... PON None Power ON POF None Power OFF AVL Volume 000 100 AMT 0 Audio MUTE OFF 1 Audio MUTE ON IMS HM1 HDMI IN 1 input HDMI1 HM2 HDMI IN 2 input HDMI2 HM3 HDMI IN 3 input HDMI3 UC1 USB C HOST input USB C SL1 SLOT input SLOT PC1 PC IN input PC NW1 Screen Transfer input Screen Transfer UD1 USB Internal Memory input USB Internal memory MV1 Memory viewer input MEMORY VIEWER WB1 WhiteBoard input WHITEBO...

Страница 30: ...ions enables the daisy chain connection Note Connection cables are not supplied with this unit Daisy chain connection is possible only between the displays of the same series Stereo mini plug M3 cable commercially available First display Second display Third display AUDIO OUT terminal connection Note Audio equipment and the cable shown are not supplied with this set line in Stereo mini plug M3 Ste...

Страница 31: ...ess indicator of the USB memory device blinks during data access The USB memory device can be connected or disconnected whether or not the display is on Stick PC commercially available USB cable commercially available HDMI extension cable commercially available When the picture is displayed depending on the USB terminal power of up to 5V 1A USB or 5V 2A USB DEVICE can be supplied to an external de...

Страница 32: ...memory device are finished The functions are read user image function see page 71 playlist edit function see page 134 data cloning function see page 169 etc Turn the unit off Do not frequently repeat connecting disconnecting the USB memory device Wait at least 5 seconds after connection and then remove the USB memory device Before reconnection wait at least 5 seconds A certain length of time is re...

Страница 33: ...ent function About Power management function see page 65 Standby state with HDMI CEC control set to Enable and at least one Link function set to other than Disable About HDMI CEC control setting and Link function see page 69 Standby state with Network control set to On About Network control settings see page 79 Standby state with the SLOT standby function About SLOT standby function see page 100 S...

Страница 34: ...ed device see page 39 5 MENU Unit Displays the menu screen see page 45 6 Unit Unit Adjusts the volume see page 40 On the menu screen switches settings or adjusts settings level see page 45 7 Unit Unit Selects the setting item on menu screen see page 45 8 ENTER Unit Configures the item on menu screen see page 45 Switches aspect mode see page 42 9 Built in speakers Sound is output backward Note To o...

Страница 35: ... size of the screen see page 47 11 INPUT Switches input to display on the screen see page 39 12 PICTURE see page 50 13 SOUND see page 49 14 RECALL Displays the current setting status of Input mode Aspect mode etc see page 40 15 RETURN Used to return to the previous menu see page 45 16 FUNCTION Displays Function button guide see page 90 17 OFF TIMER Switches to stand by after a fixed period see pag...

Страница 36: ...om the area where the sensor can be seen When directly aiming the remote control at the remote control sensor of the main unit the distance from the front of remote control sensor should be approx 7 m or less Depending on the angle the operation distance may be shorter Do not subject the remote control sensor of the main unit to the direct sunlight or strong fluorescent light 1 Connect the AC cord...

Страница 37: ...played or OFF standby state When Power LED light up setting is set to Off the power indicator does not light up see page 98 Power LED light up setting When the Unit is turned on for the first time Following screen will be displayed 1 Select the language with and press ENTER English UK Deutsch Français Italiano Español ENGLISH US Русский OSD language 2 For vertical installation select Portrait with...

Страница 38: ...g Note Once set or skipped this screen won t be displayed when switching on the unit next time Use the following menu to configure the setting again Network settings see page 79 Power ON message The following message may be displayed when turning the unit power ON No activity power off Precautions No activity power off is enabled When No activity power off in the Setup menu is set to Enable a warn...

Страница 39: ... PC may be displayed as PC YPBPR depending on the settings of PC input mode see page 98 2 For USB and Internal Memory input either one selected for the Use memory select setting is displayed see page 98 Note Inputs set for Input skip settings or inputs when each function is disabled cannot be selected see page 65 Displays the signal name as set in Input label see page 64 Input will not be switched...

Страница 40: ... play file are not displayed Instead the image set in No signal image settings will be displayed To display the clock set Date and time and then set Clock display to On see page 77 Volume Adjustment Press VOL VOL or Unit Unit to adjust volume Unit INPUT ENTER MENU 20 Volume INTERNAL SPEAKERS The current sound volume level is memorised even if the power is turned off When Maximum VOL function is se...

Страница 41: ... After that it switches to stand by To see the Off timer remaining time press RECALL The Off timer is cancelled if a power interruption occurs When the power is turned on later on it will be in stand by condition When the image set in No signal image settings see page 70 is displayed remaining time is not displayed even when the timer expires in 3 minutes Instead the image is displayed until the p...

Страница 42: ...ure Enlarged screen Pictures are displayed filling the screen Normal Pictures are displayed with the aspect ratio of input signals Native Pictures are displayed with the resolution of input signals H fit Pictures are enlarged to the maximum horizontal dimension of the screen Pictures of signals with the aspect ratio vertically longer than the aspect ratio of the screen are displayed with the top a...

Страница 43: ... a public showing and then use the aspect mode select function to shrink or expand the picture you may be violating the copyright under copyright law It is prohibited to show or alter the copyrighted materials of other people for commercial purposes without the prior permission of the copyright holder When viewing a non wide picture with a 4 3 aspect ratio by displaying in full screen using a zoom...

Страница 44: ...o exit the mode The screen returns to the previous state just before entering the digital zoom mode and the digital zoom operation guide display disappears Press any of the following buttons to exit the mode Then the operation of the pressed button is performed Remote Control AUTO SETUP POSITION PICTURE INPUT SETUP SOUND DEFAULT RECALL MUTE ASPECT OFF TIMER FUNCTION VOL VOL 1 6 Unit INPUT Unit MEN...

Страница 45: ...our Hue Sharpness Gamma Memory save Memory load Memory edit High Enhance level 6500K Colour temperature Dynamic contrast Colour enhancement Off Off Refine enhancer Colour management Gradation smoother Off Off Blue light reduction Off To display the submenu press ENTER 3 Set Press to set INPUT ENTER MENU Press to set 4 Exit from the menu Press Press RETURN to return to the previous screen Alternati...

Страница 46: ...ture 6500K Colour enhancement Dynamic contrast Memory save Memory load Memory edit Off Off Enhance level High Gradation smoother Off Setup menu see page 56 100 1 3 Setup Screensaver Input label Power management settings Off timer function No activity power off OSD language Enable Disable English UK Image settings HDMI CEC settings Input lock Off Audio input select Power on settings Input search Fa...

Страница 47: ...etting is enabled when an analogue signal PC is input PC input mode is set to PC and the aspect mode is set to Full see page 98 While displaying the picture of the corresponding signal select Auto setup and press ENTER Using Remote Control Press AUTO SETUP When Auto Setup does not work Invalid is displayed Note When the dot clock frequency of a PC signal is 162 MHz or higher Clock phase and Dot cl...

Страница 48: ... is set to Full Zoom1 or Zoom2 Note this setting is disabled when using USB MEMORY VIEWER input multi screen display of the multi display or digital zoom PC auto setting Sets the operational mode of the automatic position adjustment in the Position menu Off Automatic position adjustment starts when AUTO SETUP is pressed on the remote control or automatic position adjustment is executed from the Po...

Страница 49: ...NDARD Bass Adjusts low pitch sounds Treble Adjusts high pitch sounds Surround Off Normal sound On Surround sound Note Bass Treble and Surround settings are memorised separately for Normal Dynamic and Clear in Sound mode Auto volume Adjusts the volume level automatically Select from among Min Mid and Max according to the degree of imbalance of sound level Off Min Mid Max Small effect Large effect N...

Страница 50: ...e to the picture source or environment where this unit is used Vivid signage Suitable for signage applications featuring more vivid and sharper images in bright environments such as a shop Natural signage Suitable for signage applications such as merchandise exhibition featuring natural tone images with colour reproduction emphasized under light Standard Faithfully reproduces original picture Surv...

Страница 51: ...ed 1 Press ENTER while setting Colour temperature 2 2 6500K Gamma Colour temperature Example When Colour temperature is 6500K it is possible to reflect the set point 6500K to the set point of User1 and User2 2 Select the user to memorise settings with and press ENTER Adjust colour temperature Change to 6500K User1 User2 3 Select Yes with and press ENTER Adjust colour temperature Overwrite colour t...

Страница 52: ... and press ENTER In ENGLISH US OSD language Hue is displayed as TINT Note When 6 segment is selected R red G green B blue and complementary colours cyan magenta and yellow are adjusted respectively When 12 segment is selected 6 segment items and the intermediate colours can be adjusted Dynamic contrast Automatically adjusts the contrast by determining the changes in the use of colours for images t...

Страница 53: ...ther Memory save Memory load Memory edit Off Off Off Off High Dynamic contrast Colour management Gamma 2 2 Blue light reduction Off Memory save see page 54 Memory load see page 54 Memory edit see page 55 1 2 3 MEMORY1 MEMORY2 MEMORY3 4 MEMORY4 5 MEMORY5 6 MEMORY6 Overview of Picture Profiles Original picture Adjust picture see page 50 52 Custom picture Example Save the picture adjustment values in...

Страница 54: ... S T U V W X Y Z _ Ok Cancel All delete Delete 6 When you finished entering the profile name select Ok with and press ENTER MY MEMORY1 0 1 2 3 4 5 6 7 8 9 A B C D E F G H I J K L M N O P Q R S T U V W X Y Z _ a A Ok Cancel All delete Delete To cancel saving the profile select Cancel Loading profiles Load profiles and apply the picture adjustment values to the display as follows 1 In the Picture me...

Страница 55: ...ith and press ENTER Memory delete Delete the MEMORY1 data Ok Cancel Renaming profiles 1 In the Picture menu select Memory edit with and press ENTER Memory save Memory load Memory edit 2 Select Memory name change with and press ENTER Memory edit Memory delete Memory name change 3 Select the profile to rename with and press ENTER 1 2 MEMORY1 3 MEMORY2 MEMORY3 Memory name change 4 Enter a name for th...

Страница 56: ...s RETURN Signal Examples of Signal submenu screen When HDMI1 HDMI2 HDMI3 is selected 60 00 Hz 74 18 MHz 1080 60i 33 72 kHz Signal Cinema reality YUV RGB in select Noise reduction Signal range MPEG noise reduction Dynamic backlight control V freq H freq Dot clock freq Signal format Off YUV Auto Full 0 255 Off Off HDCP status EDID select 4K 60p HDR Colour gamut Auto Dynamic range Auto Input HDMITM 1...

Страница 57: ... noise reduction Reduces block noise and mosquito noise on MPEG videos Off Disables MPEG noise reduction Min Mid Max Sets strength of MPEG noise reduction XGA mode This menu is displayed with PC IN input and when PC input mode is set to PC This unit supports XGA signals 1024 x 768 1280 x 768 1366 x 768 having different aspect ratios and sampling rates Auto Automatically detects the signal Switch t...

Страница 58: ...put 4K 60p 4K 30p and 2K are selectable If 4K 60p SDR or 4K 60p HDR is selected and pictures are not displayed correctly during 4K video signal input switch the setting to 4K 30p If 4K 60p SDR 4K 60p HDR or 4K 30p is selected and pictures are not displayed correctly during 2K or lower video signal input switch the setting to 2K For details of signals written in EDID of 4K 60p SDR 4K 60p HDR 4K 30p...

Страница 59: ...n the volume cannot be set to the level higher than the level set for Maximum VOL level Power ON screen delay When multiple displays are installed and are turned on simultaneously this function distributes the load of power by delaying the power supply timing of each display Setting is required for each display Off The powers are supplied at the same time as power on Auto The delay time is automat...

Страница 60: ... On see page 70 SLOT power link is set to On see page 100 If the input is changed by this function the last input is selected when the power is turned on next time If you wish to retain the original input when the power is turned on set Initial input to the original input see page 59 Input search submenu screen Input search Input search 1st search input 2nd search input Custom None None Input sear...

Страница 61: ...event the accidental input switch during a short period such as when the signal is interrupted due to the frequency change for the input signal while Input detection is operating If a signal is detected again within the set period sec the input is not switched Input detection may not operate correctly depending on the image playback device PC operates only when PC input mode is set to PC see page ...

Страница 62: ...function Active Indicates that the conditions are met and activates the Backup Input function Main input Displays the main input set by switching input Current input Displays whether the input currently in use for viewing is the main input set by switching input or the backup one Setting conditions The following table describes restrictions available combinations on each setting item Main HDMI1 HD...

Страница 63: ...n SATURDAY 2022 01 01 Note If the following buttons are pressed while the screen saver is operating the screen saver is cancelled Remote control RETURN Unit MENU Unit INPUT Unit Unit Unit ENTER Unit When the display is turned off the Screensaver will be deactivated To set interval of Screensaver Select Interval in Mode Set Periodic time Press to change the time by 15 minutes In ENGLISH US OSD lang...

Страница 64: ...Multi screen display is set to On Wobbling will not be activated see page 72 When Portrait settings Portrait display is set to On Wobbling will not be activated see page 73 When this function is operating part of the screen may appear to be missing Input label This function can change the label of the Input signal to be displayed Input label submenu screen Input label HDMI3 HDMI3 USB C USB C PC PC...

Страница 65: ...e menu of power consumption reduction Individual setting is not available No signal power off Enable HDMI1 power management On HDMI2 power management On HDMI3 power management On USB C power management On SLOT power management On PC power management On Power save On 1 2 Power management mode Custom The menu of the power consumption reduction is individually set This setting is enabled when Power m...

Страница 66: ...the power on or off automatically When no pictures sync signal are detected for 60 seconds or so at USB C input Power is turned off standby the power indicator lights up purple When pictures sync signal are subsequently detected at USB C input Power is turned on the power indicator lights up blue Note This function may not operate depending on the video output devices When this function is set to ...

Страница 67: ...o Mode 3 set Quick start to On to enable the operation When Quick start is set to Off this function works as it is set to Mode 2 even if it is set to Mode 3 This function does not operate if the power plug is removed from the outlet Turn the power ON once to use this function Changing delay Sets the delay time until the input is switched when Power management mode is Input detection Off Switches t...

Страница 68: ...evice Note When a Webex device is connected to the HDMI IN 1 HDMI IN 2 or HDMI IN 3 terminal the link function works The following functions are fixed Video conference mode settings of the corresponding input is fixed to On For details of operation when Video conference mode settings is set to On refer to Video conference mode settings see page 75 Picture mode is set to the suitable value Over sca...

Страница 69: ...e displayed HDMI CEC operation Displays the operation screen of the HDMI CEC compatible device Press RETURN to hide the operation screen MENU code Changes the code to assign for the MENU operation on the HDMI CEC operation screen Adjust the code to that of the connected HDMI CEC compatible device Display Device Enables Disables this unit to perform interlocking control of the HDMI CEC compatible d...

Страница 70: ...SCII characters excluding control code are displayed Note Picture cannot be adjusted when setting the startup image Only Backlight Gamma Colour temperature and Blue light reduction can be adjusted when setting the no signal image Images displayed for the startup image and no signal image may slightly differ from images confirmed on the computer When No signal image settings is set to On Input sear...

Страница 71: ...selected for Use memory select images are loaded from the USB memory device images cannot be loaded from the internal memory Clear user image Clears the image read in Read user image Startup image settings submenu screen Startup image settings Display setting User image On Image select Clear user image Read user image Note When there is no User image that have been read Clear user image is greyed ...

Страница 72: ...splay settings Multi screen display Horizontal scale Bezel H adjustment Vertical scale Bezel V adjustment Location Off 2 2 A1 Frame control Auto Note The settings are memorised separately for each input terminal When Multi screen display is set to Off adjust to the same angle of view for Position see page 47 Then set Multi screen display to On Again make fine adjustment of the angle of view for Po...

Страница 73: ...rtical direction However when Multi screen display is set to Off the adjusted value of the image display timing is fixed to 0 no adjustment 1 to 4 Adjusted value of the image display timing manual setting Operation is performed regardless of On Off setting for Multi screen display Note Video conference mode settings and Frame control cannot be used simultaneously Only one of them can be used When ...

Страница 74: ...cut 16 9 H fit Displays the entire input images however some portion of the images on top and bottom is not displayed Note 16 9 V fit and 16 9 H fit keep the aspect ratio 16 9 but Full doesn t Bezel adjustment Adjusts the area of image hidden in the joint area on the portrait screen 0 to 100 Location Assign the positions of portrait screens When Installation method is Landscape 3 screens Upper Cen...

Страница 75: ...button on the Control menu Quick input settings Quick input 1 USB C HDMI1 Quick input 2 Quick input 4 Quick input 3 WHITEBOARD MEMORY VIEWER Video conference mode settings Shortens the delay time from input to video display to configure the setting suitable for a video conference device connected externally Accordingly functions to change the picture size and position can no longer be used Video c...

Страница 76: ...s the program every day Weekday Executes the program from every Monday to Friday Weekend Executes the program on Saturdays and Sundays Custom Executes the program on selected days Refer to Customized setting for days of the week 4 Set the time Pressing once changes time 1 minute Pressing continuously changes time by 15 minutes 5 Set the power On Off 6 Set the input Customized setting for days of t...

Страница 77: ...onth Day Hour Minute are set to The upper limit of date and time that can be set is Year 2035 Month 12 Day 31 Hour 23 and Minute 59 Clock display Sets to display hide the clock Off Hides the clock On Displays the clock Note The clock is displayed at the lower left of the screen when RECALL button is pressed Display duration is approx 5 seconds When current date and time is not set the clock is not...

Страница 78: ...ent or child setting is Child NTP synchronization off operation is performed If two or more displays with Parent set are present on one network display synchronization does not operate properly Time is not synchronized if no displays with Parent set is present on one network Time is not synchronized if the time is not set for the display with Parent set on the network Depending on the network envi...

Страница 79: ...me The keyboard for setting the user name is displayed Enter the user name Entering characters see page 177 Password The keyboard for setting the password is displayed After entering the password select Ok the confirmation screen is displayed Enter the password again and select Ok the password is determined Save Saves the user name and password determined above in the display unit Note Once determ...

Страница 80: ...fied Note For IPv6 IP address entering method refer to Entering numbers see page 83 Initial values for notified IP addresses of IPv6 are blank Save Saves the password determined above in the display unit Note Once determined it is necessary to enter the password to display the settings To set the setting to On you must configure Administrator account settings in advance To use PJLink control you n...

Страница 81: ...yed in grey Entering numbers 0 0 0 0 0 8 1 9 2 1 6 8 IP address 1 Select the address and press ENTER 2 Select digits with 3 Change numbers with 4 Press ENTER You can cancel the change by pressing RETURN Select Save and press ENTER Save the current network Setup Note To use a DHCP server make sure the DHCP server is started Contact your network administrator for details on IP address Subnet mask an...

Страница 82: ...ver exists in the network the Display is going to be connected Off When a DHCP server does not exist in the network the Display is going to be connected set IP address Subnet mask and Gateway manually IP address IP address display and setting Enter an IP address when DHCP server is not used Subnet mask Subnet mask display and setting Enter a Subnet mask when DHCP server is not used Gateway Gateway...

Страница 83: ...elect the EAP that has been set for the RADIUS server If the EAP has not been set select None The types of EAPs that can be set are as follows PEAP MS CHAPv2 PEAP GTC EAP TTLS MD5 EAP TTLS MS CHAPv2 EAP FAST MS CHAPv2 EAP FAST GTC EAP TLS User name Enter the user name for authentication with one byte alphanumeric characters excluding space Up to 64 characters This can be set only when EAP is set t...

Страница 84: ...less address or Temporary address and press ENTER their list display screens are displayed Up to 8 items are displayed Stateless address list screen Stateless address 2001 db8 111 ffff 20b 97ff fe41 305 64 2001 db8 111 eeee 20b 97ff fe41 305 64 2001 db8 111 dddd 20b 97ff fe41 305 64 2001 db8 111 cccc 20b 97ff fe41 305 64 2001 db8 111 bbbb 20b 97ff fe41 305 64 2001 db8 111 aaaa 20b 97ff fe41 305 64...

Страница 85: ...NK not connected HDMI on DIGITAL LINK connected HDCP on HDCP supported on DIGITAL LINK Signal quality It is the quantified minimum and maximum numbers of errors that have occurred The display colours are red yellow or blue depending on the number Signal quality Display Colours Reception Status 12dB or below Blue Good 11 to 8dB Yellow Bad 7dB or above Red Terrible The number is represented by yello...

Страница 86: ...etting for Use memory select accessing devices differ When USB is selected a USB memory device inserted to the USB terminal is used When Internal memory is selected the internal memory is used USB media player settings submenu screen USB media player settings USB media player Scenario file check No scenario file Slide show duration Enable 10 sec Schedule play function Enable Video playback mode St...

Страница 87: ...edit function see page 134 Scenario file check Checks the memory selected for Use memory select When an error is detected the error code and file name are displayed For details of the error codes refer to USB memory contents check see page 132 Select Scenario file check with and press ENTER Available Scenario file check Note When the schedule playback is proceeding using Content Management Softwar...

Страница 88: ...o Sort order Sort type Auto display operation guide Thumbnail View Play method Ascending File name None 10 sec Memory viewer Enables Disables Memory viewer View Sets the display format of the content in the USB memory or internal memory device to the thumbnail display or the list display Content select Sets the type of content to display All Displays all the files including picture video and music...

Страница 89: ...on PIN code Sets whether to require the input of PIN code when connecting to this unit using Screen Transfer Off Does not require the input of PIN code On Requires the input of PIN code Note This function does not operate during communication with IPv6 settings Wireless presentation settings This menu configures the settings for wireless presentation system connection For details refer to the oper...

Страница 90: ...ible with version 1 5000 and later Pressing the numeric button switches the connection destination of the USB DEVICE terminal among Internal USB C and SLOT Note Pressing of the main unit while the menu screen is not displayed switches the connection destination of the USB DEVICE terminal Power off operation or input switching operation restores the connection destination set for USB DEVICE connect...

Страница 91: ... on screen menus OSD settings sub menu screen OSD settings Menu position Menu display duration Onscreen display OSD transparency OSD memory Right 60 sec On 0 On Menu position Sets the display position of the on screen menu Each time or is pressed the display position of the on screen menu changes Display example Left Centre Menu display duration Sets the display duration time for the on screen men...

Страница 92: ... keyboard for setting the password is displayed After entering the password select Ok the confirmation screen is displayed Enter the password again and select Ok the password is determined Entering characters see page 177 Save Saves the settings above in the display unit Note The default password is 1111 The security password is used when performing Shipping and Network settings Reset Change the p...

Страница 93: ...or not when serial command which the group is specified is received Off Does not respond On Responds Serial daisy chain position Sets the first and the last terminals of the daisy chain connection when serial controlling this unit by the daisy chain connection via DIGITAL LINK When controlling this unit alone with serial control or connecting at a position other than the first and last terminals i...

Страница 94: ... Hue according to the viewing environment Colour enhancement Automatically adjust the color emphasis Colour enhancement according to the viewing environment Colour temp enhance Automatically adjusts the color temperature color emphasis Colour enhancement according to the viewing environment White adj Colour enh Automatically adjusts the white balance Hue color emphasis Colour enhancement according...

Страница 95: ... Starts measurement by selecting this item after the sensor is set on the reference display Adjust set adjust start Starts adjustment by selecting this item after the sensor is set on the display to be adjusted Note Connect between the 2 displays using an RS 232C cross cable female female Check that Control settings is set as shown below on the 2 displays Serial control is set to SERIAL IN Serial ...

Страница 96: ...d on the reference display Sensor module Reference display Adjustment display 4 Select Reference set measurement start and press ENTER 5 When Adjust OK is displayed after measurement set the sensor on the display to be adjusted Adjust OK Reference set measurement start Adjust set adjust start Sensor module Reference display Adjustment display 6 Select Adjust set adjust start and press ENTER 7 When...

Страница 97: ...st and the Display enters the standby mode No signal warning timing 5 minutes No signal error timing 10 minutes HDMI1 power management On 60 seconds Note The No signal error timing cannot be set shorter than No signal warning timing Even when a USB memory or internal memory is connected if there is no playable file the unit determines no signal is present Temperature warning When set to On the dis...

Страница 98: ... USB C HOST terminal SLOT Connects to the SLOT Other inputs Connects to the internal system of the main unit USB C Connects to the USB C HOST terminal SLOT Connects to the SLOT Other inputs Connects to USB Internal Connects to the internal system of the main unit The same operation as that for the USB terminal is performed Note When USB DEVICE connection switching function is executed this setting...

Страница 99: ...e Main Power On Off button are disabled MENU ENTER Locks MENU Unit and ENTER Unit buttons To set Button lock Set with the buttons on the unit Off Press Unit for 4 times Press INPUT Unit for 4 times Press Unit for 4 times Press ENTER Unit On Press Unit for 4 times Press ENTER Unit for 4 times Press Unit for 4 times Press ENTER Unit MENU ENTER Press ENTER Unit for 4 times Press Unit for 4 times Pres...

Страница 100: ...HDMI CEC control is set to Enable this menu will be greyed out and cannot be set see page 69 When the DIGITAL LINK Terminal Board is attached SLOT power link is grayed out and cannot be set SLOT standby Sets the power supply status for the SLOT when the unit is in standby mode Off The power is not supplied to the SLOT when the power is turned off by the remote control etc On The power is supplied ...

Страница 101: ...When it is set to On power indicator lights purple under the condition of power Off with remote control stand by state When using the DIGITAL LINK IN LAN terminal of DIGITAL LINK Terminal Board for LAN control select Setup Mode settings and set LAN terminal setting to DIGITAL LINK SLOT see page 98 When Quick start is set to Off the power can be turned off via network control even if Network contro...

Страница 102: ...yte 1 byte 1 byte 8 bytes 1 byte Mode 1 Protect mode 3 Hash the following data with the MD5 algorithm and generate a 32 byte hash value zzzzzzzzyyyyy zzzzzzzz 8 byte random number obtained in step 2 yyyyy Password set for Administrator account settings Command transmission method Transmit in the following command format Transmitted data Header Control symbol Data part Control symbol Last terminal ...

Страница 103: ... account settings yyyyy Password set for the above Administrator account settings zzzzzzzz 8 byte random number obtained in step 2 Command transmission method Transmit in the following command format Transmitted data Header Data part Last terminal symbol Hash value see Connection method 0 0x30 0 0x30 Control command ASCII character string CR 0x0d 32 bytes 1 byte 1 byte Undefined 1 byte Received da...

Страница 104: ...e 21 Audio Off audio on mute 30 Shutter mode Off picture and audio mute deactivated 31 Shutter mode On picture and audio on mute Class Command Control 1 ERST Error status query First byte 0 Second byte 0 Third byte 0 Fourth byte 0 Fifth byte 0 Sixth byte Other error 0 or 2 Meaning of 0 2 0 Error is not detected 2 Error 1 2 INST Input switch list query 11 PC IN input PC PC YPBPR 31 HDMI IN 1 input ...

Страница 105: ...ranet and detects signs of abnormality of such devices that may arise in future As for the early warning function the maximum number of devices that can be registered to monitor differs according to the type of license Up to 2 048 devices can be registered for free for a maximum of 90 days after the installation to the computer has completed For more details visit the following web site https pana...

Страница 106: ...led settings Detailed set up and password change Change password operate Computer Setup Disable the proxy server settings and enable JavaScript The setting procedure differs depending on the software version Please refer to description in HELP etc of the software Windows Windows 10 is used as an example Disable proxy server settings 1 Display Internet Properties window Click Start Settings Network...

Страница 107: ...nge The screen of step 3 is displayed again 6 Enter the new user name and password Enter the new user name and password set in step 5 7 Click OK Note The password used here is common to the password specified in Network settings Administrator account settings see page 79 The default settings are as described below Administrator privilege Specify the user name and password you set for Administrator...

Страница 108: ...ansfer Browser Remote Control Click this item to display the Browser Remote Control on the WEB browser which is the same as the supplied remote control Display status page Displays the display status Click Status Display status Displays the type of Display Displays the firmware version of the display Network status page Displays the current configuration information of the network Click Status Net...

Страница 109: ...f the unit can be performed Click Display control Basic control Power On Off control Use these to select the input signals AUDIO mute Switches aspect mode Detail control page The detailed functions of the unit can be performed Click Display control Advanced control Enter a command Use the same command used for the serial control Response from the unit is displayed Command is sent and run Note Afte...

Страница 110: ...et to items other than NONE or EAP TLS When EAP is set to EAP TLS USER NAME Enter the user name for authentication with one byte alphanumeric characters excluding space Up to 64 characters PASSWORD Enter the password for authentication with one byte alphanumeric characters Up to 64 characters Back Next Click Back to return to the previous screen Click Next to display the screen to confirm the sett...

Страница 111: ...l is set to On and it is in standby mode date and time display will be blank and they cannot be set Time zone Synchronize display and NTP synchronization cannot be set as well When SYNCHRONIZE DISPLAY is set to ON CHILD it is not possible to set NTP SYNCHRONIZATION Date or Time When NTP SYNCHRONIZATION is set to ON it is not possible to set Date or Time If the time becomes incorrect immediately af...

Страница 112: ... use SNMP v1 v2c COMMUNITY COMMUNITY NAME Enter the community name of SNMP v1 v2c PERMISSION Select whether to obtain only information via SNMP v1 v2c or to both obtain information and make the setting SNMP v3 USER USER NAME Enter the user name of SNMP v3 PERMISSION Select whether to obtain only information via SNMP v3 or to both obtain information and make the setting SECURITY LEVEL Select the se...

Страница 113: ...ric characters The maximum number of characters that can be used for a user name and password is 32 with one byte alphanumeric characters Note that the password must be set with 8 characters or more Change the password periodically and set one which is difficult to guess The SNMP manager must be operating in the system configuration used For MIB Management Information Base of this unit see the web...

Страница 114: ...nging passwords For both administrator privileges and user privileges Include at least 3 kinds of characters from the following 4 and the number of characters should be 8 or more Alphabet upper case character A to Z Alphabet lower case character a to z Number 0 to 9 Special character _ etc It is recommended to set the password using the above types of characters without leaving the password field ...

Страница 115: ...gned certificate see page 122 Server Certificate Generate Certificate Signing Request Generates signing request Generate Certificate Signing Request The page to generate the signing request is displayed by clicking Execute For details refer to Generating the signing request see page 119 Server Certificate install Intermediate Certificate install Installs the server certificate and the intermediate...

Страница 116: ...rate the signing request When using the server certificate When using the self signed certificate Acquire the server certificate Generate the self signed certificate Install the certificate Note When using the server certificate the procedure from application to the certification organization to issuing of the server certificate is required to be performed between the customer and the certificatio...

Страница 117: ...ll be displayed CRT key Generated 4 Click OK Clicking Certificate CRT Key generate Execute again can confirm the key length and generation date and time of the current CRT key with the RSA key size and Last modified of Current CRT key at the upper row of the CRT key generation page Note Not generated displayed in Last modified indicates that the CRT has not been generated RSA key size is fixed to ...

Страница 118: ...ntents are displayed 3 Confirm RSA key size and Last modified of the CRT key to restore 4 Click Apply Following confirmation message is displayed The previous CRT key will be loaded Please generate Self signed Certificate or install the Server Certificate corresponds to the CRT key Continue 5 Click OK Previously generated CRT key is reflected as the current CRT key Note When returned to the previo...

Страница 119: ...e defined in ISO 3166 1 alpha 2 two upper case alphabets State Enter the State etc 128 characters Locality Enter the locality 128 characters Organization Enter the organization name 64 characters Organization Unit Enter the organization unit name 64 characters CRT key RSA key size The key length of the current CRT key is displayed Last modified The generation date and time of the current CRT key i...

Страница 120: ...ver Certificate Information Confirm The information of the installed server certificate is displayed The details of each item are as follows Item Details Common Name The Display name or the IP address is displayed Country The country code defined in ISO 3166 1 alpha 2 two upper case alphabets is displayed State The State etc is displayed Locality The locality is displayed Organization The organiza...

Страница 121: ...haracter length limit Common Name Enter the Display name or the IP address set in the Display 64 characters Country Enter the country code defined in ISO 3166 1 alpha 2 two upper case alphabets State Enter the State etc 128 characters Locality Enter the locality 128 characters Organization Enter the organization name 64 characters Organization Unit Enter the organization unit name 64 characters CR...

Страница 122: ...ed Note The generated self signed certificate can be deleted by clicking Certificate Self signed Certificate Delete However it cannot be deleted when HTTPS set up Connection is set to HTTPS Delete it after changing the setting to perform the HTTP communication HTTPS set up page Set this page when HTTPS Hypertext Transfer Protocol Secure communication encrypted with the SSL TLS protocol is to be pe...

Страница 123: ...e network A number up to four digits Default value 3 Room ID Sets the Room ID used to determine the Display on the network Up to 32 half width characters Non Secure Port Sets the port number to be used with the unsecured communication Default value 41794 Secure Port Sets the port number to be used with the secure communication Default value 41796 Authentication Select the authentication with the c...

Страница 124: ...ion Disable Does not perform the connection authentication Enable Performs the connection authentication User Name Enter the user name used for the connection authentication Up to 20 half width characters Password Enter the password used for the connection authentication Up to 20 half width characters Crestron Fusion in the Cloud FITC Sets whether to use the Fusion server in the Cloud Disable Does...

Страница 125: ...O Cloud Configure the setting to control devices using XiO Cloud XiO Cloud Disable Disables the XiO Cloud function Enable Enables the XiO Cloud function Submit Update the XiO Cloud setting Proxy Configure the proxy server setting Proxy Disable Does not use the proxy server Enable Uses the proxy server Proxy Server Name Enter the proxy server name or IPv4 address Proxy Server Port No Enter the port...

Страница 126: ...ork control to On see page 79 The Browser Remote Control can also be displayed by entering http xxx xxx xxx xxx remote in the WEB browser URL entry field xxx xxx xxx xxx is the IP address set for this display The button long press operation is invalid The restriction for the remote control button operation set for Setup Controller user level see page 99 does not apply Avoid operating the multiple ...

Страница 127: ...ngs see page 86 Using the content list delivery function of the Multi Monitoring Control Software see page 105 content still motion pictures played back on a USB media player and the playback list can be delivered Still pictures in jpg files and motion pictures other than H 265 HEVC can only be delivered For details refer to the manual of Multi Monitoring Control Software Single Media Player Files...

Страница 128: ... supports RGB only bmp Windows Bitmap Number of pixels Minimum 32 x 18 Maximum 4 096 x 4 096 1 bit 4 bits 8 bits 24 bits Following formats are not supported Run length encoding bit field top down transparent data Motion pictures Extension Codec Video Audio avi H 264 MPEG4 AVC AAC LC LPCM MP WMA Standard MPEG4 Visual VC 1 Advanced VC 1 Simple Main mkv H 264 MPEG4 AVC AAC LC HE AAC LPCM MP3 MPEG4 Vi...

Страница 129: ...the file and then click Get Info 2 Click Details Scenario The play order and time can be specified for a play file Save under the name one byte alphabetical characters scenario dat immediately below root in USB memory Save files as UTF 8N format 1 to 999 lines can be specified for Scenario File list It is a list of play files Save under the name one byte alphabetical characters filelist dat immedi...

Страница 130: ...pg 1 2 001_Contents_Video1 wmv 2 3 002_Contents_Video2 wmv 2 4 003_Contents_Video3 wmv 2 1 Played for the duration set in Slide show duration 2 Played for the duration of the play time of the file Single Media Player Type 2 Files will be played in the order they were listed in a scenario Scenario file list Scenario Enter File name Play time File list Unnecessary Setting example USB memory contents...

Страница 131: ... The second and subsequent lines Enter File definition File name Setting example Parent side USB memory contents filelist dat scenario dat L_Introduction jpg L_Contents_Video1 wmv L_Contents_Video2 wmv L_Contents_Video3 wmv scenario dat scenario PHOTO_001 10 VIDEO_001 10 VIDEO_002 20 VIDEO_003 filelist dat file list GroupID G01 PHOTO_001 L_Introduction jpg VIDEO_001 L_Contents_Video1 wmv VIDEO_002...

Страница 132: ...etails of the detected errors are as follows Error code Detail of the error 1 No USB memory is inserted 2 scenario dat filelist dat cannot be opened 3 There is an error in the contents of scenario dat filelist dat 4 The play file format is not supported 5 No play file exists 6 The necessary group ID for Multi Media Player has not been specified 7 There are several identical file definitions 8 The ...

Страница 133: ...ion Use them within the same subnet Do not use wireless LAN for connection since playback may not be performed normally Starting ending Media Player For Single Media Player Start 1 Insert the USB memory device for Media Player to the USB terminal on the side of the display Note Depending on the type of a USB memory device it may come in contact with the periphery such as a back cover and cannot be...

Страница 134: ...t Portrait settings Digital zoom The screen and audio quality while editing the playlist is adjusted with the same content as that for the MEMORY VIEWER input Editing the playlist requires 2 MB or more of space in the USB memory device Use a USB memory device for which file reading and writing can be normally performed Use the remote control for the playlist editing function operation 1 File selec...

Страница 135: ...name When the content file is deleted with 4 a confirmation screen is displayed before deletion If 999 content files already exist another file cannot be added even if 1 is pressed 3 File output screen Select Yes with and press ENTER File output to the USB memory device or internal memory starts 4 Exit screen The exit screen appears Schedule playback function using Content Management Software This...

Страница 136: ...ent is played back at the time set for schedule Playback files in the following formats are supported Still pictures Extension Format Limitation jpg jpeg jpe JPEG Number of pixels Minimum 32 x 18 Maximum 4 096 x 4 096 supports baseline only YUV format supports YUV444 YUV442 and YUV440 Colour mode supports RGB only bmp Windows Bitmap Number of pixels Minimum 32 x 18 Maximum 2 000 x 2 000 1 bit 4 bi...

Страница 137: ...efore the specified schedule time If the unit enters the schedule standby mode after one minute before the power on schedule the power is not turned on at the specified time by the schedule playback function The power on operation by Schedule play function does not work in standby states other than the schedule standby mode Multi screen display setting of the multi display Sets the following for p...

Страница 138: ...n No signal power off HDMI CEC settings No activity power off OSD transparency Image settings Reading user image is disabled Input search Initial input Input lock Failover Failback Note Disabled functions are greyed out on the on screen menu Also serial commands are in ER401 state Including the inquiry command During schedule play mode disabled functions are set to Disable Off and those operations...

Страница 139: ...g time may be required to display content Motion pictures Extension Codec Video Audio avi H 264 MPEG4 AVC AAC LC LPCM MP WMA Standard MPEG4 Visual VC 1 Advanced VC 1 Simple Main mkv H 264 MPEG4 AVC AAC LC HE AAC LPCM MP3 MPEG4 Visual VC 1 Advanced VC 1 Simple Main H 265 HEVC wmv asf H 264 MPEG4 AVC LPCM MP3 WMA Standard WMA9 WMA10 Pro MPEG4 Visual VC 1 Advanced VC 1 Simple Main mp4 mov flv H 264 M...

Страница 140: ...ies 2 Click the Details tab For Mac 1 Click a file while holding down the Control key and click Get Info 2 Click More Info The maximum size of file is 2 GB The maximum number of file folder is up to 2 000 If the number exceeds 2 000 files folders are displayed You cannot play the files which are protected by Digital Rights Management DRM If files or folders include characters other than one byte a...

Страница 141: ...ile Music file The file has a supported extension but cannot be played In the thumbnail view if images for thumbnails can be displayed icons are replaced with automatically created thumbnail images Note If the image includes Exif information orientations of the thumbnail image and the playback image may differ 2 Information of the selected file 3 Remote control operation guide 4 Status indicator i...

Страница 142: ...ying RETURN Return to the list view 1 Not used 2 Display Hide the detail of the content that is being played back 3 Not used 4 Not used 5 Display Hide the remote control operation guide 6 Not used Pressing ENTER during play stops the play temporarily Press it again to restart the play Pressing during play starts the play from the previous picture and pressing from the next picture It is possible t...

Страница 143: ...isplay Hide the detail of the content that is being played back 3 Skip 30 seconds forward 4 Rewind 5 Display Hide the remote control operation guide 6 Fast forward Note Depending on the content to be played Skip 10 seconds backward or Skip 30 seconds forward may not operate correctly 3 Press RETURN Returns to the thumbnail view or file list view Disabled functions While using the Memory viewer the...

Страница 144: ... set Control menu see page 75 When Control menu Bottom When Control menu Top Control menu Input selection WhiteBoard Input display Zoom App Launcher Volume level control Mute Close Display setting Input selection Switches the input source to the one you click You can select the input sources displayed on the Control menu Quick input settings see page 75 Input display Lists the selectable input sou...

Страница 145: ...e buttons Click to mute the sound changes to and the volume level control is disabled To cancel the muting click it again Display setting Displays a screen to select the menu Close Click Close to minimize Control menu Click the minimized tab to restore Control menu When a menu other than Control menu is displayed Control menu is not displayed When the displayed object is closed Control menu is dis...

Страница 146: ...t drawing will be made on the white background Select the WHITEBOARD input Remote control operation Press INPUT to select the WHITEBOARD input If the function of a numeric button accessible through Setup Function button settings has been assigned to Input WHITEBOARD simply pressing it can switch the input to WHITEBOARD Mouse operation Click WHITEBOARD in Control menu About Control menu see page 14...

Страница 147: ... to an input source 2 Start up WhiteBoard from Control menu The display enters the transparent mode allowing you to draw on video or still image Main menu Click the function button on the Main menu to switch between the modes Transparent Switches to transparent mode Whiteboard Switches to WhiteBoard mode 3 Exit from WhiteBoard mode Click in the Main menu ...

Страница 148: ... mode Transparent Sets background transparent mode on WhiteBoard Whiteboard Sets white background mode on WhiteBoard A colour other than white can also be set Undo Cancels the previous action Up to 20 actions Redo Redos the action you canceled Pen Used to draw free lines such as characters and figures Select Used to select a drawing object Marker Is a translucent pen Line Used to draw a straight l...

Страница 149: ...hiteBoard mode Graph paper size Used to set the grid cell size of the background graph paper Whiteboard background Grid 1 Grid 2 size Used to set the cell size Number of lines in English notebook Used to set the number of lines to display on one screen of the background English note Number of staff lines Used to set the number of lines to display on one screen of the background staff notation Hori...

Страница 150: ...are the same as the pen settings The changed items are displayed in the palette menu and are displayed in tabs for each category Thickness select Colour select The slider allows you to freely set the thickness of the pen You can check how thick it is on the preview screen 2 Draw on the display Marker Line Erasing a drawn object To remove a small part 1 Click Eraser 2 Drag the mouse and trace the p...

Страница 151: ... erased by the object drawn All are cleared By drawing object Note It is not possible to delete only part of a drawing object If you accidentally delete one Click the Undo button on the menu to restore it To clear all Click Erase all All the drawn objects are removed ...

Страница 152: ...t file Save file Saves created data in a file Read other file format Reads image data in a format other than the project file format image data saved sequentially for each page and PDF Save other file format Saves data on WhiteBoard in image format and PDF format which are saved sequentially for each image and page Note For security reasons it is recommend to delete the stored files after using th...

Страница 153: ...ing them and create a new one Read file Loads created whiteboard data pwb On the left pane you can select Internal memory or USB memory for the source to load data from When you select a file the file name format and location are displayed at the lower right Click Read to load the selected data and display it on WhiteBoard Save file Saves the current drawing objects For the destination Internal me...

Страница 154: ...only USB memory is selectable The usable save formats are Image file JPEG Image file PNG PDF file Sequentially numbered image files JPEG and Sequentially numbered image files PNG Note With PDF all pages are saved in one file For sequentially numbered images files are created for each page in the specified format and saved in the displayed folder Switching the drawing page Page menu When drawing wi...

Страница 155: ...m the left Pen Marker Eraser Clear All The color of the pen and marker is set to the color selected in the Control menu Eraser erases a zone to which it is applied This is different from the WhiteBoard operation Drawing data is deleted when the screen is refreshed Drawing data cannot be saved It becomes a function to draw temporarily Note Capture during the simple drawing function is active gets c...

Страница 156: ...he video at the time of clicking is captured and saved in the internal memory and USB memory On one screen Only the video is captured On a screen other than one screen on a split display during simple drawing etc All other than video parts drawing contents etc are captured During zooming simple drawing split screen and image display screen shots including drawing contents are saved When saving the...

Страница 157: ... you click the number of screen splits changes from 1 2 4 9 1 2 split screen 4 split screen 9 split screen On a split screen the live video is displayed on the left pane when the 2 split screen upper left pane when other than the 2 split screen If the displayed image list does not fit on the screen use the up and down arrows to switch Overlaying two data layers transparently to compare them valid ...

Страница 158: ...d on the right side of the screen Note To go back to the folder by one level above select If the displayed image file list does not fit on the screen use the up and down arrows to switch Selecting whether to display live video Select whether to make one of the comparison images left upper left live video Click the Enable live check box to display the live image on the left or upper left when makin...

Страница 159: ...enabled Magnification display Note Use Expand Shrink button to zoom up down the screen Use the 4 way move button to move the image in that direction When the zoom function is canceled the magnification returns to 100 The zoom is canceled when the display mode Disp mode is changed Expand Shrink Move up Move right Move left Move down ...

Страница 160: ...will not be zoomed However if you have already zoomed the magnification will be retained Comparison mode menu commands Exit Quits Comparison mode Folder Displays the data selection screen Pause Pauses the video on the display screen Capture Captures the displayed image Menus and other UI objects cannot be captured The zoom is applied to image capturing Image list Displays a data list for compariso...

Страница 161: ... will be set to the background of the current page Note This item is valid only when Set background is checked The operating conditions for both modes are as described below When it is disabled it will be grayed out and you cannot click it Status Video only button WhiteBoard Capture button Set background checked Create new page checked WhiteBoard not activated Enabled Disabled Disabled Disabled Wh...

Страница 162: ...de The entire screen is masked and a part is cut out in a square to show the image You can move it by dragging and pinch the four corners to change the size Shade mode Sliding the mask show the screen little by little You can adjust the mask width of the full screen width by pinching the four corners Also you can move the mask position by pinching other positions ...

Страница 163: ...nd Copies the user background to add to the internal memory from a USB memory Delete user background Deletes the user background in the internal memory Cancel Quits the menu Note The supported formats that can be installed with user data are as follows JPEG PNG SVG It is recommend to use square size stamp data For other formats margins are added Calculator Allows you to perform simple calculations...

Страница 164: ...isplayed by right clicking Other than WHITEBOARD input WHITEBOARD input Annotation setting Makes the marker settings Drawing color setting Red Blue Yellow and Black Line thickness setting usually line thick line and thin line Setting of the time until erasure App launcher and settings see page 163 Turns off the power Sets the object selection method App launcher and settings see page 163 Turns off...

Страница 165: ...awing is erased after the set time has elapsed Note Drawing is not possible while the app is starting up The pen icon works as a color selection button for Annotation until timeout after drawing Multi mouse support Annotation is enabled with multiple mice Note When mice more than the number of the USB terminals are connected a USB hub is required Up to 8 mice can be connected However simultaneous ...

Страница 166: ...nected with the HDMI1 HDMI2 HDMI3 or SLOT input and this unit is turned on with the Power off on setting the device that was viewed or listened last is turned on When this unit is turned on with the Power off on setting and the device that was viewed or listened last with the HDMI1 HDMI2 HDMI3 or SLOT input is not connected a device displayed for HDMI1 HDMI2 HDMI3 or SLOT of HDMI CEC settings is t...

Страница 167: ...or scenes are skipped forward by the number of pressed times Stop Displays the setting menu of the device MENU code see page 69 Controls the power of the device Note It is possible to operate HDMI CEC compatible device with the numeric buttons 1 to 6 Menu operation of HDMI CEC compatible devices When the setting menu of the HDMI CEC compatible device is displayed it is possible to operate the menu...

Страница 168: ...atible device When the ARC compatible device is not connected to the HDMI IN 3 terminal or the ARC compatible device is not turned on Outputs audio to the output destination set for Sound Output select ARC On Always outputs audio from the ARC compatible device When the ARC compatible device is not connected audio is not output ARC Off Always outputs audio to the output destination set for Sound Ou...

Страница 169: ...g data cannot be copied Setting is required for each display Cloning password Security password Date and time Date and time Date and time Synchronize display setting Network settings Administrator account settings Network settings PJLink settings Network settings Display name Setting for Network settings LAN setup Time zone NTP synchronization NTP server name DNS server Control settings Display ID...

Страница 170: ...and press ENTER Select copy type Display USB memory USB memory Display 8 Select Yes with and press ENTER Data copy to the USB memory starts Data to USB memory The data will be overwritten when any data exists originally Are you OK to write the data Yes No The following message is displayed after data copy has finished Data copy finished 9 After data copy has finished remove the USB memory device f...

Страница 171: ...ning password screen is displayed Copying data to other display via LAN 1 Display Setup menu pressing SETUP 2 Select Options with and press ENTER The following display appears Display information Options Software licenses Cloning password USB data cloning Security password LAN data cloning Output log data Shipping 3 Select LAN data cloning with and press ENTER Cloning password screen is displayed ...

Страница 172: ...f the red mark appears check the LAN cable connection or power status of the display of the copy destination EQ2 001 EQ2 002 EQ2 004 EQ2 005 EQ2 014 EQ2 006 EQ2 041 EQ2 009 192 168 0 1 192 168 0 2 192 168 0 4 192 168 0 25 192 168 0 31 192 168 0 7 192 168 0 124 192 168 0 211 LAN data cloning Status Cloning finished Display name IP address If the data copy has finished the message appears on the dis...

Страница 173: ...ord LAN data cloning Output log data Shipping 3 Select Cloning password with and press ENTER Cloning password screen is displayed 4 Enter the current password and press Ok 5 Enter the new password and press Ok 6 Enter the new password again for confirmation and press Ok Note The initial password in the factory default state is AAAA Change the password periodically and set one which is difficult to...

Страница 174: ...and save them to the USB memory device File name th 55eq2_network sh Setting Example TH 55EQ2_LAN_SETTINGS A 192 168 0 18 S 255 255 255 0 G 192 168 0 1 P 1024 I ON E EAP TLS E_U EAPUSER E_P eappassword E_D digitalcertificate pfx E_C cacerficate cer TH 55EQ2_LAN_SETTINGS Fixed characters represent the model name Be sure to input as follows TH inch size Model name _LAN_SETTINGS A Specifies the IP ad...

Страница 175: ... fails the network setting is not changed Be sure to confirm the file description and insert the USB memory device again This function operates only when a file with the above file name exists in the USB memory device Use one byte alphanumeric characters to describe file contents Copying the USB memory data to the display 1 Insert the USB memory device to the USB terminal on the side of the displa...

Страница 176: ...e 93 2 Set the remote control s ID MODE switch to ON 3 Pointing the remote control at the Display you want to control press ID SET 0 ID set Display ID Controller ID 4 Press one of 0 9 Sets the tens digit 5 Press one of 0 9 Sets the units digit The steps from 3 to 5 need to be done within 5 seconds Adjustable ID number range is 0 100 Example To set the ID to 1 After step 3 press 0 and then 1 To set...

Страница 177: ...d e f g h i j k l m n o p q r s t u v w x y z _ Ok Cancel All delete Delete Switches the keyboard to the upper case alphabet Each time ENTER is pressed the keyboard is switched in the order of lower case upper case and symbols 3 Select M with and press ENTER M Repeat this process to enter the next character 4 Select Space key with and press ENTER 0 1 2 3 4 5 6 7 8 9 A a A B C D E F G H I J K L M N...

Страница 178: ...7 50 60 00 148 50 Y H UC DL 1080 50p 1 920 x 1 080 56 25 50 00 148 50 Y H UC DL 2K 24p 2 048 x 1 080 27 00 24 00 74 25 H UC DL 2K 25p 2 048 x 1 080 28 13 25 00 74 25 H UC DL 2K 30p 2 048 x 1 080 33 75 30 00 74 25 H UC DL 2K 48p 2 048 x 1 080 54 00 48 00 148 50 H UC DL 2K 60p 2 048 x 1 080 67 50 60 00 148 50 H UC DL 2K 50p 2 048 x 1 080 56 25 50 00 148 50 H UC DL 3840 x 2160 24p 3 840 x 2 160 54 00...

Страница 179: ...52 x 864 75 1 152 x 864 67 50 75 00 108 00 R H UC DL 1152 x 864 85 1 152 x 864 77 09 85 00 119 65 R H UC DL 1152 x 870 75 1 152 x 870 68 68 75 06 100 00 R H UC DL 1280 x 720 60 1 280 x 720 44 76 60 00 74 48 R H UC DL 1280 x 768 50 1 280 x 768 39 55 49 94 65 18 R H UC DL 1280 x 768 60 1 280 x 768 47 70 60 00 80 14 R H UC DL 1280 x 768 60 1 280 x 768 47 78 59 87 79 50 R H UC DL 1280 x 800 50 1 280 x...

Страница 180: ... 268 50 H UC 3840 x 1080 60 3 840 x 1 080 66 63 59 97 266 50 H UC 3840 x 2160 30 3 840 x 2 160 65 69 29 98 262 75 H UC 3840 x 2160 60 3 840 x 2 160 133 31 60 00 533 25 H UC 1 Pixel Repetition signal dot clock frequency 27 0 MHz only 2 Signals to represent formats are as follows R D sub RGB PC IN Y YPBPR YCBCR PC IN H HDMI HDMI IN 1 HDMI IN 2 HDMI IN 3 UC USB C DP Alt Mode USB C HOST DL DIGITAL LIN...

Страница 181: ...t Yes with and press ENTER The message Shipping Wait a moment will be displayed 5 After the message Please turn off the power is displayed turn the power off pressing Main Power On Off button If the Main Power On Off button is locked please disconnect the AC cord plug from the wall outlet Unit 1 Press MENU Unit for several times and display the Setup menu 2 Select OSD language with and then press ...

Страница 182: ...he main microcomputer version of the main unit software These functions cannot be used in the following versions Lower than Ver 1 5000 IPv6 settings see page 82 Lower than Ver 2 4000 Quick start confirmation screen at startup see page 37 Lower than Ver 2 5000 Signal input display see page 56 Clock adjust setting see page 77 Setting memories for number buttons by selecting Function button settings ...

Страница 183: ...conds or more to turn the power on see page 36 Power automatically turns off unexpectedly Check the settings of No signal power off Power management function for each input and No activity power off Any of them may be set to On Enable see page 65 Power indicator is blinking in orange There is possibility of malfunction Please contact an Authorized Service Centre No remote control operations can be...

Страница 184: ...tive Min Mid Max see page 49 Sound distortion or noise annoys you Check whether the rated 0 5 Vrms audio or more is input to audio input terminals AUDIO IN Use the unit within the rated audio input see page 187 The RS 232C is uncontrollable Check whether the connection has been made properly see page 28 The LAN is uncontrollable Check that the connection has been made properly see page 101 To cont...

Страница 185: ...iquid crystal panel the edges may appear to flicker in the fast moving parts of the images This is normal and not indicative of malfunctioning There may be red spots blue spots green spots and black spots on the screen This is a characteristic of liquid crystal panels and is not a problem The liquid crystal panel is built with very high precision technology giving you fine picture details Occasion...

Страница 186: ... 125 W TH 43SQ2HW 93 W TH 86EQ2W 443 W TH 75EQ2W 257 W TH 65EQ2W 215 W TH 55EQ2W 163 W TH 50EQ2W 142 W TH 43EQ2W 112 W Stand by condition 0 5 W Quick start Off LCD Display panel TH 98SQ2HW 98 inch ADS panel Direct LED backlight 16 9 aspect ratio TH 86SQ2HW 86 inch VA panel Direct LED backlight 16 9 aspect ratio TH 86EQ2W 86 inch ADS panel Direct LED backlight 16 9 aspect ratio TH 75SQ2HW TH 75EQ2W...

Страница 187: ... Approx 28 2 62 17 lbs TH 55SQ2HW Approx 18 0 39 69 lbs TH 50SQ2HW Approx 15 5 34 02 lbs TH 43SQ2HW Approx 11 5 25 29 lbs TH 86EQ2W Approx 50 7 111 8 lbs net TH 75EQ2W Approx 37 3 82 2 lbs net TH 65EQ2W Approx 29 7 65 5 lbs net TH 55EQ2W Approx 18 0 39 7 lbs net TH 50EQ2W Approx 15 5 34 2 lbs net TH 43EQ2W Approx 11 7 25 8 lbs net Operating condition Temperature 0 C 40 C 32 F 104 F 2 Humidity 20 8...

Страница 188: ...2HW TH 86SQ2HW TH 75SQ2HW TH 86EQ2W TH 75EQ2W 15 mm 25 mm 1 φ 70 mm 1 2 pieces TH 65SQ2HW TH 55SQ2HW TH 50SQ2HW TH 43SQ2HW TH 65EQ2W TH 55EQ2W TH 50EQ2W TH 43EQ2W φ 30 mm 2 2 pieces Audio Output 20 W 10 W 10 W 10 THD Remote Control Transmitter Power source DC 3 V battery AAA R03 LR03 type 2 Operating range Approx 7 m 22 9 ft when operated directly in front of remote control sensor Mass Approx 63 2...

Страница 189: ...ery of this product Panasonic Connect Co Ltd will give to any third party who contacts us at the contact information provided below for a charge no more than our cost of physically performing source code distribution a complete machine readable copy of the corresponding source code covered under GPL V2 0 LGPL V2 0 LGPL V2 1 or the other licenses with the obligation to do so as well as the respecti...

Страница 190: ...tion points in accordance with your national legislation By disposing of them correctly you will help to save valuable resources and prevent any potential negative effects on human health and the environment For more information about collection and recycling please contact your local authority Penalties may be applicable for incorrect disposal of this waste in accordance with national legislation...

Страница 191: ...erial Number Panasonic Connect North America Unit of Panasonic Corporation of North America Executive Office Two Riverfront Plaza Newark New Jersey 07102 Panasonic Canada Inc 5770 Ambler Drive Mississauga Ontario L4W 2T3 Manufactured by Panasonic Connect Co Ltd 4 1 62 Minoshima Hakata ku Fukuoka 812 8531 Japan Importer Panasonic Connect Europe GmbH Hagenauer Strasse 43 65203 Wiesbaden Germany Auth...

Отзывы: