


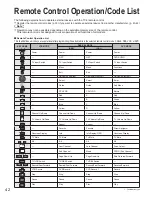


28
29
Advanced
VIERA
Link
TM
“HDA
VI Control
TM
”
VIERA Link
TM
“HDAVI Control
TM
”
Simultaneously control all Panasonic “HDAVI Control” equipped components using one
button on one remote.
VIERA Link
TM
is a new name for EZ Sync
TM
.
Enjoy additional HDMI Inter-Operability with Panasonic products which have “HDAVI Control”.
This TV supports “HDAVI Control 3” function.
Connections to the equipment (DVD recorder DIGA, HD Camcorder, Player theatre, RAM
theater, Amplifier, etc.) with HDMI cables allow you to interface them automatically.
The equipment with “HDAVI Control” function enables the following operations:
Automatic Input Switching (p. 29)
Power on link (p. 29)
Power off link (p. 29)
Default speakers (p. 29)
One-touch theater playback (p. 29)
Speaker control (p. 31)
The equipment with “HDAVI Control 2” (or more) function enables the following operations:
VIERA Link control only with the TV’s remote control (for “HDAVI Control 2” or “HDAVI Control 3”) (P. 31)
Providing the setting information (for “HDAVI Control 3”) (p. 29)
Automatic lip-sync function (for “HDAVI Control 3”) (p. 29)
Direct TV Recording (for “HDAVI Control 3”) (p. 31)
VIERA Link “HDAVI Control”, based on the control functions provided by HDMI which is an
industry standard known as HDMI CEC (Consumer Electronics Control), is a unique function
that we have developed and added. As such, its operation with other manufacturers’ equipment
that supports HDMI CEC cannot be guaranteed.
Please refer to the individual manuals for other manufacturers’ equipment supporting the VIERA Link function.
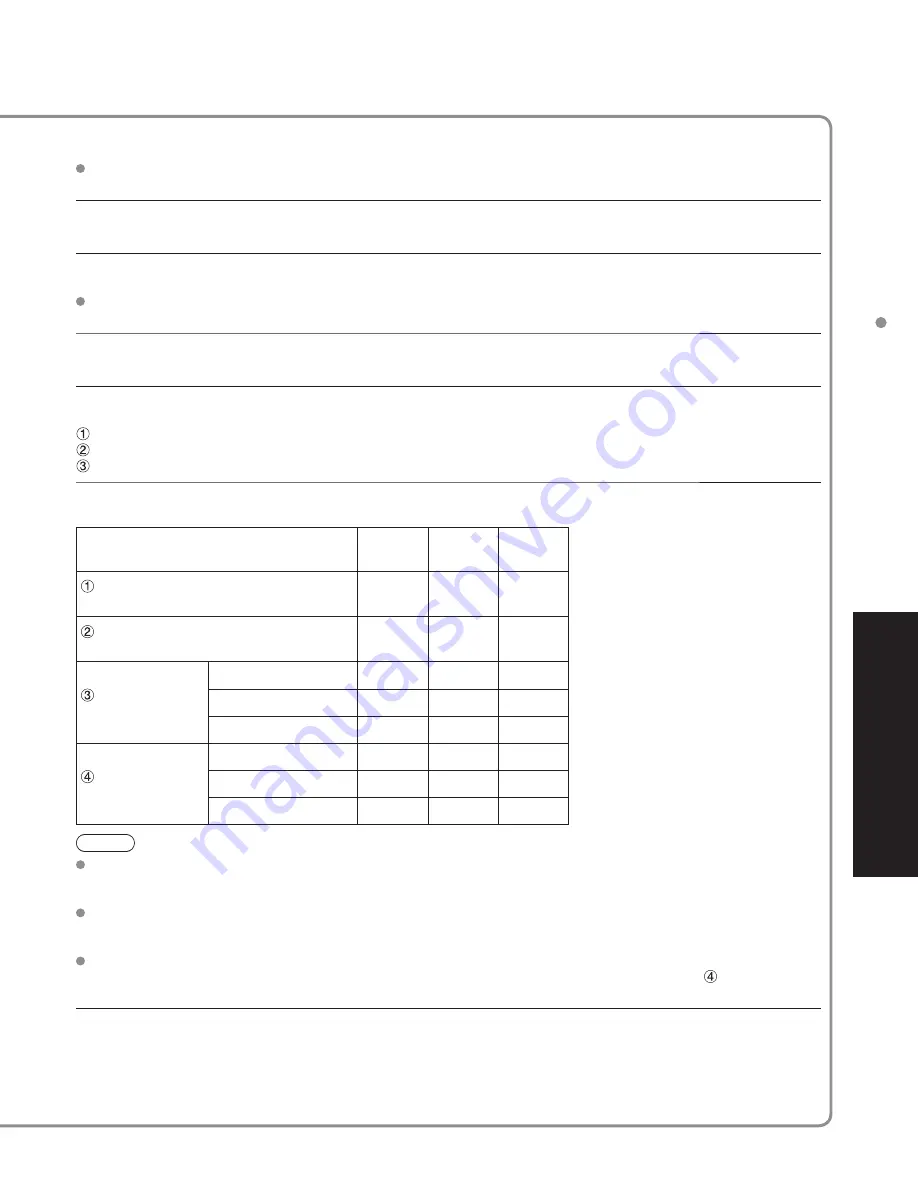
■
For the first time / when adding new equipment, reconnecting equipment or changing
the setup after the connection, turn the equipment on and then switch the TV on.
Select the input mode to HDMI1, HDMI2 or HDMI3 (p. 22), and make sure that an image
is displayed correctly.
■
HDMI cable
This function needs an HDMI compliant (fully wired) cable. Non-HDMI-compliant cables cannot be utilized.
It is recommended that you use Panasonic’s HDMI cable. Recommended part number:
RP-CDHG10 (3.3 ft/1.0 m), RP-CDHG15 (4.9 ft/1.5 m), RP-CDHG20 (6.6 ft/2.0 m),
RP-CDHG30 (9.8 ft/3.0 m), RP-CDHG50 (16.4 ft/5.0 m)
* For more details on the external equipment’s connections, please refer to the operating
manuals for the equipment.
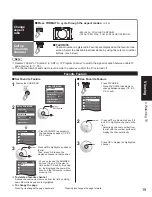
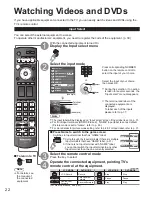
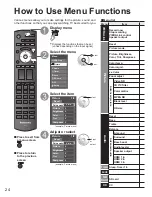
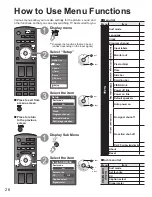
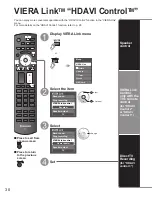
TV MENU
■
Press to exit from
a menu screen
■
Press to return
to the previous
screen
Follow direction - in “VIERA Link
setting” (p. 23)
Select settings
VIERA Link setting
VIERA Link
Power off link
Power on link
Default speakers
On
Set
Set
TV
select
Set
VIERA Link setting
VIERA Link
Power off link
Power on link
Default speakers
On
Set
Set
Theater
change
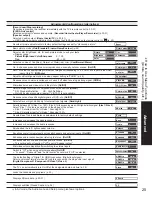
Automatic
Input
Switching
At the start of the DIGA, Player theater, or RAM theater playback, the TV’s input automatically switches to the input
based on the playback equipment.
For the RAM theater, the speakers automatically switch to the theater system.
If using the DIGA operation, the TV’s input automatically switches to the DIGA and DIGA menu is displayed.
Power on
link
When “Set” is selected (p. 27), TV is turned on automatically and switches to the appropriate HDMI input whenever
VIERA Link compatible equipment is initially turned on and Play mode is selected.
Power off
link
When “Set” is selected (p. 27) and the TV is turned off, all connected VIERA Link compatible equipment is also
automatically turned off.
DIGA (Panasonic DVD Recorder) will not turn off if it is still in rec mode.
Caution:
The TV remains on even if the VIERA Link compatible equipment is turned off.
Default
speakers
“TV” is the default setting. To set the Home Theater system as default speakers, change the default speakers
setting from “TV” to “Theater”. Sound will be output from the Home Theater whenever the TV is powered on.
One-touch
theater
playback
If the “ONE TOUCH PLAY” key is pressed on the remote control for Panasonic Home Theater system, the following
sequence of operations is performed automatically.
Home Theater power switches On, and playback begins.
TV power switches On, and the playback screen is displayed.
Audio is muted on the TV and switches to the theater system.
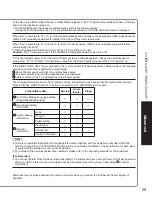
Providing
the setting
information
(for “HDAVI
Control 3”)
The following information about the TV settings can be transmitted to each equipment (Recorder/Home theater/
Player) that has “HDAVI Control 3” function connected to a TV with HDMI piece of cable.
Transmittable data
Recorder
Home
theater
Player
On Screen Display Language setting
(English/Español/Français)
○
○
○
Panel Aspect Ratio
(16
:
9
fixed)
○
○
○
Closed caption
information
mode
○
---
---
CC type
○
---
---
Digital setting
○
---
---
Channel
information
Input signal
○
---
---
Channel list
○
---
---
Caption information
○
---
---
Note
There is a possibility that all the GUI language information might be set from equipment that has HDMI CEC
function connected to TV with HDMI cable. Depending on operating conditions or the specification for each piece
of equipment the setting may or may not be applied.
For details on the external equipment’s operation, please refer to the operating manuals for the equipment.
[For Recorder]
You cannot operate other functions while transmitting TV’s information above except Power On/Off key operation.
When you turn off this unit, the transmission will be interrupted (only when you are transmitting
Channel
information).
Automatic
lip-sync
function
(for “HDAVI
Control 3”)
Minimizes lip-sync delays between the picture and audio when you connect to a Panasonic theater system or
Amplifier.