20
Basic Controls
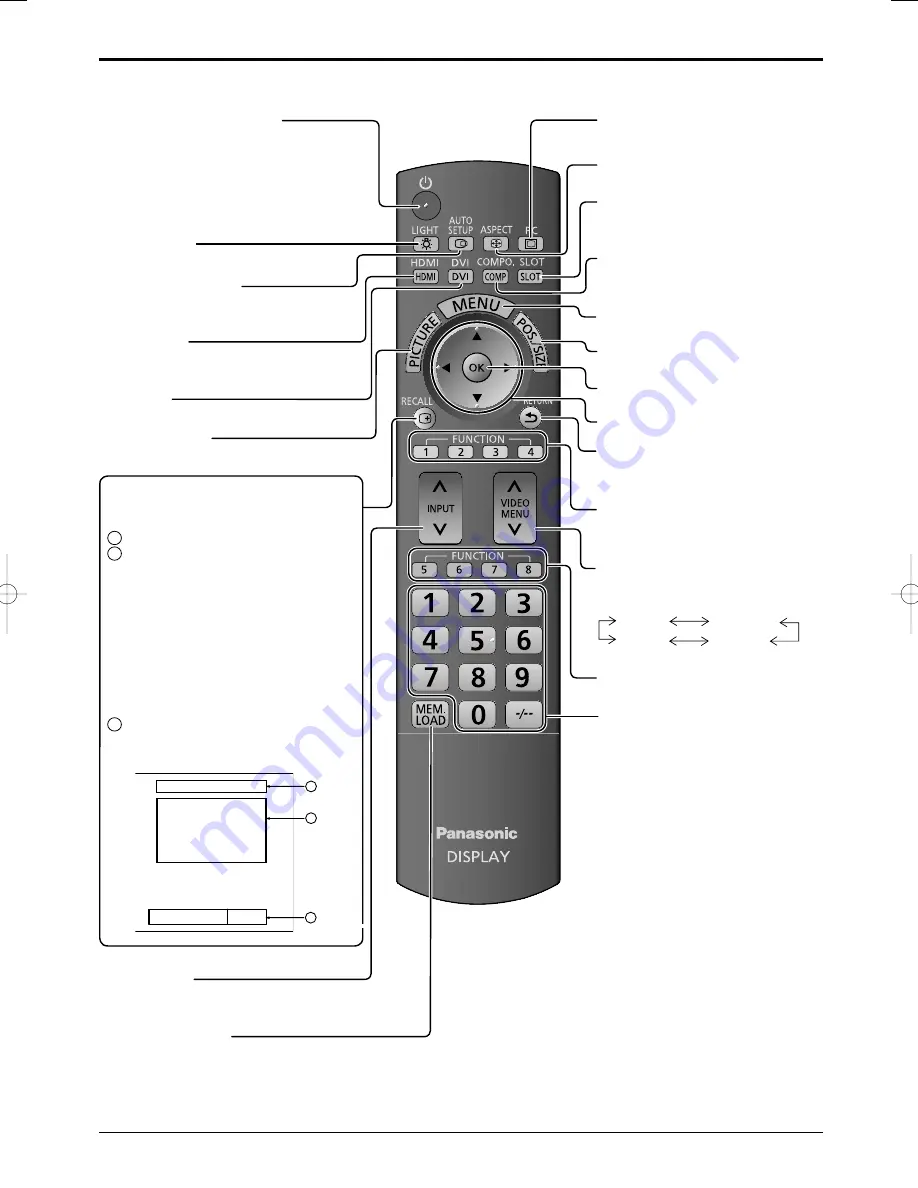
Remote Control Transmitter
DVI button
Press to select DVI-D input. (see page 18)
PC button
Press to select PC input. (see page 18)
ASPECT button
Press to adjust the aspect. (see page 21)
SLOT buttons
Press to select SLOT Terminal
Board. (see page 18)
COMPO. button
Press to select Component or RGB
input. (see page 18)
MENU button
Displays menu screen. (see page 25)
POS. /SIZE button
(see page 26)
OK button
Press to make selections.
Cursor buttons
RETURN button
(see page 25)
Press the RETURN button to return
to previous menu screen.
FUNCTION buttons
(see page 63)
FUNCTION buttons
(see page 63)
VIDEO MENU button
Press to select Picture Mode.
(see page 30)
Monitor
Normal
Cinema
Dynamic
Numeric buttons
(see page 37)
Standby (ON / OFF) button
The Plasma Display must
fi
rst be plugged
into the wall outlet and turned on at the power
switch (see page 15).
Press this button to turn the Plasma Display
On, from Standby mode. Press it again to turn
the Plasma Display Off to Standby mode.
LIGHT button
The remote control’s buttons illuminate.
AUTO SETUP button
Automatically adjusts the position/ size
of the screen. (see page 27)
HDMI button
Press to select HDMI input.
(see page 18)
PICTURE button
(see page 29)
RECALL button
Press the “RECALL” button to display
the current system status.
1
Input label
2
Aspect mode (see page 21)
During 3D images (see page 44)
Audio input (see page 62)
Pro
fi
le name (see page 37)
NANODRIFT Saver operating
(see page 54)
Mode of RGB/MONO settings
(see page 50)
Mode of HV Delay (see page 28)
3D Colour Compensation: Off
(see page 44)
3
Off timer
The off timer indicator is displayed
only when the off timer has been set.
1
2
3
Off timer
90min
PC
4:3
♪
COMPONENT
Memory name: Memory2
NANODRIFT
R Off
H Delay
3D Colour Compensation Off
3D
INPUT button
Press to select input signal sequentially.
(see page 18)
MEM. LOAD button
(see page 37)


