background image

12

English

Network

A broadband network environment is required to be able 
to use internet services.

If you do not have any broadband network services, 
please consult your retailer for assistance.

Prepare the internet environment for wired connection 
or wireless connection.

Setup of the network connection will start when first 
using the TV.   

(p. 16)

For details, refer to [eHELP] (Search by Purpose > 
Network > Network connections).

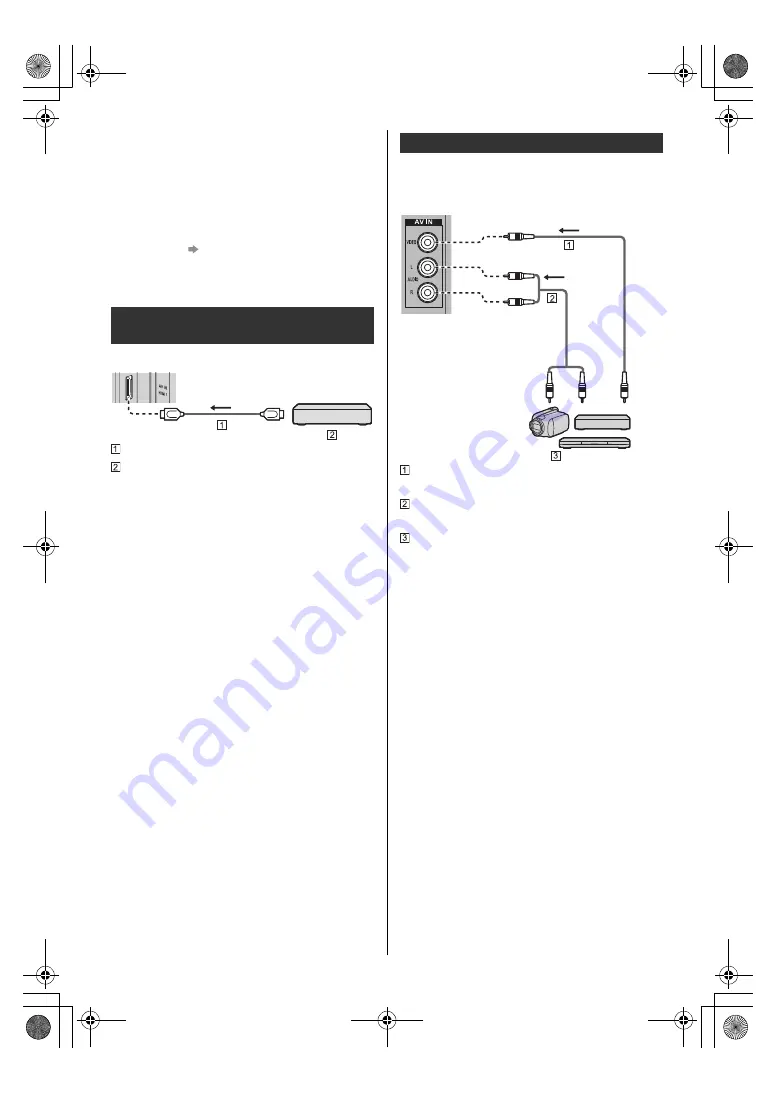
TV

HDMI cable

4K / HDR compatible equipment

Reproduces the image more precisely with the 
expanded colour gamut when connecting the 
4K-compatible equipment. [Mode2] is a mode that 
supports higher definition signals than [Mode1]. Set to 
[Mode1] when the image or sound in HDMI input is not 
played properly.

Connect the 4K compatible equipment to HDMI 
terminal using a 4K compatible cable and you can 
watch content in 4K format.

Supporting HDR does not increase the peak 
brightness capabilities of the TV panel.

[HDMI Auto Setting] ([Settings] menu)

Reproduces the image more precisely with the expanded 
colour gamut when connecting the 4K compatible 
equipment. Select the mode depending on the 
equipment.

[Mode1]:
For better compatibility. Set to [Mode1] when the 
image or sound in HDMI input is not played properly.
[Mode2]:
For the 4K compatible equipment that has the function 
to output the image precisely with the expanded 
colour gamut

To change the mode
1. Select the HDMI input mode connected to the 

equipment.

2. Display the menu and select [HDMI Auto Setting] 

(Settings > Device Preferences > Inputs).

For information about the valid format, refer to 
[eHELP] (Search by Purpose > Watching > 4K 
resolution > HDMI Auto Setting).

DVD Player / Camcorder / Game equipment

(VIDEO equipment)

TV

Composite video cable (Shielded)

Use shielded composite cable.

Audio cable (Shielded)

Use shielded audio cables.

DVD Player / Camcorder / Game equipment

Amplifier 

(listening with external speakers)

To enjoy multi-channel sound from external 
equipment (e.g. Dolby Digital 5.1ch), connect the 
equipment to the amplifier. For information about the 
connections, read the manuals of the equipment and 
amplifier.

For details, refer to [eHELP] (Search by Purpose > 
Watching > External equipment > External 
connection).

Headphones

To use headphones, set [Audio Output] in the Sound 
menu to [Headphone].

For information about the headphone terminal output 
settings, refer to [eHELP] (Search by Purpose > 
Settings > Sound).

USB HDD (for recording)

Use USB 2 port for connecting the USB HDD.

For details, refer to [eHELP] (Search by Purpose > 
Recording).

HDMI CEC

Use HDMI 1 - 3 for HDMI CEC connection.

For details, refer to [eHELP] (Search by Purpose > 
Functions > HDMI CEC).

Connections for 4K / HDR compatible 
equipment

Other connections

(Viewing)

(Listening)

TH-40_50_58_65JX700Z_Eng_8A06B00032100.book  12 ページ  2021年2月19日 金曜日 午後4時45分

Содержание TH-40JX700Z

Страница 1: ...u for purchasing this Panasonic product Please read these instructions carefully before operating this product and retain them for future reference Please carefully read the Safety Precautions of this manual before use The images shown in this manual are for illustrative purposes only F1220SR1021 English English image TH 65JX700Z TH 40_50_58_65JX700Z_Eng_8A06B00032100 book 1 ページ 2021年2月19日 金曜日 午後4...

Страница 2: ...Accessories 8 Installing the TV 8 Installing the wall hanging bracket 10 Connections 11 Identifying Controls 14 Initial Setup 16 Watching TV 17 How to Use eHELP 18 FAQs 18 Maintenance 19 Specifications 20 TH 40_50_58_65JX700Z_Eng_8A06B00032100 book 2 ページ 2021年2月19日 金曜日 午後4時45分 ...

Страница 3: ...asonic Corporation is under license x v Colour is a trademark DiSEqC is a trademark of EUTELSAT DVB and the DVB logos are trademarks of the DVB Project Google is a trademark of Google LLC Amazon Prime Video and all related logos are trademarks of Amazon com Inc or its affiliates This product complies with the UHD Alliance Technical Specification UHDA Specified Reference Mode Version 1 0 FILMMAKER ...

Страница 4: ...ity to and does not grant you that permission and explicitly disclaims any right ability or intention to obtain such permission on your behalf It is your responsibility to ensure that your use of this or any other device complies with applicable copyright legislation in your country Please refer to that legislation for more information on the relevant laws and regulations involved or contact the o...

Страница 5: ... within the screen Do not use an unapproved pedestal mounting equipment Be sure to ask your local Panasonic dealer to perform the setup or installation of approved wall hanging brackets Do not apply any strong force or impact to the display panel Ensure that children do not climb on the TV If you detect anything unusual immediately remove the mains plug Mains plug types vary depending on the model...

Страница 6: ...not subject the built in wireless LAN to high temperatures direct sunlight or moisture Data transmitted and received over radio waves may be intercepted and monitored The built in wireless LAN uses 2 4 GHz and 5 GHz frequency bands To avoid malfunctions or slow response caused by radio wave interference when using the built in wireless LAN keep the TV away from other devices that use 2 4 GHz and 5...

Страница 7: ...e as long as the mains plug is still connected to a live mains socket Remove the mains plug from the wall socket when the TV is not in use for a prolonged period of time Excessive volume If you hear a drumming noise in your ears turn down the volume or temporarily stop using the headphones Battery for the Remote Control Keep the batteries out of reach of children to prevent swallowing Adverse phys...

Страница 8: ...stal 2 B Assembly screw 4 Take out the pedestal and the TV from the packing case and put the TV onto a work table with the screen panel down on the clean and soft cloth blanket etc Use a flat and firm table bigger than the TV Do not hold the screen panel part Make sure not to scratch or break the TV Standard accessories M4 20 mm M4 24 mm Preparations 40 inch model 50 inch model 58 inch model 65 in...

Страница 9: ...Remove the assembly screws B from the pedestal 3 Pull out the pedestal from the TV It is recommended to secure the pedestal to a furniture as shown to prevent the TV from falling over This information is designed to reduce the risk of injuries caused by the TV falling over However no measure can guarantee protection in all cases Attaching the fall prevention parts C Screw 2 D Wood screw 2 E Band 2...

Страница 10: ...vent the TV from falling off Handle the TV carefully during installation since subjecting it to impact or other forces may cause product damage Take care when fixing wall brackets to the wall Always ensure that there are no electrical cables or pipes in the wall before hanging bracket To prevent fall and injury remove the TV from its fixed wall position when it is no longer in use a b View from th...

Страница 11: ...le Aerial For Digital TV Analogue TV Keep RF aerial cable away from the mains lead to avoid and minimise mains interference pickup Do not place the RF cable under the TV An aerial correct cable 75 Ω coaxial and correct terminating plug are required to obtain optimum quality picture and sound If a communal aerial system is used you may require the correct connection cable and plug between the wall ...

Страница 12: ... the function to output the image precisely with the expanded colour gamut To change the mode 1 Select the HDMI input mode connected to the equipment 2 Display the menu and select HDMI Auto Setting Settings Device Preferences Inputs For information about the valid format refer to eHELP Search by Purpose Watching 4K resolution HDMI Auto Setting DVD Player Camcorder Game equipment VIDEO equipment TV...

Страница 13: ...n to display the registration screen then follow the on screen instructions to register If the registration screen doesn t appear If registration fails p 13 When registering face the remote control at the remote control signal receiver on the TV within about 50 cm Registration may not be completed correctly if the batteries in the remote control are running low If registration fails If registratio...

Страница 14: ...11 Teletext button Switches to teletext mode 12 Volume Up Down 13 Google Assistant Used for the voice control function Voice control button 14 Numeric buttons Changes channel and teletext pages 15 eHELP Displays eHELP Built in Operating Instructions 16 MY APP Displays my Home Screen Starts your favourite application directly when the application is assigned to the button For details refer to eHELP...

Страница 15: ...ending on the country area or broadcaster The TV needs to be connected to the internet in order to perform searches etc p 12 The effective range for voice controls depends on the viewing environment Operation may not be correct depending on the type of voice the person has and the way they speak as well as the surrounding environment and conditions When other Bluetooth devices are connected at the...

Страница 16: ...if necessary of the connected equipment before starting Initial Setup For information about the settings for the connected equipment read the manual of the equipment 1 Plug the TV into a live mains socket and turn the power on Takes a few seconds to be displayed 2 Select the following items Set up each item by following the on screen instructions Example How to use the remote control Select the la...

Страница 17: ...ave all settings initialised by accessing Reset If tuning has failed check the Satellite cable RF cable and the network connection and then follow the on screen instructions The TV goes into Standby mode when no signal is received and no operation is performed for 10 minutes if No Signal Power Off in the Power menu is set to 10 Minutes factory setting To retune all channels Channel Scan Settings C...

Страница 18: ...ue to system startup when the LED is blinking orange You can use the remote control after the LED turns constant red Point the remote control directly at the TV s remote control signal receiver within about 7 m and a 30 degree angle of the signal receiver Situate the TV away from sunshine or other sources of bright light so they do not shine on the TV s remote control signal receiver If you are tr...

Страница 19: ...r about contents that require visual confirmation for connection phenomenon etc of this TV itself Maintenance First remove the mains plug from the mains socket Regular care Gently wipe the surface of the display panel cabinet or pedestal by using a soft cloth to remove dirt or fingerprints For stubborn dirt 1 First clean the dust from the surface 2 Dampen a soft cloth with clean water or diluted n...

Страница 20: ...ble screen size diagonal 100 cm 126 cm 146 cm 164 cm Display resolution 3 840 W 2 160 H Panel LED backlight Liquid Crystal Display Sound Speaker output 20 W 10 W 2 Headphones 3 5 mm stereo mini jack 1 Connection terminals AV IN VIDEO 1 0 V p p 75 Ω AUDIO L R 0 5 V rms HDMI 1 2 3 input TYPE A Connectors HDMI 1 3 4K Content Type Deep Colour x v Colour HDMI 2 4K Content Type ARC Audio Return Channel ...

Страница 21: ...nd Frequency band IEEE802 11a n ac 5 GHz band IEEE802 11b g n 2 4 GHz band Security WPA3 SAE AES WPA2 PSK TKIP AES WPA PSK TKIP AES WEP 64 bit 128 bit Bluetooth wireless technology Standard Compliance and Frequency band Bluetooth 5 1 2 4 GHz band Not all the Bluetooth compatible devices are available with this TV Up to 5 devices can be used simultaneously Design and Specifications are subject to c...

Страница 22: ...TH 40_50_58_65JX700Z_Eng_8A06B00032100 book 22 ページ 2021年2月19日 金曜日 午後4時45分 ...

Страница 23: ...and Limited 18 Sir Woolf Fisher Drive Highbrook East Tamaki Private Bag 14911 Panmure Auckland Tel 09 272 0100 Customer Care Center Email Customerservice nz panasonic com www panasonic co nz NEW ZEALAND TH 40_50_58_65JX700Z_Eng_8A06B00032100 book 23 ページ 2021年2月19日 金曜日 午後4時45分 ...

Страница 24: ... model name plate on the rear of the unit You should note this serial number in the space provided below and retain this book plus your purchase receipt as a permanent record of your purchase to aid in identification in the event of theft or loss and for Warranty Service purposes Model Number Serial Number TH 40_50_58_65JX700Z_Eng_8A06B00032100 book 24 ページ 2021年2月19日 金曜日 午後4時45分 ...

Отзывы: