background image

24

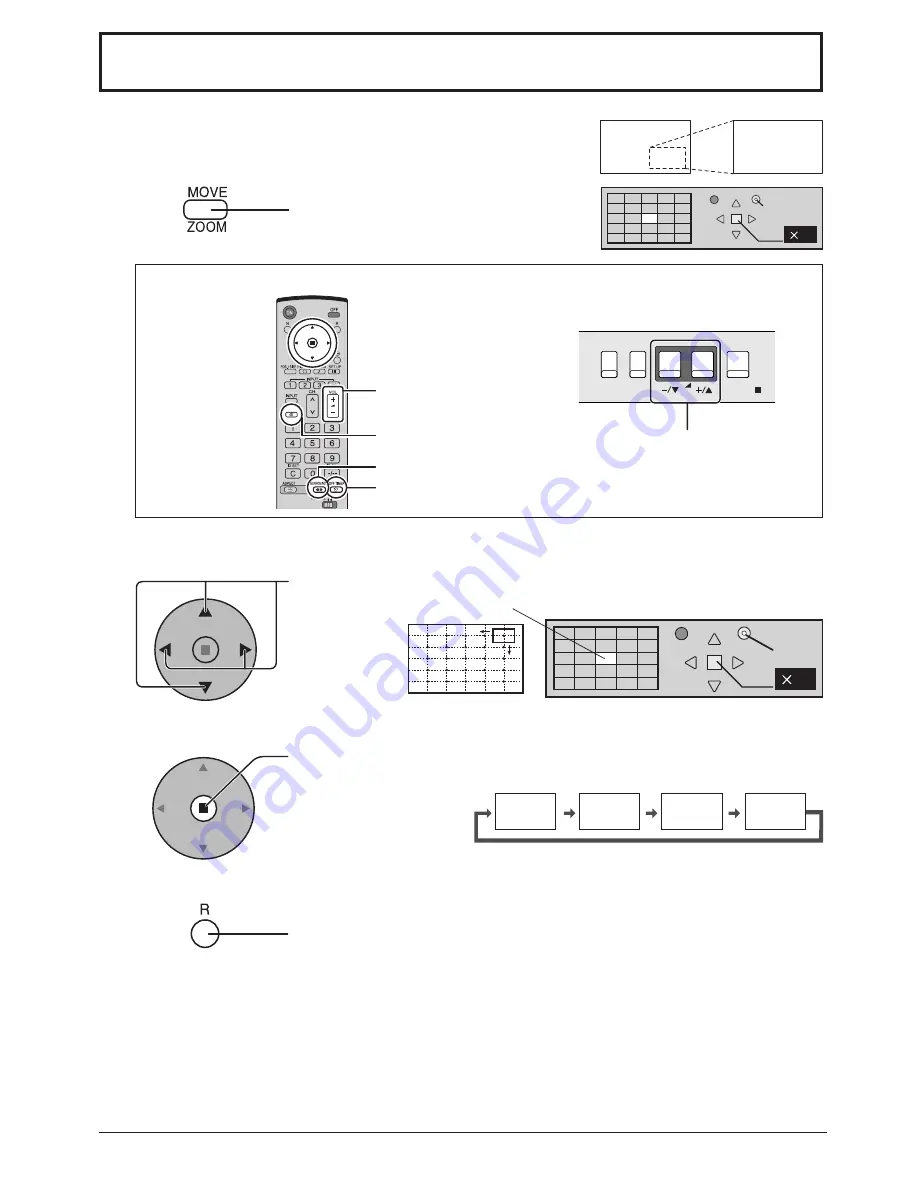
Digital Zoom

1

3

2

4

This displays an enlargement of the designated part of the displayed image. 

Display the “Operation Guide”.

Press to access Digital Zoom.
The “Operation Guide” will be displayed.

Select the area of the image to be enlarged.

Press on the enlargement location to select.

Select the magni

fi

 cation required for the enlarged display.

Each time this is pressed, the magni

fi

 cation factor changes. 

This is shown in the image being displayed.

Return to normal display (quit Digital Zoom).

Press to exit from the Digital Zoom.

The cursor will move.

VOL button

MUTE button

SURROUND button
OFF TIMER button 

2

Exit

1

× 

1

× 

2

× 

3

× 

4

1

Exit

Notes:

•  When power goes OFF (including “Off Timer” operation), Digital Zoom terminates.
•  The Digital Zoom function cannot be selected while in the following operation state:
  “Multi-viewer” (Picture in Picture, Picture out Picture, Picture and Picture) operation. (see page 19)
•  While Digital Zoom is in operation, “Adjusting Pos. / Size” cannot be used.

During Digital Zoom, only the following buttons can be operated.

[Remote control]

[Unit]

VOL button

MENU

ENTER/

INPUT

VOL

Содержание TH-37PG9B

Страница 1: ...se instructions before operating your set and retain them for future reference English The illustration shown is an image Model No Operating Instructions Progressive Wide Hospitality Plasma Display TH 37PG9B TH 42PG9B ...

Страница 2: ...ent after image to remain on the Plasma Display Examples of still pictures include logos video games computer images teletext and images displayed in 4 3 mode Important Safety Notice 3 Safety Precautions 4 Accessories 7 Accessories Supply 7 Connections 8 PC Input Terminals connection 9 SERIAL Terminals connection 10 Power On Off 11 Basic Controls 12 On Screen Menu Displays 14 Initial selections 16...

Страница 3: ... in this plug Shall the fuse need to be replaced please ensure that the replacement fuse has a rating of 5 amps and that it is approved by ASTA or BSI to BS1362 Check for the ASTA mark ASA or the BSI mark on the body of the fuse If the plug contains a removable fuse cover you must ensure that it is refitted when the fuse is replaced If you lose the fuse cover the plug must not be used until a repl...

Страница 4: ...entally swallowed Keep small parts away from young children Discard unneeded small parts and other objects including packaging materials and plastic bags sheets to prevent them from being played with by young children creating the potential risk of suffocation Do not place the Plasma Display on sloped or unstable surfaces The Plasma Display may fall off or tip over Do not place any objects on top ...

Страница 5: ...c shocks Do not do anything that may damage the power cable When disconnecting the power cable pull on the plug body not the cable Do not damage the cable make any modifications to it place heavy objects on top of it heat it place it near any hot objects twist it bend it excessively or pull it To do so may cause fire and electric shock If the power cable is damaged have it repaired at your local P...

Страница 6: ...aning and maintenance The front of the display panel has been specially treated Wipe the panel surface gently using only a cleaning cloth or a soft lint free cloth If the surface is particularly dirty wipe with a soft lint free cloth which has been soaked in pure water or water to which a small amount of neutral detergent has been added and then wipe it evenly with a dry cloth of the same type unt...

Страница 7: ...uction book Accessories Supply Check that you have the accessories and items shown Power supply cord Fixing bands 2 CRM Customer Relationship Management The remote control is not included with this set Available for purchase separately Object model EUR7636090R ...

Страница 8: ...e ensuring there is sufficient slack in cables to minimize stress especially in the power cord firmly bind all cables with the supplied fixing band To tighten To loosen Pull Pull Push the catch AC cord connection see page 11 AC cord fixing Optional Terminal Board Insert Slot covered From EXTERNAL monitor terminal on Computer see page 9 From SERIAL Terminal on Computer see page 10 1 Connect power p...

Страница 9: ...not be connected to the set There is no need to use an adapter for computers with DOS V compatible Mini D sub 15P terminal The computer shown in the illustration is for example purposes only Additional equipment and cables shown are not supplied with this set Do not set the horizontal and vertical scanning frequencies for PC signals which are above or below the specified frequency range To use syn...

Страница 10: ...ignal in that order If there are no parameters then the parameter signal does not need to be sent Notes If multiple commands are transmitted be sure to wait for the response for the first command to come from this unit before sending the next command If an incorrect command is sent by mistake this unit will send an ER401 command back to the computer Communication parameters With the power off this...

Страница 11: ... Press the button on the remote control to turn the Plasma Display off Power Indicator Red standby Press the button on the remote control to turn the Plasma Display on Power Indicator Green Turn the power to the Plasma Display off by pressing the switch on the unit when the Plasma Display is on or in standby mode Note During operation of the power management function the power indicator turns oran...

Страница 12: ...utton Press to adjust the aspect see page 17 MULTI Window buttons see page 19 MENU Screen ON OFF This button is locked by initial setting Each time the MENU button is pressed the menu screen will switch see page 14 Power Indicator The Power Indicator will light Power OFF Indicator not illuminated The unit will still consume some power as long as the power cord is still inserted into the wall outle...

Страница 13: ...e Channel Adjustment This button cannot be used for this model Volume Adjustment Press the Volume Up or Down button to increase or decrease the sound volume level OFF TIMER button The Plasma Display can be preset to switch to stand by after a fixed period The setting changes to 30 minutes 60 minutes 90 minutes and 0 minutes off timer cancelled each time the button is pressed When three minutes rem...

Страница 14: ...Pos Size V Pos H Pos V Size H Size Normal Normalise Pos Size V Pos H Pos V Size H Size Clock Phase 1 2 Signal PC Off Standby save Off Power management Off Auto power off Off OSD Language English UK Component RGB in select RGB Input label Power save Setup 2 2 Setup Screensaver MULTI DISPLAY Setup Set up TIMER PRESENT TIME Setup To Pos Size adjust menu see page 18 During RGB PC input signal During A...

Страница 15: ...N Time POWER OFF Time To Set up Timer selection screen see page 25 26 To PRESENT TIME Setup see page 25 Press to return to next menu screen from the unit Press the R button to return to Setup menu Press to Setup Press to select Start Time Finish Time When Time Designation is selected Press to select Periodic Time Operating Time When Interval is selected To setup Screensaver see page 27 29 Screensa...

Страница 16: ...y pressing the INPUT button on the unit Input terminal will not be selected if the terminal board is not installed into the SLOT Select to match the signals from the source connected to the component RGB input terminals see page 31 In 2 screen display the same input mode cannot be selected for the main picture and sub picture Selecting the input signal Select the input signals to be connected by i...

Страница 17: ...lied to the center of the screen so that elongation is only apparent at the left and right edges of the screen The size of the picture will depend on the original signal Panasonic Auto Panasonic Auto 4 16 3 9 The display will automatically become enlarged depending on the picture source allowing you to view the picture at its maximum size Notes Panasonic Auto mode is designed to automatically adju...

Страница 18: ...os Size function If adjusting the Picture V Pos V Size in Panasonic Auto with 16 9 mode the adjustment is not memorized When exiting the mode the screen will return to a former adjustment Normal Normalise Pos Size V Pos H Pos V Size H Size Normal Normalise Pos Size V Pos H Pos V Size H Size Clock Phase While the Pos Size display is active if either the N button on the remote control is pressed at ...

Страница 19: ...cture Sub picture Picture and Picture Picture in Picture Notes Sound output is from the picture which is selected in Audio Out PIP See page 23 In 2 screen display the same input mode cannot be selected for the main picture and sub picture The main picture and sub picture are processed by different circuits resulting in a slight difference in the clarity of the pictures There may also be a differen...

Страница 20: ...de Due to the small dimensions of the sub pictures these sub pictures cannot be shown in detail Computer screen picture is displayed in a simplified format and it may not be possible to discern details on them satisfactorily Following combinations of two analog signals cannot be displayed simultaneously Component Component Component PC RGB PC RGB Component PC RGB PC RGB Refer to each board s opera...

Страница 21: ...amma Input level W B High R Press or button to switch between modes While the Picture menu is displayed if either the N button on the remote control is pressed at any time or the ACTION button is pressed during Normalise then all adjustment values are returned to the factory settings Helpful Hint Normalise Normalisation Normal Cool Warm Press or button to switch between modes Normal For viewing in...

Страница 22: ...olour Less More Adjusts colour saturation Tint Reddish Greenish Adjusts for nice skin colour Sharpness Less More Adjusts picture sharpness Item Effect Details Black extension Less More Adjusts the dark shades of the image in gradation Input level Less More Adjustment of parts which are extremely bright and hard to see This cannot be adjusted when the input signal is Digital W B High R Less More Ad...

Страница 23: ...her the N button on the remote control is pressed at any time or the ACTION button is pressed during Normalise then all adjustment values are returned to the factory settings Helpful Hint Normalise Normalisation Sound Normal Normalise Normal 0 0 0 Off Treble 0 Mid Sound Mode Balance Bass Surround Main Audio Out PIP Accentuates sharp sound Emits the original sound Normal Dynamic Bass Adjusts low pi...

Страница 24: ...g displayed Return to normal display quit Digital Zoom Press to exit from the Digital Zoom The cursor will move VOL button MUTE button SURROUND button OFF TIMER button 2 Exit 1 1 2 3 4 1 Exit Notes When power goes OFF including Off Timer operation Digital Zoom terminates The Digital Zoom function cannot be selected while in the following operation state Multi viewer Picture in Picture Picture out ...

Страница 25: ...PRESENT TIME Press to setup PRESENT TIME button Forward button Back Notes Pressing or button once changes PRESENT TIME 1minute Pressing or button continuously changes PRESENT TIME by 15 minutes Press to select Set Press to store PRESENT TIME Setup Note Set cannot be selected unless PRESENT TIME is set Press to exit from PRESENT TIME Setup 1 2 PC Off Standby save Off Power management Off Auto power...

Страница 26: ...s POWER ON Time POWER OFF Time by 15 minutes Press to select POWER ON Function POWER OFF Function Press to select On Press twice to exit from Setup 1 2 3 Note Timer function will not work unless PRESENT TIME is set Display the Set up TIMER screen Set up TIMER POWER OFF Function POWER OFF Time POWER ON Time POWER ON Function Off 0 00 Off 0 00 PRESENT TIME 99 99 Set up TIMER POWER OFF Function POWER...

Страница 27: ... TIME 99 99 Reversal Scroll selection 2 3 1 4 Press to display the Setup menu Press to select Screensaver Press to display Screensaver screen Press to select Function Press to select the desired function White bar scroll Image Reversal White bar scroll The white bar will scroll from left to right Image Reversal Negative image will be displayed on the screen Mode selection Start setting 5 When the ...

Страница 28: ...elect Wobbling or Peak limit Press to select On1 On2 or Off Wobbling On or Off Peak limit 2 3 1 Press to display the Setup menu Screensaver Start Function Mode Side panel Wobbling Peak limit Finish Time Start Time White bar scroll Off 6 15 12 30 High Off Off PRESENT TIME 99 99 Screensaver Start Function Mode Side panel Wobbling Peak limit Operating Time Periodic Time White bar scroll Interval 6 15...

Страница 29: ... screen Refer to the previous page operation guide steps 1 and 2 Notes To reduce the occurrence of after images set the Side panel to High The side panels may flash alternate black white depending on the picture being shown on the screen Using Cinema mode will reduce such flashing side panel 4 3 Screen Display after images A B Picture out Picture Picture and Picture Non picture area This function ...

Страница 30: ...e label of the Input signal to be displayed Select the input signal which you would like to change its label before customizing the Input labels see page 13 16 Note While selecting an Input signal through Optional Terminal Board connected to Slot1 Slot2 and Slot3 the Input label will depend on each Optional Terminal Board Input labels for Slot1 Slot2 Slot3 and mini D sub Slot1 Input INPUT1 VIDEO1 ...

Страница 31: ...splayed Press to select the 3D Y C Filter NTSC Press to set On Off Press to exit from adjust mode Note When On this setting only affects NTSC input signals Note Selection may not be possible depending on which optional board is installed 1 2 PC Off Standby save Off Power management Off Auto power off Off OSD Language English UK Component RGB in select RGB Input label Signal Power save Setup 1 2 PC...

Страница 32: ... P NR cannot be adjusted while a PC signal is being applied 1 2 PC Off Standby save Off Power management Off Auto power off Off OSD Language English UK Component RGB in select RGB Input label Signal Power save Setup 3D Y C Filter NTSC Colour system Signal On Auto Cinema reality Panasonic Auto 4 3 Off 4 3 AV P NR Off 1 2 PC Off Standby save Off Power management Off Auto power off Off OSD Language E...

Страница 33: ...r VBS Uses a synchronized signal of Composite Sync input which is input from the HD connector Displays the H Horizontal V Vertical frequencies This display is valid only for RGB PC and Digital input signal Display range Horizontal 15 110 kHz Vertical 48 120 Hz H Freq kHz V Freq Hz Sync Sync Auto Sync on G Sync VBS 1 2 PC Off Standby save Off Power management Off Auto power off Off OSD Language Eng...

Страница 34: ...Displays all the following on screen Power on display Input signal switch display No signal display Mute and the remaining time of off timer after was pressed Off Hides all the items above from view Initial INPUT Off PC INPUT1 INPUT2 INPUT3 Adjusts the input signal when TV is turned on Notes Only the adjusted signal is displayed see page 16 Signal can be displayed when the Terminal board is instal...

Страница 35: ...en this is set to Off In two screen display mode if anything other than Off is set the value will be fixed as the value input in the single screen display mode Studio W B Off On Off Nullify all the settings adjusted On Sets the colour temperature for TV studio Note Valid only when the low is set as colour temperature on screen adjustment Advanced PIP Off On Off Sets normal two screen display mode ...

Страница 36: ...remote control ID select Sets panel ID number when panel is used in Remote ID or Serial ID Set value range 0 100 Standard value 0 Remote ID Off On Off Disables ID remote control functions You can use normal remote control operations On Enable ID remote control functions Serial ID Off On Sets the panel ID Control Off Disables external control by the ID On Enables the external control by the ID Item...

Страница 37: ...Press to select OSD Language Press and hold till the SHIPPING menu is displayed Press to select YES Press to confirm SHIPPING YES from the unit 1 Press the MENU button till the Setup menu is displayed 2 Press the Volume Up or Down button to select OSD Language 3 Press and hold the ENTER button till the SHIPPING menu is displayed 4 Press the Volume Up or Down button to select YES 5 Press the ENTER ...

Страница 38: ...l and not indicative of malfunctioning This Plasma Display uses special image processing Hence a slight time lag may occur between image and audio depending on the type of input signal However this is not a malfunction Plasma Display panel Symptoms Check The screen darkens slightly whenbrightpictureswithminimal movements are shown The screen will darken slightly when photos still images of a compu...

Страница 39: ...6 25 21 800 600 60 Hz 37 88 60 32 22 800 600 72 Hz 48 08 72 19 23 800 600 75 Hz 46 88 75 00 24 800 600 85 Hz 53 67 85 06 25 1 024 768 60 Hz 48 36 60 00 26 1 024 768 70 Hz 56 48 70 07 27 1 024 768 75 Hz 60 02 75 03 28 1 024 768 85 Hz 68 68 85 00 29 1 152 864 75 Hz 67 50 75 00 30 1 280 960 60 Hz 60 00 60 00 31 1 280 960 85 Hz 85 94 85 00 32 1 280 1 024 60 Hz 63 98 60 02 33 1 280 1 024 75 Hz 79 98 75...

Страница 40: ...10 kHz Vertical scanning frequency 48 120 Hz Connection terminals PC HIGH DENSITY MINI D SUB 15PIN Y or G with sync 1 0 Vp p 75 Ω Y or G without sync 0 7 Vp p 75 Ω B PB CB 0 7 Vp p 75 Ω R PR CR 0 7 Vp p 75 Ω HD VD 1 0 5 0 Vp p high impedance VBS use HD port with picture 1 0 Vp p high impedance without picture 0 3 Vp p high impedance AUDIO IN M3 JACK 0 5 Vrms SERIAL EXTERNAL CONTROL TERMINAL D SUB ...

Страница 41: ...41 Memo ...

Страница 42: ...42 Memo ...

Страница 43: ...43 Memo ...

Страница 44: ...sma DVD Ram LCD Television LCD Projector product Interested in purchasing an extended guarantee Please contact your dealer or our Customer Support Department on 01344 476540 or customer care panasonic co uk for more details Information on Disposal for Users of Waste Electrical Electronic Equipment private households This symbol on the products and or accompanying documents means that used electric...

Отзывы: