3 CAUTION
3.1. NOTE
When you note the serial number, write down all of the 11 digits.
The serial number may be found on the label affixed to the bottom of the unit.
3.2. SAFETY PRECAUTIONS
1. Before servicing, unplug the power cord to prevent an electric shock.
2. When replacing parts, use only the manufacturer´s recommended components for safety.
3. Check the condition of the power cord. Replace if wear or damage is evident.
4. After servicing, be sure to restore the lead dress, insulation barriers, insulation papers, shields, etc.
5. Before returning the serviced equipment to the customer, be sure to perform the following insulation resistance test to prevent
the customer from being exposed to shock hazards.
3.3. INSULATION RESISTANCE TEST
1. Unplug the power cord and short the two prongs of the plug with a jumper wire.
2. Turn on the power switch.
3. Measure the resistance value with ohmmeter between the jumpered AC plug and each exposed metal cabinet part, such as
screw threads, control shafts, handle brackets, etc.
Note:
Some exposed parts may be isolated from the chassis by design. These will read infinity.
4. If the measurement is outside the specified limits, there is a possibility of shock hazard. The equipment should be repaired and
rechecked before it is returned to the customer.
3.4. BATTERY CAUTION
1. Danger of explosion if battery is incorrectly replaced. Replace only with the same or equivalent type recommended by the
manufacturer. Dispose of used batteries according to the manufacturer’s Instructions.
2. The lithium battery is a critical component (type No.CR23541). Please observe for the proper polarity and the exact location
when replacing it and soldering the replacement lithium battery in.
3.5. CAUTION
The power socket wall outlet should be located near this equipment and be easily accessible.
5
KX-TDA100CE
Содержание TDA 100
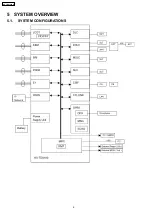
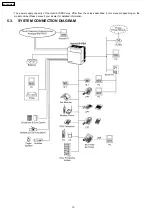
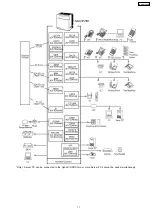
Страница 8: ...5 SYSTEM OVERVIEW 5 1 SYSTEM CONFIGURATIONS 8 KX TDA100CE ...
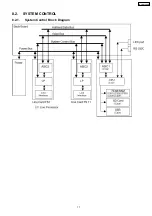
Страница 17: ...8 2 SYSTEM CONTROL 8 2 1 System Control Block Diagram 17 KX TDA100CE ...
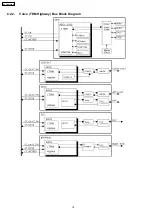
Страница 18: ...8 2 2 Voice TDM Highway Bus Block Diagram 18 KX TDA100CE ...
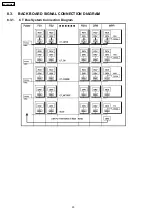
Страница 20: ...8 3 BACK BOARD SIGNAL CONNECTION DIAGRAM 8 3 1 CT Bus System Connection Diagram 20 KX TDA100CE ...
Страница 21: ...8 3 2 EC Bus System Connection Diagram 21 KX TDA100CE ...
Страница 32: ...11 TROUBLESHOOTING GUIDE 11 1 MPR CARD 11 1 1 Startup 32 KX TDA100CE ...
Страница 33: ...33 KX TDA100CE ...
Страница 34: ...34 KX TDA100CE ...
Страница 35: ...35 KX TDA100CE ...
Страница 36: ...36 KX TDA100CE ...
Страница 37: ...11 1 2 Phone Call 37 KX TDA100CE ...
Страница 38: ...11 1 3 Paging 38 KX TDA100CE ...
Страница 39: ...39 KX TDA100CE ...
Страница 40: ...40 KX TDA100CE ...
Страница 41: ...11 1 4 MOH Using 41 KX TDA100CE ...
Страница 42: ...42 KX TDA100CE ...
Страница 43: ...43 KX TDA100CE ...
Страница 44: ...11 1 5 USB Connection 44 KX TDA100CE ...
Страница 45: ...45 KX TDA100CE ...
Страница 46: ...11 1 6 RS 232C Connection 46 KX TDA100CE ...
Страница 47: ...47 KX TDA100CE ...
Страница 48: ...11 1 7 SD Card I F 48 KX TDA100CE ...
Страница 49: ...11 1 8 Other 49 KX TDA100CE ...
Страница 54: ...12 2 DIAGNOSIS TEST 1 Click Diagnosis of Utility 54 KX TDA100CE ...
Страница 55: ...2 Pair Port Test operation Select card for Test 3 Click Pair Port Test 55 KX TDA100CE ...
Страница 56: ...4 Click OK 5 Click Cancel 56 KX TDA100CE ...
Страница 57: ...6 Card Test operation Select card for Test 7 Click Card Test 57 KX TDA100CE ...
Страница 58: ...8 Click OK 9 Click Cancel 58 KX TDA100CE ...
Страница 63: ...14 TERMINAL GUIDE OF ICS TRANSISTORS AND DIODES 63 KX TDA100CE ...
Страница 65: ...16 CABINET AND ELECTRICAL PARTS LOCATION 65 KX TDA100CE ...
Страница 66: ...16 1 EXTENSION BOARDS FOR SERVICING 66 KX TDA100CE ...
Страница 67: ...17 ACCESSORIES AND PACKING MATERIALS 67 KX TDA100CE ...
Страница 86: ...Waveform 7 Waveform 8 20MHz 12MHz KX TDA100CE 86 ...
Страница 91: ...91 KX TDA100CE A KXTDA100CE ...


