15.1. PREPARATION
·
PbF (: Pb free) Solder
·
Soldering Iron
Tip Temperature of 700°F ± 20°F (370°C ± 10°C)
Note: We recommend a 30 to 40 Watt soldering iron. An
expert may be able to use a 60 to 80 Watt iron where
someone with less experience could overheat and damage
the PCB foil.
·
Flux
Recommended Flux: Specific Gravity
→
0.82.
Type
→
RMA (lower residue, non-cleaning type)
Note: See ABOUT LEAD FREE SOLDER (PbF: Pb free)
(P.3).
15.2. PROCEDURE
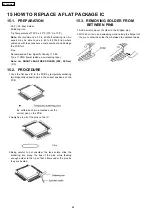
1. Tack the flat pack IC to the PCB by temporarily soldering
two diagonally opposite pins in the correct positions on the
PCB.
Be certain each pin is located over the
correct pad on the PCB.
2. Apply flux to all of the pins on the IC.
3. Being careful to not unsolder the tack points, slide the
soldering iron along the tips of the pins while feeding
enough solder to the tip so that it flows under the pins as
they are heated.
15.3. REMOVING SOLDER FROM
BETWEEN PINS
1. Add a small amount of solder to the bridged pins.
2. With a hot iron, use a sweeping motion along the flat part of
the pin to draw the solder from between the adjacent pads.
15 HOW TO REPLACE A FLAT PACKAGE IC
64
KX-TDA100CE
Содержание TDA 100
Страница 8: ...5 SYSTEM OVERVIEW 5 1 SYSTEM CONFIGURATIONS 8 KX TDA100CE ...
Страница 17: ...8 2 SYSTEM CONTROL 8 2 1 System Control Block Diagram 17 KX TDA100CE ...
Страница 18: ...8 2 2 Voice TDM Highway Bus Block Diagram 18 KX TDA100CE ...
Страница 20: ...8 3 BACK BOARD SIGNAL CONNECTION DIAGRAM 8 3 1 CT Bus System Connection Diagram 20 KX TDA100CE ...
Страница 21: ...8 3 2 EC Bus System Connection Diagram 21 KX TDA100CE ...
Страница 32: ...11 TROUBLESHOOTING GUIDE 11 1 MPR CARD 11 1 1 Startup 32 KX TDA100CE ...
Страница 33: ...33 KX TDA100CE ...
Страница 34: ...34 KX TDA100CE ...
Страница 35: ...35 KX TDA100CE ...
Страница 36: ...36 KX TDA100CE ...
Страница 37: ...11 1 2 Phone Call 37 KX TDA100CE ...
Страница 38: ...11 1 3 Paging 38 KX TDA100CE ...
Страница 39: ...39 KX TDA100CE ...
Страница 40: ...40 KX TDA100CE ...
Страница 41: ...11 1 4 MOH Using 41 KX TDA100CE ...
Страница 42: ...42 KX TDA100CE ...
Страница 43: ...43 KX TDA100CE ...
Страница 44: ...11 1 5 USB Connection 44 KX TDA100CE ...
Страница 45: ...45 KX TDA100CE ...
Страница 46: ...11 1 6 RS 232C Connection 46 KX TDA100CE ...
Страница 47: ...47 KX TDA100CE ...
Страница 48: ...11 1 7 SD Card I F 48 KX TDA100CE ...
Страница 49: ...11 1 8 Other 49 KX TDA100CE ...
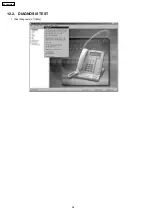
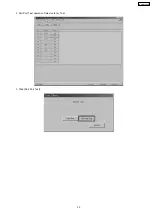
Страница 54: ...12 2 DIAGNOSIS TEST 1 Click Diagnosis of Utility 54 KX TDA100CE ...
Страница 55: ...2 Pair Port Test operation Select card for Test 3 Click Pair Port Test 55 KX TDA100CE ...
Страница 56: ...4 Click OK 5 Click Cancel 56 KX TDA100CE ...
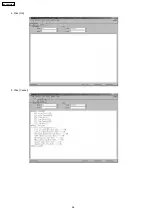
Страница 57: ...6 Card Test operation Select card for Test 7 Click Card Test 57 KX TDA100CE ...
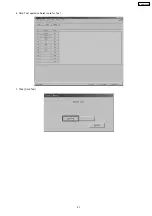
Страница 58: ...8 Click OK 9 Click Cancel 58 KX TDA100CE ...
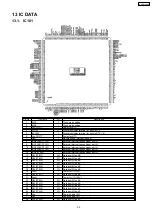
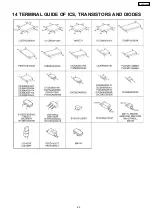
Страница 63: ...14 TERMINAL GUIDE OF ICS TRANSISTORS AND DIODES 63 KX TDA100CE ...
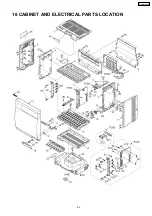
Страница 65: ...16 CABINET AND ELECTRICAL PARTS LOCATION 65 KX TDA100CE ...
Страница 66: ...16 1 EXTENSION BOARDS FOR SERVICING 66 KX TDA100CE ...
Страница 67: ...17 ACCESSORIES AND PACKING MATERIALS 67 KX TDA100CE ...
Страница 86: ...Waveform 7 Waveform 8 20MHz 12MHz KX TDA100CE 86 ...
Страница 91: ...91 KX TDA100CE A KXTDA100CE ...

