background image

17

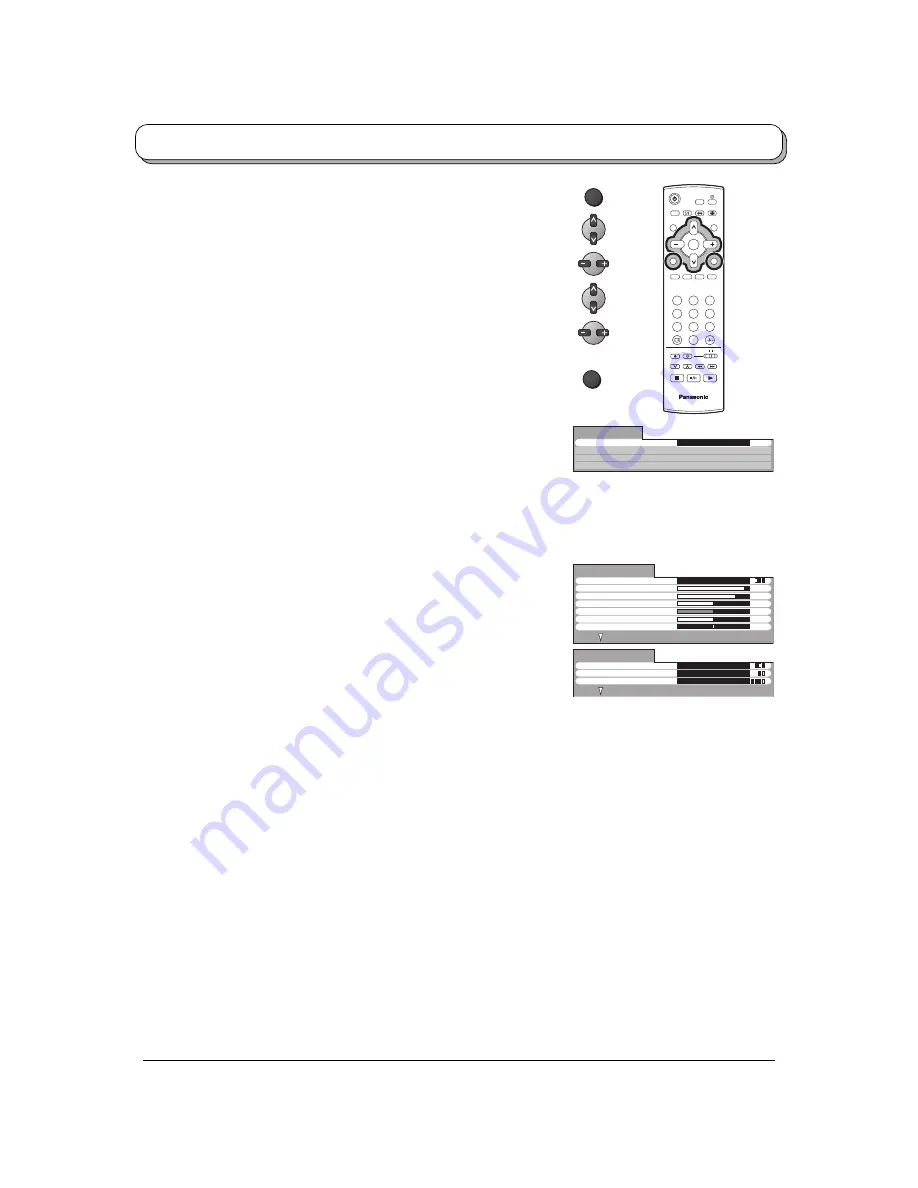
Menu mode will be memorized for each TV, AV1 and
AV2 mode.
Dynamic / Standard / Cinema
You can change the level of each Item (Backlight,
Contrast, Brightness, Colour, Sharpness, NTSC-Tint,
Colour temperature, AI and D.PNR) for each Menu
(Dynamic, Standard and Cinema) according to your
personal preference.

Increase or decrease the levels of these options
according to your personal preference.

The picture hue can be adjusted to suit your taste.
Notes:
• When the TV is receiving NTSC signals, NTSC-Tint

is displayed and level adjustment is possible.

• When the TV is receiving YUV (60Hz) signals, Tint is

displayed and level adjustment is possible.

MENU

1

2

3

4

6

7

8

9

0

TV

OK

5

Access

Picture menu
Sound menu
Setup menu

Main menu

Language

Picture menu

Press the MENU button.

Move to choose Picture menu.

Access Picture menu.

Move to choose menu option.

Adjust chosen option or access chosen menu.

Press the TV/AV button at any time to go back to watching TV.

Menu

NTSC-Tint (Tint)

Colour
temperature

AI

D.PNR

TV/AV

Dynamic

Menu
Backlight

Picture menu

Brightness
Colour

-

+

-

+

-

+

-

+

-

+

Sharpness
NTSC-Tint

Contrast

Standard

Colour temperature
AI

Picture menu

D.PNR

On
Auto

Note:
By pressing the N button on the remote control while the Picture menu is displayed, the selected menu will be
changed to the Normal mode.
Normalization will not occur if the menu is not displayed when the N button is pressed.
The Normal mode is the factory preset condition. Returning to this original condition is called “Normalization”.

Allows you to set the overall colour tone of the picture. Choose from Cool, Standard and
Warm.

Automatically analyses the incoming picture and processes it to give improved contrast and
optimum depth of field.

Automatically reduces unwanted picture noise.

Backlight, Contrast, Brightness, Colour, Sharpness

Содержание TC-20LA2H

Страница 1: ... TV Model No Please read these instructions before operating your set and retain them for future reference English TQBC0863 1 2 3 4 5 6 7 8 9 0 TV VCR DVD MENU REC TV AV N R TUNE OK ASPECT SURROUND STILL The illustration shown is an image ...

Страница 2: ...ols 20 Still 20 VCR DVD operation 21 Stereo Bilingual Sound Selection 21 Remote control setting 22 Troubleshooting 23 Maintenance 23 Specifications 24 Contents Dear Panasonic Customer Welcome to the Panasonic family of customers We hope that you will have many years of enjoyment from your new LCD TV To obtain maximum benefit from your set please read these Instructions before making any adjustment...

Страница 3: ...to the socket DO NOT use at a voltage other than indicated Warnings and Precautions DO NOT touch the power plug if your hands are wet Turn the power Off before connecting other electrical equipment Ask your sales outlet to install the aerial WARNING HIGH VOLTAGE Do not remove the rear cover as live parts are accessible when it is removed There are no user serviceable parts inside TV Games Home Com...

Страница 4: ...r near the TV set DO NOT insert foreign objects metal or easily flammable objects DO NOT stand or place heavy objects on the unit Particular care should be taken by families with small children DO NOT place in an unstable location Place in a safe location DO NOT jolt the unit Preparation Receiver Location Locate for comfortable viewing Avoid placing where sunlight or other bright light including r...

Страница 5: ...one 3 Do not mix battery types example Zinc Carbon with Alkaline 4 Do not attempt to charge short circuit disassemble heat or burn used batteries 5 Battery replacement is necessary when remote control acts sporadically or stops operating the TV set How to use the LCD stand Adjust the LCD panel to your desired angle The LCD panel can be adjusted the following direction 5 Forward 15 Backward 30 Righ...

Страница 6: ...Your local Television Service Centre or Dealer may be able to assist you in obtaining the correct Aerial system for your particular area and the accessories required Any matters regarding Aerial installation upgrading of existing systems or accessories required and the costs incurred are the responsibility of you the Customer For proper reception of VHF UHF channels an external antenna is required...

Страница 7: ...clear after a few seconds If you want to select an input when the keys are not shown press any coloured button and the keys will reappear Note The volume level of the headphones can be adjusted by selecting Volume from the Sound menu How to connect the Headphones terminal Headphones Optional TV AV 1 2 3 4 6 7 8 9 0 OK 5 AV1 AV2 AV1 Notes You can also select an AV source using the TV AV button on t...

Страница 8: ... OUT S VIDEO OUT L R MONITOR VCR Example of output signal source Amplifier to speaker system Connect the S VIDEO or VIDEO terminal Audio Video connections How to connect the Monitor Output terminals to other Equipment How to connect the AV1 Input terminals Example of input signal source S VIDEO VCR CAMCORDER VCR DVD PLAYER S VIDEO 4 pin terminal Luminance earth Luminance in Chrominance in Chromina...

Страница 9: ...TV set can be switched on by pressing the button again if it was in Standby mode Notes This TV will still consume some power as long as the mains plug is still inserted into the wall socket The mains plug shown is an example Power Indicator Remote control signal sensor LED Indicator Standby Red On No Light 1 2 3 4 6 7 8 9 0 TV OK 5 Audio Video connections DVD PLAYER Example of input signal source ...

Страница 10: ...d Language menus see page 11 17 19 Switch between viewing TV or AV input see page 7 Off timer see page 19 Press to store settings in Tuning menu Stereo Bilingual Sound Selection see page 21 Surround On Off see page 18 Recall Press to display the current system status for example Programme number Channel number Stereo mode Aspect mode Sound menu Picture menu Programme Number Selection Press to sele...

Страница 11: ...ures to store settings after adjustments have been made or options have been set The TV AV button is used to exit the menu system and return to the normal viewing screen An On Screen Help box is displayed whenever a menu is displayed on the TV This Help box indicates which buttons on the remote control are used to navigate the menu shown see above for descriptions of button functions ON SCREEN HEL...

Страница 12: ...e when weather conditions are affecting reception quality of a program To cancel the Fine tuning tune again by Manual tuning It is possible to skip Program Number on which no TV stations are tuned appearing on the screen The function is only effective when pressing the Program Number up or down button either on the TV set or on the remote control Under the normal viewing select the Program Number ...

Страница 13: ...performed the unit memorises the channels tuned in order from Programme No 1 Press the 1 button to view channel 2 Press the 2 button to view channel 4 Press the 3 button to view channel 6 During Position mode various reception channels can be viewed Direct When the Ch select is on Direct and Auto tuning is performed the unit memorises the Programme Number which is the same as the channel tuned Thi...

Страница 14: ...l display the programme now stored on programme position 1 Press the TV AV button at any time to go back to watching TV please read the Notes in the above procedure MENU 1 2 3 4 6 7 8 9 0 TV OK 5 MENU Return to tuning menu TV AV To exit AUTO SETUP IN PROGRESS SEARCHING PLEASE WAIT Stored CH36 CH36 9 Press F until Tuning mode is reached Press or to access Tuning mode Press F until Auto tuning is re...

Страница 15: ...n Change programme Search and Change sound system Press or to change programme position or start search When the desired station is found press STR to store The programme position will flash Repeat above procedure to tune additional programme positions Press F at any time to exit the Tuning menu TV AV Manual tuning via top panel Notes If a clear picture cannot be obtained even when a Broadcast or ...

Страница 16: ...S 3 S 1 S 2 S 3 S 1 S 2 S 3 S 1 S 1 S 2 S 3 21 22 23 24 28 57 58 59 62 63 69 90 91 92 93 94 95 96 97 98 99 70 73 74 75 76 77 78 79 80 81 89 100 107 117 118 120 125 100 125 Z10 Z11 Z12 Z13 Z14 Z15 Z16 Z17 Z18 Z19 S11 S12 S13 S14 S15 S16 S17 S18 S19 S20 S11 S12 S13 S14 S15 S16 S17 S18 S19 S20 S11 S12 S13 S14 S15 S16 S17 S18 S19 S20 S11 S12 S13 S14 S15 S16 S17 S18 S19 S20 S14 S15 S16 S17 S18 S19 S20 ...

Страница 17: ...ccess Picture menu Move to choose menu option Adjust chosen option or access chosen menu Press the TV AV button at any time to go back to watching TV Menu NTSC Tint Tint Colour temperature AI D PNR TV AV Dynamic Menu Backlight Picture menu Brightness Colour Sharpness NTSC Tint Contrast Standard Colour temperature AI Picture menu D PNR On Auto Note By pressing the N button on the remote control whi...

Страница 18: ... output The levels of sound between the left and right speakers can be adjusted to suit your listening position To enjoy a concert hall effect turn Surround to On Switching is also possible by pressing the SURROUND button The benefits of Surround sound are enormous You can be completely enveloped in sound just as if you were at a concert hall or cinema The Surround effect can be obtained without t...

Страница 19: ... or Off when there is no signal Reproduction of irregular signals such as certain TV games and rental video tapes may be improved Displayed during AV mode If a clear picture with current colours cannot be obtained when a Broadcast or AV signal is received this function is used Auto PAL SECAM NTSC 4 43 NTSC 3 58 PAL SECAM and NTSC 3 58 are different colour signal broadcast transmission systems appl...

Страница 20: ...SPECT 1 2 3 4 6 7 8 9 0 OK 5 Aspect Controls Still The TV will allow you to enjoy viewing the picture at its optimum size and aspect The aspect mode changes each time the ASPECT button is pressed 4 3 16 9 Mode Picture Explanation 4 3 16 9 4 3 will display a 4 3 picture at its standard 4 3 size and can be selected if you wish to view in this format 16 9 will display a 16 9 picture at its standard 1...

Страница 21: ...onditions are not optimum or if STEREO MONO automatic switching occurs it is recommended you switch from STEREO to MONO Even when the contents of the receiving signal undergo changes selection mode is kept intact When the receiving conditions deteriorate listening will be easier if the mode is set to the MONO position using the stereo bilingual sound selection button DUAL also known as DUAL MONO o...

Страница 22: ... may not be operative It will not operate with other than the above manufacturers Remote Control Operation is possible for the Panasonic VCR s and DVD s equipment After completion of setting execute the various operations after pressing the VCR DVD selection switch Switch to select VCR or DVD While pressing the VCR DVD Power button press the manufacturer code enter the two digit code and press the...

Страница 23: ...eption may have deteriorated Sound system Picture Sound Colour Controls set at minimum levels Colour system This is a characteristic of liquid crystal panels and is not a problem The liquid crystal panel is built with very high precision technology giving you fine picture details Occasionally a few non active pixels may appear on the screen as a fixed point of blue green or red Please note this do...

Страница 24: ... Note Design and Specifications are subject to change without notice Weight and Dimensions shown are approximate Customer s Record The model number and serial number of this product can be found on its rear panel You should note this serial number in the space provided below and retain this book plus your purchase receipt as a permanent record of your purchase to aid in identification in the event...

Отзывы: