background image

RQTT0845

36

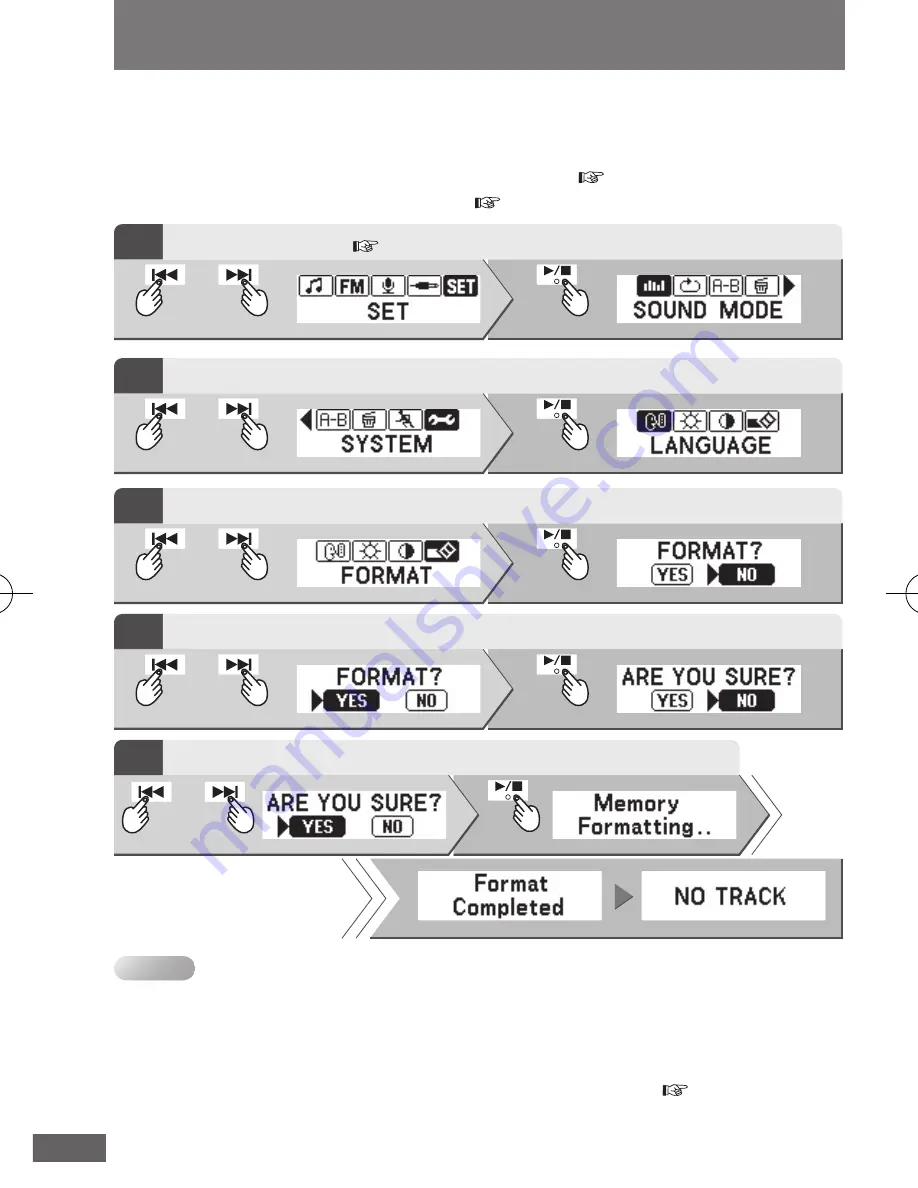
Formatting

The unit’s memory can be initialized (formatted) by the unit itself. Doing 

so will erase all the data recorded on it.

Initiate the formatting while the battery indicator shows a full charge.

Preparation:


1. Release the HOLD switch. (  page 14)


2. Turn the unit on. (  page 15)

Press

or

Press

or

Press

Press

or

Press

Press

or

Press

Press

• Do not use your computer to format the unit’s memory.

•  Do not remove the battery during formatting. Doing so may cause the unit to 

malfunction.

•  If the remaining battery charge becomes depleted or the battery is removed 

before formatting is completed, initiate the reset procedure. (  page 38)

Note

or

Press

Press

5

Select “YES”.

1

Select “SET”. 

(  page 30, Setting various items)

2

Select “SYSTEM”.

3

Select “FORMAT”.

4

Select “YES”.

MP805_810VEn_2.indd   36

2005/12/28   13:50:52

Содержание SV-MP805V

Страница 1: ...he instructions completely Please keep this manual for future reference Caution This unit is not waterproof and should not be exposed to excessive moisture RQTT0845 G GC Matsushita Electric Industrial Co Ltd Web site http www panasonic co jp global Operating Instructions Digital Audio Player Model No SV MP805V SV MP810V ...

Страница 2: ... Do not recharge ordinary dry cell battery Remove the battery if the unit is not to be used for a long time Do not use batteries if the covering has been peeled off Mishandling of battery can cause electrolyte leakage which can damage items the fluid contacts and may cause a fire If electrolyte leaks from the batteries consult your dealer Wash thoroughly with water if electrolyte comes in contact wi...

Страница 3: ...rs structure display on your computer 12 Saving data 13 Name of parts and basic operations 14 Selecting modes 15 Playing music 17 Selecting a playlist and listening to music 18 Selecting various play modes 20 PLAY MODE settings 20 A B REPEAT 21 Listening to FM radio 22 Recording the FM radio 23 Presetting stations FM1 FM2 24 Voice recording 26 LINE IN recording 28 Setting various items 30 Making b...

Страница 4: ...nhofer IIS and Thomson multimedia Other names of systems and products mentioned in these instructions are usually the registered trademarks or trademarks of the manufacturers who developed the system or product concerned The and marks are not used to identify registered trademarks and trademarks in these instructions Please check and identify the supplied accessories 2 1 1 2 4 Earphone holder Will...

Страница 5: ...CPU or Multi boot environments are not supported 1 alkaline battery LR03 Battery indicator When the battery charge is low and the display flashes the display panel backlight will not light If rechargeable batteries are to be used rechargeable batteries manufactured by Panasonic are recommended Operation is not guaranteed when used with manganese batteries Do not use manganese batteries Full Empty R...

Страница 6: ...nless the setting of the destination where the music is to be saved has been changed the music will be saved in the following folder My Music in My Documents These displays differ depending on the operating system Use Windows Media Player a standard Windows software program This unit supports WMA and MP3 music files You can also use music content as either WMA or MP3 music files downloaded from musi...

Страница 7: ... Select the tracks to be recorded 3 WMP9 Select the Copy Music WMP10 Select the Rip Music Recording now starts Introduction RQTT0845 7 WMP10 screen 1 On the Tools menu click Options If the Tools menu does not appear click at the top right 2 WMP9 Select the Copy Music tab WMP10 Select the Rip Music tab 3 Click to clear the Copy protect music check box 4 Click OK Your attention is drawn to the fact ...

Страница 8: ...the computer When the connection is complete USB CONNECTED appears and music can be recorded On your computer open My Computer and check whether the unit is indicated as a Removable Disk When the LOW BATTERY or NO BATTERY message appears on the screen replace the battery with a new one 8 1 3 2 USB cable included Removable Disk x Before connecting the unit to the computer be absolutely sure to inse...

Страница 9: ... not followed the music data may be destroyed making it impossible to play the data properly Use the unit or the computer to delete the music data which has been destroyed If the data cannot be deleted initiate resetting page 38 Once resetting has been initiated all the stored data will be lost Re record the music data on the unit X Incorrect Do not connect or disconnect the USB cable while ACCESS...

Страница 10: ...f the language of the ID3 tag recorded for the MP3 is different from the language setting for this unit Compatible with DRM PDDRM Microsoft MP3 WMA files should always be saved in the MUSIC folder If saved in the root folder the files cannot be played back or deleted from the unit Note Computer folder MUSIC folder 10 You can first put files into a new folder and then put that folder into the MUSIC fol...

Страница 11: ...transferred The USB Mass Storage Device window appears on the computer screen Depending on the OS the display differs When the USB cable is disconnected the unit s power goes off Introduction RQTT0845 11 When WMP9 is used select the MUSIC folder as the transfer destination For WMP10 1 Select Tools Options Devices Removable Disk x 2 Click Properties to display Removable Disk x Properties 3 Check th...

Страница 12: ...WMA Naming files and folders aaatrack mp3 Folder and files will play in the order in which they are downloaded If ARTIST_B has been sent after ARTIST_A the playback sequence will be ARTIST_A ALBUM_A1 ALBUM_ A2 and ARTIST_B Extension alphanumeric character FM RADIO VOICE and LINE IN folders are automatically created to store files when you record You may not be able to play on another device the files ...

Страница 13: ...ess Voice and MBR Multiple Bit Rate A file that contains the same content encoded at several different bit rates If you use VBR format MP3 files some of the unit s functions can not be operated normally Do not use your computer to format the unit s memory Doing so may cause the unit to malfunction Use the unit to format its memory page 36 Formatting Note Folders displayed as playlists for the unit T...

Страница 14: ... below Earphones jack M3 jack page 4 Volume button below Display Turn on off Play Stop button below USB port page 8 HOLD switch below HOLD ON Release before operation Adjust the volume Press or 0 25 Skip Press backward or forward Search During play press and hold backward or forward Display the main menu Press Turn ON Press Turn OFF Press and hold Good bye is displayed and the unit s power is turn...

Страница 15: ... of the modes will be displayed If more than 60 seconds pass before proceeding to the next step repeat from step 2 Press or Press Press You can listen to and record FM radio broadcasts page 22 Listening to FM radio Press or Press Basic operations RQTT0845 15 MUSIC mode FM RADIO mode 1 Turn the unit on 2 Display the main menu 3 Select mode 1 Select MUSIC Playback screen Main menu 1 Select FM RADIO ...

Страница 16: ... various items If selecting MUSIC mode Basic operations Press or Press Press or Press Press or Press The items that can be set differ depending on the mode After selecting the mode in which you will make the setting select SET Note The SET menu for each mode will be displayed VOICE RECORD mode LINE IN mode SET RQTT0845 16 1 Select VOICE RECORD 1 Select LINE IN 1 Select SET VOICE RECORD standby scr...

Страница 17: ...n this case repeat from step 1 To save power the unit will switch off if left continuously in playback stop mode for 60 seconds Auto off function If PROTECT appears on the display page 38 Note MUSIC mode RQTT0845 17 When you adjust the volume the screen will change from track name display to the volume display Basic playback operations page 14 Setting various Items page 30 Playback icon Track numb...

Страница 18: ...ill be the track numbered 003 or higher or Press Press or Press Press or Press Press or Press Press Preparation 1 Recording music on the unit page 8 2 Release the HOLD switch page 14 3 Put on the earphones page 4 4 Turn the unit on page 15 5 Select MUSIC mode page 15 Press and HOLD RQTT0845 18 Selecting the track from which play is to start Example When you want to select TRACK2 1 Track number 1 D...

Страница 19: ...Select FOLDER PLAY in step 5 When you press all of the tunes in ALBUM B2 will play in the order in which they were recorded or Press Press When FOLDER PLAY is selected all the tracks in the selected folder are played and then play stops When the lowest track number in the folder selected for FOLDER PLAY is 005 then playback will start from the track numbered 005 MUSIC VOICE LINE IN FM RADIO ALL MU...

Страница 20: ...DER PLAY is selected on the playlist menu after ALL REP or RANDOM has been set only the tracks in the selected folders are played Note or Press Press The display returns to the playback screen where the ONE REP icon was displayed PLAY MODE settings RQTT0845 20 1 Display the main menu 2 Select SET 3 Select PLAY MODE 4 Select ONE REP NORMAL Normal play ALL REP All tracks in a list repeat ONE REP One...

Страница 21: ...Press Press The display returns to the playback screen where the A B REPEAT icon was displayed To clear a setting select OFF and press A B REPEAT playback Press Press 2 Pressing again will set point B at which A B REPEAT playback ends The display returns to the playback screen where the A B REPEAT icon was displayed Changing the EQ SETTING or SPEED MODE Page 30 Setting various items 3 Select A B R...

Страница 22: ...M1 FM2 This needs to be preset beforehand page 24 Presetting stations In the manual mode press and hold or until the frequency starts scrolling to start automatic tuning Tuning stops when a station is found The tuning band steps can be changed page 32 FM RADIO BAND STEP Setting various items page 30 Each time you hold down Manual FM1 FM2 No display or Press Adjust the volume Press or 0 25 Changing...

Страница 23: ... until the maximum memory capacity is reached SV MP810V 46 hours 40 minutes SV MP805V 23 hours 20 minutes Do not remove the battery while recording All the data being recorded will be lost Note Show available time Press Press again to show the recording time Stop recording Press Press Recording time Available time Press Each time MODE is pressed the display screen switches between the recording ti...

Страница 24: ... or Press Press or Press Press AUTO PRESET will start The radio screen automatically returns when AUTO PRESET is finished No operations are acknowledged during AUTO PRESET AUTO presetting Preparation Display the main menu during FM reception page 15 Selecting modes 1 Select SET 2 Select AUTO PRESET 3 Select FM1 or FM2 4 Select YES ...

Страница 25: ...to FM radio Press or Press Press or Press Press Repeat from step 1 to step 3 for each of the stations to be stored as preset stations FM RADIO mode RQTT0845 25 MANUAL presetting 1 While listening to FM radio 2 Select the frequency 3 Select the channel ...

Страница 26: ...E folder Setting various items page 30 Preparation 1 Release the HOLD switch page 14 2 Turn the unit on page 15 Press If the unit is already set to VOICE RECORD mode the VOICE RECORD standby screen shown in step 2 will be displayed 2 Select VOICE RECORD RECORD MODE page 30 VOICE RECORD 3 Start recording Available time 5 Stop recording 1 Display the main menu 4 Speak into the microphone VOICE RECOR...

Страница 27: ... stop in the following situations When there is no more free memory during recording When the battery charge is insufficient To record the next time repeat steps 3 to 5 on page 26 The power will be turned off when the unit is left in the recording standby mode for more than 10 minutes Show available time Press Press again to show the recording time Stop recording Press Changing mode Press while the...

Страница 28: ...ng standby mode The standby screen in step 1 appears when the recording standby mode remains established for 10 or more minutes 1 Select LINE IN page 15 Selecting modes 4 Complete the recording when the recording source device stops USB cable included Turn the unit on LINE OUT 2 Set to the recording standby mode 3 Recording starts when the recording source device is played 3 Connect the recording ...

Страница 29: ...e Do not remove the battery while recording All the data being recorded will be lost Recording will automatically stop in the following situations When there is no more free memory during recording When the battery charge is insufficient The power will be turned off when the unit is left in the standby screen for more than 10 minutes Pressing while recording time is displayed will cause available t...

Страница 30: ... LOW1 NORMAL HIGH2 HIGH1 SYSTEM LANGUAGE BACKLIGHT CONTRAST FORMAT AUTO PRESET FM1 FM2 BAND STEP 50kHz 100kHz 200kHz RECORD MODE 128Kbps 96Kbps 64Kbps SYNC MODE SYNC OFF 1 SYNC AUTO SYNC SYSTEM RECORD MODE SYSTEM SYSTEM 64Kbps 48Kbps 32Kbps Same method as MUSIC mode VOICE RECORD mode MUSIC mode LINE IN mode FM RADIO mode RQTT0845 30 A B D E F G H I A B D C C E F G G H H I ...

Страница 31: ...or Press Press The SYSTEM settings menu will be displayed or Press Press The BACKLIGHT time selection menu will be displayed or Press Press When the settings are completed the playback screen will reappear Each time you press 1MIN 5SEC 20SEC 1 minute 5 seconds 20 seconds Setting mode RQTT0845 31 2 Select SET 1 Display the main menu 3 Select SYSTEM 4 Select BACKLIGHT 5 Select 1MIN When SET is selec...

Страница 32: ...at play OFF Normal play ERASE MODE MUSIC FM RADIO VOICE LINE IN Erases all tracks in the playlist TRACK Erases selected tracks in the playlist SPEED MODE LOW2 L2 Approximately 75 of NORMAL LOW1 L1 Approximately 88 of NORMAL NORMAL Normal speed HIGH1 H1 Approximately 110 of NORMAL HIGH2 H2 Approximately 120 of NORMAL SYSTEM General system setting Next page AUTO PRESET page 24 Presetting stations BA...

Страница 33: ...DE AUTO SYNC While recording from an external device each track is saved as a file SYNC OFF Normal recording 1 SYNC While recording from an external device only one track is saved as a file SYSTEM General system setting Below SYSTEM LANGUAGE ENGLISH TRADITION SIMPLE JAPANESE KOREAN RUSSIAN Changing the language in which track and playlist titles are displayed BACKLIGHT 5SEC 20SEC 1MIN Setting the du...

Страница 34: ...VOICE or LINE IN folders Example When erasing all the tracks in the MUSIC folder Press MUSIC FM RADIO VOICE LINE IN ARTIST_A ARTIST_B ALBUM_A TRACK1 mp3 This unit When erasing all the tracks in the MUSIC folder When erasing a track 2 Select SET 1 Display the main menu In the ERASE MODE two erasure methods can be selected 1 Erase folders By selecting the MUSIC FM RADIO VOICE or LINE IN folder all t...

Страница 35: ...s in the MUSIC folder will be erased Example When erasing TRACK1 While TRACK1 is playing or stopped or Press Press Press or Press Press or Press Press Other information RQTT0845 35 When erasing a track The selected TRACK1 is erased or Press Press 3 Select ERASE MODE 4 Select the folder to be erased 5 Select YES 4 Select TRACK 5 Select YES 6 Select YES ...

Страница 36: ...n page 15 Press or Press or Press Press or Press Press or Press Press Do not use your computer to format the unit s memory Do not remove the battery during formatting Doing so may cause the unit to malfunction If the remaining battery charge becomes depleted or the battery is removed before formatting is completed initiate the reset procedure page 38 Note or Press Press 5 Select YES 1 Select SET p...

Страница 37: ... random play mode may be on Play usually resumes from the track where you last stopped play Use skip to return to the first track Ensure that FOLDER PLAY has not been selected page 19 The unit stops working Take the battery out for about 5 seconds then reinsert it The display is too dark or too light Adjust the contrast page 33 The display just shows WAIT WAIT will be displayed while the unit is wr...

Страница 38: ...ving the battery and then putting it back inside If the symptom still persists follow the resetting procedure below Initiating resetting makes it possible to delete files which cannot be deleted using the computer or the unit Initiate the reset procedure while the battery indicator shows a full charge 1 Slide the to ON 2 Turn the unit on 3 While a screen is displayed press the keys in the following...

Страница 39: ...CE RECORD 64 kbps 5 hours FM RADIO 9 hours LINE IN 128 kbps Dimensions W H D Maximum 55 8 mm 25 7 mm 25 2 mm Cabinet 55 3 mm 25 2 mm 25 2 mm Mass 34 3 with battery 23 0 without battery The play time shown is when the bit rate is 128 kbps MP3 EQ SETTING NORMAL SURROUND OFF REMASTER OFF volume is 10 the backlight is not used the ambient temperature is 25 C and supplied alkaline battery is used Speci...

Страница 40: ...ct to rain water or other liquids If you see this symbol Information on Disposal in other Countries outside the European Union This symbol is only valid in the European Union If you wish to discard this product please contact your local authorities or dealer and ask for the correct method of disposal Recording and operating problems may occur on some computer systems Please note that Panasonic and...

Отзывы: