background image

Connecting and Operating with a personal computer

38

38

38

38

10

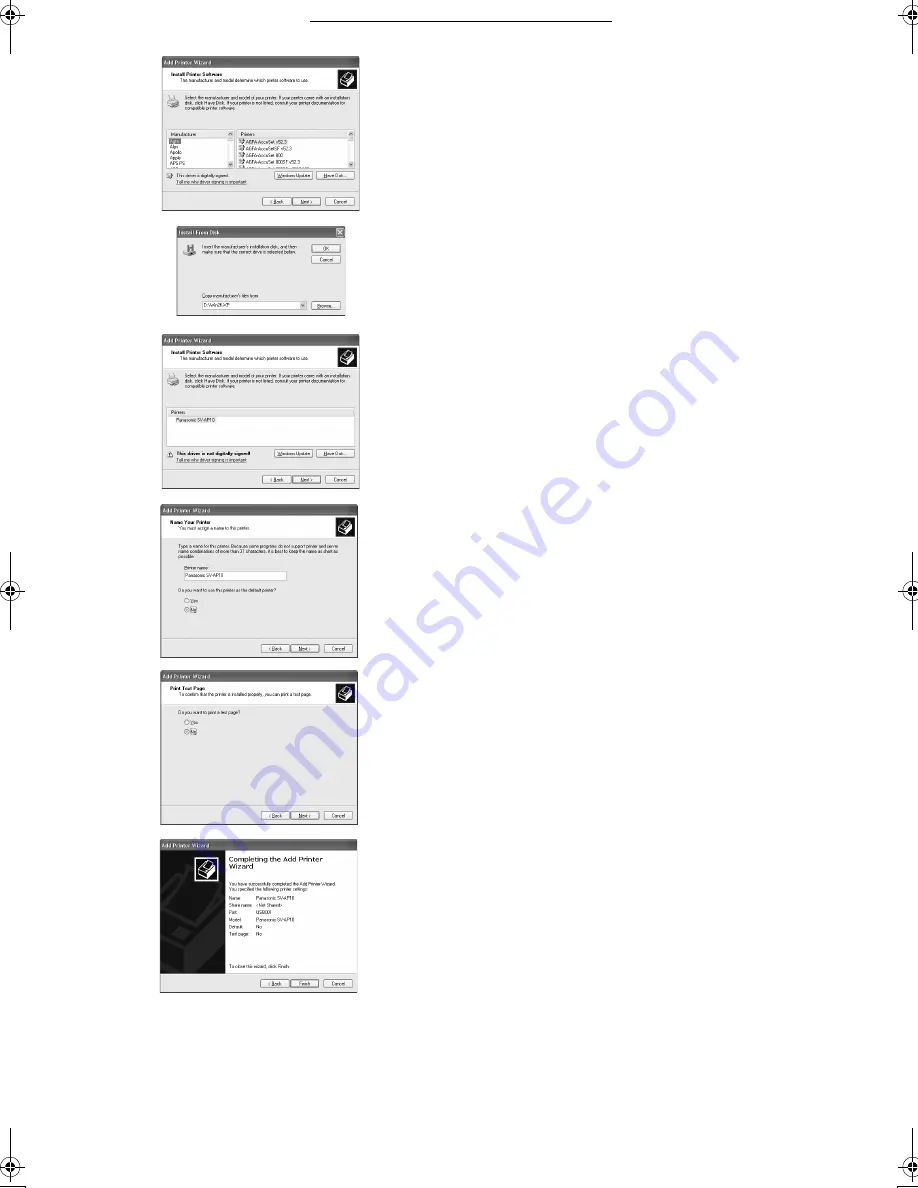
Click [Have Disk].

11

Select the folder where the Printer Driver is located.

If the CD-ROM drive is the [D: drive], select [D:\Win2K-XP] folder.

12

Click [OK].

13

Check that [Panasonic SV-AP10] is displayed and click 
[Next].

14

Click [Next].

If the screen to select the default printer is displayed, select [Yes], 
if it is the default printer.

If the screen to select the whether the printer is shared or not is 
displayed, select [This Printer is not Shared], if the printer is not 
shared and click [Next].

15

If a screen asking you to execute a test print is displayed 
during installation, select [No], and click [Next].

16

Click [Finish].

The installation is now complete.

10

11,12

13

15

14

16

SV‑AP10B.book  38 ページ  2002年9月18日 水曜日 午前8時55分

Содержание SV-AP10B

Страница 1: ...Before use please read these instructions completely Please retain this manual for future reference VQT0B56 Digital Photo Printer Operating Instructions Model No SV AP10E EN B For UK Customers Only ...

Страница 2: ...oncerned Avoid using a cell phone near the Photo Printer because doing so may cause noise to adversely affect the picture WARNING TO REDUCE THE RISK OF FIRE OR SHOCK HAZARD AND ANNOYING INTERFERENCE USE ONLY THE RECOMMENDED ACCESSORIES AND DO NOT EXPOSE THIS EQUIPMENT TO RAIN OR MOISTURE DO NOT REMOVE THE COVER OR BACK THERE ARE NOT USER SERVICEABLE PARTS INSIDE REFER SERVICING TO QUALIFIED SERVIC...

Страница 3: ...R OF SEVERE ELECTRICAL SHOCK IF THE CUT OFF PLUG IS INSERTED INTO ANY 13 AMPERE SOCKET If a new plug is to be fitted please observe the wiring code as shown below If in any doubt please consult a qualified electrician ªIMPORTANT The wires in this mains lead are coloured in accordance with the following code Blue Neutral Brown Live As the colours of the wires in the mains lead of this appliance may...

Страница 4: ...icensee Article 2 Use by a Third Party Licensee may not use copy modify transfer or allow any third party whether free of charge or not to use copy or modify the Software except as expressly provided for in this Agreement Article 3 Restrictions on Copying the Software Licensee may make a single copy of the Software in whole or a part solely for back up purpose Article 4 Computer Licensee may use t...

Страница 5: ...for Vertical Layout VYQ2551 Feet for Horizontal Layout VKA0376 CD ROM VFF0171 Important Information Including optional USB Connection Cable In order to prevent electromagnetic interference install the Clamp Filter supplied on the Cable as shown in the figure After passing the Cable through the Clamp Filter and looping it around once close the Clamp Filter until it clicks into place When you attach...

Страница 6: ...ds accepted All enquiries transactions and distribution facilities are provided directly by Panasonic UK Ltd It couldn t be simpler Customer Care Centre For UK customers 08705 357357 For Republic of Ireland customers 01 289 8333 Technical Support For UK customers 0870 1 505610 This Technical Support Hot Line number is for Panasonic PC software related products only For Republic of Ireland please u...

Страница 7: ...tles onto Cards 21 Erasing Titles From Cards 21 Viewing Slide Shows 22 Multiple Functions Printing Multiple Screen Shots of the Same Picture MULTI FRAME MODE 23 Returning a Multiple Screen to a Single Screen 23 Printing Multiple Screen Shots of Different Pictures 24 Creating a Personalized Picture Calendar 26 Inserting Wallpaper and Printing 27 Title Functions Inserting Illustrations and Printing ...

Страница 8: ...Use to exit MENU 7 Remote Control Receiver Receives the signal from the remote controller Do not obstruct the remote control receiver to be emitted 8 Error Lamp Flashes when the error has occurred 9 Card Access Lamp Light while the Photo Printer is making an access to the Card 10 PC Card Eject Button 11 SD Memory Card MultiMediaCard Insert Location 12 PC Card Insert Location 13 Paper Cassette Inse...

Страница 9: ...rints all pictures when there are no pictures DPOF was set in the Card 8 ZOOM IN Button Press this button to enlarge the picture and characters 9 ZOOM OUT Button Press this button to reduce the picture and characters 10 ROTATE Button Press this button to rotate the picture and characters 11 MULTI COPY Button Press this button to select numbers of multiple screen shots of the same picture 12 MULTI ...

Страница 10: ...t or short circuit the batteries When you do not use the remote control for a long time take out the batteries and store them in a cool dry place Using the Remote Controller 1 Direct the remote controller to the remote control receiver A and press a button Distance from the Photo Printer Within approximately 7 m Angle Within approximately 40 degrees in the vertical directions and 60 degrees in the...

Страница 11: ...C Mains Lead supplied to the main unit and Household Mains Socket with the cord hooked to the cord stopper 2 Connect the Video cable supplied to VIDEO OUT Socket on main unit and the Video Input Socket on TV After connections turn on the Photo Printer and TV and switch the input to the video input For Connection to PC 1 Connect the AC Mains Lead supplied to the main unit and Household Mains Socket...

Страница 12: ...d Do not insert remove only the card with the card adaptor inserted Inserting Paper 1 Open the lid of the paper cassette included 1 spread out 2 and stand up or push down 3 When using 9 x 12 cm printing paper or 16 Pre Cut Adhesive printing paper spread 2 and stand up 3 When using 10 x 15 cm printing paper spread 2 and push down 3 2 Face the white print side of the paper up and insert under 4 5 is...

Страница 13: ...Cassette and do not pull it out of the cassette Close the Ink Cassette Compartment Door Do not peel off the label on the Ink Cassette When all of the Ink film in an Ink Cassette has been used up replace the Ink Cassette with a new one Used Ink Cassettes cannot be reused MENU Interface 1 MENU Categories The Photo Printer is divided into 4 major categories 2 MENU Contents Select the specific MENU yo...

Страница 14: ...ection press C 4 Press C to enter your selection 5 Press D to exit the MENU On Screen Display The screen display disappears a few seconds later it appears again when pressing the 34 Buttons 1 Number display 2 Date display 3 Input display DISPLAY CANCEL PRINT MENU SET B A D C SET DISPLAY CANCEL ERROR PRINT MENU C A D B DPOF D P O F A Search BASIC FUNCTION EFFECT OPTION Input Slide Card Album Batch ...

Страница 15: ... not affect the printed image Do not pull out the papers when they are moving during printing Do not remove the paper cassette or the Ink Cassette Do not put 11 or more printing papers on the receiving position the causing the paper jam It may take some time until the picture is displayed depending on the card The picture on the TV screen may flicker depending on the card However it does not affec...

Страница 16: ...e number of pages remaining to be printed including the currently printing page appears in the lower left corner of the screen ªPaper Jams A Paper jam has occurred Remove paper and press PRINT error message appears Remove paper out of the left side 1 or the right side 2 and remove the Ink Cassette Make sure no more paper is stuck inside then re install the Ink Cassette Press the Print button The e...

Страница 17: ...pear in the Index Display and then make the same picture appear again with the DISPLAY button When the picture is enlarged the picture quality may be inferior You cannot enlarge reduce rotate or move the picture when setting to the multi select display or the calendar display To Operate with the Button of the main unit 1 1 1 1 Select Album under BASIC on the MENU screen and press A 2 2 2 2 Using t...

Страница 18: ... Change the Date 43 Buttons Move the Cursor Years can be entered from 1980 to 2040 3 Confirm the pictures you found in the lower right corner and press B A batch of the searched pictures is printed If no images could be found within the designated search period a A picture wasn t found message will appear To print all images that were found as a batch return to the MENU screen and select Selected ...

Страница 19: ...The Photo Printer cannot configure DPOF Confirm settings on the equipment on which the settings were made Setting the print count in Number under OPTION will have no effect Only the DPOF configured print count will be printed If 100 or more copies are set to be printed on the DPOF settings only 99 will be printed If you do not use the DPOF configuring device to set the date on cards they cannot be...

Страница 20: ...Delete and press A Select the date and press A 4 Select an image press A confirm the screen and press A again Press B to cancel Images will be permanently deleted Multiple copies of images cannot be selected at one time You cannot copy or erase the picture and title simultaneously Do not pull out during copying or erasing You cannot copy or erase the locked picture Unlock the picture on the equipm...

Страница 21: ...ecorded to cards Pictures containing both titles and images cannot be recorded Erasing Titles From Cards Titles recorded on cards can be deleted Unlock the card when inserting the SD Memory Card 1 1 1 1 Select Card under BASIC on the MENU screen and press A 2 2 2 2 Select Title and press A 3 3 3 3 Select Delete and press A 4 4 4 4 Select a picture and press A Press B to cancel before pressing A Ti...

Страница 22: ...A Press B to cancel Pictures may take a few moments to load depending on the picture size Do not remove the card during a Slide Show When setting the Slide Show with the other equipment the pictures set with the other equipment has a more priority than DPOF configured pictures Cancel the setting with the other equipment When selecting Selected date all pictures with date selected on the Album Disp...

Страница 23: ... Screen to a Single Screen Dividing on screens are performed in FUNCTION Copy Select Calendar Wallpaper To undo these functions 1 Press A MULTI COPY Button or B MULTI SELECT Button until Standard is displayed in the left lower corner of the screen when the pictures are displayed A single screen can be returned in Standard under FUNCTION on the MENU screen To Operate with the Button of the main uni...

Страница 24: ... horizontal direction if only 2 pictures 4 Confirm the screen and press D Pictures stored in memory will be deleted one at a time each time you press the 3 button When you press the 21 buttons pictures stored in memory can be changed To Operate with the Button of the main unit 1 1 1 1 Select the pictures and mark them with A Repeat for the selected number of pictures Select the picture and then pr...

Страница 25: ... pictures will automatically be set If the Ink Cassette is removed the screen will not automatically return to a single screen If you print the vertical picture the pictures are displayed and printed with them rotated by 90 degrees Selecting a Large Amount of Pictures and Printing Multiple SELECT as batches 1 Select all necessary pictures in Step 1 and press E to go to the MENU screen 2 Select Bat...

Страница 26: ...eating 2 month calendars press D to bring up the MENU screen When creating 2 month calendars they can be deleted one at a time by pressing the 3 Button after storing pictures to memory Select Reset b and then press A to return to the initial setting The colours of days may be changed except for the selected year Illust Type or Display under EFFECT menu cannot be used when selecting Calendar Howeve...

Страница 27: ...n selecting 2 or more pictures When pressing F you can enlarge decrease and rotate the characters using the 3421 Buttons Press F again to return to the Step 5 Press A to go to the Step 6 6 After confirming the picture press G to print Press B and you can select the picture again You need to set the picture again at the Step 5 Move the picture in the end of the screen after enlarging decreasing or ...

Страница 28: ...rds Select Don t indicate in Display under EFFECT not to display created title Illustrations Characters temporarily Select Clear in Display under EFFECT to delete created titles Illustrations Characters If an illustration is inserted onto the picture with characters the characters will be deleted Switching Displays Indicate Don t indicate Clear You can switch title displays Illustrations Character...

Страница 29: ...Turning the power off will delete all inputted characters Select Don t indicate in Display under EFFECT not to display created title Illustrations Characters temporarily Characters may appear disfigured on the TV Screen but will not be so when printed The size of characters is restricted by the number of characters Character fonts cannot be altered Created titles Illustrations Characters can be re...

Страница 30: ...so displayed with D 2 Select Create sepia style and press A 3 Press B to print Press C to bring up the MENU screen Push the 21 Buttons to select the other picture COLOUR C BALANCE and AWB cannot be adjusted when Create sepia style is selected Titles Illustrations Characters do not become Sepia tone COPY DATE PRINT MENU TITLE SET DISPLAY CANCEL B C D A SET DISPLAY CANCEL ERROR PRINT MENU A B C A BA...

Страница 31: ...ENU screen and press A 2 Select With trim and press A When Without trim is selected the entire image data will always be fit within the print paper Even borderless paper can contain space To Operate with the Button of the main unit 1 1 1 1 Select Number under OPTION on the MENU screen and press A 2 2 2 2 Using the 21 Buttons select number of prints and press A You can select 1 sheet to 10 sheets T...

Страница 32: ...Owner ID 3 Input a PIN Number Select desired numbers or characters and press A You can input 4 characters 4 Select Next and press A 5 Repeat Steps 3 4 to input desired numbers or characters for Your name House No Postcode You can input up to 12 characters in Your name and up to 11 characters in House No and Postcode 6 Select Next and press A to finish the setup To verify Owner ID Select Owner ID u...

Страница 33: ... bit or more Desktop resolution of 800X600 dots or higher Disk drive CD ROM drive Ports USB Terminal Other requirements Mouse Remove the memory card when using this printer as the printer for your PC A USB hub or USB card used for connection is out of guarantee for normal operation The names of the products you are using may differ from the names given in the text Depending on the operating enviro...

Страница 34: ... the Photo Printer 3 Use auxiliary USB Connection Cable to connect The Found New Hardware Wizard screen appears 4 Click the Next Button Confirm that the item Install the software automatically is selected 5 Click the Finish Button when the Printer Driver Software is detected The driver setup is completed When the Printer Driver Software is not detected please refer to page 37 Please read also the ...

Страница 35: ...t Button 5 Click the Finish Button when the Printer Driver Software is detected 6 Add New Hardware Wizard screen appears again Click the Next Button 7 Select No when the Add Printer Wizard screen appears Select Yes to set as the default printer After clicking Finish the message of File DLL is not found can be displayed depending on the environment of PC Many PCs may install this file on the Hard D...

Страница 36: ...ws 2000 example of D drive assigned as CD ROM drive 7 Click the Next Button Re click the Next Button when the search confirmation screen appears The message of File DLL is not found can be displayed depending on the environment of PC Many PCs may install this file on the Hard Disk Click Refer and select C windows option cabs If your system is Windows 2000 proceed to the step 13 8 Click the Finish ...

Страница 37: ...esent on some personal computers In this case select Start Control Panel Printers and Other Hardware Printers and Faxes For Windows 98SE Me 2000 Select Start Settings Printers For Windows XP 1 Before installation check that all applications have been exited 2 Connect the printer to your personal computer with a USB cable and turn on the printer 3 Select Start Printers and Faxes Printers and Faxes ...

Страница 38: ...nd click Next 14 Click Next If the screen to select the default printer is displayed select Yes if it is the default printer If the screen to select the whether the printer is shared or not is displayed select This Printer is not Shared if the printer is not shared and click Next 15 If a screen asking you to execute a test print is displayed during installation select No and click Next 16 Click Fi...

Страница 39: ... Next 7 Click Have Disk 8 Select the folder where the Printer Driver is located If the CD ROM drive is the D drive select D Win9X Me folder 9 Click OK 10 Check that Panasonic SV AP10 is displayed and click Next 11 Select the USB port through which the Printer is connected and click Next Select USB00X for example USB001 12 Click Next If a screen to select the default printer is displayed select Yes...

Страница 40: ...turn ON the printer 3 Select Start Settings Printers 4 Double click the Add Printer icon 5 When the Add Printer Wizard is activated click Next 6 Select Local Printer and deselect Automatically detect and install my Plug and Play printer 7 Click Next 8 Select Use the following port and select the port through which the Printer is connected in the adjacent list Select USB00X for example USB001 9 Cli...

Страница 41: ... 16 Click Finish The installation is now complete ªNotes on Installation of Printer Driver If your system is Windows XP or Windows 2000 log on with the user name of Administrator administrator of your PC or any user name having an equivalent right to the administrator and then start to install Uninstalling the Printer Driver Before uninstalling the Printer Driver disconnect the USB connect Cable F...

Страница 42: ...ils Click on the screen to open it To view the installed operating instructions Adobe Acrobat Reader 4 0 or higher is required Install Adobe Acrobat Reader 5 0 from the supplied CD ROM To Select the Picture 1 Click the folder saving the picture from the explorer The thumbnails are displayed When restarting the pictures in the folder selected last are displayed after finishing SD Viewer for Printer...

Страница 43: ...paper 6 Select the division number When printing one picture select 1 frame Be sure to select 16 frames when using 16 Pre Cut Adhesive printing paper After opening the detail setting on Print 1 Set the printer name to Panasonic SV AP10 Select SV AP10 from the printing menu when using it from the other application 2 Click Properties and select Paper and Division number on Paper and Device Options t...

Страница 44: ...the application Changing of the initial setting affects on setting of the printer when starting the application To change the initial setting For Windows XP Select Start Control panel Printers and Other Hardware Printer and Faxes to open the property and select the paper and division number from General Print Preferences Advanced For Windows 2000 Select Start Settings Printers to open the property...

Страница 45: ...nters and double click this Printer s icon A window will be displayed Select Cancel All Documents from the Printer on the menu bar in the window For Windows 98SE Me Select Start Settings Printers and double click this Printer s icon A window will be displayed Select Purge Printing Documents from the Printer on the menu bar in the window 4 The message USB port cannot be detected may be displayed wh...

Страница 46: ...Cassette Paper Set has been stored at a low temperature condensation could form when brought into a warmer room If the Ink Cassette Paper Set is defective due to a manufacturing error on the part of Panasonic we will replace the Ink Cassette Paper Set with an equivalent Ink Cassette Paper Set Panasonic shall not bear any responsibility beyond replacing the product ªInk Cassette Notes Do not remove...

Страница 47: ...print quality or injury Do not affix cellophane tape to the printed surface Particularly be careful not to let plastic desk pads business card cases or plastic erasers come into contact with the printed surface Do not touch the printed surface with your fingers Do not spill or apply volatile solvents such as alcohol to the printed surface Doing so could result in discoloration or fading Do not lea...

Страница 48: ...her solvents to clean the printer Most of the printer surface is plastic Do not use solvents such as Benzene and paint thinner to wipe the printer since they can damage the surface of the printer and cause the surface to peel To clean the surface wipe up any dust with a soft dry cloth If the Photo Printer is particularly dirty soak the cloth in kitchen detergent neutral diluted with water and wrin...

Страница 49: ...made of nylon polypropylene or cellophane Using other materials may result in colour transfer or discoloration ªAbout Paper and Ink Cassettes 10 How should I store the Ink Cassettes and paper after having opened them 10 Do not leave the Ink Cassettes or paper in a location exposed to direct sunlight or in a location subjected to high temperature or high humidity Place the cassette or paper back in...

Страница 50: ... from the device generating the magnetic field Keep away from the equipments 8 The printer does not respond when a button is pressed 8 1 The internal temperature of the printer is too high Wait 8 2 Printing is in progress Wait until printing is complete 8 3 The ink cassette which the ink lacks is installed Wait 9 Paper jams occur frequently 9 1 More than 36 sheets of paper or 25 sheets of 9 x 12 c...

Страница 51: ...art Control Panel Printers and the other Hardware Printers and Faxes Click the printer icon twice and select Cancel All Document under Printer Windows 2000 Select Start Setting Printer Click the printer icon twice and select Cancel All Document under Printer Windows 98SE Me Select Start Setting Printer Click the printer icon twice and select Delete the Printing Document under Printer 18 Space is m...

Страница 52: ...mmed paper and insert the specified printing paper Paper jam has occurred Remove the jammed paper Ink cassette is incorrect Use the specified Ink Cassette There is no ink Replace the Ink Cassette with a new one Paper is incorrect Set properly Insert the specified printing paper correctly Set paper Insert paper into the Paper Cassette The temperature is too high please wait Wait for a moment Please...

Страница 53: ...river again Error occurred Turn the printer s power off and then back on and then click Restart for printing or click Abort to abort printing Restart the job or abort the printing after turning off and on the Photo Printer Communication with the printer has failed First check that the printer is connected properly and click Restart for printing or click Abort to abort printing Turn off and on the ...

Страница 54: ...Copy Calendar Wallpaper Component Print Title Character Input Sepia Print Zoom Batch Print Index Date Print Date Search Trimming Card Storage Card Erase Card Copy Slide Show DPOF Digital Print Order Format Album Print Head Film thermal head 10 20 dots mm 259 dpi Input Socket Card SD Memory Card MultiMediaCard Front 1 PC Card TYPE II Front 1 Personal Computer USB terminal rear 1 Output Socket Image...

Страница 55: ...55 55 55 55 ...

Страница 56: ...VQT0B56 X0902Ah0 A Printed in Japan Matsushita Electric Industrial Co Ltd Web site http www panasonic co jp global B ...

Отзывы: