background image

16

RQ

T

9

68

2

Getting S

tarted

Playing

 Discs

Ot

her Op

era

tions

Reference


This unit can play PAL and NTSC, but the “TV System” (

B

14) of this unit 

must match the system of your TV.


Depending on the PAL video on the disc, the image may not be displayed 
correctly on an NTSC TV.

Do not attach labels or stickers to discs. This may cause disc warping, 
rendering it unusable.

Do not write on the label side with a ball-point pen or other writing 
instrument.

Do not use record cleaning sprays, benzine, thinner, liquids which 
prevent static electricity, or any other solvent.

Do not use scratch-proof protectors or covers.

Do not use the following discs:
– Discs with exposed adhesive from removed stickers or labels (rented 

discs, etc.).

– Discs that are badly warped or cracked.
– Irregularly shaped discs, such as heart shapes.

There may be differences in the display order on the menu screen and 
computer screen.

This unit cannot play files recorded using packet write.

DVD-R/RW

Discs must conform to UDF bridge (UDF 1.02/ISO9660).

This unit does not support multi-session. Only the default session is 
played.

CD-R/RW

Discs must conform to ISO9660 level 1 or 2 (except for extended 
formats).

This unit supports multi-session but if there are many sessions it takes 
more time for play to start. Keep the number of sessions to a minimum 
to avoid this.

USB device

This unit does not guarantee connection with all USB devices.

This unit does not support USB device charging.

FAT12, FAT16 and FAT32 file systems are supported.

This unit supports USB 2.0 Full Speed.

Never use alcohol, paint thinner or benzine to clean this unit.

Before using chemically treated cloth, carefully read the instructions that 
came with the cloth.

Do not use commercially available lens cleaners as they may cause 
malfunction.

 Cleaning of the lens is generally not necessary although 

this depends on the operating environment.

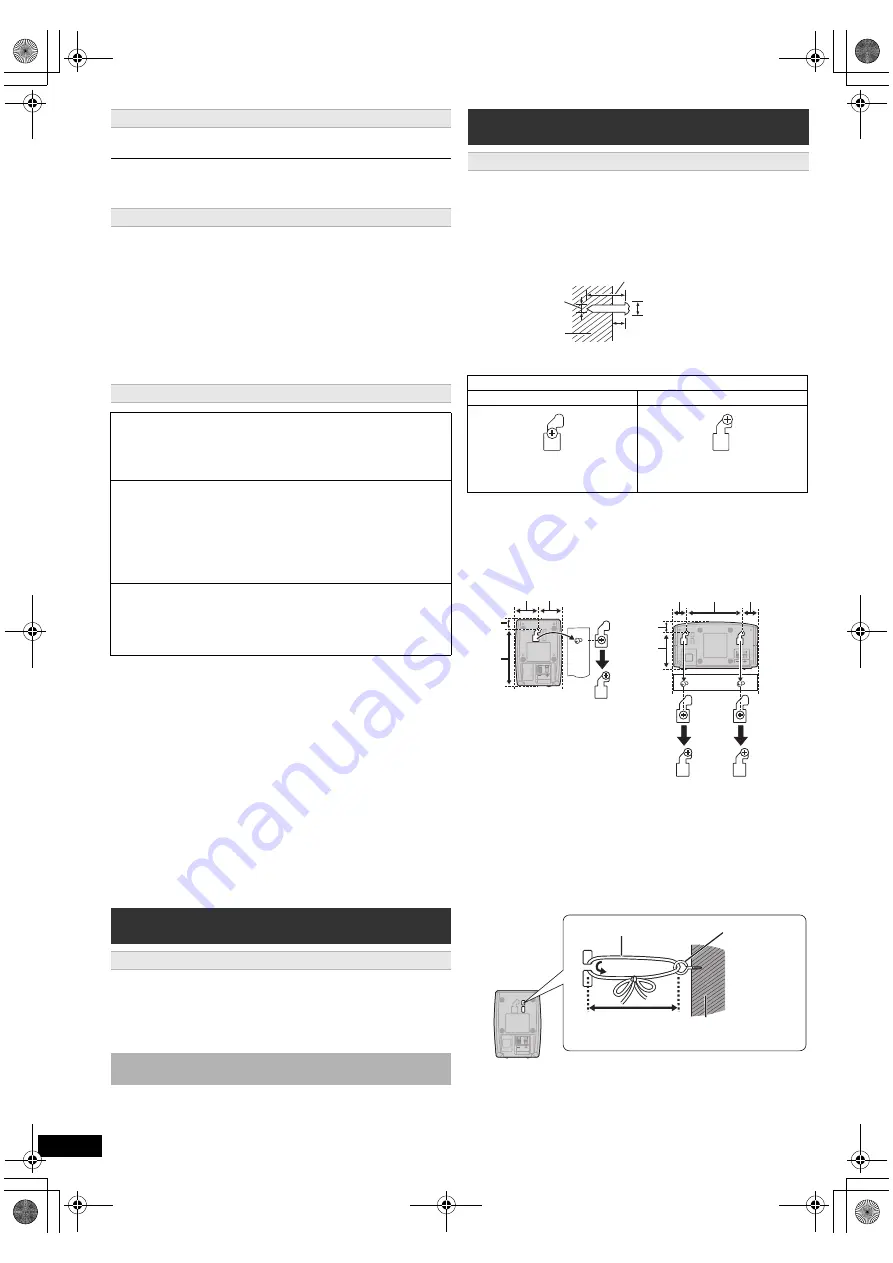
You can attach all of the speakers (except subwoofer) to a wall.

The wall or pillar on which the speakers are to be attached should be 
capable of supporting 10 k

g

 per screw. Consult a qualified building 

contractor when attaching the speakers to a wall. Improper attachment 
may result in damage to the wall and speakers, and personal injury.

1 Drive a screw (not supplied) into the wall.

2 Fit the speaker securely onto the screw(s) with the hole(s).

Tips

Use the measurements indicated below to identify the screwing positions 
on the wall.

Leave at least 20 mm of space above the speaker and 10 mm on each 
side to allow enough space for fitting the speaker.

Video systems

Disc handling precautions

About MP3/JPEG/Xvid files

[MP3]

 (Extension: “.MP3”, “.mp3”)

Sampling frequency and compression rate:
– 8 kHz, 11.02 kHz, 12 kHz, 16 kHz, 22.05 kHz, 24 kHz (8 kbps to 

160 kbps), 32 kHz, 44.1 kHz and 48 kHz (32 kbps to 320 kbps)

ID3 tags: version 1, 2

[JPEG]

 (Extension: “.JPG”, “.jpg”, “.JPEG”, “.jpeg”)

JPEG files taken on a digital camera that conform to DCF Standard 
(Design rule for Camera File system) Version 1.0 are displayed.
– Files that have been altered, edited or saved with computer picture 

editing software may not be displayed.

This unit cannot display moving pictures, MOTION JPEG and other 
such formats, still pictures other than JPEG (e.g. TIFF), or play 
pictures with attached audio.

[Xvid]

 (Extension: “.XVID”, “.xvid”, “.AVI”, “.avi”)

Xvid files greater than 2 GB or have no index may not be played 
properly on this unit.

This unit supports all resolutions up to maximum of 720

k

480 

(NTSC)/720

k

576 (PAL).

Maintenance

Clean this unit with a soft, dry cloth

Before moving the unit, ensure the disc tray is empty.

 Failure to 

do so will risk severely damaging the disc and the unit.

Speaker installation option

Attaching to a wall

e.g., Surround speaker

DO NOT

DO

In this position, the speaker will 
likely fall if moved to the left or 
right.

Move the speaker so that the 
screw is in this position.

To prevent speakers from falling

Front speaker, Surround speaker, Center speaker
e.g. Front speaker

At least 30 mm

7.0 mm to 

9.4 mm

Wall or pillar

5.5 mm to 7.5 mm

4.0 mm

 

Front/Surround speaker

Center speaker

A

18 mm

B

99 mm

C

40 mm

D

40 mm

E

17 mm

F

64 mm

G

24 mm

H

96 mm

I

27 mm

Wall

Screw eye
(not supplied)

String (not supplied)

Less than 
10 cm

SC-XH20GC_RQT9682-G_eng.book  Page 16  Wednesday, January 4, 2012  4:19 PM

Содержание SC-XH20

Страница 1: ...tions carefully Please keep this manual for future reference The illustrations shown may differ from your unit Region number The player plays DVD Video marked with labels containing the region number 2 or ALL Example ALL 3 4 2 2 The illustration shows SC PT70 Obrázek představuje model SC PT70 Na rysunku przedstawiono model SC PT70 SC XH20GC_RQT9682 G_eng book Page 1 Wednesday January 4 2012 4 19 P...

Страница 2: ...SB HF10 Center speaker SB HC10 Surround speakers SB HS10 Subwoofer SB HW20 Operations in these instructions are described mainly with the remote control but you can perform the operations on the main unit if the controls are the same Accessories Please check and identify the supplied accessories 1 Remote control N2QAYB000694 1 Remote control battery 1 FM indoor antenna 1 Video cable Speaker cables...

Страница 3: ...ve RETURN VOL STOP VOL TV INPUT AV SKIP SLOW PAUSE SEARCH SEARCH PLAY DVD RADIO EXT IN EXIT REPEAT PLAYMODE SOUND SURROUND FLDISPLAY 1 2 3 4 5 6 7 8 0 9 10 10 CANCEL FUNCTIONS MUTE M E N U START T O P M E N U OK SKIP SLEEP CHSELECT W SRD MUSIC PORT 1 MIC 2 VOL SC XH20GC_RQT9682 G_eng book Page 3 Wednesday January 4 2012 4 19 PM ...

Страница 4: ...n again TV operations Aim the remote control at the Panasonic TV and press the button TV Í Turn the TV on off INPUT AV Change the TV s video input mode r VOL s Adjust the TV volume This may not work properly with some models Adjust the volume of the main unit Mute the sound MUTE flashes on the main unit s display while the function is on To cancel press the button again or adjust the volume Muting...

Страница 5: ...s audio from this unit s speakers 9 Playing Discs Basic play 11 Playing from the selected item 11 Other modes of play 12 Program and Random play 12 Repeat play 12 Using on screen menus 12 Other Operation Playing from an USB device 13 Reference Changing the player settings 13 Media that can be played 15 Maintenance 16 Speaker installation option 16 Troubleshooting guide 17 Messages 18 Licenses 18 S...

Страница 6: ... turn the TV off for about 30 minutes The demagnetising function of the TV should correct the problem If it persists move the speakers further away from the TV Turn off all equipment before connection and read the appropriate operating instructions Do not connect the AC mains lead until all other connections are completed Use of the speaker cable stickers is convenient when making cable connection...

Страница 7: ... memory items when plugging back the main unit The supplied AC mains lead is for use with the main unit only Do not use it with other equipment Also do not use cords for other equipment with the main unit Please use the supplied AC mains lead suitable for the household mains socket This unit will memorize the playback position when there is a power failure After the power supply recovers turn on y...

Страница 8: ... This remote control can perform some basic TV operations B 4 1 Press Í 1 to turn on the unit The Easy setup screen appears automatically 2 Press 3 4 8 to select Yes and press OK 8 3 Follow the messages and make the settings with 3 4 2 1 8 and OK 8 Language Select the language used on menu screen TV aspect Select the aspect to suit your TV Speaker layout Select Surround layout Recommended mode or ...

Страница 9: ... there is audio input to the AUX TV terminal the main unit will automatically turn on and select AUX TV as the source When there is no audio input to the AUX TV terminal for 30 minutes the main unit will turn off Preparation Make sure that there is an audio connection between this unit and the TV or other device B 7 Turn on the TV or and other device Press EXT IN 4 to choose the source that is use...

Страница 10: ...LBY PLII MOVIE Suitable for movies or videos recorded in Dolby Surround DOLBY PLII MUSIC Adds 5 1 channel effects to stereo sources S SRD Super Surround You can enjoy surround effect with stereo sources STEREO Sound will only be output to the front speakers and the subwoofer from any source Recommended modes to enjoy TV audio or stereo sources from all speakers MULTI CH DOLBY PLII MOVIE DOLBY PLII...

Страница 11: ...me Basic controls Stop STOP 5 The position is memorised while RESUME is on the main unit s display DVD V VCD CD MP3 Xvid This unit can memorise the resume position for the last 5 discs Press 1 PLAY 5 to resume For the power failure resume refer to page 7 Press STOP 5 again to clear the position Pause PAUSE 5 Press 1 PLAY 5 to restart play Skip SKIP SKIP 9 5 Search SEARCH6 SEARCH5 5 during play Slo...

Страница 12: ...o the previous folder press RETURN D You can also do this by selecting in the menu 2 Press 3 4 8 to select the desired content and press OK 8 Play starts from the selected content If there are MP3 JPEG and Xvid contents random play will be based on the selected content type Music Program 1 2 3 4 5 6 Track 1 Track 2 Track 3 Track 4 Track 1 MP3 RND 1 10 Track 1 Track 2 Track 3 Track 4 Repeat play Du...

Страница 13: ...of 96 kHz is converted to 48 kHz This function may not work depending on the disc s recording Repeat Mode B 12 Repeat play A B Repeat To repeat a specified section Except JPEG Xvid Press OK 8 at the starting and ending points Select Off to cancel Subtitle DVD V with multiple subtitles To select subtitle language On iR iRW a subtitle number may be shown for subtitles that are not displayed Angle DV...

Страница 14: ...f connecting to a progressive output compatible TV Interlace Progressive Audio menu Dynamic Range On Adjusts for clarity even when the volume is low Convenient for late night viewing Only works with Dolby Digital Off The full dynamic range of the signal is reproduced Speaker Settings Select the delay time of the speakers Effective only when Surround layout Recommended mode is selected in Speaker l...

Страница 15: ...e on the market including CVD DVCD and SVCD that do not conform to IEC62107 Others menu Auto AUX Link On When this unit is in standby mode this unit will turn on and change the source to AUX TV when there is an audio signal to the AUX TV terminal B 9 Off Slide Show Time Set the speed of the slideshow 3 Seconds 5 Seconds 10 Seconds 15 Seconds Easy setup You can execute basic settings to optimise yo...

Страница 16: ...able of supporting 10 kg per screw Consult a qualified building contractor when attaching the speakers to a wall Improper attachment may result in damage to the wall and speakers and personal injury 1 Drive a screw not supplied into the wall 2 Fit the speaker securely onto the screw s with the hole s Tips Use the measurements indicated below to identify the screwing positions on the wall Leave at ...

Страница 17: ...al for Video CDs Playback control menu does not appear VCD with playback control Press MENU C to change to PBC on and then press RETURN D during playback Play does not start If a disc contains CD DA and other formats proper playback may not be possible No subtitles Display the subtitles Subtitle in Menu 1 B 13 Subtitles may not be displayed depending on the disc Xvid Point B is automatically set T...

Страница 18: ...ted a disc that has not been finalised NO DISC You have not inserted a disc insert one You have not inserted the disc correctly insert it correctly B 11 USB OVER CURRENT ERROR The USB device is drawing too much power Switch to DVD CD mode remove the USB and turn the unit off F61 Check and correct the speaker cable connections If this does not fix the problem consult the dealer B 6 F76 There is a p...

Страница 19: ...ure and video contents and 259 groups Excluding Root folder 5 Plays Xvid video Pick up Wavelength DVD CD 655 790 nm Laser power CLASS 1 Audio output Disc Number of channels 5 1 ch FL FR C SL SR SW VIDEO SECTION Video system PAL NTSC Composite video output Output level Terminal 1 Vp p 75 Pin jack 1 system Component video output Y output level PB output level PR output level Terminal 1 Vp p 75 0 7 V...

Страница 20: ... the mobile telephone This unit is intended for use in tropical climates Placement Place this unit on an even surface To reduce the risk of fire electric shock or product damage Do not install or place this unit in a bookcase built in cabinet or in another confined space Ensure this unit is well ventilated Do not obstruct this unit s ventilation openings with newspapers tablecloths curtains and si...

Страница 21: ...21 RQT9682 Getting Started Playing Discs Other Operations Reference SC XH20GC_RQT9682 G_eng book Page 21 Wednesday January 4 2012 4 19 PM ...

Страница 22: ...Panasonic Corporation Web Site http panasonic net C Panasonic Corporation 2012 RQT9682 G F0212AA0 p SC XH20GC_RQT9682 G_eng book Page 27 Wednesday January 4 2012 4 19 PM ...

Отзывы: