background image

15

Con

tr

o

l ref

e

rence 

g

u

id

e

/

Uti

lisin

g the 

ST

AR

T men

u

15

RQ

TX00

88

You can select desired source or access playback/menus by using the 
START menu.

When “Input Selection” is selected

You can select a desired source from the menu.

DVD/CD (

 12), FM (

 13), 

[PT460]


AM (

 13), AUX

§

 (

 32), 

DIGITAL IN

§

 (

 32), USB (

 32), iPod (

 33) 

§

 “(TV)” will appear beside “AUX” or “DIGITAL IN”, indicating the TV audio 

setting for VIERA Link “HDAVI Control” (

 28).

Press [

3

,

4

], then press [OK] to make the settings.

When a disc is loaded or an USB device is connected, you can also 
access playback or menus from the START menu.
e.g. 

[DVD-V]

When the on-screen control panel appears
e.g. 

[DVD-V]

 (when “Playback Disc” is selected from the START menu)

You can operate the playback with the indicated controls.

V

OLUME

13

14

15

16

SELECTOR

TU

N

E

MEMORY

TU

N

E MODE

FM MODE

AC I

N

S

W

BOOST

1

2

3

4

5

6

7

8

OPE

N

CLOSE

MIC 

V

OL

12

10

11

9

PT465

PT465

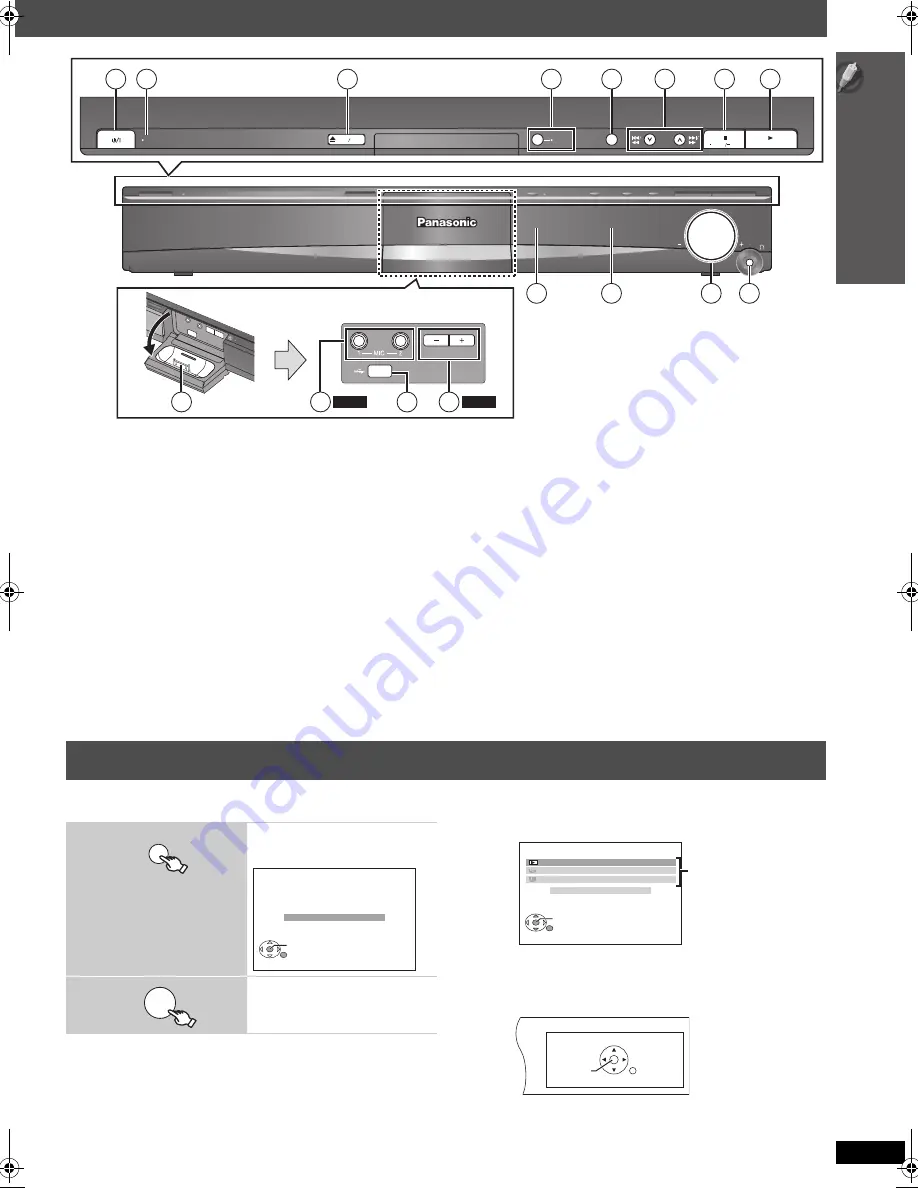
1

Standby/on switch [

Í

/I]

Press to switch the unit from on to standby mode or vice 
versa. In standby mode, the unit is still consuming a small 
amount of power. (

 16)

2

This indicator lights when the unit is connected to the AC 
mains supply.

3

Open/Close the disc tray (

 16)

4

Turn Subwoofer Boost on/off (

 31)

5

Select the source

[PT465]

DVD/CD

#

USB

#

FM

#

AUX

#

D-IN

#

IPOD

^-------------------------------------------------------------------}

[PT460]

DVD/CD

#

USB

#

FM

#

AM

#

AUX

#

D-IN

#

IPOD

^-----------------------------------------------------------------------------}

6

Skip or slow-search play / Select the radio stations 
(

 13, 16)

7

Stop playing / Select the tuning mode / Adjust the FM 
reception condition (

 13, 16)

8

Play discs / Memorize the receiving radio stations
(

 16, 26)

9

Connect iPod (

 33)

:

[PT465]

 Connect microphones (

 27)

;

Connect USB device (

 32)

<

[PT465]

 Adjust microphone volume (

 27)

=

Remote control signal sensor

>

Display

?

Adjust the volume of the main unit

@

Connect headphones (not included)

Headphone plug type: 

3.5 mm stereo mini plug

Reduce the volume before connecting.

Audio is automatically switched to 2-channel stereo.

To prevent hearing damage, avoid listening for prolonged periods of 
time.
Excessive sound pressure from earphones and headphones can 
cause hearing loss.

Utilising the START menu

1

Show the START menu.

e.g.

2

Select an item.

To exit press [START].

START

DVD/CD

Home Cinema

OK
RETURN

Input Selection

OK

DVD/CD

Home Cinema

OK
RETURN

Input Selection

Playback Disc

TOP  MENU (DVD)
MENU (DVD)

Playback/menu 
access

SEARCH

RETURN

SEARCH

PLAY

PAUSE

STOP

PT465GC-GS-GCS-GCT-PT460GN_RQTX0088-B_eng.book  Page 15  Thursday, December 13, 2007  9:04 AM

Содержание sc-pt460

Страница 1: ...Video marked with labels containing the region number or ALL Region Number The Middle East South Africa Saudi Arabia and Kuwait 2 Southeast Asia and Thailand 3 Australia and N Z 4 Example The Middle East South Africa Saudi Arabia and Kuwait 2 ALL 3 5 2 VIERA Link compatible Enjoy high quality picture and linked operations with your VIERA TV 28 Sound enhancement options Surround Enhancer Dolby Pro ...

Страница 2: ...RTS INSIDE REFER SERVICING TO QUALIFIED SERVICE PERSONNEL CAUTION DO NOT INSTALL OR PLACE THIS UNIT IN A BOOKCASE BUILT IN CABINET OR IN ANOTHER CONFINED SPACE ENSURE THE UNIT IS WELL VENTILATED TO PREVENT RISK OF ELECTRIC SHOCK OR FIRE HAZARD DUE TO OVERHEATING ENSURE THAT CURTAINS AND ANY OTHER MATERIALS DO NOT OBSTRUCT THE VENTILATION VENTS DO NOT OBSTRUCT THE UNIT S VENTILATION OPENINGS WITH N...

Страница 3: ... Playing RAM and DVD R RW DVD VR discs 19 Using on screen menus 20 About DivX VOD contents 22 Changing the player settings 23 Selecting the delay time of the speakers 26 Enjoying the radio 26 Manual tuning 26 PT465 Enjoying Karaoke 27 Using Karaoke mode 27 Adding echo effect 27 Using the VIERA Link HDAVI ControlTM 28 One touch play 28 Auto input switching 28 Power off link 28 Speaker control 29 VI...

Страница 4: ...ith the coloured markings identifying the terminals in your plug proceed as follows The wire which is coloured Blue must be connected to the terminal which is marked with the letter N or coloured Black or Blue The wire which is coloured Brown must be connected to the terminal which is marked with the letter L or coloured Brown or Red WARNING DO NOT CONNECT EITHER WIRE TO THE EARTH TERMINAL WHICH I...

Страница 5: ...om the power supply and contact your dealer Do not spray insecticides onto or into the unit They contain flammable gases which can ignite if sprayed into the unit Do not attempt to repair this unit by yourself If sound is interrupted indicators fail to light smoke appears or any other problem that is not covered in these instructions occurs disconnect the AC mains lead and contact your dealer or a...

Страница 6: ...crete wall or a surface that may not have strong enough support Improper attachment may result in damage to the wall or speakers step 1 PT465 Assembling the front speakers Make sure you have all the indicated components before starting assembly setup and connection 2 Front speakers with cover plate 2 Stands with cable 2 Bases 8 Screws 6 Tighten securely Slide into the groove Position the cable bet...

Страница 7: ...electronic instrument When adjusting the sound quality When turning the unit on or off If irregular colouring occurs on your TV The center speaker is designed to be used close to a TV but the picture may be affected with some TVs and setup combinations If this occurs turn the TV off for about 30 minutes The demagnetising function of the TV should correct the problem If it persists move the speaker...

Страница 8: ...t over 10 kg The stands must be stable even if the speakers are in a high position e g Center speaker PT465 Caution The main unit and supplied speakers are to be used only as indicated in this setup Failure to do so may lead to damage to the amplifier and or the speakers and may result in the risk of fire Consult a qualified service person if damage has occurred or if you experience a sudden chang...

Страница 9: ...Speaker cable sticker included Attach the speaker cable stickers to make connection easier Be careful not to cross short circuit or reverse the polarity of the speaker wires as doing so may damage the speakers DO NOT Main unit Insert fully e g Surround speaker L AM ANT EXT LOOP LOOP ANT GND FM ANT 75 1 3 2 Adhesive tape FM indoor antenna included Affix this end of the antenna where reception is be...

Страница 10: ...nk HDAVI Control If your Panasonic TV is VIERA Link compatible you can operate it synchronising with home theater operations or vice versa 28 Using the VIERA Link HDAVI ControlTM Make the extra audio connection above when you use VIERA Link HDAVI Control function Panasonic TVs with 576 50i 50p 480 60i 60p input terminals are progressive compatible Consult the manufacturer if you have another brand...

Страница 11: ...he remote control signal sensor 15 avoiding obstacles at a maximum range of 7 m directly in front of the unit Other audio connections TV or external equipment terminal Cable required not included Main unit terminal Features Optical digital audio cable Do not bend sharply when connecting OPTICAL IN This unit can decode the surround signals received through the set top box digital broadcasting or sa...

Страница 12: ...T NAVIGATOR START PLAY LIST SLOW SEARCH PLAY PAUSE STOP SKIP 1 2 3 4 5 6 7 8 9 0 10 CANCEL VOL ONE TOUCH PLAY FM EXT IN TV AV VOL iPod USB DVD W S PL TV LEVEL OK ECHO FUNCTIONS PT465 PT460 RETURN KARAOKE RETURN SETUP DVD OK 1 Turn on the unit 2 Select DVD CD 3 Show the setup menu 4 Select OTHERS 5 Select QUICK SETUP 6 Select SET 7 Select YES e g 8 Follow the messages and make the settings MENU LAN...

Страница 13: ...utton when FM AUTO or PT460 AM AUTO is displayed Main unit Press and hold MEMORY The tuner tunes to the lowest frequency and starts to preset all the stations it can receive into the channels in ascending order SLEEP REPEAT MUTING FL DISPLAY PLAY MODE SUBWOOFER CHSELECT SETUP SOUND LEVEL TOP MENU MENU DIRECT NAVIGATOR START PLAY LIST SLOW SEARCH PLAY PAUSE STOP SKIP 1 2 3 4 5 6 7 8 9 0 10 CANCEL V...

Страница 14: ...how a disc menu or play list 17 19 9 Show on screen menu 20 PT465 Adjust echo level 27 Turn Dolby Pro Logic II on off 30 Show setup menu 12 Select sound mode Turn Whisper mode Surround on off 30 TV operations Aim the remote control at the Panasonic TV and press the button Í Turn the TV on off TV AV Change the TV s video input mode r s Adjust the TV volume This may not work properly with some model...

Страница 15: ...er 16 2 This indicator lights when the unit is connected to the AC mains supply 3 Open Close the disc tray 16 4 Turn Subwoofer Boost on off 31 5 Select the source PT465 DVD CD USB FM AUX D IN IPOD PT460 DVD CD USB FM AM AUX D IN IPOD 6 Skip or slow search play Select the radio stations 13 16 7 Stop playing Select the tuning mode Adjust the FM reception condition 13 16 8 Play discs Memorize the rec...

Страница 16: ...VOLUME TUNE MEMORY OPEN CLOSE SELECTOR 1 2 3 4 5 VOLUME Start play Turn i VOLUME to adjust the volume You can enjoy surround sound when you press ÎPLII on the remote control to turn on Dolby Pro Logic II 30 Stop Select DVD CD Turn on the unit Press to skip Press and hold to search during play start slow motion play during pause Press 1 Play to start normal play Open the disc tray Load the disc Loa...

Страница 17: ... LIST SLOW SEARCH PLAY PAUSE STOP SKIP 1 2 3 4 5 6 7 8 9 0 10 CANCEL VOL FM EXT IN TV AV VOL iPod USB TV DVD W S PL OK ONETOUCH PLAY FL DISPLAY SLOW SEARCH ONE TOUCH PLAY OK RETURN KARAOKE ECHO FUNCTIONS PT465 PT460 RETURN KARAOKE RETURN Numbered buttons ONE TOUCH PLAY STOP PAUSE SKIP SLOW SEARCH OK On screen item select Select Confirm Enter number DVD VR DVD V VCD CD e g To select 12 S10 1 2 VCD ...

Страница 18: ...s and hold Show the repeat mode 2 While the repeat mode is displayed Select an item to be repeated e g DVD V TITLE CHAP OFF b To cancel select OFF CANCEL SLEEP REPEAT MUTING FL DISPLAY PLAY MODE SUBWOOFER CHSELECT SETUP SOUND LEVEL TOP MENU MENU DIRECT NAVIGATOR START PLAY LIST SLOW SEARCH PLAY PAUSE STOP SKIP 1 2 3 4 5 6 7 8 9 0 10 CANCEL VOL FM EXT IN TV AV VOL iPod USB TV DVD W S PL OK ONE TOUC...

Страница 19: ...TART PLAY LIST SLOW SEARCH PLAY PAUSE STOP 1 2 3 4 5 6 7 8 9 0 10 CANCEL VOL FM EXT IN W S PL OK ONE TOUCH PLAY STOP TOP MENU DIRECT NAVIGATOR MENU PLAY LIST OK PLAY SKIP RETURN SKIP KARAOKE ECHO FUNCTIONS PT465 PT460 RETURN KARAOKE RETURN OK PLAYBACK MENU WMA MP3 JPEG MPEG4 DivX AUDIO PICTURE VIDEO OK DATA DISC ROOT Perfume My favorite1 My favorite2 My favorite3 Underwater Fantasy planet City of ...

Страница 20: ...10 1 2 3 OK AUDIO DVD V DivX with multiple soundtracks To select audio soundtrack DVD VR VCD To select L R L R or L R Signal type data LPCM PPCM ÎD DTS MP3 MPEG Signal type kHz Sampling frequency bit ch Number of channels DivX It may take some time for play to start if you change the audio on a DivX video disc 3 2 1ch 0 No surround 1 Mono surround 2 Stereo surround left right 1 Low frequency effec...

Страница 21: ...TO the constructing method of the DivX contents is automatically distinguished and output If the picture is distorted select INTERLACE or PROGRESSIVE depending on which constructing method was used when the contents were recorded to disc AUTO INTERLACE PROGRESSIVE JPG DATE DIALOGUE ENHANCER To make the dialogue in movies easier to hear DVD V Dolby Digital DTS MPEG 3 channel or higher with the dial...

Страница 22: ...ntent If you use this code to purchase DivX VOD content and then play the content on this unit you will no longer be able to play any content that you purchased using the previous code If you purchase DivX VOD content using a registration code different from this unit s code you will not be able to play this content AUTHORIZATION ERROR is displayed Regarding DivX content that can only be played a ...

Страница 23: ...he previous screen press RETURN PT460 RETURN 3 Select the item 4 Make the settings 5 Exit SETUP SET MAIN DISC VIDEO AUDIO DISPLAY HDMI OTHERS EXIT SETUP RETURN Menu OK SET RETURN DISC EXIT SETUP SETTING STATE AUDIO SUBTITLE MENUS RATINGS PASSWORD ENGLISH AUTO ENGLISH 8 NO LIMIT Display the current setting of the items below Item Setting OK OK SETUP QUICK SETUP enables successive settings of the it...

Страница 24: ... discs 34 Video systems NTSC When connected to an NTSC TV PAL60 When connected to a PAL TV Southeast Asia and Thailand NTSC is the factory preset STILL MODE Specify the type of picture shown when paused AUTO FIELD 5 The picture is not blurred but picture quality is lower FRAME 5 Overall quality is high but the picture may appear blurred VIDEO OUT I P Select PROGRESSIVE only if connecting to a prog...

Страница 25: ...structions DVD VR DATA Select to play only DVD VR or DATA format DVD VR To play the video programs on DVD RAM or DVD R RW DATA To play the data files on DVD RAM or DVD R RW DEFAULTS This returns all values in the MAIN menu to the default settings RESET The password screen is shown if RATINGS 23 is set Please enter the same password then turn the unit off and on again Language code list Abkhazian 6...

Страница 26: ...ress MEMORY twice 2 While a channel is flashing on the display Press X TUNE W and then press MEMORY A station previously stored is overwritten when another station is stored in the same channel preset Selecting the delay time of the speakers a Center speaker b Surround speaker Difference Approx Setting Difference Approx Setting 30 cm 1ms 150 cm 5ms 60 cm 2ms 300 cm 10ms 90 cm 3ms 450 cm 15ms 120 c...

Страница 27: ...ettings To exit the screen press RETURN SLEEP REPEAT MUTING FL DISPLAY PLAY MODE SUBWOOFER SETUP SOUND LEVEL TOP MENU MENU DIRECT NAVIGATOR START PLAY LIST PL OK RETURN KARAOKE ECHO OK RETURN KARAOKE ECHO FUNCTIONS MIC VOL Microphone not included Main unit MIC VOL RETURN KARAOKE 1 KARAOKE MODE OFF OK OK OK OK Items shown differ depending on the type of disc AUDIO CHANGE To change the audio mode wh...

Страница 28: ...tings are changed reconfirm the points above Automatic setup The settings for TV ASPECT 1 24 VIDEO menu and LANGUAGE 2 25 DISPLAY menu will automatically follow to the settings of the TV This may not work if the corresponding setting you have made for your TV is not available on this unit 1 When using VIERA Link HDAVI Control with HDAVI Control 3 compatible TV 2 When using VIERA Link HDAVI Control...

Страница 29: ...ntrol refer to the below illustration for operation buttons 1 Select this unit s operation menu by using the TV menu settings For details refer to the operating instructions of your TV The START menu will be shown e g DVD V The START menu can also be shown by using a button on the TV s remote control e g OPTION When DVD CD or USB is selected as the source this works only during stop mode This does...

Страница 30: ...der that derives 5 channel surround from stereo sound sources whether or not it has been specifically Dolby Surround encoded ÎPLII lights when there is effect This does not work when audio is output from HDMI AV OUT terminal You can adjust the volume of the surround speakers to get the best surround effect 31 Adjusting the speaker level Except DivX You can enhance the surround effect for low volum...

Страница 31: ...R RS LS SW You can adjust SW Subwoofer only if the disc includes a subwoofer channel and ÎPLII is not lit 2 Press 3 increase or 4 decrease to adjust the speaker level for each speaker C RS LS SW 6 dB to i6 dB L R Only the balance is adjustable To adjust the balance of the front speakers while L or R is selected press 2 1 Adjusting the subwoofer level SUB W 1 SUB W 2 SUB W 3 Using Subwoofer Boost B...

Страница 32: ... up It is not recommended to use a USB extension cable The USB device connected using the cable will not recognised by this unit Connect the USB device not included Play starts from the selected content You can enjoy surround sound effect when you press ÎPLII to turn on Dolby Pro Logic II 30 For other operating functions they are similar to those described in Playing Discs 16 to 26 Supported Forma...

Страница 33: ...rging in main unit standby mode Check iPod to see if the battery is fully recharged If you are not using iPod for an extended period of time after recharging has completed disconnect it from main unit as the battery will be depleted naturally Once fully recharged additional recharging will not occur Note When connecting the iPod ensure the USB device and PT465 microphones have been disconnected Co...

Страница 34: ...uding CVD DVCD and SVCD that do not conform to IEC62107 Video systems This unit can play PAL and NTSC but your TV must match the system used on the disc PAL discs cannot be correctly viewed on an NTSC TV This unit can convert NTSC signals to PAL 60 for viewing on a PAL TV 24 NTSC DISC OUT in VIDEO menu Disc handling precautions Do not attach labels or stickers to discs This may cause disc warping ...

Страница 35: ...z 32 to 320 kbps CD R RW 8 11 02 12 16 22 05 24 kHz 8 to 160 kbps 32 44 1 and 48 kHz 32 to 320 kbps JPEG DVD RAM DVD R RW CD R RW JPG jpg JPEG jpeg JPEG files taken on a digital camera that conform to DCF Standard Design rule for Camera File system Version 1 0 are displayed Files that have been altered edited or saved with computer picture editing software may not be displayed This unit cannot dis...

Страница 36: ...control Depending on the number being displayed 1 or 2 press and hold OK and the corresponding numbered button 1 or 2 for at least 2 seconds 14 General operation No response when any buttons are pressed This unit cannot play discs other than the ones listed in these operating instructions The unit may not be operating properly due to lightning static electricity or some other external factor Turn ...

Страница 37: ...re than 4 devices are connected with HDMI cables Reduce the number of connected devices When using the HDMI connection ensure that AUDIO OUT in the HDMI menu is set to ON 25 No sound from the TV Confirm the audio connection Press FM EXT IN PT460 EXT IN to select the corresponding source 10 32 No surround sound Press ÎPLII to turn on Dolby Pro Logic II or turn on Surround Enhancer 30 Picture The pi...

Страница 38: ...ns When using the COMPONENT VIDEO OUT terminal set VIDEO OUT I P in VIDEO menu to INTERLACE Alternatively press and hold CANCEL until PRG disappears from the main unit display 21 24 Pictures not in progressive output Select PROGRESSIVE in VIDEO OUT I P in VIDEO menu The unit s VIDEO OUT terminal outputs an interlaced signal even if PRG is displayed 24 Radio Distorted sound or noise is heard ST fli...

Страница 39: ...high definition compatible TV is required I P B MPEG 2 the video compression standard adopted for use with DVD Video codes frames using these 3 picture types I Intra coded picture This picture has the best quality and is the best to use when adjusting the picture P Predictive coded picture This picture is calculated based on past I or P pictures B Bidirectionally predictive coded picture This pict...

Страница 40: ...PEG jpg jpeg MPEG4 asf USB device file system FAT12 FAT16 FAT32 USB Port power Max 500 mA Discs played 8 cm or 12 cm 1 DVD DVD Video DivX 5 6 2 DVD RAM DVD VR MP3 2 5 JPEG 4 5 MPEG4 5 7 DivX 5 6 3 DVD R DVD Video DVD VR MP3 2 5 JPEG 4 5 MPEG4 5 7 DivX 5 6 4 DVD R DL DVD Video DVD VR 5 DVD RW DVD Video DVD VR MP3 2 5 JPEG 4 5 MPEG4 5 7 DivX 5 6 6 iR iRW Video 7 iR DL Video 8 CD CD R RW CD DA Video ...

Страница 41: ... range 95 Hz to 25 kHz j16 dB 120 Hz to 22 kHz j10 dB Dimensions WtHtD 92 mmk142 mmk95 mm Mass 0 6 kg Surround speaker SB HS460 Type 1 way 1 speaker system Bass reflex Speaker unit s Impedance 3 Full range 6 5 cm Cone type Input power IEC 125 W 8 Max Output sound pressure 80 dB W 1 0 m Frequency range 95 Hz to 25 kHz j16 dB 120 Hz to 22 kHz j10 dB Dimensions WtHtD 92 mmk142 mmk95 mm Mass 0 6 kg Ce...

Страница 42: ... and the Windows logo are trademarks or registered trademarks of Microsoft Corporation in the United States and or other countries This product is protected by certain intellectual property rights of Microsoft Corporation and third parties Use or distribution of such technology outside of this product is prohibited without a license from Microsoft or an authorized Microsoft subsidiary and third pa...

Страница 43: ...43 RQTX0088 MEMO ...

Страница 44: ...Matsushita Electric Industrial Co Ltd Web Site http panasonic net RQTX0088 B F1207TM0 p ...

Отзывы: