


RQTV0123
2
Dear customer
Thank you for purchasing this product.
For optimum performance and safety, please read these
instructions carefully.
These operating instructions are applicable to the following
system.
System
SC-PM33DB
SC-PM32DB
Main unit
SA-PM33DB
SA-PM32DB
Speakers
SB-PM33DB
SB-PM3
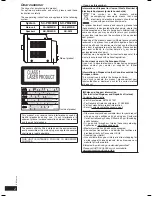
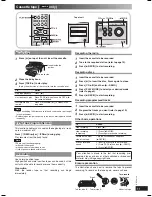
Side of product
Inside of product
This product may receive radio interference caused by
mobile telephones during use. If such interference is
apparent, please increase separation between the product
and the mobile telephone.
The socket outlet shall be installed near the equipment and
easily accessible or the mains plug or an appliance coupler
shall remain readily operable.
THIS UNIT IS INTENDED FOR USE IN MODERATE
CLIMATES.
– If you see this symbol –
Information on Disposal for Users of Waste Electrical &
Electronic Equipment (private households)
This symbol on the products and/or
accompanying documents means that used
electrical and electronic products should not be
mixed with general household waste.
For proper treatment, recovery and recycling, please take
these products to designated collection points, where they
will be accepted on a free of charge basis. Alternatively, in
some countries you may be able to return your products
to your local retailer upon the purchase of an equivalent
new product.
Disposing of this product correctly will help to save valuable
resources and prevent any potential negative effects on
human health and the environment which could otherwise
arise from inappropriate waste handling. Please contact
your local authority for further details of your nearest
designated collection point.
Penalties may be applicable for incorrect disposal of this
waste, in accordance with national legislation.
For business users in the European Union
If you wish to discard electrical and electronic equipment,
please contact your dealer or supplier for further
information.
Information on Disposal in other Countries outside the
European Union
This symbol is only valid in the European Union.
If you wish to discard this product, please contact your
local authorities or dealer and ask for the correct method
of disposal.
■
Sales and Support Information
(For the United Kingdom and Republic of Ireland)
Customer Care Centre
• For UK customers: 08705 357357
• For Republic of Ireland customers: 01 289 8333
• Visit our website for product information
• E-mail: [email protected]
Direct Sales at Panasonic UK
• Order accessory and consumable items for your product
with ease and confi dence by phoning our Customer
Care Centre Monday-Friday 9:00am-5:30pm. (Excluding
public holidays)
• Or go on line through our Internet Accessory ordering
application at www.panasonic.co.uk
• Most major credit and debit cards accepted.
• All enquiries transactions and distribution facilities are
provided directly by Panasonic UK Ltd.
• It couldn’t be simpler!
• Also available through our Internet is direct shopping for
a wide range of fi nished products, take a browse on our
website for further details.
Interested in purchasing an extended guarantee?
Please call 0870 240 6284 or visit our website
www.panasonic.co.uk/guarantee.
PM32-33DB_EB_En.indd 2
PM32-33DB_EB_En.indd 2
3/1/06 12:11:30 PM
3/1/06 12:11:30 PM


