38
RQTX0072
3
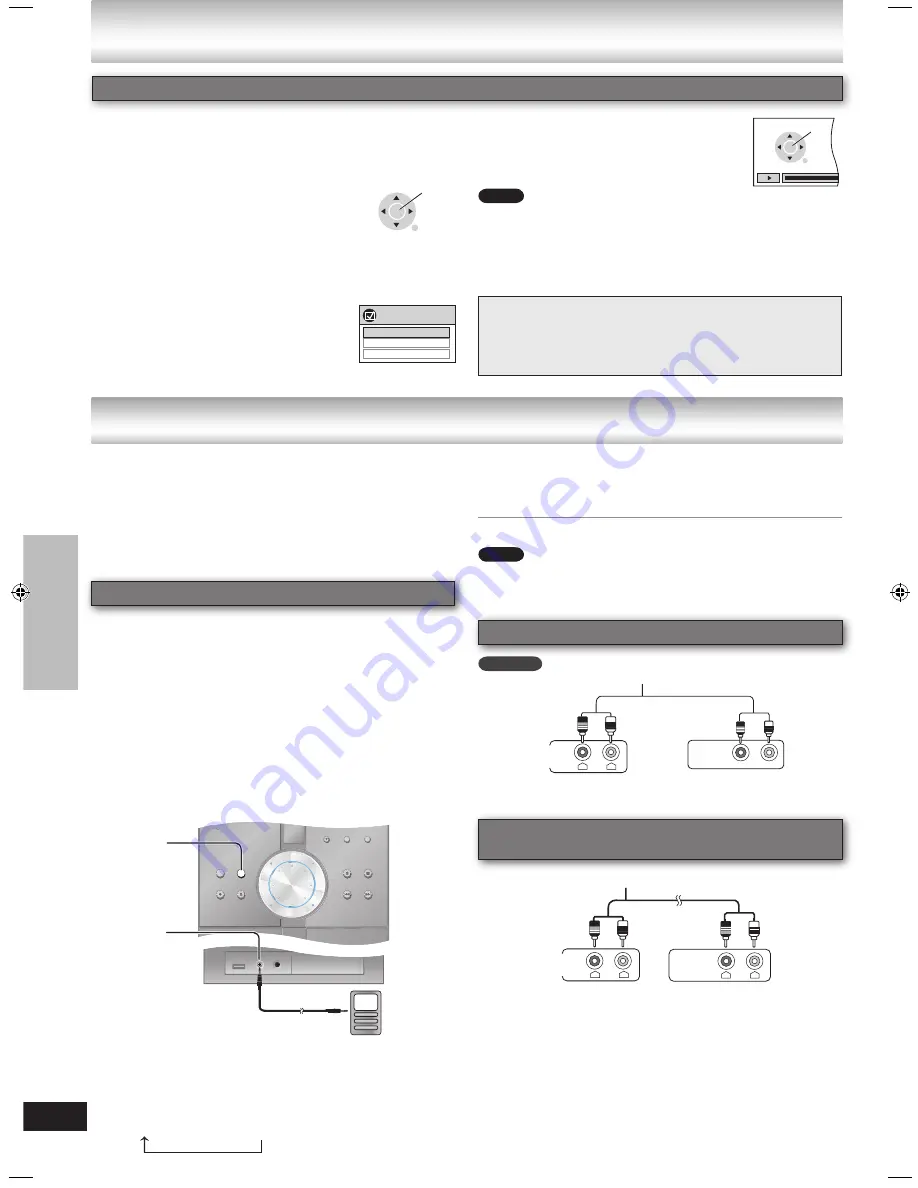
Play the portable audio equipment.
(For details, refer to the external unit’s instruction
manual.)
For recording ,
➡
page 33.
To avoid damage to the speakers, do not maximize the
volume level of portable audio equipment or this unit.
2
Press [EXT-IN] to select “MUSIC P.”
The unit comes on.
Every time you press the button:
MUSIC P.
→
AUX
→
AV
You can playback sound from portable audio equipment.
Sound from the speaker may be distorted if the portable
audio equipment’s equalizer (if any) is turned on. Turn it
off before you plug into the MUSIC PORT jack. (There is
no output from REC OUT.)
Preparation:
Reduce the volume of the unit and portable audio
equipment before connecting or disconnecting.
Before connection
Disconnect the AC mains lead.
Turn off all equipment and read the appropriate
operating instructions.
The equipment connections described are examples only.
Peripheral cables and equipment are sold separately
unless otherwise indicated.
•
•
•
•
Using the Music Port
R
L
REC
IN
REC OUT
Audio cable
(not included)
Video cassette recorder
Back of this unit
Recording to other equipment
Note
EXT-IN
MUSIC P.
Portable audio equipment
(not included)
Audio cable
(not included)
SC-NC9
1
Connect the portable audio equipment.
Plug type: Ø3.5 mm stereo
While recording, these functions are not available:
One Touch Play, Auto input switching, Speaker
control, Power off link, VIERA Link Control only with
TV’s remote control (for “HDAVI Control 2”).
•
–
You can control the disc menus of the stereo system
with the TV’s remote control when using the “DVD/CD” or
“USB” source. When operating the TV’s remote control,
refer to the below illustration for operation buttons.
1 Select the stereo system operation
menu by using the television menu
settings. (For details, refer to the
operating instructions of your television.)
The stereo system will automatically switch to
“DVD/CD” if it is in “AUX” mode.
2 Select the desired item.
“TOP MENU”
: Shows a disc top
menu (
➡
page 19, 20) or program
list (
➡
page 21).
“MENU”
: Shows a disc menu (
➡
page 19, 20) or playlist (
➡
page 21).
•
•
•
Depending on the menu, some button operations
cannot be performed from the TV’s remote control.
“Control Panel” can be selected directly by using a
button on the TV’s remote control (e.g. [OPTION]).
•
•
VIERA Link Control only with TV’s remote control (for “HDAVI Control 2”)
Note
PAUSE
PLAY
SKIP
RETURN
STOP
SKIP
VIERA Link
TOP MENU
MENU
Control Panel
Using the VIERA Link “HDAVI Control
TM
”
Using other equipment
“Control Panel”
: The basic
operations for discs are available.
•
Using the
VIERA Link
“HD
A
VI Contr
ol
TM
”
Using other equipment
This audio connection enables you to play audio from
your video cassette recorder or television through your
DVD stereo system.
Press [EXT-IN] (
➡
page 13) to select “AUX” as the
source to operate the audio output.
R
L
AUX
AUDIO
OUT
R
L
Audio cable
(not included)
Back of this unit
Television/
Video cassette recorder
Audio connection for video cassette
recorder or television.
ENTER/
PLAY
RETURN
NC9_NC6 EB Draft.indb 38
2/26/2007 1:47:34 PM


