Panasonic SC-HC55DB Скачать руководство пользователя страница 6

6

R

Q

T

X

12

67

Attaching the unit to a wall (optional)

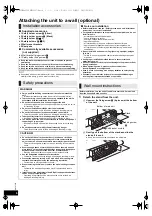
Supplied accessories

1 Safety holder screw 

B

 (Silver)

2 Safety holder screws 

C

 (Black)

1 Safety holder 

D

 (

>

3)

2 Safety holders 

E

 (

>

3)

2 Wall mount brackets

2 Rear pads

Commercially available accessories 
(not supplied)

4 Wall bracket fixing screws 

F

1 Safety holder fixing screw 

G


Use screws with a nominal diameter of 

4 mm, which are suitable to the 

material of the wall (e.g., wood, steel, concrete, etc.)

1

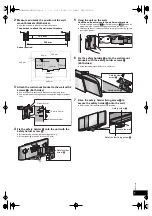
Detach the stand from the unit.

1

Unscrew the fixing screw 

A

 (4 pieces) at the bottom 

of the unit.

2

Gently pull the bottom of the stand and slide the 
stand off the unit.

Keep the removed screws and stand in a safe place.

Installation accessories

Keep the wall mount brackets out of reach of children to prevent 
swallowing.

Keep the rear pads out of reach of children to prevent swallowing.

Keep the screws out of reach of children to prevent swallowing.

Keep the safety holder out of reach of children to prevent swallowing.

Safety precautions

WARNING!

Only a qualified building contractor shall install or uninstall this 
unit.

– Improper installation may cause the unit to fall, resulting in injury.

To prevent injury, the unit must be securely attached to the wall in 
accordance with the installation instructions.

Do not install the unit where it cannot support the load.

– If the mounting parts are not strong enough, this may cause the unit to 

fall, resulting in injury.

Do not use installation methods other than instructed.

– This may cause the unit to fall and be damaged, resulting in injury.

Do not install the unit at locations other than vertical walls.

– This may cause the unit to fall and be damaged, resulting in injury.

Take the safety factor for mounting strength into account.

– Insufficient strength will cause the unit to fall, resulting in injury.

The wall on which the unit is to be attached to should be capable of 
supporting 33 k

g

 per screw.

– Insufficient strength of the walls will cause the unit to fall in the long 

run.

Do not disassemble or modify the wall-mounting hanger.

– This will cause the unit to fall and be damaged, resulting in injury.

CAUTIONS!

Do not install this unit at humid or dusty locations, or locations 
where airborne grease or steam may come into contact with the 
unit, or under an air conditioner where water may drip onto the unit.

– This may have negative impact on the unit, resulting in fire or electric 

shock.

Secure enough space of more than 30 cm above the main unit and 
more than 10 cm on the left and right sides respectively. Keep space 
between the wall and rear of the unit clear of obstructions.

– Blocking the exhaust holes on the main unit may result in fire.

Use the designated components for installation.

– Otherwise, the main unit may fall and be damaged, resulting in injury.

Prevent the mounting screws or AC mains lead from coming into 
contact with metal parts inside the wall during installation.

– Failure to do so may cause electric shock.

When removing the main unit, remove the wall mounting screws as 
well.

– Otherwise the wall mounting screws may hit a person and lead to 

injury.

Install the unit at a height where the USB port and operation buttons 
can be seen for safe operation.

– Operating at improper position may cause the unit to fall and be 

damaged, resulting in injury.

Notes on installation

Before installation, read the “Safety precautions” and “Wall mount 
instructions” for correct installation.

For optimal performance and to prevent potential problems, do not 
install this unit:

– at locations other than vertical walls.
– near a sprinkler or a sensor.
– near high-voltage lines or power sources.
– near heating device.
– at locations where the unit is subject to vibration or impact.
– near sources of magnetism, heat, vapour, airborne grease, etc.
– at locations where there may be water droplets (e.g. under an air 

conditioner).

Do not install this unit under ceiling lights (e.g. spotlight, halogen 
light, etc.).

– Failure to do so may bend the cabinet or lead to damage caused by 

high heat.

Use a proper installation method that suits the structure and 
material of the wall.

Use a soft blanket or cloth to prevent damage to the product or floor 
during installation.

When tightening screws, make sure the screws are not 
loosely-tightened or overtightened.

Secure a safe surrounding area and pay attention to safety during 
installation.

Panasonic is not liable for incidental or consequential damages 
resulting from improper installation or operation.

Wall mount instructions

Before installation, turn the unit off and disconnect the AC mains lead 
from the household mains socket.

Bottom of main unit 

Stand

Soft blanket or cloth

Fixing screw 

A

SC-HC55DB&35GN-RQTX1267-B.book  6 ページ  2011年2月18日 金曜日 午後5時58分

Содержание SC-HC55DB

Страница 1: ...l for future reference Included Installation Instructions 2 6 The installation should never be done by any other than a qualified installation specialist Before commencing work carefully read these in...

Страница 2: ...leave the battery ies in a car exposed to direct sunlight for a long period of time with doors and windows closed Do not take apart or short circuit Do not recharge alkaline or manganese batteries Do...

Страница 3: ...ions 2 Accessories 3 Unit and media care 3 Connections 4 Attaching the unit to a wall optional 6 Control reference guide 8 Opening Closing the sliding door 9 Disc operations 10 Radio operations 11 Sou...

Страница 4: ...e T should be kept firmly stretched Find a good position with good reception Tape the antenna to a wall or column in a position with the least amount of interference Please refer to Checking the DAB s...

Страница 5: ...d Connect the USB device not supplied Use DAB outdoor antenna for better reception The antenna should only be installed by a competent technician Never use the outdoor antenna during lightning storm P...

Страница 6: ...ntact with the unit or under an air conditioner where water may drip onto the unit This may have negative impact on the unit resulting in fire or electric shock Secure enough space of more than 30 cm...

Страница 7: ...onto the wall mount brackets Connect the DAB antenna HC55 or FM AM antenna HC35 and the AC mains lead to the unit before hanging the unit onto the wall 4 After hanging the unit release your hand caref...

Страница 8: ...T LEVEL 5 A iPod 9 iPod OPEN CLOSE HC55 Sensor activity indicator B PLAY F 12 C CLOCK TIMER 12 D PROGRAM 10 11 14 E VOL VOLUME 18 Adjusts sound volume F MUTE 18 Mutes the sound Press again to cancel M...

Страница 9: ...the open close sensor The sensitivity of the sensor can be changed to increase or decrease the activating area of the open close sensor Press OPEN CLOSE SENSOR repeatedly to select MODE 1 MODE 2 MODE...

Страница 10: ...r Inserting a disc Basic play Stop Press Pause Press 1 Press again to resume play Skip Press or 9 to skip track Press 3 4 to skip album MP3 Search CD Press and hold 6 or 5 Direct access play Play star...

Страница 11: ...Press and hold RADIO EXT IN on the main unit After a few seconds the display changes to display current minimum frequency 3 Continue to hold down RADIO EXT IN on the main unit When the minimum frequen...

Страница 12: ...ng gradually to the preset level The sleep timer can turn the unit off after a set time 1 Press SLEEP to turn the sleep function on or off 30MIN 60MIN 90MIN 120MIN OFF Cancel 2 Press SLEEP once to che...

Страница 13: ...d for the first time this function starts automatically Depending on some factors such as the broadcasting time availability the station may not broadcast even if it is stored into the memory If this...

Страница 14: ...XT IN RADIO repeatedly to select DABr Make sure that the initial settings are made 13 To select by station alphanumeric order Press 6 or 5 to select a station To select by preset Press or 9 to select...

Страница 15: ...ect SCAN MODE 2 Press 2 1 to select ALL BAND III or AUSTRALIA and then press OK The Auto scan begins automatically after the change has been made The DAB preset channels are erased when the SCAN MODE...

Страница 16: ...iPhone responses may vary on new iPhone models or iPhone new software updates Charging the iPod iPhone When iPod iPhone is being charged in standby mode IPOD CHARGING is shown on the main unit s disp...

Страница 17: ...ated control of aircraft air traffic control management controlling movement of heavy freight systems control of life support or extension systems control of weapons systems and or missile launch syst...

Страница 18: ...e Bluetooth device and execute a Bluetooth search to find this unit SC HC55 If prompted for the passkey enter 0000 To select communication quality 1 Press MENU repeatedly to select LINK MODE 2 Press 2...

Страница 19: ...ssed You want to clear and reset the memory contents 1 Disconnect the AC mains lead Wait for at least 3 minutes before proceeding to step 2 2 While pressing and holding down I on the main unit reconne...

Страница 20: ...ring AM broadcast Keep the antenna away from other cables and cords Keep the AM antenna away from the unit The picture on the television near the unit disappears or stripes appear on the screen The lo...

Страница 21: ...connected device is shown as Character that cannot be displayed will be replaced by An unknown device name is detected and displayed as Noise is heard or broken sound The Bluetooth communication dista...

Страница 22: ...e iPod iPhone device is not inserted correctly Read the instructions and try again 16 The USB device is not inserted Check the connection REMOTE 1 The main unit is in REMOTE 1 mode Switch the remote c...

Страница 23: ...h 790 nm Laser power CLASS 1 CLASS 1M Audio Output Disc Number of channels FL FR 2 ch SPEAKER SECTION HC55 Type 2 way 2 speaker system Passive Radiator Speaker unit s Woofer 6 5 cm Cone typek1 per cha...

Страница 24: ...Panasonic Corporation Web Site http panasonic net p RQTX1267 B F0211ST0 C Panasonic Corporation 2011 For SC HC55DB only SC HC55DB 35GN RQTX1267 B book 24...

Отзывы: