Panasonic SC-HC55DB Скачать руководство пользователя страница 3

3

R

Q

T

X

12

67

Unit and media care

Pull out the AC mains lead from the outlet before maintenance.

Clean this unit with a soft, dry cloth

When dirt is heavy, wring the cloth moistened in water tightly to 
wipe the dirt, and then wipe it with a dried cloth.

When cleaning the speaker covers, use a fine cloth.
Do not use tissues or other materials (towels, etc.) that can fall 
apart.


Small grains may get stuck inside the speaker cover.

Never use alcohol, paint thinner or benzine to clean this unit.

Before using chemically treated cloth, carefully read the 
instructions that came with the cloth.

Maintenance of the lens

Clean discs

Wipe with a damp cloth and then wipe dry.

Disc handling precautions

Handle discs by the edges to avoid inadvertent scratches or 
fingerprints on the disc.

Do not attach labels or stickers to discs.

Do not use record cleaning sprays, benzine, thinner, static 
electricity prevention liquids or any other solvent.

Do not use the following discs:

j

Discs with exposed adhesive from removed stickers or 
labels (rented discs etc.).

j

Discs that are badly warped or cracked.

j

Irregularly shaped discs, such as heart shapes.
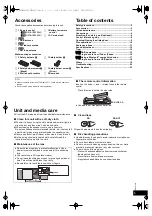
Accessories

Table of contents

Check the supplied accessories before using this unit.

Safety precautions.................................................................2
Accessories............................................................................3
Unit and media care...............................................................3
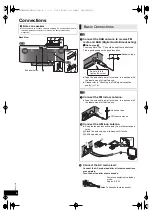
Connections ...........................................................................4
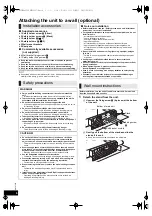
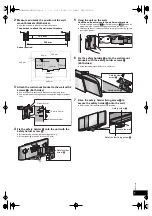
Attaching the unit to a wall (optional)..................................6
Control reference guide ........................................................8
Opening/Closing the sliding door ........................................9
Disc operations....................................................................10
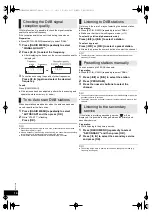
Radio operations .................................................................11
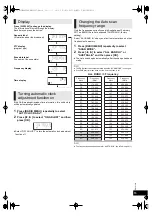
Sound adjustment ...............................................................12
Timer .....................................................................................12

[HC55]

 DAB operations ..........................................................13

Listening to audio from iPod or iPhone.............................16
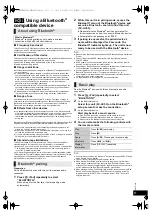
[HC55]

 Using a Bluetooth

®

 compatible device .....................17

Listening to audio from a USB device ...............................19
Others ...................................................................................19
Troubleshooting...................................................................20
Specifications.......................................................................23

1 Remote control

(

[HC55]

 N2QAYB000643)

(

[HC35]

 N2QAYB000641)

[HC55]


1 DAB antenna

[HC35]

1 FM indoor antenna

[HC35]

1 AM loop antenna

1 Battery for remote 

control

1 AC mains lead

Wall mounting accessories

2 Safety holders 

E

1 Safety holder 

D

2 Safety holder screws 

C


(Black) 

2 Wall mount brackets

1 Safety holder screw 

B


(Silver) 

2 Rear pads


Product numbers correct as of February 2011. These may be subject to 
change.

Do not use AC mains lead with other equipment.

The remote control information

Insert so the poles (

i

 and 

j

) match those in the remote 

control.

Use alkaline or manganese batteries.

R6/LR6, AA

Place this side in before the other side.

Clean the lens regularly to prevent malfunctions. Use a 
blower to remove dust and a cotton swab if it is extremely 
dirty.

You cannot use a CD type lens cleaner.

Do not leave the sliding door open for prolonged periods of 
time. This will cause the lens to get dirty.

Be careful not to touch the lens with your fingers.

Lens

DO

DO NOT

SC-HC55DB&35GN-RQTX1267-B.book  3 ページ  2011年2月18日 金曜日 午後5時58分

Содержание SC-HC55DB

Страница 1: ...l for future reference Included Installation Instructions 2 6 The installation should never be done by any other than a qualified installation specialist Before commencing work carefully read these in...

Страница 2: ...leave the battery ies in a car exposed to direct sunlight for a long period of time with doors and windows closed Do not take apart or short circuit Do not recharge alkaline or manganese batteries Do...

Страница 3: ...ions 2 Accessories 3 Unit and media care 3 Connections 4 Attaching the unit to a wall optional 6 Control reference guide 8 Opening Closing the sliding door 9 Disc operations 10 Radio operations 11 Sou...

Страница 4: ...e T should be kept firmly stretched Find a good position with good reception Tape the antenna to a wall or column in a position with the least amount of interference Please refer to Checking the DAB s...

Страница 5: ...d Connect the USB device not supplied Use DAB outdoor antenna for better reception The antenna should only be installed by a competent technician Never use the outdoor antenna during lightning storm P...

Страница 6: ...ntact with the unit or under an air conditioner where water may drip onto the unit This may have negative impact on the unit resulting in fire or electric shock Secure enough space of more than 30 cm...

Страница 7: ...onto the wall mount brackets Connect the DAB antenna HC55 or FM AM antenna HC35 and the AC mains lead to the unit before hanging the unit onto the wall 4 After hanging the unit release your hand caref...

Страница 8: ...T LEVEL 5 A iPod 9 iPod OPEN CLOSE HC55 Sensor activity indicator B PLAY F 12 C CLOCK TIMER 12 D PROGRAM 10 11 14 E VOL VOLUME 18 Adjusts sound volume F MUTE 18 Mutes the sound Press again to cancel M...

Страница 9: ...the open close sensor The sensitivity of the sensor can be changed to increase or decrease the activating area of the open close sensor Press OPEN CLOSE SENSOR repeatedly to select MODE 1 MODE 2 MODE...

Страница 10: ...r Inserting a disc Basic play Stop Press Pause Press 1 Press again to resume play Skip Press or 9 to skip track Press 3 4 to skip album MP3 Search CD Press and hold 6 or 5 Direct access play Play star...

Страница 11: ...Press and hold RADIO EXT IN on the main unit After a few seconds the display changes to display current minimum frequency 3 Continue to hold down RADIO EXT IN on the main unit When the minimum frequen...

Страница 12: ...ng gradually to the preset level The sleep timer can turn the unit off after a set time 1 Press SLEEP to turn the sleep function on or off 30MIN 60MIN 90MIN 120MIN OFF Cancel 2 Press SLEEP once to che...

Страница 13: ...d for the first time this function starts automatically Depending on some factors such as the broadcasting time availability the station may not broadcast even if it is stored into the memory If this...

Страница 14: ...XT IN RADIO repeatedly to select DABr Make sure that the initial settings are made 13 To select by station alphanumeric order Press 6 or 5 to select a station To select by preset Press or 9 to select...

Страница 15: ...ect SCAN MODE 2 Press 2 1 to select ALL BAND III or AUSTRALIA and then press OK The Auto scan begins automatically after the change has been made The DAB preset channels are erased when the SCAN MODE...

Страница 16: ...iPhone responses may vary on new iPhone models or iPhone new software updates Charging the iPod iPhone When iPod iPhone is being charged in standby mode IPOD CHARGING is shown on the main unit s disp...

Страница 17: ...ated control of aircraft air traffic control management controlling movement of heavy freight systems control of life support or extension systems control of weapons systems and or missile launch syst...

Страница 18: ...e Bluetooth device and execute a Bluetooth search to find this unit SC HC55 If prompted for the passkey enter 0000 To select communication quality 1 Press MENU repeatedly to select LINK MODE 2 Press 2...

Страница 19: ...ssed You want to clear and reset the memory contents 1 Disconnect the AC mains lead Wait for at least 3 minutes before proceeding to step 2 2 While pressing and holding down I on the main unit reconne...

Страница 20: ...ring AM broadcast Keep the antenna away from other cables and cords Keep the AM antenna away from the unit The picture on the television near the unit disappears or stripes appear on the screen The lo...

Страница 21: ...connected device is shown as Character that cannot be displayed will be replaced by An unknown device name is detected and displayed as Noise is heard or broken sound The Bluetooth communication dista...

Страница 22: ...e iPod iPhone device is not inserted correctly Read the instructions and try again 16 The USB device is not inserted Check the connection REMOTE 1 The main unit is in REMOTE 1 mode Switch the remote c...

Страница 23: ...h 790 nm Laser power CLASS 1 CLASS 1M Audio Output Disc Number of channels FL FR 2 ch SPEAKER SECTION HC55 Type 2 way 2 speaker system Passive Radiator Speaker unit s Woofer 6 5 cm Cone typek1 per cha...

Страница 24: ...Panasonic Corporation Web Site http panasonic net p RQTX1267 B F0211ST0 C Panasonic Corporation 2011 For SC HC55DB only SC HC55DB 35GN RQTX1267 B book 24...

Отзывы: