16
RQT8043
RQTX0273
ES
P
A
Ñ
O
L
ES
P
A
Ñ
O
L
ES
P
A
Ñ
O
L
ES
P
A
Ñ
O
L
ES
P
A
Ñ
O
L
USB and internal memory (continued)
Advanced play
Advanced play
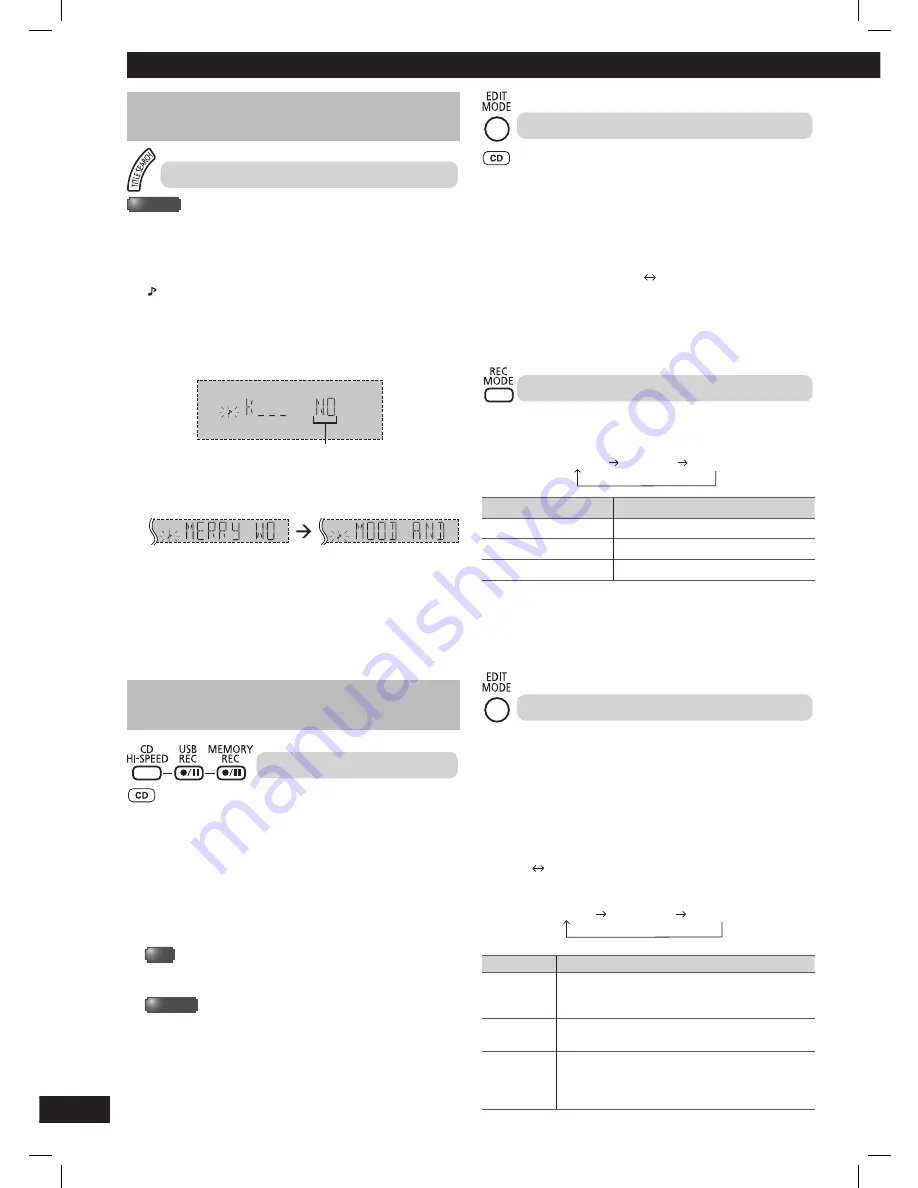
Title search
MEMORY
After a period of time, the number of MP3 tracks will increase in
the internal memory storage. This is where the title search function
comes in handy to enable you the convenience to search for your
desired track.
1
Press [TITLE SEARCH] to start the search.
“ ” indicator blinks.
2
Press [
5
] or [
∞
] repeatedly to select the fi rst character of
the desired track.
5
: Search in descending order (other characters, 9 to 0, Z to A).
∞
: Search in ascending order (A to Z, 0 to 9, other characters).
Example:
Indication that there is no match
3
When there are more than one track that match with the
selected character, press [
1
] or [
2
] repeatedly to search for
your desired track.
Example:
4
Press [OK] to select and play the track.
Note:
• This function will skip tracks that are created with basic recording
(
➡
page 14).
• This function does not work with any random or program mode.
• The character is not case sensitive.
• A same track title display will be shown for tracks with the same
title.
Advanced recording functions
Advanced recording functions
High-speed recording
Recording speed:
CD
: Four times (maximum of 4x) the normal speed.
CD-RW : Two times (2x) the normal speed.
1
Insert the CD you want to record.
2
Press [
6
, CD] and then [
7
] (stop).
3
Press [PLAY MODE] to select 1-TRACK, 1-DISC or ALL
DISC.
4
USB
Press [CD HI-SPEED] and [
/
8
, USB REC] simultaneously
to start recording.
MEMORY
Press [CD HI-SPEED] and [
/
8
, MEMORY REC]
simultaneously to start recording.
Note:
• Depending on the condition of the disc, it may not be possible
to record at four times the normal speed or perform high-speed
recording. Record the CD at normal speed.
• The sound is muted during high-speed recording.
Recording from CD using analog format
You can change your recording mode from the default digital
recording to analog recording.
1
Press [
6
, CD] and then [
7
] (stop).
2
Press and hold [EDIT MODE] to select “ANALOG-REC”.
Each time you press and hold the button:
ANALOG-REC
(analog recording)
DIGITAL-REC
(digital recording)
Note:
• The recording mode returns to the default “DIGITAL-REC” after
completing the analog recording.
• High-speed recording is not applicable while using analog mode.
Recording mode
You can select the desired recording mode before you start the basic
recording (
➡
page 14).
Press [REC MODE] repeatedly to select your desired setting.
128 KBPS
192 KBPS
320 KBPS
Recording mode
Effect
128 KBPS
Long play mode
192 KBPS
Normal mode
320 KBPS
High quality sound mode
During recording
Press [DISPLAY] repeatedly to display the current recording
mode.
Note:
You cannot change the recording mode during recording.
Adding track marks
When recording from analog source such as radio, music port or
aux, you may want to separate the sound or music track at the
desired point during recording.
You can perform this separation by adding track marks using the
various listed modes.
Before recording
Press [EDIT MODE] repeatedly to select your desired track
mark mode.
Radio:
MANUAL
TIME MARK
MUSIC PORT or AUX:
MANUAL
SYNCHRO
TIME MARK
Edit mode
Action
MANUAL
Track marks are inserted manually.
Press [OK] to add track marks during
recording.
TIME MARK
Track marks are inserted automatically every fi ve
minutes.
SYNCHRO
Recording starts automatically when the other
equipment starts play.
Recording pause when it detects silence for
approximately three seconds.
RQTX0273-2M_us.indd 16
RQTX0273-2M_us.indd 16
12/21/09 12:22:11 PM
12/21/09 12:22:11 PM


