background image

14

RQT8043

RQTV0196

LANG - 5

LANG - 4

FRANÇAIS

DANSK

ESP

AÑOL

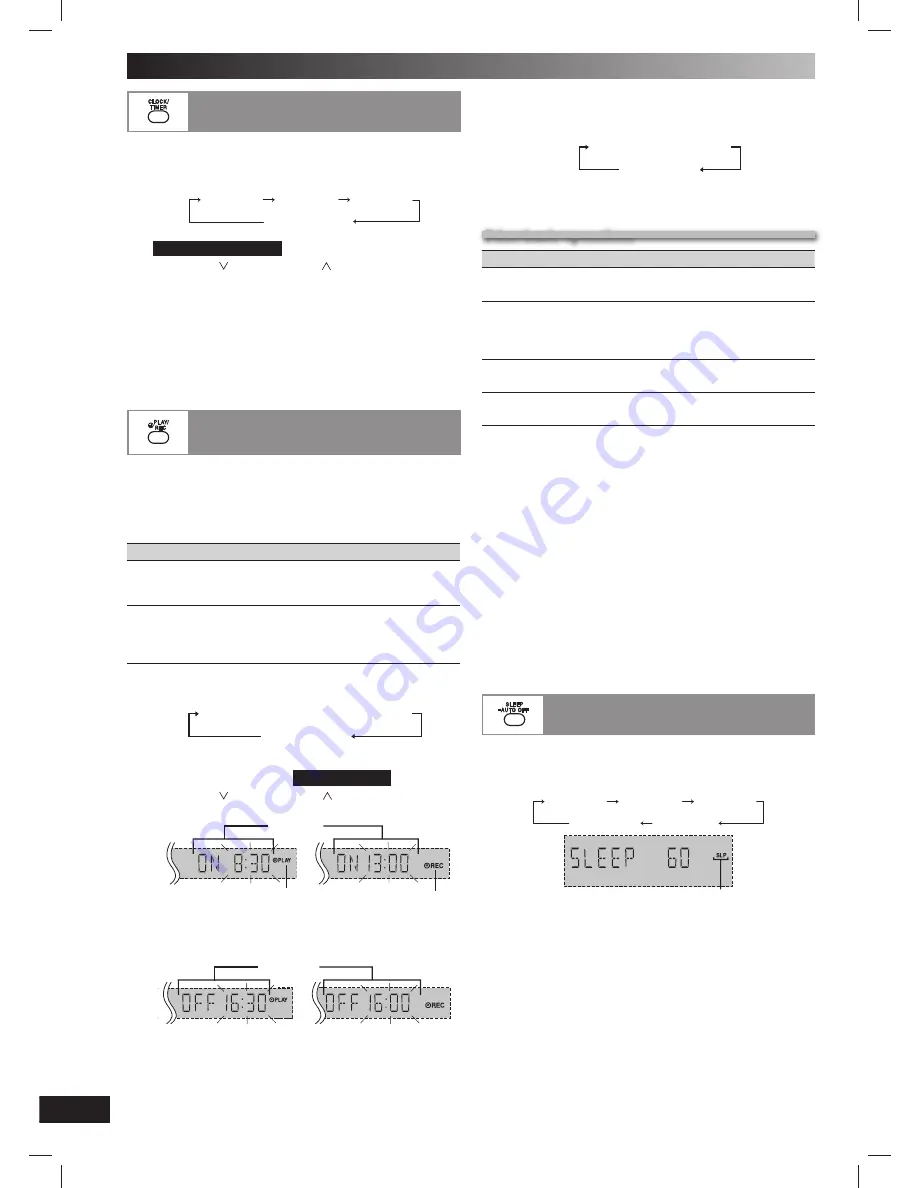
Setting the clock

Setting the clock

This is a 24-hour clock.

1

Press [CLOCK / TIMER] to select “CLOCK”.

Each time you press the button:

CLOCK

˚


PLAY

Original display

˚


REC

2

(

Within 8 seconds or so

)

Press [

4

,   / REW]  or  [

¢

,   / FF] to set the time.

3

Press [CLOCK / TIMER] to finish setting the time.

Displaying the clock

Press [CLOCK


/


TIMER] once when the unit is on or in standby 

mode.
The time is displayed for a few seconds.

Note:

Reset the clock regularly to maintain accuracy.

Using the play or record timer

Using the play or record timer

You can set the timer to come on at a certain time to wake 
you up (play timer) or to record from the radio or the external 
equipment (record timer).
Play timer and record timer cannot be used together.

Turn the unit on and set the clock.

Timer

Action

Play timer

Prepare the music source you want to listen to; 
cassette, disc number (1 ~ 5), radio or other 
external equipments, and set the volume.

Record 
timer

Check the cassette’s erasure prevention tabs 
(

\

 page 12), insert the cassette and tune to the 

radio station (

\

 page 13) or select the external 

equipment (

\

 page 15 ~ 16).

1

Press [CLOCK/TIMER] to select the timer function.

Each time you press the button:

CLOCK

˚

 PLAY

Original display

˚

 REC

˚

PLAY : to set the play timer

˚

REC  : to set the record timer

(Proceed to the next step 

within 8 seconds

)

2

Press [

4

,   / REW ]  or  [

¢

,   / FF] to set the 

starting time.

Play timer indicator

Start time

Record timer indicator

1

3

Press  [CLOCK / TIMER]  to  confirm.

4

Repeat steps 2 to 3 to set the finishing time.

1

Finish time

To activate the timer

5

Press [ 

˚

PLAY/REC] repeatedly to turn on your desired 

timer.

˚


PLAY

no display (off)

˚


REC

6

Press [

y

] to turn off the unit.

The unit must be off for the timers to operate.

Other basic operations

Other basic operations

To

Action

change the 
settings

Repeat steps 1 to 4 and 6 (

\

 see left and 

above).

change the 
source or 
volume

1) Press [ 

˚

PLAY/REC] to clear the timer 

indicator from the display.

2)  Make changes to the source or volume.
3)  Perform steps 5 to 6 (

\

 see above).

check the 
settings

Press [CLOCK/TIMER] repeatedly to select 

˚

PLAY or 

˚

REC.

cancel Press 

˚

PLAY/REC] to clear the timer 

indicators from the display.

If you use the unit after the timers are set

After using, check that the correct tape/disc are loaded 
before turning the unit off.

Note:

•  The play timer will start at the preset time with volume increasing 

gradually to preset level.

•  The record timer will start 30 seconds before the set time with the 

volume muted.

•  The timer comes on at the set time every day if the timer is on.
•  The unit must be in the standby mode for the timer to function.
•  If you turn the unit off and on again while a timer is functioning, 

the fi nish time setting will not be activated.

•  If MUSIC PORT is selected as the source when the timer comes 

on, the system turns on and engages MUSIC PORT as the 
source. If you wish to playback or record from the portable audio 
equipment, just activate the equipment’s play mode and increase 
the volume. (See the portable audio equipment’s instruction 
manual.)

Using the sleep timer

Using the sleep timer

This function enables you to turn off the unit automatically 
after the set time.

Press [SLEEP] to select your desired time. 

SLEEP 30

SLEEP 60

SLEEP 90

SLEEP OFF

SLEEP 120

Sleep timer indicator

To cancel

Press [SLEEP] to select “SLEEP OFF”.

Changing the remaining time

Press [SLEEP] to show the remaining time and press 
[SLEEP] again to select your desired time.

Note:

•  The play and sleep timer or the record and sleep timer can be 

used together.

•  The sleep timer always has priority. Be sure not to overlap timer 

settings.

•  The sleep timer turns off when you perform the record function.

Timer

RQTV0196-B.indd   14

RQTV0196-B.indd   14

2/23/07   4:49:32 PM

2/23/07   4:49:32 PM

Содержание SC-AK250

Страница 1: ...ease read these instructions completely Please keep this manual for future reference Note EB on the packaging indicates the United Kingdom Operations in these instructions are described mainly using remote control but you can perform the operations on the main unit if the controls are the same Unless otherwise indicated illustrations in these operating instructions are of SC AK350 for the United K...

Страница 2: ...2 RQT8043 RQTV0196 LANG 5 LANG 4 FRANÇAIS DANSK ESPAÑOL Back of product Inside of product Tuotteen sisällä Produktets innside RQTV0196 B indd 2 RQTV0196 B indd 2 2 23 07 4 48 37 PM 2 23 07 4 48 37 PM ...

Страница 3: ...3 RQT8043 RQTV0196 LANG 5 LANG 4 FRANÇAIS DANSK DEUTSCH RQTV0196 B indd 3 RQTV0196 B indd 3 2 23 07 4 48 39 PM 2 23 07 4 48 39 PM ...

Страница 4: ...ext carefully This appliance is supplied with a moulded three pin mains plug for your safety and convenience A 5 ampere fuse is fitted in this plug Should the fuse need to be replaced please ensure that the replacement fuse has a rating of 5 ampere and that it is approved by ASTA or BSI to BS1362 Check for the ASTA mark m or the BSI mark o on the body of the fuse If the plug contains a removable f...

Страница 5: ...igh levels over extended periods Reduce the volume in the following cases to avoid damage When playing distorted sound When adjusting the sound quality Caution Use the speakers only with the recommended system Failure to do so can damage the amplifier and speakers and can cause fire Consult a qualified service person if damage occurs or if a sudden change in performance is apparent Do not attach t...

Страница 6: ... is no problem using the unit For your reference To save power when the unit is not to be used for a long time unplug it from the household mains socket You will need to reset some memory items after plugging in the unit Note The included AC mains lead is for use with this unit only Do not use it with other equipment Connector Appliance inlet Connect the speaker cords Connect the left L side in th...

Страница 7: ...batteries Mishandling of batteries in the remote control can cause electrolyte leakage which may cause a fire If electrolyte leaks from the batteries consult your dealer Wash thoroughly with water if electrolyte comes in contact with any part of your body Do not mix old and new batteries use different types of batteries at the same time heat or expose batteries to flame take apart or short circuit...

Страница 8: ... and N Z 2 USB play pause 16 Music port jack 15 Cassette holder 12 For Australia and N Z USB port 16 Remote control Remote control Buttons such as 1 function the same as the controls on the main unit ENTER REPEAT SEARCH DISPLAY MUTING DIMMER PRESET EQ H BASS MANUAL EQ TITLE CD TUNER BAND MUSIC PORT Sleep timer 14 Auto off 1 Program 10 13 Play mode 9 13 Enter 10 11 Title search 11 Disc album select...

Страница 9: ...e function You can listen to specific discs and tracks Preparation Select and play your desired disc Press PLAY MODE to select the desired mode Mode To play 1 DISC 1 DISC one selected disc ALL DISC ALL DISC all loaded discs in succession from the selected disc to the final disc Example 4 5 1 2 3 1 TRACK 1 TR one selected track on the selected disc Press the numeric buttons to select the track in t...

Страница 10: ...ss DISC and then 1 5 to select the disc 4 Press the numeric buttons to select your desired track Repeat steps 3 to 4 to program other tracks 5 Press 6 CD to start play 1 Press DISC and then 1 5 to select the disc 2 Press 7 CLEAR 3 Press PROGRAM 4 Press ALBUM or to select your desired album To select an album directly press the numeric buttons after pressing ALBUM or 5 Press 4 REW or FF to select t...

Страница 11: ... 5 Press 6 CD to start play from the album track found Note This function does not work during any random program mode NOTE on CDs This unit can access up to 99 tracks Choose disc with this mark This unit can play MP3 files and CD DA format audio CD R RW that have been finalized It may not be able to play some CD R RW due to the condition of the recording Do not use irregularly shaped disc Do not ...

Страница 12: ...reparation Wind up the source tape so recording can begin immediately 1 Press 0 OPEN and insert the cassette to be recorded Insert with the side to be recorded facing towards you and the exposed tape facing down 2 Select the source to be recorded Radio recording Tune in the station page 13 Disc recording Insert the disc s you want to record Press 6 CD and then 7 STOP Prepare the desired disc recor...

Страница 13: ...y display PS PTY Program type displays NEWS AFFAIRS INFO SPORT EDUCATE DRAMA CULTURE SCIENCE VARIED POP M ROCK M M O R M LIGHT M CLASSICS OTHER M WEATHER FINANCE CHILDREN SOCIAL A RELIGION PHONE IN TRAVEL LEISURE JAZZ COUNTRY NATIONAL OLDIES FOLK M DOCUMENT TEST ALARM M O R M Middle of the Road music Note RDS displays may not be available if reception is poor TUNER BAND Memory preset Memory preset...

Страница 14: ...erations To Action change the settings Repeat steps 1 to 4 and 6 see left and above change the source or volume 1 Press PLAY REC to clear the timer indicator from the display 2 Make changes to the source or volume 3 Perform steps 5 to 6 see above check the settings Press CLOCK TIMER repeatedly to select PLAY or REC cancel Press PLAY REC to clear the timer indicators from the display If you use the...

Страница 15: ...ow frequency sound so that heavy bass sound can be heard clearly even if the acoustics of your room are not optimal To activate Press H BASS To cancel Press H BASS again Note The actual effect depends on the disc Sound adjustment Connecting to a portable audio equipment Connecting to a portable audio equipment This feature enables you to enjoy music from a portable audio equipment Note All periphe...

Страница 16: ...ntrol Bulk Interrupt is not supported A device using NTFS file system is not supported Only FAT 16 32 File Allocation Table 16 32 file system is supported Depending on the sector size some files may not work This unit can access up to 255 albums including blank folders and 2500 tracks The maximum number of tracks in a folder are 999 tracks Only one memory card will be selected when connecting a mu...

Страница 17: ...onsult the dealer Listening to the radio Noise is heard The stereo indicator flickers or doesn t light Sound is distorted Use an outdoor antenna 7 A beat sound is heard Turn the TV off or separate it from the unit A low hum is heard during AM broadcast Separate the antenna from other cables and cords When there is a television set nearby The picture on the TV disappears or stripes appear on the sc...

Страница 18: ...xceeds 500mA Disconnect the USB device Turn the unit off and then back on NO PLAY Check the content Only MP3 format files can be played Memory reset Initialization When the following situations occur refer to the instructions below to reset the memory There is no response when buttons are pressed You want to clear and reset the memory contents To reset memory 1 Disconnect the AC mains lead Wait at...

Страница 19: ...r of channels 2 Stereo FL FR USB SECTION For Australia and N Z AK250 Playable USB Storage Media 1 HDD 2 USB MP3 Player Digital Audio Player 3 USB Thumbdrives Supported audio file format MP3 bit rate USB memory port Maximum current 500 mA Bit rate MP3 32 kbps to 320 kbps Sampling frequency MP3 32 kHz 44 1 kHz 48 kHz Audio output MP3 Number of channels 2 channels Frequency response MP3 20 Hz to 20 k...

Страница 20: ...Matsushita Electric Industrial Co Ltd Web Site http panasonic net RQTV0196 1B L0207TK1027 En RQTV0196 B indd 20 RQTV0196 B indd 20 2 23 07 4 49 44 PM 2 23 07 4 49 44 PM ...

Отзывы: