background image

GETTING ST

AR

TED

ENGLISH

ENGLISH

4

RQT8043

RQTX0067

-If you see this symbol-

Information on Disposal for Users of Waste 
Electrical & Electronic Equipment (private 
households)

This symbol on the products and/or 
accompanying documents means that 
used electrical and electronic products 
should not be mixed with general 
household waste.
For proper treatment, recovery and 
recycling, please take these products 
to designated collection points, where 
they will be accepted on a free of 
charge basis. Alternatively, in some 
countries you may be able to return 
your products to your local retailer 
upon the purchase of an equivalent 
new product.

Disposing of this product correctly will help 
to save valuable resources and prevent any 
potential negative effects on human health and 
the environment which could otherwise arise from 
inappropriate waste handling. Please contact your 
local authority for further details of your nearest 
designated collection point.
Penalties may be applicable for incorrect disposal of 
this waste, in accordance with national legislation.

For business users in the European Union

If you wish to discard electrical and electronic 
equipment, please contact your dealer or supplier 
for further information.

Information on Disposal in other Countries 
outside the European Union

This symbol is only valid in the European Union.
If you wish to discard this product, please contact 
your local authorities or dealer and ask for the 
correct method of disposal.

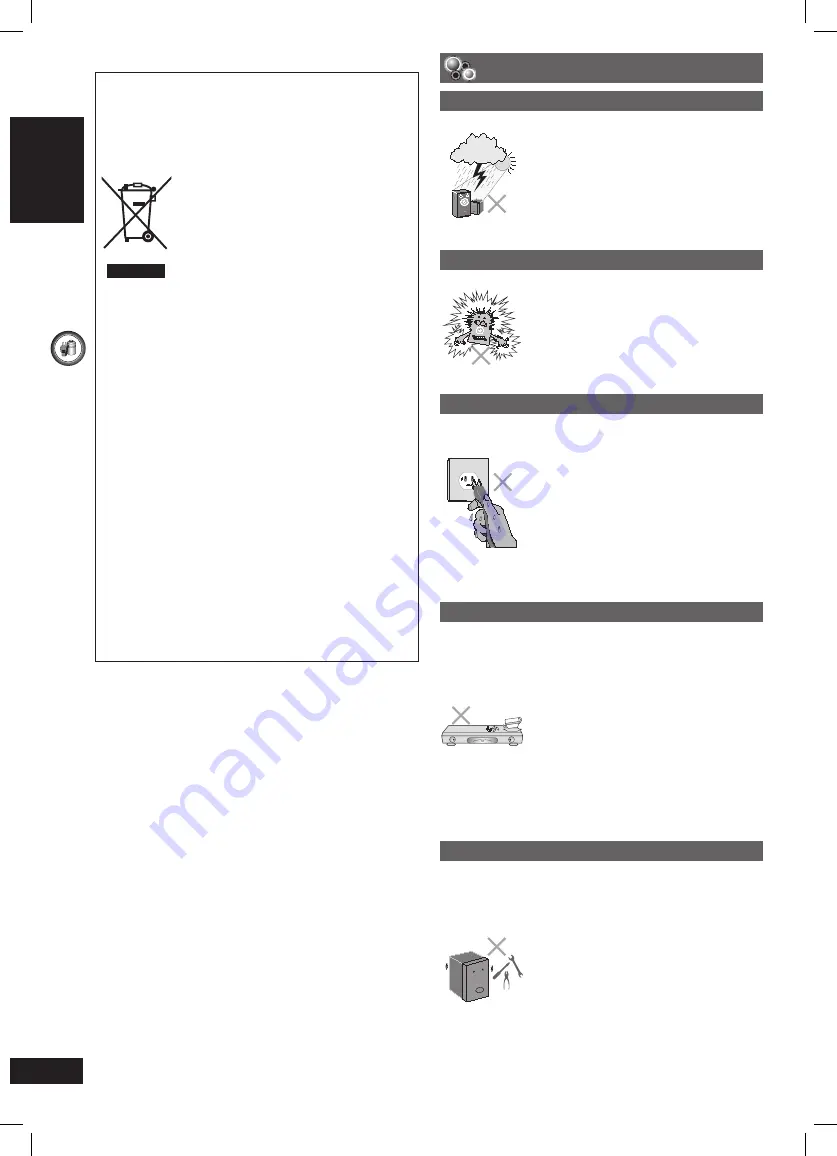
Placement

Set the unit up on an even surface 
away from direct sunlight, high 
temperatures, high humidity, and 
excessive vibration. These conditions 
can damage the cabinet and other 
components, thereby shortening the 
unit’s service life.

Do not place heavy items on the unit.

Voltage

Do not use high voltage power 
sources. This can overload the unit 
and cause a fire.

Do not use a DC power source. 
Check the source carefully when 
setting the unit up on a ship or other 
places where DC is used.

AC mains lead protection

Ensure the AC mains lead is 
connected correctly and not damaged. 
Poor connection and lead damage 
can cause fire or electric shock. Do 
not pull, bend, or place heavy items 
on the lead.

Grasp the plug firmly when 
unplugging the lead. Pulling the AC 
mains lead can cause electric shock.

Do not handle the plug with wet 
hands. This can cause electric shock.

Foreign matter

Do not let metal objects fall inside the 
unit. This can cause electric shock or 
malfunction.

Do not let liquids get into the unit. 
This can cause electric shock 
or malfunction. If this occurs, 
immediately disconnect the unit from 
the power supply and contact your 
dealer.

Do not spray insecticides onto or 
into the unit. They contain flammable 
gases which can ignite if sprayed into 
the unit.

Service

Do not attempt to repair this unit 
by yourself. If sound is interrupted, 
indicators fail to light, smoke appears, 
or any other problem that is not 
covered in these instructions occurs, 
disconnect the AC mains lead and 
contact your dealer or an authorized 
service center. Electric shock or 
damage to the unit can occur if the 
unit is repaired, disassembled or 
reconstructed by unqualified persons.

Extend operating life by disconnecting 
the unit from the power source if it is 
not to be used for a long time.

 Safety precautions

RQTX0067-B_new18.indd   4

RQTX0067-B_new18.indd   4

3/19/07   5:48:04 PM

3/19/07   5:48:04 PM

Содержание SB-HW550

Страница 1: ...l for future reference Your unit may not look exactly the same as illustrated Note EB on the packaging indicates the United Kingdom HDMI Capability page 27 Enjoy high quality resolution in high definition with HDMI The player plays DVD Video marked with labels containing the region number 2 or ALL Example 2 ALL 3 5 2 RQTX0067 B_new18 indd 1 RQTX0067 B_new18 indd 1 3 19 07 5 48 01 PM 3 19 07 5 48 0...

Страница 2: ...RE NO USER SERVICEABLE PARTS INSIDE REFER SERVICING TO QUALIFIED SERVICE PERSONNEL CAUTION DO NOT INSTALL OR PLACE THIS UNIT IN A BOOKCASE BUILT IN CABINET OR IN ANOTHER CONFINED SPACE ENSURE THE UNIT IS WELL VENTILATED TO PREVENT RISK OF ELECTRIC SHOCK OR FIRE HAZARD DUE TO OVERHEATING ENSURE THAT CURTAINS AND ANY OTHER MATERIALS DO NOT OBSTRUCT THE VENTILATION VENTS DO NOT OBSTRUCT THE UNIT S VE...

Страница 3: ...in any doubt please consult a qualified electrician IMPORTANT The wires in this mains lead are coloured in accordance with the following code Blue Neutral Brown Live As these colours may not correspond with the coloured markings identifying the terminals in your plug proceed as follows The wire which is coloured Blue must be connected to the terminal which is marked with the letter N or coloured B...

Страница 4: ...d excessive vibration These conditions can damage the cabinet and other components thereby shortening the unit s service life Do not place heavy items on the unit Voltage Do not use high voltage power sources This can overload the unit and cause a fire Do not use a DC power source Check the source carefully when setting the unit up on a ship or other places where DC is used AC mains lead protectio...

Страница 5: ...Using the radio 30 Manual tuning Selecting the preset channels 30 Automatic presetting RDS broadcasting 30 Using sound effects 31 Enhancing the sound from the center speaker Center Focus 31 Adjusting the amount of bass Subwoofer level 31 Enhancing the surround sound effect Surround Enhancer 31 Changing the sound quality Equalizer Mode EQ 31 Enhancing the stereo sound Super Surround 31 Enhancing th...

Страница 6: ... types of batteries at the same time heat or expose batteries to flame take apart or short circuit the batteries attempt to recharge alkaline or manganese batteries use batteries if the covering has been peeled off Mishandling of batteries can cause electrolyte leakage which can severely damage the remote control Remove the batteries if the remote control is not going to be used for a long period ...

Страница 7: ...ibration Leave a space of 30 cm from the television Note You can damage your speakers and shorten their useful life if you play sound at high levels over extended periods Reduce the volume in the following cases to avoid damage When playing distorted sound When the speakers are reverberating due to a record player noise from FM broadcasts or continuous signals from an oscillator test disc or elect...

Страница 8: ...dby mode approx 0 8 W To save power when the unit is not to be used for a long time unplug it from the household mains socket You will need to reset some memory items after plugging in the unit To household mains socket Connect to the speakers Attach the speaker cable stickers to make connection easier 6 SUBWOOFER 2 FRONT R 1 FRONT L 3 SURROUND L 4 SURROUND R 5 CENTER Speaker cable sticker White B...

Страница 9: ...nal Television not included SCART cable not included Using the SCART AV terminal To improve picture quality you can change the video signal output from the SCART AV terminal from Video to either S Video or RGB to suit the type of television you are using Select S Video YPbPr or RGB No Output from QUICK SETUP page 11 Set Video Mode to Off page 27 HDMI tab This connection will also enable you to pla...

Страница 10: ...th the hole s Center speaker 190 mm Front and surround speakers Ø7 0 to 9 4 mm 4 0 to 6 0 mm Wall or pillar Ø4 0 mm At least 30 mm 7 Fitting speaker stands not included For center front and surround speakers Ensure the stands meet these conditions before purchasing them Note the diameter and length of the screws and the distance between screws as shown in the diagram The stands must be able to sup...

Страница 11: ...oose the language for the on screen messages English Français Deutsch Italiano Español Polski Svenska Nederlands TV Type Select to suit the type of television Standard Direct View TV CRT Projector LCD TV Projector Projection TV Plasma TV TV Aspect Choose the setting to suit your television and preference 4 3 Regular aspect television 16 9 Widescreen television Video Out AV Component Choose the vid...

Страница 12: ... using DVD Video Format 5 Recorded using a format different from DVD Video Format therefore some functions cannot be used 6 A process that allows play on compatible equipment To play a disc that is displayed as Necessary on this unit the disc must first be finalized on the device it was recorded on 7 Closing the session will also work Discs that can be played Disc Logo Indicated in these instructi...

Страница 13: ...ttach labels or stickers to discs This may cause disc warping rendering it unusable Do not write on the label side with a ball point pen or other writing instrument Do not use record cleaning sprays benzine thinner static electricity prevention liquids or any other solvent Do not use scratch proof protectors or covers Do not use the following discs Discs with exposed adhesive from removed stickers...

Страница 14: ... 16 Press to switch the unit from on to standby mode or vice versa In standby mode the unit is still consuming a small amount of power 3 MEMORY Disc playback 16 Memorise the receiving radio stations 30 Overview of controls Main unit 4 TUNE 3 Skipping or slow search play Select the radio stations 30 Headphones not included Headphone plug type Ø3 5 mm stereo mini plug Reduce the volume before connec...

Страница 15: ...main unit on or off 16 Change the television s video input mode 37 Select disc s title numbers and etc Enter numbers 17 Select preset radio stations 30 Show a disc top menu 17 or program list 17 Show on screen menu 21 Show the display on the main unit 17 This function enables you to turn off the unit automatically after the set time SLEEP 30 SLEEP 60 SLEEP 90 OFF SLEEP 120 To cancel the timer Pres...

Страница 16: ... NAVIGATOR Disc Basic play Using the main unit Using the remote control 1 Power on 2 Select DVD CD 3 Load a disc in the tray Load double sided discs so the label for the side you want to play is facing up For DVD RAM remove the disc from its cartridge before use 4 Adjust the volume and start playback RQTX0067 B_new18 indd 16 RQTX0067 B_new18 indd 16 3 19 07 5 48 15 PM 3 19 07 5 48 15 PM ...

Страница 17: ...t work during program and random play page 18 Enter numbers while stopped Example To select 12 with Playback control PBC Press 7 STOP and then press the numeric buttons to cancel the PBC functions Note The numeric buttons that can function depend on the number of tracks on the VCD Example To select 123 Cancel the numbers On screen item select Confirm Select Select Disc menus Shows a disc top menu ...

Страница 18: ... To select a 2 digit number Example To select 12 2 To select an item using the cursor buttons Press ENTER and 5 to select an item then press ENTER again to confirm To select all the items While the Chapter Track or Content field is highlighted press 5 to select ALL Then press ENTER again to confirm Example To change the selected program 1 Press 5 to select the program number 2 Press the numeric bu...

Страница 19: ...displayed 2 To select an item Items shown differ depending on the type of disc Groups and contents are displayed To search by content or group title see below To switch between guide messages and the elapsed play time indicator JPEG only WMA MP3 only WMA MP3 or JPEG To go to previous group To go to next group Thumbnail images Groups only Contents only 7 Searching by a content or a group title High...

Страница 20: ...ppear only if the titles are recorded on the disc You cannot edit programs playlists and disc titles Playing the programs 1 2 To select the program Press 3 to show the contents of the program and the disc 3 To exit the screen Press DIRECT NAVIGATOR Playing a playlist Applicable only when the disc contains a playlist 1 2 To select the playlist 3 To exit the screen Press PLAY LIST Playing the select...

Страница 21: ...ch Number of channels Example 3 2 1ch 1 Low frequency effect not displayed if there is no signal 0 No surround 1 Mono surround 2 Stereo surround left right 1 Center 2 Front left Front right 3 Front left Front right Center To display the current bitrate or sampling frequency Number Select with playback control To select number While the disc menu is displayed Press 5 Press ENTER To change the numbe...

Страница 22: ... Picture Mode Normal Cinema1 Mellows images and enhances detail in dark scenes Cinema2 Sharpens images and enhances detail in dark scenes Animation Suitable for animation Dynamic Enhances the contrast for powerful images User Press ENTER to select Picture Adjustment see below Picture Adjustment Contrast Increases the contrast between light and dark parts of the picture Brightness Brightens the pic...

Страница 23: ...rce is selected When playing PAL discs or video contents Auto Automatically detects the film and video content and appropriately converts it Video Select when using Auto and the content is distorted Film Select this if the edges of the film content appear jagged or rough when Auto is selected However if the video content is distorted as shown in the illustration to the right then select Auto When ...

Страница 24: ... Indicates various information when connected with HDMI AV OUT terminal see below Confirming HDMI information 7 Other Menu Setup page 25 Play as DVD VR Play as HighMAT or Play as Data Disc To use functions for data discs page 19 To play MP3 JPEG or video contents on DVD RAM or to play a HighMAT disc without using HighMAT function Select Play as Data Disc Confirming HDMI information Using on screen...

Страница 25: ...evel a password screen is shown Follow the on screen instructions Do not forget your password A message screen will be shown if a DVD Video disc exceeding the ratings level is inserted in the unit Enter your password and then follow the on screen instructions 1 Language options French German Italian Spanish Polish Swedish Dutch 2 The original language designated on the disc is selected 3 Input a c...

Страница 26: ...d but picture quality is lower 5 Frame Overall quality is high but the picture may appear blurred NTSC Disc Output Choose PAL 60 or NTSC output when playing NTSC discs page 13 Video systems PAL60 When connected to a PAL television NTSC When connected to an NTSC television 7 Audio tab Dolby Digital 6 Bitstream PCM Select to suit the type of equipment you connected to the HDMI AV OUT terminal page 9...

Страница 27: ...udio output is not from the HDMI AV OUT terminal The audio is output using the settings of the main unit VIERA Link HDAVI Control On The VIERA Link HDAVI Control function is available page 36 Off 7 Display tab Menu Language English Français Deutsch Italiano Español Polski Svenska Nederlands On Screen Messages On Off 7 Others tab FL Dimmer Change the brightness of the unit s display Bright Dim Auto...

Страница 28: ...commended setting a Center speaker Difference Approx Setting 30 cm 1 0 ms 60 cm 2 0 ms 90 cm 3 0 ms 120 cm 4 0 ms 150 cm 5 0 ms b Surround speaker Difference Approx Setting 150 cm 5 0 ms 300 cm 10 0 ms 450 cm 15 0 ms 7 To enter the speaker setting 1 Press 5 to select the delay time box and press ENTER 2 Press 5 to adjust the delay time and press ENTER Center delay time Exit Surround delay time 7 T...

Страница 29: ...d be with numbers that have an equal number of digits and should be done in the order you want to play them this may not work at times Files must have the extension see below Extension WMA or wma Compatible compression rate between 48 kbps and 320 kbps You cannot play WMA files that are copy protected This unit does not support Multiple Bit Rate MBR Extension MP3 or mp3 Compatible compression rate...

Страница 30: ...R The station occupying a channel is erased if another station is preset to that channel Selecting the preset channels 1 To select FM 2 To select the channel TO Alternatively press 4 3 To perform the step on the main unit first press TUNE MODE to select PRESET and then press 4 TUNE 3 to select the channel When a stereo FM broadcast is being received ST lights in the display If noise is excessive i...

Страница 31: ...enter speaker seem like it is coming from within the television C FOCUS ON C FOCUS OFF This also works when Dolby Pro Logic II is turned on Enhancing the stereo sound Super Surround Movie Use this mode when playing movie software Music Adds surround effects to stereo sources Off Cancel This works only in FM AV Music P and AUX mode Super Surround and EQ can be turned on simultaneously Enhancing the...

Страница 32: ...e volume level normally used for listening 3 To adjust the speaker level for each speaker OR Adjust the speaker levels to the same level as the front speakers C RS LS 6 dB to 6 dB To stop the test signal Press TEST again To adjust speaker level during play Effective when playing multi channel audio or when Dolby Pro Logic II is on 1 Press and hold CH SELECT to select the speaker L C R RS LS SW SW ...

Страница 33: ... of this main unit SCART cable not included SCART cable not included To listen to the sound from the television select the appropriate audio out example Monitor on the television Sound from the television Press EXT IN page 37 to select the AV audio input on the remote control You can change the video signal output from the SCART AV terminal from RGB to either S Video or Video to suit the type of t...

Страница 34: ...cable is being used for connection When the HDMI cable is connected there will be no video output from the SCART and COMPONENT VIDEO OUT terminals of the main unit Do not connect any kind of audio video distribution devices between this unit and the television such as an amplifier etc Set Video Mode to On and Audio Output to On page 27 HDMI tab Set Video Output Mode page 23 Picture Menu Connecting...

Страница 35: ...ice example MP3 player through your home theater system Preparation To avoid distorted sound make sure that any equalizer function of your external device is turned off 1 Reduce the volume and connect the external device not included Plug type Ø3 5 mm stereo mini plug External device not included Reduce the volume before connecting Optional Music Port connection and operation 2 To select MUSIC P A...

Страница 36: ...D if it is in AUX mode When you start disc play the television will automatically switch to the HDMI input mode for the home theater system Speaker control You can select whether audio is output from the home theater system or the television speakers by using the television menu settings For details refer to the operating instructions of your television Home Cinema Theater speakers are active When...

Страница 37: ...ent REMOTE 1 or REMOTE 2 appears on the main unit display when you operate the remote control If REMOTE 1 appears The main unit is in REMOTE 1 mode Press and hold ENTER and 1 on the remote control for at least 2 seconds If REMOTE 2 appears The main unit is in REMOTE 2 mode Press and hold ENTER and 2 on the remote control for at least 2 seconds Note You can still operate a television using the remo...

Страница 38: ...ture or sound Check the video or speaker connection Check the power or input setting of the connected equipment and the main unit Check that the disc has something recorded on it While the HDMI cable is being used there will be no video output from the SCART and COMPONENT VIDEO OUT terminals If the SCART and COMPONENT VIDEO OUT terminals are to be used remove the HDMI cable and power on off the ma...

Страница 39: ...still picture data If a disc contains CD DA and other formats proper playback may not be possible 7 Sound abnormal or improper Sound is distorted Noise may occur when playing WMA When using the HDMI output audio may not be output from other terminals Effects do not work Some audio effects do not work or have less effect with some discs Dolby Pro Logic II does not work if you have changed the play ...

Страница 40: ... output is not selected when the connected television is not progressive compatible Press and hold CANCEL until the picture is displayed correctly The output will return to 480i or 576i When using SCART AV terminal set Video mode in the HDMI tab to Off When using component terminal set Video out AV Component in Video tab to Video YPbPr or S Video YPbPr 26 33 9 23 27 26 Picture size does not fit th...

Страница 41: ...You inserted a disc that has not been finalized 12 NO DISC You have not inserted a disc insert one You have not inserted the disc correctly insert it correctly 16 F61 Check and correct the speaker cable connections If this does not fix the problem consult the dealer 8 F76 There is a power supply problem Consult the dealer DVD U11 Disc may be dirty Wipe it clean 13 ERROR Incorrect operation perform...

Страница 42: ...isc may not be played in your region Only DVD Video discs that include or have the same region number as the one on the rear panel of this unit can be played Cover page No on screen display Select On in On Screen Messages in the Display tab 27 Main unit s screen saver remains When using the HDMI connection audio video information is continually transferred between the main unit and the television ...

Страница 43: ...elorussian 6669 Latin 7665 Tajik 8471 Cambodian 7577 Latvian Lettish 7686 Tamil 8465 Catalan 6765 Lingala 7678 Tatar 8484 Chinese 9072 Lithuanian 7684 Telugu 8469 Corsican 6779 Macedonian 7775 Thai 8472 Croatian 7282 Malagasy 7771 Tibetan 6679 Czech 6783 Malay 7783 Tigrinya 8473 Danish 6865 Malayalam 7776 Tonga 8479 Dutch 7876 Maltese 7784 Turkish 8482 English 6978 Maori 7773 Turkmen 8475 Esperant...

Страница 44: ...ition video output 720p 1080p from the HDMI AV OUT terminal To enjoy high definition video a high definition compatible television is required I P B MPEG 2 the video compression standard adopted for use with DVD Video codes frames using these 3 picture types I Intra coded picture This picture has the best quality and is the best to use when adjusting the picture P Predictive coded picture This pic...

Страница 45: ... 480i PAL 576p 576i Y output level 1 Vp p 75 PB output level 0 7 Vp p 75 PR output level 0 7 Vp p 75 Terminal Pin jack Y green PB blue PR red 1 system RGB video output R output level 0 7 Vp p 75 G output level 0 7 Vp p 75 B output level 0 7 Vp p 75 Terminal Scart jack 1 system HDMI AV output Terminal Type A connector 19 pin This unit supports HDAVI Control 2 function DISC SECTION Discs played 8 cm...

Страница 46: ...ssure 82 dB W 1 0 m Frequency range 80 Hz to 25 kHz 16 dB 96 Hz to 22 kHz 10 dB Dimensions W x H x D 270 mm x 94 mm x 95 mm Mass 1 3 kg Subwoofer SB HW550 Type 1 way 1 speaker system Bass reflex Speaker unit s Impedance 6 Woofer 16 cm Cone type Input power IEC 250 W Max Output sound pressure 81 dB W 1 0 m Frequency range 31 Hz to 220 Hz 16 dB 37 Hz to 180 Hz 10 dB Dimensions W x H x D 153 mm x 415...

Страница 47: ...ler than that of MP3 HighMAT and the HighMAT logo are either trademarks or registered trademarks of Microsoft Corporation in the United States and or other countries HDMI the HDMI logo and High Definition Multimedia Interface are trademarks or registered trademarks of HDMI Licensing LLC HDAVI ControlTM is a trademark of Matsushita Electric Industrial Co Ltd Sales and Support Information For the Un...

Страница 48: ...Matsushita Electric Industrial Co Ltd Web Site http panasonic net RQTX0067 1B L0207LE1037 En RQTX0067 B_new18 indd 48 RQTX0067 B_new18 indd 48 3 19 07 5 48 43 PM 3 19 07 5 48 43 PM ...

Отзывы: