background image

4

RQ

TX13

26

Getting S

tarted

Playing

 Discs

Ot

her Op

era

tions

Reference


Other Panasonic audio/video equipment may start functioning when you 
operate the unit using the supplied remote control.
You can operate this unit in another mode by setting the remote control 
operating mode to “REMOTE 2”.

The main unit and remote control must be set to the same mode.

1 Press [EXT-IN]

4

 to select “AUX”.

2 Press and hold [

<

 OPEN/CLOSE]

2

 on the main unit and [2] on the 

remote control until the main unit’s display shows “REMOTE 2”.

3 Press and hold [OK]

8

 and [2] on the remote control for at least 2 

seconds.

To change the mode back to “REMOTE 1”, repeat the steps above by 
replacing [2] with [1].

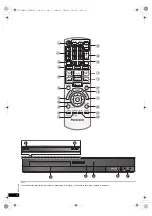
Control reference guide

Remote control

1

Turn the main unit on/off (

B

8)

2

Select channels and title numbers etc. / Enter numbers
(

B

9, 12)

3

Cancel (

B

13)

4

Source select

[DVD]:

Select disc as the source (

B

12)

[RADIO]:

Select FM tuner (

B

9)

[EXT-IN]:

Select external audio as the source ( 

B

10)

AUX

 # 

ARC

 # 

D-IN 

MUSIC P.

^------__-----------------------------------------}

5

Basic operations for play (

B

12)

6

Show on-screen menu (

B

13)

7

Show a disc top menu (

B

12)

8

Select or confirm menu items / Frame-by-frame (

B

12)

9

Select the play mode / Set the repeat mode 

(

B

13

)

:

Select sound mode / Select speaker channel (

B

11)

;

Select surround sound effects (

B

11)

or

Set the Sleep timer

Press and hold [

j

SLEEP].

While the time is shown on the main unit’s display, press 
[

j

SLEEP] repeatedly.

Each time you press the button:

SLEEP 30 

SLEEP 60 

#

 SLEEP 90 

SLEEP120

^-------------------------- 

OFF (Cancel) 

(------------------------}

To confirm the remaining time, press and hold the button again.

<

TV operations

Aim the remote control at the Panasonic TV and press the 
button.
[TV, 

Í

]:

Turn the TV on/off

[INPUT, AV]: Change the TV’s video input mode
[

r

, VOL, 

s

]: Adjust the TV volume

This may not work properly with some models.

=

Adjust the volume of the main unit

>

Mute the sound

“MUTE” flashes on the main unit’s display while the function is on.

To cancel, press the button again or adjust the volume.

Mute is cancelled when you switch the unit to standby.

?

Select radio stations manually (

B

9)

@

Select preset radio stations (

B

9)

A

Exit the display

B

Show START menu (

B

10)

C

Show a disc menu (

B

12)

D

Return to previous screen (

B

12)

E

Switch information on the main unit’s display (

B

12)

F

Turn Whisper-mode Surround on/off (

B

11)

Avoiding interference with other Panasonic equipment

Main unit

1

Standby/on switch (POWER

Í

/I)

Press to switch the unit from on to standby mode or vice 
versa. In standby mode, the unit is still consuming a small 
amount of power.

2

Open/Close the disc tray (

B

12)

3

Disc tray

4

Remote control signal sensor

5

Display (FL display)

6

Connect external music device (

B

15)

7

Adjust the volume of the main unit

POWER-SAVING FEATURES

The main unit is designed to conserve its power 
consumption and save energy.

Auto power-down function

The main unit will automatically switch to standby mode after 
30 minutes of inactivity.
e.g.
– There is no audio signal from an external device.
– Disc playback is stopped/paused.
– The disc menu is displayed and play is not selected.

(This function may not work depending on the application 
type of discs.)

SC-XH50PPC_RQTX1326-P_eng.book  Page 4  Thursday, February 10, 2011  9:05 AM

Содержание SAXH50

Страница 1: ...imum performance and safety please read these instructions carefully If you have any questions contact U S A and Puerto Rico 1 800 211 PANA 7262 Canada 1 800 561 5505 Only for U S A and Puerto Rico The warranty can be found on page 23 Only for Canada The warranty can be found on page 24 SC XH50PPC_RQTX1326 P_eng book Page 1 Wednesday March 23 2011 10 33 AM ...

Страница 2: ...CE THE RISK OF FIRE ELECTRIC SHOCK OR PRODUCT DAMAGE DO NOT EXPOSE THIS APPARATUS TO RAIN MOISTURE DRIPPING OR SPLASHING AND THAT NO OBJECTS FILLED WITH LIQUIDS SUCH AS VASES SHALL BE PLACED ON THE APPARATUS USE ONLY THE RECOMMENDED ACCESSORIES DO NOT REMOVE THE COVER OR BACK THERE ARE NO USER SERVICEABLE PARTS INSIDE REFER SERVICING TO QUALIFIED SERVICE PERSONNEL The lightning flash with arrowhea...

Страница 3: ...VOL STOP VOL TV INPUT AV SKIP SLOW PAUSE SEARCH SEARCH PLAY DVD RADIO EXT IN EXIT REPEAT PLAYMODE CHSELECT SOUND SURROUND W SRD FLDISPLAY 1 2 3 4 5 6 7 8 0 9 10 10 CANCEL FUNCTIONS MUTE M E N U START T O P M E N U OK SKIP SLEEP MUSIC PORT 1 MIC 2 MUSIC PORT VOL SC XH50PPC_RQTX1326 P_eng book Page 3 Thursday February 10 2011 9 05 AM ...

Страница 4: ... remaining time press and hold the button again TV operations Aim the remote control at the Panasonic TV and press the button TV Í Turn the TV on off INPUT AV Change the TV s video input mode r VOL s Adjust the TV volume This may not work properly with some models Adjust the volume of the main unit Mute the sound MUTE flashes on the main unit s display while the function is on To cancel press the ...

Страница 5: ...n only with dry cloth 7 Do not block any ventilation openings Install in accordance with the manufacturer s instructions 8 Do not install near any heat sources such as radiators heat registers stoves or other apparatus including amplifiers that produce heat 9 Do not defeat the safety purpose of the polarized or grounding type plug A polarized plug has two blades with one wider than the other A gro...

Страница 6: ...out 30 minutes The demagnetizing function of the TV should correct the problem If it persists move the speakers further away from the TV Caution Do not touch the front netted area of the speakers Hold by the sides Turn off all equipment before connection and read the appropriate operating instructions Do not connect the AC power supply cord until all other connections are completed step 1 Position...

Страница 7: ... already in use for the TV audio reconnect the TV audio to the AUX terminal using an audio cable If you have various sound sources such as Blu ray Disc player DVD recorder VCR etc connect them to the available inputs on the TV and the TV output should then be connected to the AUX HDMI AV OUT or DIGITAL AUDIO IN OPTICAL terminal of the main unit 2 Radio antenna connections Using an indoor antenna U...

Страница 8: ...ger of explosion if battery is incorrectly replaced Replace only with the same or equivalent type recommended by the manufacturer Dispose of used batteries according to the manufacturer s instructions Use alkaline or manganese batteries Do not heat or expose to flame Do not leave the battery ies in an automobile exposed to direct sunlight for a long period of time with doors and windows closed Use...

Страница 9: ...ng to the radio Presetting stations automatically 1 Press RADIO 4 to select FM 2 Press MENU C Each time you press the button LOWEST factory preset To begin auto preset with the lowest frequency CURRENT To begin auto preset with the current frequency To change the frequency refer to Manual tuning B right 3 Press and hold OK 8 Release the button when FM AUTO is displayed The tuner starts to preset a...

Страница 10: ...e If the device s STB etc input channel on the TV is changed or if you want to change the device allocated for the linked operations select the STB mode to OFF in step 3 above and then select SET again This function will not operate if DIGITAL IN is selected in TV Audio B 17 Using the START menu 1 Press START B to show the START menu When using VIERA Link HDAVI Control the TV also turns on when th...

Страница 11: ...und DOLBY PLII MUSIC Adds 5 1 channel effects to stereo sources S SRD Super Surround You can enjoy sound from all speakers with stereo sources STEREO Sound will only be output to the front speakers and the subwoofer from any source Recommended modes to enjoy TV audio or stereo sources from all speakers DOLBY PLII MOVIE DOLBY PLII MUSIC S SRD Selecting sound mode 1 Press SOUND to select a sound mod...

Страница 12: ...ols One touch play 1 PLAY 5 during standby mode The main unit automatically turns on and starts playing the disc in the tray Stop STOP 5 The position is memorized while RESUME is on the main unit s display DVD V VCD CD MP3 This unit can memorize the resume position for the last 5 discs Press 1 PLAY 5 to resume Press STOP 5 again to clear the position Pause PAUSE 5 Press 1 PLAY 5 to restart play Sk...

Страница 13: ...group and press OK 8 e g MP3 To return to the previous folder press RETURN D You can also do this by selecting in the menu 2 MP3 JPEG Press 3 4 8 to select the desired content and press OK 8 If there are both MP3 and JPEG contents random play will be based on the selected content type 3 Press 1 PLAY 5 to start play Music Program 1 2 3 4 5 6 Track 1 Track 2 Track 3 Track 4 Track 1 MP3 RND 1 10 Trac...

Страница 14: ...s equipment supporting VIERA Link function For HDAVI Control 3 or later This function automatically provides synchronized audio and video output This works only when the source is DVD CD AUX 2 ARC 1 2 or D IN 2 3 When using DVD CD as the source set Time Delay in Video menu to 0ms Auto B 16 Play Speed DVD V To change play speed from k0 6 to k1 4 in 0 1 unit steps Press 1 PLAY 5 to return to normal ...

Страница 15: ...is unit speakers and TV speakers the TV screen may go blank for several seconds For HDAVI Control 2 or later You can control the playback menus of this unit with the TV s remote control When operating the TV s remote control refer to the below illustration for operation buttons You can operate the playback with the indicated controls The on screen control panel can also be shown by using a button ...

Страница 16: ...se the setting to suit your TV 16 9 Widescreen TV 16 9 4 3 Pan Scan Regular aspect TV 4 3 The sides of the widescreen picture are cut off so it fills the screen unless prohibited by the disc 4 3 Letterbox Regular aspect TV 4 3 Widescreen picture is shown in the letterbox style Setup Display Audio Subtitle DVD Menu English English Off English Language Video Audio HDMI Others Set RETURN Menu Item Cu...

Страница 17: ...delay time for your surround speakers Test Tone Use the test tone to listen to the speaker output to confirm speaker connections Test tone will be output to each channel in the following order Left Center Right Surround Right Surround Left Subwoofer To stop the test tone press RETURN D HDMI menu VIERA Link On The VIERA Link HDAVI Control function is available B 14 Off Audio Out On When audio outpu...

Страница 18: ...n Only the default session is played CD R RW Discs must conform to ISO9660 level 1 or 2 except for extended formats This unit supports multi session but if there are many sessions it takes more time for play to start Keep the number of sessions to a minimum to avoid this Discs that can be played Type of media Logo Remarks Indicated as DVD Video High quality movie and music discs DVD V Video CD Mus...

Страница 19: ...er installation option Attaching to a wall At least 30 mm 13 16q 7 0 mm to 9 4 mm 9 32q to 3 8q Wall or pillar 3 mm to 5 mm 1 8q to 3 16q 4 0 mm 5 32q A 12 3 mm 15 32q B 106 7 mm 43 16q C 40 mm 19 16q D 40 mm 19 16q Maintenance Clean this unit with a soft dry cloth Before moving the unit ensure the disc tray is empty Failure to do so will risk severely damaging the disc and the unit Licenses Manuf...

Страница 20: ...er being displayed 1 or 2 press and hold OK 8 and the corresponding numbered button 1 or 2 for at least 2 seconds B 4 No response when any buttons are pressed This unit cannot play discs other than the ones listed in this Owner s Manual B 18 The unit may not be operating properly due to lightning static electricity or some other external factor Turn the unit off and then back on Alternatively turn...

Страница 21: ...SRD B 11 The picture on the TV is not displayed correctly or disappears Ensure that the unit is connected directly to the TV and is not connected through a VCR B 7 Mobile telephone chargers can cause some disturbance If you are using an indoor TV antenna change to an outdoor antenna The TV antenna wire is too close to the unit Move it away from the unit Reduce the number of connected HDMI devices ...

Страница 22: ...elength DVD CD 655 790 nm Laser power For U S A For Canada CLASS II CLASS 1M Audio output Disc Number of channels 5 1 ch FL FR C SL SR SW VIDEO SECTION Video system NTSC Composite video output Output level Terminal 1 Vp p 75 Pin jack 1 system HDMI AV output Terminal 19 pin type A connector HDAVI Control This unit supports HDAVI Control 5 function SPEAKER SECTION Front speakers SB HF70 Type Speaker...

Страница 23: ...rvice by anyone other than a Factory Service Center or other Authorized Servicer or damage that is attributable to acts of God THERE ARE NO EXPRESS WARRANTIES EXCEPT AS LISTED UNDER LIMITED WARRANTY COVERAGE THE WARRANTOR IS NOT LIABLE FOR INCIDENTAL OR CONSEQUENTIAL DAMAGES RESULTING FROM THE USE OF THIS PRODUCT OR ARISING OUT OF ANY BREACH OF THIS WARRANTY As examples this excludes damages for l...

Страница 24: ...mer controls improper maintenance power line surge lightning damage modification introduction of sand humidity or liquids commercial use such as hotel office restaurant or other business or rental use of the product or service by anyone other than an Authorized Servicer or damage that is attributable to acts of God Dry cell batteries are also excluded from coverage under this warranty THIS EXPRESS...

Страница 25: ...25 RQTX1326 Getting Started Playing Discs Other Operations Reference SC XH50PPC_RQTX1326 P_eng book Page 25 Thursday February 10 2011 9 05 AM ...

Страница 26: ...ote This equipment has been tested and found to comply with the limits for a Class B digital device pursuant to Part 15 of the FCC Rules These limits are designed to provide reasonable protection against harmful interference in a residential installation This equipment generates uses and can radiate radio frequency energy and if not installed and used in accordance with the instructions may cause ...

Отзывы: