


48
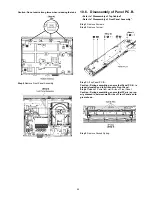
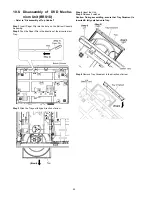
10.4. Disassembly of Rear Panel
• Refer to “Disassembly of Top Cabinet”
Step 1 Remove 6 screws.
Step 2 Remove 1 screw.
Step 3 Release the tab of each side of the Rear Panel in the
direction of arrow.
Step 4 Remove Rear Panel.
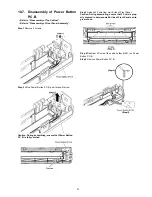
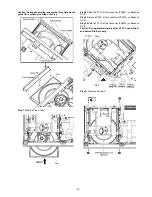
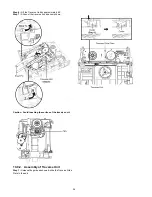
10.5. Disassembly of Front Panel
Assembly
• Refer to “Disassembly of Top Cabinet”.
Step 1 Detach 17P FFC at the connector (CN203) on Main/D-
Amp P.C.B..
Step 2 Lift up 2 Himelons.
Caution: Replace the Himelons if it is torn.
Step 3 Release the 2 tabs at each side of the Front Panel
Assembly in the direction of arrow.
Step 4 Release the 3 tabs at the bottom chassis.
Содержание SA-XH50P
Страница 13: ...13 4 1 Others Licences ...
Страница 14: ...14 5 Location of Controls and Components 5 1 Remote Control and Main Unit Key Button Operations ...
Страница 16: ...16 5 4 Speaker Connection ...
Страница 17: ...17 5 5 Linked Operations with the TV VIERA LINK HDAVI Control ...
Страница 18: ...18 ...
Страница 19: ...19 5 6 Connection with an ARC compatible TV ...
Страница 21: ...21 5 7 2 File Extension Type Support MP3 JPEG ...
Страница 23: ...23 3 Gently pull out the tray 4 Remove disc ...
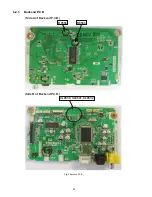
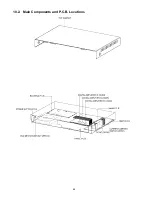
Страница 46: ...46 10 2 Main Components and P C B Locations ...
Страница 82: ...82 ...
Страница 92: ...92 ...
Страница 94: ...94 ...
Страница 131: ...131 MMH1104 SFT1 RFKZXH150PK2 50P FFC MAIN TO BACKEND 1 Safety Ref No Part No Part Name Description Qty Remarks ...