


67
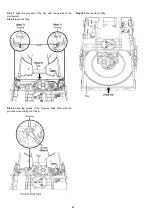
Step 5 Lift up to remove the D-Amp P.C.B. as arrow shown.
Step 6 Connect 3P Fan Wire at the connector (CN5401) on D-
Amp P.C.B..
Step 7 Connect 18P FFC at the connector (CN5402) on D-Amp
P.C.B..
Step 8 Connect 4P Cable at the connector (CN5400) on D-
Amp P.C.B..
Step 9 Upset the D-Amp P.C.B. and place it on an insulated
material.
Step 10 Proceed to check Side A of D-Amp P.C.B..
Содержание SA-XH201
Страница 15: ...15 4 1 Others Licences ...
Страница 16: ...16 5 General Introduction 5 1 Power Saving Features ...
Страница 17: ...17 5 2 Linked Operations with the TV VIERA Link HDAVI Control ...
Страница 18: ...18 5 2 1 Easy Control With Viera Remote Control ...
Страница 19: ...19 5 3 Disc Information 5 3 1 Media that can be played ...
Страница 20: ...20 5 3 2 File Extension Type Support MP3 JPEG Xvid ...
Страница 21: ...21 6 Location of Controls and Components 6 1 Remote Control Key Button Operations ...
Страница 22: ...22 6 2 Main Unit Key Button Operations ...
Страница 24: ...24 7 3 Connection with an ARC compatible TV ...
Страница 47: ...47 12 3 Main Components and P C B Locations ...
Страница 76: ...76 ...
Страница 78: ...78 ...
Страница 122: ...122 MMH1303 ...