background image

20

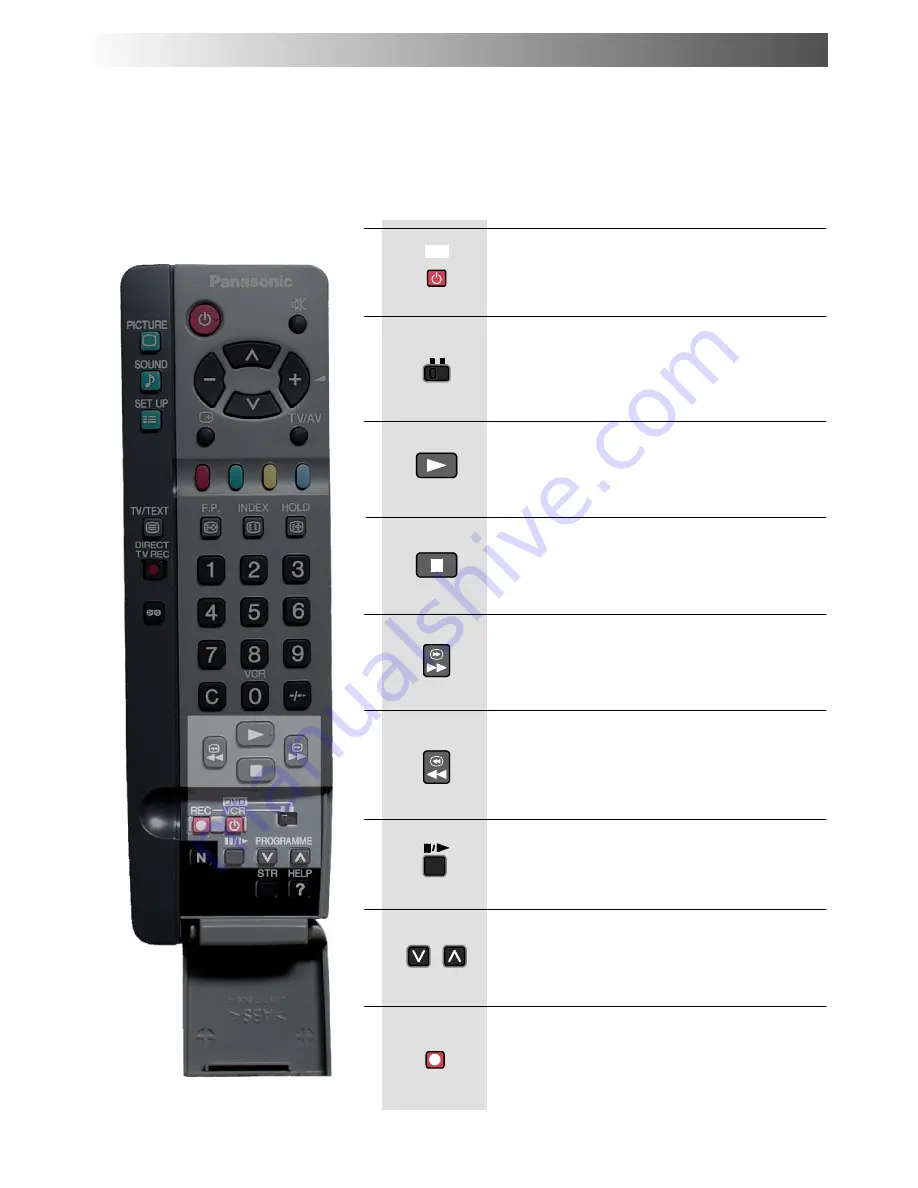
The Remote Control is capable of operating some functions of selected Panasonic VCRs and DVD (Digital Versatile Disc) equipment.
Some VCR and DVD equipment have different functions, so to ensure compatibility please refer to the equipment’s instruction book or

consult your dealer for details.

VCR / DVD OPERATION

Press to switch the VCR or DVD to standby mode.

Press again to switch back on.

Standby

Press to playback the tape or DVD.

Play

Press to stop the tape or DVD.

Stop

VCR: Press to fast forward the tape. In Play mode, press

to view the picture rapidly forward.

DVD: Press once to skip to the next track. In play mode

press and hold to view the picture rapidly forward.

Skip / Fast Forward / Cue

VCR: Press to rewind the tape. In Play mode, press to

view the picture rapidly in reverse.

DVD: Press once to skip to the previous track. In play

mode press and hold to view the picture rapidly in

reverse.

Skip / Rewind / Review

Press in playback mode, the picture will pause.

Press again to restart play.

Pause / Still

Press to increase or decrease the VCR programme

position by one.

Programme Up / Down

Press this button to start recording.

Record

Use this switch to select whether controls operate

DVD equipment or your VCR.

VCR / DVD switch

REC

VCR

DVD

Содержание QuintrixF TX-21AS1D

Страница 1: ... Panasonic Panasonic Panasonic Panaso nic Panasonic Panasonic Panasonic Panasonic Panasoni c Panasonic Panasonic Panasonic Panasonic Panasonic Panasonic Panasonic Panasonic Panasonic Panasonic Pa nasonic Panasonic Panasonic Panasonic Panasonic Pana sonic Panasonic Panasonic Panasonic Panasonic Panaso nic Panasonic Panasonic Panasonic Panasonic Panasoni c Panasonic Panasonic Panasonic Panasonic Pan...

Страница 2: ...et is designed to operate on A C 220 240V 50Hz D To prevent damage which might result in electric shock or fire do not expose this TV set to rain or excessive moisture D WARNING HIGH VOLTAGE Donot remove the rear cover as live parts are accessible when it is removed There are no user serviceable parts inside D Avoid exposing the TV set todirect sunlight and other sources of heat D The On Off switc...

Страница 3: ...on book n D Make sure that the batteries are fitted the correct way round D Do not mix old batteries with new batteries Remove old exhausted batteries immediately D Donot mix different battery types i e Alkaline and Manganese or use rechargeable Ni Cad batteries Remote control batteries Remote Control Transmitter EUR511200 ACCESSORIES ...

Страница 4: ...d data from the TV you may need to select the Download option from the VCR s menu D If Q Link is not operating correctly check it is connected to the television s AV2 socket the SCART lead is a full function type and the VCR is compatible with Q Link NEXTVIEWLINK or similar technologies Ask your dealer for further details D For further information on Q Link and connecting equipment see pages 18 24...

Страница 5: ...nction settings F Function select Displays the On Screen Display functions use repeatedly to select from the available functions Volume Contrast Brightness Colour Sharpness Tint in NTSC mode Bass Treble Balance and Tuning mode Increases or decreases the programme position by one When a function is already displayed press to increase or decrease the selected function TV AV switch see page 19 Headph...

Страница 6: ...nd down cursor buttons are used to move the cursor up and down the menus The left and right cursor buttons are used to access menus adjust levels or to select from a range of options The STR button is used to store settings after adjustments have been made or options have been set The TV AV button is used to exit the menu system and return to the normal viewing screen The HELP button will run a de...

Страница 7: ... allow adjustment of the hue The Colour balance settingallows youto set the overall colour tone of the picture P NR will automatically reduce unwanted picture interference The AI setting automatically analyses the incoming picture and processes it to give improved contrast optimum depth of field and vivid colour tones PICTURE MENU TV AV Picture menu Contrast Brightness Colour Sharpness Colour bala...

Страница 8: ...will suit your listening position MPX will usually be set to Stereo to provide the best reproduction however if reception deteriorates or if the service is not available then it is advisable to switch to Mono Mono M1 and M2 can also be selected if signals are being transmitted The sound can be improved during Music or Speech mode by selecting the appropriate function Ambience provides a dynamic en...

Страница 9: ...allows you to enable or disable data communication with a compatible VCR See page 18 The Tuning menu provides an entry to many other features including Programme edit ATP Fine tuning Manual tuning Colour system and Volume correction See page 10 OSD language allows you to select the language used for On Screen Displays See page 17 SETUP MENU TV AV SET UP Setup menu Teletext FLOF Aspect 4 3 Off time...

Страница 10: ...e Colour system menu allows you to decide the correct choice of transmission standard Volume correction allows you to adjust the volume level of individual stations This option is used when a decoder is connected via AV2 Set to On if a scrambled signal is to be processed by the decoder Set to Off after use TUNING MENU TV AV SET UP Setup menu Teletext FLOF Aspect 4 3 Off timer Off Q Link Off Tuning...

Страница 11: ... have finished in the Programme edit menu press the TV AV button to exit TUNING MENU PROGRAMME EDIT TV AV STR SET UP Setup menu Teletext FLOF Aspect 4 3 Off timer Off Q Link Off Tuning menu OSD language TV AV Select Change Exit Setup menu Teletext FLOF Aspect 4 3 Off timer Off Q Link Off Tuning menu Access OSD language TV AV Select Access Exit Prog Chan Name Lock Sys 1 CH41 XYZ Off SC2 2 Off SC2 3...

Страница 12: ...again to confirm If you have finished in the Programme edit menu press the TV AV button to exit TUNING MENU PROGRAMME EDIT STR TV AV Prog Chan Name Lock Sys 1 CH41 XYZ Off SC2 2 Off SC2 3 CH44 ZXY Off SC2 4 Off SC2 5 Off SC2 Delete Add Move TV VCR Return Change programme Select option Exit Store Programme edit Prog Chan Name Lock Sys 1 CH41 XYZ Off SC2 2 Off SC2 3 CH44 ZXY Off SC2 4 Off SC2 5 Off ...

Страница 13: ...tion Continue until renaming is done Press STR to store If you have finished in the Programme edit menu press the TV AV button to exit TUNING MENU PROGRAMME EDIT Return Change channel Select option Exit Store Programme edit Prog Chan Name Lock Sys 1 CH41 XYZ Off SC2 2 Off SC2 3 CH44 ZXY Off SC2 4 Off SC2 5 Off SC2 Return Change character Select option Exit Store Programme edit Prog Chan Name Lock ...

Страница 14: ...e to the Prog column Press the Blue button on the remote control Programme data will now be sent to the VCR This might take a few seconds depending on the number of stations stored If the message Unable to download check your VCR appears on the screen the television is unable to send the programme information to the VCR See the VCR handbook for further information If you have finished in the Progr...

Страница 15: ...ll be sent to the VCR via Q Link see page 18 Once this operation is completed the TV will display programme position 1 TUNING MENU AUTO SETUP ATP Setup menu Teletext FLOF Aspect 4 3 Off timer Off Q Link Off Tuning menu Access OSD language TV AV Select Access Exit WARNING All current tuning data will be erased Start Auto setup Exit TV AV AUTO SETUP IN PROGRESS SEARCHING PLEASE WAIT SETUP Return to ...

Страница 16: ...ss Tuning mode Press the TV AV button to move between Change programme Search or Change TV system Press the or button to change programme position start search or alter TV system When the desired station is found press STR to store the changes Repeat above procedure to tune additional programmes or press the F button to exit TUNING MENU MANUAL TUNING Manual tuning 02 99 21 41 1 CH41 Return Program...

Страница 17: ...etup menu Move to the OSD language menu Access the OSD language menu Move to your choice Press the TV AV button to select and exit OSD LANGUAGE Setup menu Teletext FLOF Aspect 4 3 Off timer Off Q Link Off Tuning menu OSD language Access TV AV Select Access Exit OSD language Return Select Select Exit TV AV English Magyar Hrvatski Čeština Russkij Bulgarian Română Slovensky Slovensko Polski Nemački T...

Страница 18: ...u do the VCR will automatically stop recording and switch off The write protection tab on the back of the cassette has been removed No recording VCR IS PLAYING No recording ALREADY RECORDING VCR recording own tuner No recording TAPE MAY BE DAMAGED VCR recording VCR external No recording NO SOURCE AVAILABLE Examples of other messages that might be displayed are To share tuning information To ensure...

Страница 19: ...nus Open the Setup menu Move to your choice Access adjustments or options Press the TV AV button to exit Open the Sound menu Move to your choice Access adjustments or options Press the TV AV button to exit AV SELECT AND SETUP TV AV TV AV TV AV SET UP SOUND AV1 AV2 S AV3 S Setup menu Teletext FLOF Aspect 4 3 Off timer Off Colour system AUTO Volume correc Q Link On OSD language TV AV Select Change E...

Страница 20: ...ay mode press to view the picture rapidly forward DVD Press once to skip to the next track In play mode press and hold to view the picture rapidly forward Skip Fast Forward Cue VCR Press to rewind the tape In Play mode press to view the picture rapidly in reverse DVD Press once to skip to the previous track In play mode press and hold to view the picture rapidly in reverse Skip Rewind Review Press...

Страница 21: ...ons Red Green Yellow and Blue to select the following information D To move between subject blocks SPORT for example use the Blue button Within this SPORT topic it is possible to select different groups such as Tennis Football Baseball etc by using the Yellow button When the last group within the block is reached the yellow button moves to the next block D The Green button will select the next ava...

Страница 22: ...ed the page number will be displayed on screen Press the Yellow button to display the News Flash Press TV TEXT to return to normal TV operation Update Press SET UP Yellow to see the update of information on certain pages When an update is received the page number will be displayed at the top left of the screen Press the Yellow button to view the page Press TV TEXT to return to normal TV operation ...

Страница 23: ... you are waiting for is available press the Yellow button to return to viewing the Teletext pages then use the left and right cursor buttons to select the sub page of your choice Notes D If you do not want the four coloured special function keys to be displayed on the TV picture while waiting for a sub page to be found press either the PICTURE SOUND or SETUP menu button to clear the keys from the ...

Страница 24: ... Audio out R CVBS in video RGB status earth Status RGB Status CVBS Audio in L Audio earth Audio in R 21 19 17 15 13 11 9 7 5 3 1 20 18 16 14 12 10 8 6 4 2 AV1 21 pin SCART terminal AV2 Pins 15 and 20 are dependent on AV2 S VHS VIDEO switching H SCART Terminal Information Socket Earth CVBS out video CVBS earth Earth Earth Audio out L Audio out R CVBS in video Q Link data Status CVBS Audio in L Audi...

Страница 25: ...M Output from L R AUDIO OUT Sockets Rear AV1 AV2 S 21 Pin SCART and RCA Audio Out Terminals Notes Ancillary equipment and cables shown are not supplied with this TV set Do not connect a computer with TTL output 5V to this set 2 x RCA Audio Cables SCART Cable SCART Cable VCR CAMCORDER GAMES CONSOLE COMPUTER RGB SATELLITE RECEIVER AUDIO VIDEO CONNECTIONS ...

Страница 26: ...on No Picture No Sound TV set to AV mode Not plugged into A C outlet Not switched on Picture Sound controls set at minimum levels Check if in standby mode No Colour Normal Sound Colour controls set at minimum levels Poor or Distorted Picture Weak or No Sound Retune Channel s Coloured Patches Normal Sound Magnetic Interference from unshielded equipment Receiver moved while switched ON switch TV off...

Страница 27: ...nce P NR Teletext mode Volume correction Q Link Decoder AV2 H Sleep Feature If the set is notswitched offwhen theTV stationstops transmitting it will automatically go to standby mode after 30 minutes This function will not operate when the TV is in AV mode TX 21AS1D Power Source 220 240V 50Hz A C Power Consumption 106W Standby Consumption 1 4W Picture Tube Visible Diagonal 51 cm Audio Output Music...

Страница 28: ...28 2001CX ...

Отзывы: