- 21 -
Service Manual
6.
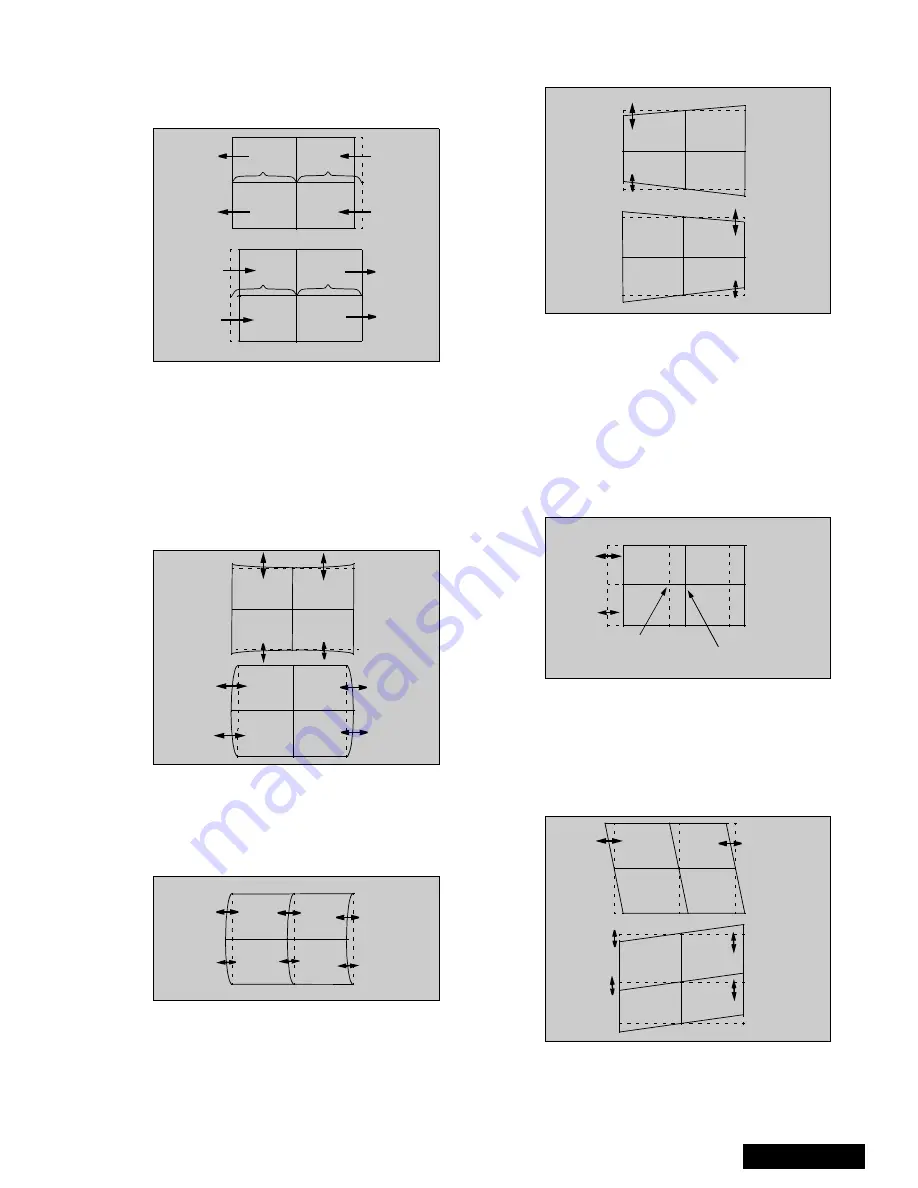
Enter to linearity “G-LINEAR” mode by pressing
“TV/VIDEO”.
7.
Adjust linearity by pressing VOL right-left until A=B
(See Figure 39)
Figure 39. Linear Mode Adjustment
8.
Press “7” then “ACTION” key on remote to save
changes.
9.
Enter to PIN “G-PIN” mode by pressing “TV/
VIDEO”.
10. Adjust V_PIN by pressing CH up-down (See
Figure 40).
11. Adjust H_PIN by pressing VOL right-left.
12. Press “7” then “ACTION” key on remote to save
changes.
Figure 40. H & V PIN Adjustment
13. Enter to CORNER “G-CORNER” mode by pressing
TV/VIDEO.
14. Adjust by pressing VOL right-left (See Figure 41).
15. Press “7” then “ACTION” key on remote to save
changes.
Figure 41. Corner Adjustment
16. Enter to KEY “G-KEY” mode by pressing TV/
VIDEO.
17. Adjust by pressing CH up-down (See Figure 42)
18. Press “7” then “ACTION” key on remote to save
changes
Figure 42. KEY mode adjustment
Note: Confirm that pattern looks like a square and
almost overlaps the screen frame, check that
vertical and horizontal line center match with
the marks on screen frame, if linearity is not
good enough, repeat adjustments.
19. Enter to “STATIC” mode by pressing TV/VIDEO.
20. Press “1” or “3” repeatedly until green and red only
are shown.
21. Adjust “R-STATIC” so that the center of red
overlaps with the center of green.
Figure 43. STATIC mode adjustment
22. Enter to SKEW “R-SKEW” mode by pressing TV/
VIDEO
23. Adjust “R-SKEW” so that the vertical and horizontal
line of center overlaps with green (See Figur e44)
24. Press “7” then “ACTION” key on remote to save
changes.
Figure 44. SKEW adjustment
Note: Remember always save data following each
adjustment by pressing “7” key on remote, then
ACTION.
A
B
A
B
Red
Green
Содержание PT51G36E - 51" PROJECTION TV
Страница 17: ...50 PT 51G36E EC A Board Schematic Left Portion...
Страница 19: ...52 PT 51G36E EC P Board Schematic Left Portion...
Страница 21: ...54 PT 51G36E EC X Board Schematic Left Portion...


