


Attention
f
Do not drop the remote control.
f
Avoid contact with liquids or moisture.
f
Do not attempt to modify or disassemble the remote control.
f
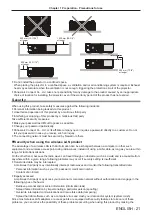
Please observe the following contents that are described on the back of the remote control unit (see the picture below).
g
Do not use a new battery together with an old battery.
g
Do not use unspecified batteries.
g
Make sure the polarities (+ and -) are correct when inserting the batteries.
In addition, please read the contents that are related to batteries in the "Read this first!".
Caution label at the back of the remote control
Note
f
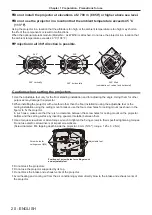
The remote control can be used within a distance of about 30 m (98′5″) if pointed directly at the remote control signal receiver. The remote
control can control at angles of up to ± 30 ° vertically and ± 30 ° horizontally, but the effective control range may be reduced.
f
If there are any obstacles between the remote control and the remote control signal receiver, the remote control may not operate correctly.
f
You can operate the projector by reflecting the remote control signal on the screen. The operating range may differ due to the loss of light
caused by the properties of the screen.
f
When the remote control signal receiver is lit with a fluorescent light or other strong light source, the projector may become inoperative. Set
the projector as far from the luminous source as possible.
f
The power indicator <ON (G)/STANDBY (R)> will blink if the projector receives a remote control signal.
r
For PT-VMZ51S and PT-VMZ41
2
1
3
5
10
11
19
4
4
20
6
7
8
9
18
15
16
17
12
13
14
1 Power <
v
/
b
> button
(
v
: Standby,
b
: Power on)
Sets the projector to the state where the projector is switched
off (standby mode). Also starts projection when the power is
switched off (standby mode).
2 Input selection buttons (
<HDMI1>, <HDMI2>,
<COMPUTER1/2>,
<NETWORK/USB>)
Switches the input signal to project.
(
x
page 53)
3 <MENU> button/<RETURN> button / <ENTER> button/
asqw
buttons
Used to navigate through the menu screen.
(
x
page 65)
asqw
buttons are also used to enter the password in
[SECURITY] or enter characters.
4 <VOL-> button/<VOL+> button
Adjusts the volume of the built-in speaker or audio output.
(
x
page 57)
5 <SCREEN ADJ> button
You can extend the projection distance via the Digital Zoom
Extender function or correct various types of distortion in a
projected image. (
x
page 59)
6 <FREEZE> button
Used when pausing the image and turning off the audio.
(
x
page 58)
7 <P-TIMER> button
Operates the presentation timer function. (
x
page 61)
8 <D.ZOOM +> button / <D.ZOOM -> button
Zoom in and out the images.
(
x
page 59)
9 Remote control signal transmitter
10 <AUTO SETUP> button
Automatically adjusts the image display position while the image
is projected. (
x
page 58)
28 -
ENGLISH
Chapter 1 Preparation - About your projector
Содержание PT-VMZ51
Страница 44: ...Chapter 3 Basic Operations This chapter describes basic operations to start with 44 ENGLISH...
Страница 114: ...Chapter 5 Operation of Function This chapter describes the operation methods of some functions 114 ENGLISH...
Страница 152: ...Chapter 7 Appendix This chapter describes specifications for the projector 152 ENGLISH...


